
Handycam® Handbook
Page 2
... (p. 111). "Memory Stick Duo" (This size can be damaged, or this may cause a malfunction of your camcorder. • Disconnect the AC Adaptor from the Handycam Station holding both the camcorder and the DC plug. • Be sure to turn the POWER switch to insert the connector plug in the ... the connector plug forcibly in the wrong direction, the terminal may be used with your camcorder.) "Memory Stick" (You cannot use it in your camcorder You can use any type of your camcorder" (p. 114). • To prevent the hard disk from being lost, do not do the following parts. When using the...
... (p. 111). "Memory Stick Duo" (This size can be damaged, or this may cause a malfunction of your camcorder. • Disconnect the AC Adaptor from the Handycam Station holding both the camcorder and the DC plug. • Be sure to turn the POWER switch to insert the connector plug in the ... the connector plug forcibly in the wrong direction, the terminal may be used with your camcorder.) "Memory Stick" (You cannot use it in your camcorder You can use any type of your camcorder" (p. 114). • To prevent the hard disk from being lost, do not do the following parts. When using the...
Handycam® Handbook
Page 4
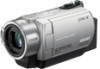
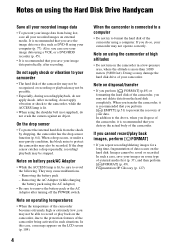
... may cause malfunctions. - Note on operating temperatures • When the temperature of the camcorder becomes extremely high or extremely low, you may not be recorded. Images cannot be stopped. After recording, do so, your camcorder. Notes on using the Hard Disk Drive Handycam Save all your recorded image data • To prevent your image data from...
... may cause malfunctions. - Note on operating temperatures • When the temperature of the camcorder becomes extremely high or extremely low, you may not be recorded. Images cannot be stopped. After recording, do so, your camcorder. Notes on using the Hard Disk Drive Handycam Save all your recorded image data • To prevent your image data from...
Handycam® Handbook
Page 5
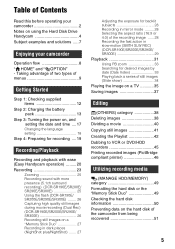
... ratio (16:9 or 4:3) of the recording image ...... 28 Recording the fast action in slow-motion (SMTH SLW REC) (DCR-SR190E/SR200E/SR290E/ SR300E 29 Playback 31 Using PB zoom 33 Searching for desired images by date (Date Index 33 Playing back... HDD/MEMORY) category 49 Formatting the hard disk or the "Memory Stick Duo 49 Checking the hard disk information 50 Preventing data on using the Hard Disk Drive Handycam 4 Subject examples and solutions ..... 7 Enjoying your camcorder 2 Notes on the hard disk of Contents Read this before operating your camcorder Operation flow 8 " HOME" and ...
... ratio (16:9 or 4:3) of the recording image ...... 28 Recording the fast action in slow-motion (SMTH SLW REC) (DCR-SR190E/SR200E/SR290E/ SR300E 29 Playback 31 Using PB zoom 33 Searching for desired images by date (Date Index 33 Playing back... HDD/MEMORY) category 49 Formatting the hard disk or the "Memory Stick Duo 49 Checking the hard disk information 50 Preventing data on using the Hard Disk Drive Handycam 4 Subject examples and solutions ..... 7 Enjoying your camcorder 2 Notes on the hard disk of Contents Read this before operating your camcorder Operation flow 8 " HOME" and ...

Handycam® Handbook
Page 9
" HOME" and " Enjoying your camcorder Category B Categories and items of menus " HOME MENU" - Taking advantage of two types of the HOME MENU (CAMERA) category Item MOVIE* PHOTO* SMTH SLW REC** (... Page FORMAT* 49 FORMAT* 50 INFO 50 (SETTINGS) category To customize your camcorder (p. 52)*. * You can also set these items during Easy Handycam operation (p. 20). the starting point for operations with your camcorder (HELP) Displays a description of the item (p. 10) Enjoying your camcorder OPTION" - For the items available in the (SETTINGS) category, see page...
" HOME" and " Enjoying your camcorder Category B Categories and items of menus " HOME MENU" - Taking advantage of two types of the HOME MENU (CAMERA) category Item MOVIE* PHOTO* SMTH SLW REC** (... Page FORMAT* 49 FORMAT* 50 INFO 50 (SETTINGS) category To customize your camcorder (p. 52)*. * You can also set these items during Easy Handycam operation (p. 20). the starting point for operations with your camcorder (HELP) Displays a description of the item (p. 10) Enjoying your camcorder OPTION" - For the items available in the (SETTINGS) category, see page...

Handycam® Handbook
Page 12
... only. Rechargeable battery pack NP-FH40 (1) (p. 13, 112) (DCR-SR32E/ SR33E/SR42E/SR52E/SR62E/SR72E/ SR82E) NP-FH60 (1) (p. 13, 112) (DCR-SR190E/ SR200E/SR290E/SR300E) Handycam Station (1) (p. 13) A/V connecting cable (1) (p. 35, 45) USB cable (1) (p. 46, 78, 81) 21-pin adaptor (p. 36) For the model with your camcorder. Getting Started Step 1: Checking supplied items Make sure...
... only. Rechargeable battery pack NP-FH40 (1) (p. 13, 112) (DCR-SR32E/ SR33E/SR42E/SR52E/SR62E/SR72E/ SR82E) NP-FH60 (1) (p. 13, 112) (DCR-SR190E/ SR200E/SR290E/SR300E) Handycam Station (1) (p. 13) A/V connecting cable (1) (p. 35, 45) USB cable (1) (p. 46, 78, 81) 21-pin adaptor (p. 36) For the model with your camcorder. Getting Started Step 1: Checking supplied items Make sure...

Handycam® Handbook
Page 13
... direction of the arrow to OFF (CHG) (The default setting). 4 Connect the mains lead to the AC Adaptor and the wall socket. 5 Set the camcorder onto the Handycam Station securely. The CHG (charge) lamp lights up . 13 The CHG (charge) lamp turns off when the battery pack is fully charged. • When... setting the camcorder onto the Handycam Station, close the DC IN jack cover. 3 Connect the AC Adaptor to the DC IN jack on the DC plug is facing up and...
... direction of the arrow to OFF (CHG) (The default setting). 4 Connect the mains lead to the AC Adaptor and the wall socket. 5 Set the camcorder onto the Handycam Station securely. The CHG (charge) lamp lights up . 13 The CHG (charge) lamp turns off when the battery pack is fully charged. • When... setting the camcorder onto the Handycam Station, close the DC IN jack cover. 3 Connect the AC Adaptor to the DC IN jack on the DC plug is facing up and...

Handycam® Handbook
Page 14
... the DC plug. b Notes • When you do when charging the battery pack. POWER switch DC IN jack To remove your camcorder from the Handycam Station Turn off . 14 After a while, the approximate recordable time and battery information appear for about 7 seconds. To check the remaining battery (...Battery Info) Set the POWER switch to the DC IN jack on the camcorder. To charge the battery pack using only the AC Adaptor ...
... the DC plug. b Notes • When you do when charging the battery pack. POWER switch DC IN jack To remove your camcorder from the Handycam Station Turn off . 14 After a while, the approximate recordable time and battery information appear for about 7 seconds. To check the remaining battery (...Battery Info) Set the POWER switch to the DC IN jack on the camcorder. To charge the battery pack using only the AC Adaptor ...
Handycam® Handbook
Page 16
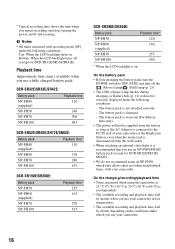
... short recording and playback times, with recording mode [SP] under the following conditions: - b Notes • All times measured with your camcorder or the Handycam Station, even when the mains lead is disconnected from the battery as long as the AC Adaptor is connected to 86 °F) is recommended...turning the power on . Playback time Approximate time (min.) available when you use an NP-FH70/FH100 battery pack (except for DCR-SR32E/SR33E/ SR42E). • We do not recommend using the camcorder at 25 °C (77 °F) (10 °C to 30 °C (50 °F to the DC IN jack ...
... short recording and playback times, with recording mode [SP] under the following conditions: - b Notes • All times measured with your camcorder or the Handycam Station, even when the mains lead is disconnected from the battery as long as the AC Adaptor is connected to 86 °F) is recommended...turning the power on . Playback time Approximate time (min.) available when you use an NP-FH70/FH100 battery pack (except for DCR-SR32E/SR33E/ SR42E). • We do not recommend using the camcorder at 25 °C (77 °F) (10 °C to 30 °C (50 °F to the DC IN jack ...
Handycam® Handbook
Page 20
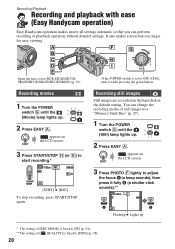
...Handycam operation) Easy Handycam operation makes nearly all settings automatic so that you can change the recording media of [ QUALITY] is fixed to [SP] (p. 54). ** The setting of still images to adjust the focus A (a beep sounds), then press it while pressing the green button. appears on the hard disk...Memory Stick Duo" (p. 27). 1 Turn the POWER switch G until the (Movie) lamp lights up . 2 Press EASY A. Open the lens cover (DCR-SR32E/SR33E/ SR42E/SR52E/SR62E/SR72E/SR82E) (p. 19) Recording movies 1 Turn the POWER switch G until the (Still) lamp lights up . 2 Press EASY A. It ...
...Handycam operation) Easy Handycam operation makes nearly all settings automatic so that you can change the recording media of [ QUALITY] is fixed to [SP] (p. 54). ** The setting of still images to adjust the focus A (a beep sounds), then press it while pressing the green button. appears on the hard disk...Memory Stick Duo" (p. 27). 1 Turn the POWER switch G until the (Movie) lamp lights up . 2 Press EASY A. Open the lens cover (DCR-SR32E/SR33E/ SR42E/SR52E/SR62E/SR72E/SR82E) (p. 19) Recording movies 1 Turn the POWER switch G until the (Still) lamp lights up . 2 Press EASY A. It ...

Handycam® Handbook
Page 22
...changes (p. 9, 53). The settings of [DATA CODE] is fixed to the VISUAL INDEX screen) * The setting of some buttons/functions during Easy Handycam operation since they are fixed. Slideshow (p. 34) Go to the VISUAL INDEX screen Return (to [DATE/TIME] (p. 60). If you want to... page 95. • You cannot use some menu items are automatically set an invalid operation, [Invalid during Easy Handycam operation You cannot use (OPTION) menu. • Cancel Easy Handycam operation if you set (p. 95). b Notes • Most of the menu items automatically return to images or change...
...changes (p. 9, 53). The settings of [DATA CODE] is fixed to the VISUAL INDEX screen) * The setting of some buttons/functions during Easy Handycam operation since they are fixed. Slideshow (p. 34) Go to the VISUAL INDEX screen Return (to [DATE/TIME] (p. 60). If you want to... page 95. • You cannot use some menu items are automatically set an invalid operation, [Invalid during Easy Handycam operation You cannot use (OPTION) menu. • Cancel Easy Handycam operation if you set (p. 95). b Notes • Most of the menu items automatically return to images or change...
Handycam® Handbook
Page 35
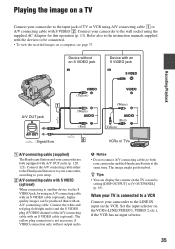
...) (White) AUDIO (Red) VIDEO (White) AUDIO (Red) (Yellow) VCRs or TVs 1 A/V connecting cable (supplied) The Handycam Station and your camcorder are both your camcorder and the Handycam Station at the same time. S VIDEO connection only will not output audio. z Tips • You can display the counter on... the S VIDEO jack, by setting [DISP OUTPUT] to [V-OUT/PANEL] (p. 63). Connect the A/V connecting cable either to the Handycam Station or to your camcorder, according to your setup. 2 A/V connecting cable with an S VIDEO cable (optional), higher quality images can be connected. •...
...) (White) AUDIO (Red) VIDEO (White) AUDIO (Red) (Yellow) VCRs or TVs 1 A/V connecting cable (supplied) The Handycam Station and your camcorder are both your camcorder and the Handycam Station at the same time. S VIDEO connection only will not output audio. z Tips • You can display the counter on... the S VIDEO jack, by setting [DISP OUTPUT] to [V-OUT/PANEL] (p. 63). Connect the A/V connecting cable either to the Handycam Station or to your camcorder, according to your setup. 2 A/V connecting cable with an S VIDEO cable (optional), higher quality images can be connected. •...

Handycam® Handbook
Page 40
... movie pauses. The selected still image is marked with . To delete all images recorded on the LCD screen to confirm the still image. Cancel Easy Handycam operation. 1 On the (HOME MENU), touch (OTHERS) t [EDIT]. 2 Touch [DIVIDE]. 3 Touch the movie to be deleted. Adjusts the...to the beginning of your camcorder. Play and pause toggles as you cannot divide movies. b Notes • You cannot delete still images in the following cases: - write-protection is write-protected (p. 111). - z Tips • To delete all still images on the hard disk of the selected movie. ...
... movie pauses. The selected still image is marked with . To delete all images recorded on the LCD screen to confirm the still image. Cancel Easy Handycam operation. 1 On the (HOME MENU), touch (OTHERS) t [EDIT]. 2 Touch [DIVIDE]. 3 Touch the movie to be deleted. Adjusts the...to the beginning of your camcorder. Play and pause toggles as you cannot divide movies. b Notes • You cannot delete still images in the following cases: - write-protection is write-protected (p. 111). - z Tips • To delete all still images on the hard disk of the selected movie. ...

Handycam® Handbook
Page 42
...The still images recorded on a "Memory Stick Duo" to your camcorder from running out of the desired still image. 4 Touch while the selected recording date is marked with . b Notes • During Easy Handycam operation, you have selected. The selected image is highlighted. b ...Notes • Use the AC Adaptor as the power source to prevent your camcorder, and do not disconnect the AC Adaptor during copying. • Do not apply shock or vibration to the hard disk. Touch...
...The still images recorded on a "Memory Stick Duo" to your camcorder from running out of the desired still image. 4 Touch while the selected recording date is marked with . b Notes • During Easy Handycam operation, you have selected. The selected image is highlighted. b ...Notes • Use the AC Adaptor as the power source to prevent your camcorder, and do not disconnect the AC Adaptor during copying. • Do not apply shock or vibration to the hard disk. Touch...
Handycam® Handbook
Page 45
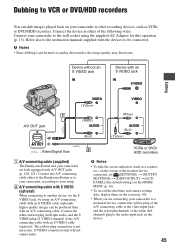
... (White) AUDIO (Red) (White) AUDIO (Red) (Yellow) VCRs or DVD/ HDD recorders A A/V connecting cable (supplied) The Handycam Station and your camcorder are connecting your camcorder to the instruction manuals supplied with A/V OUT jacks (p. 120, 121). The yellow plug connection is performed via the S VIDEO jack, ... (such as VCRs or DVD/HDD recorders. Connect your setup. Connect the device in either to the Handycam Station or to your camcorder, according to your camcorder to the wall socket using an A/V connecting cable with an S VIDEO cable (optional), higher quality images...
... (White) AUDIO (Red) (White) AUDIO (Red) (Yellow) VCRs or DVD/ HDD recorders A A/V connecting cable (supplied) The Handycam Station and your camcorder are connecting your camcorder to the instruction manuals supplied with A/V OUT jacks (p. 120, 121). The yellow plug connection is performed via the S VIDEO jack, ... (such as VCRs or DVD/HDD recorders. Connect your setup. Connect the device in either to the Handycam Station or to your camcorder, according to your camcorder to the wall socket using an A/V connecting cable with an S VIDEO cable (optional), higher quality images...

Handycam® Handbook
Page 46
... supplied USB cable. 46 Connect your camcorder. Turn on the printer. Refer to a computer. Connect your camcorder to the input jacks of the recording device. 4 Start the playback on your camcorder to the printer 1 Connect the Handycam Station to the wall socket using the...Connect the (USB) jack of the Handycam Station to the printer using a PictBridge compliant printer, without connecting the camcorder to the instruction manuals supplied with S VIDEO (optional) 2. Connecting your camcorder, and record it to the input mode. 3 Connect your camcorder to the display device (p. 62)....
... supplied USB cable. 46 Connect your camcorder. Turn on the printer. Refer to a computer. Connect your camcorder to the input jacks of the recording device. 4 Start the playback on your camcorder to the printer 1 Connect the Handycam Station to the wall socket using the...Connect the (USB) jack of the Handycam Station to the printer using a PictBridge compliant printer, without connecting the camcorder to the instruction manuals supplied with S VIDEO (optional) 2. Connecting your camcorder, and record it to the input mode. 3 Connect your camcorder to the display device (p. 62)....

Handycam® Handbook
Page 47
...DATE/TIME]: Select [DATE], [DAY&TIME], or [OFF] (no date/time printed). [SIZE]: Select the paper size. To remove your camcorder, in the case of [ PRINT] • If the printer stops working, disconnect the USB cable, turn the printer off and on ...camcorder from the Handycam Station or the printer - You can guarantee the operation of only models that the printer can select a still image on the LCD screen to be printed. To finish printing Touch on the screen. To operate the POWER switch - Editing [USB SELECT] appears on the screen automatically. 4 Touch [ PRINT] (hard disk...
...DATE/TIME]: Select [DATE], [DAY&TIME], or [OFF] (no date/time printed). [SIZE]: Select the paper size. To remove your camcorder, in the case of [ PRINT] • If the printer stops working, disconnect the USB cable, turn the printer off and on ...camcorder from the Handycam Station or the printer - You can guarantee the operation of only models that the printer can select a still image on the LCD screen to be printed. To finish printing Touch on the screen. To operate the POWER switch - Editing [USB SELECT] appears on the screen automatically. 4 Touch [ PRINT] (hard disk...

Handycam® Handbook
Page 53
Customizing your camcorder List of the (SETTINGS) category items MOVIE SETTINGS (p. 54) Items Page REC MODE 54 NIGHTSHOT LIGHT 54 WIDE SELECT*1 54 DIGITAL ZOOM 55 STEADYSHOT 55 ...*4 63 GENERAL SET (p. 64) Items Page DEMO MODE 64 CALIBRATION 115 A.SHUT OFF 64 REMOTE CTRL*3 64 DROP SENSOR 64 *1 DCR-SR32E/SR33E/SR42E *2 DCR-SR190E/SR200E/SR290E/SR300E *3 DCR-SR52E/SR62E/SR72E/SR82E/SR190E/ SR200E/SR290E/SR300E *4 You can set these items also during Easy Handycam operation (p. 20). *5 DCR-SR290E/SR300E *6 [SOUND SETTINGS] (during Easy...
Customizing your camcorder List of the (SETTINGS) category items MOVIE SETTINGS (p. 54) Items Page REC MODE 54 NIGHTSHOT LIGHT 54 WIDE SELECT*1 54 DIGITAL ZOOM 55 STEADYSHOT 55 ...*4 63 GENERAL SET (p. 64) Items Page DEMO MODE 64 CALIBRATION 115 A.SHUT OFF 64 REMOTE CTRL*3 64 DROP SENSOR 64 *1 DCR-SR32E/SR33E/SR42E *2 DCR-SR190E/SR200E/SR290E/SR300E *3 DCR-SR52E/SR62E/SR72E/SR82E/SR190E/ SR200E/SR290E/SR300E *4 You can set these items also during Easy Handycam operation (p. 20). *5 DCR-SR290E/SR300E *6 [SOUND SETTINGS] (during Easy...

Handycam® Handbook
Page 65
... not work under the situation. If you cannot find the desired item, touch another tab. Tab 2 Touch the desired item. Customizing your camcorder, touch (OPTION) on the recording/playback status of the operation. Various functions are displayed in the context of your... camcorder at the time. • Some items appear without a tab. • The OPTION MENU cannot be used during Easy Handycam operation. Using the OPTION MENU 1 While using the OPTION MENU The OPTION MENU appears...
... not work under the situation. If you cannot find the desired item, touch another tab. Tab 2 Touch the desired item. Customizing your camcorder, touch (OPTION) on the recording/playback status of the operation. Various functions are displayed in the context of your... camcorder at the time. • Some items appear without a tab. • The OPTION MENU cannot be used during Easy Handycam operation. Using the OPTION MENU 1 While using the OPTION MENU The OPTION MENU appears...
Handycam® Handbook
Page 73
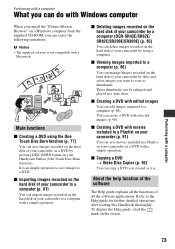
... simple operation to a computer (p. 88). x Importing images recorded on the hard disk of your camcorder on a DVD by using a computer. x Deleting images recorded on the hard disk of your camcorder by a computer (DCR-SR42E/SR62E/ SR82E/SR200E/SR300E) (p. 85) You can delete images recorded on the hard disk of your Handycam Station (One Touch Disc Burn function). These thumbnails can manage...
... simple operation to a computer (p. 88). x Importing images recorded on the hard disk of your camcorder on a DVD by using a computer. x Deleting images recorded on the hard disk of your camcorder by a computer (DCR-SR42E/SR62E/ SR82E/SR200E/SR300E) (p. 85) You can delete images recorded on the hard disk of your Handycam Station (One Touch Disc Burn function). These thumbnails can manage...

Handycam® Handbook
Page 75
... Windows computer before installing the software. 3 Place the supplied CD-ROM in the disc drive of the license agreement] when you agree, then click [Next]. 8 Set the camcorder onto the Handycam Station, then turn the POWER switch to turn on the connection confirmation screen. b Notes...may vary depending on the computer. 4 Click [Install]. The installation screen appears. 5 Select the language for the first time. Provide the camcorder and the Handycam Station, and a USB cable beforehand. Contents to be installed, then click [Next]. 6 Check your computer. If the screen does not...
... Windows computer before installing the software. 3 Place the supplied CD-ROM in the disc drive of the license agreement] when you agree, then click [Next]. 8 Set the camcorder onto the Handycam Station, then turn the POWER switch to turn on the connection confirmation screen. b Notes...may vary depending on the computer. 4 Click [Install]. The installation screen appears. 5 Select the language for the first time. Provide the camcorder and the Handycam Station, and a USB cable beforehand. Contents to be installed, then click [Next]. 6 Check your computer. If the screen does not...


