
Operating Instructions
Page 4
... loop - Signal convert function 60 Recording video or TV programs ....... 61 Inserting a scene from a tape - Table of contents Quick Start Guide 6 Checking supplied accessories 8 Getting started Using this manual 9 Step 1 Preparing the power supply ... 11 Installing the battery pack ...Nightshot 21 Self-timer recording 23 Checking the recording - PB ZOOM 52 Quickly locating a scene using the zero set memory function 53 Searching a recording by date - Memory Photo recording 79 Advanced Recording Operations Recording a still image on a moving image - Digital effect 38 Using ...
... loop - Signal convert function 60 Recording video or TV programs ....... 61 Inserting a scene from a tape - Table of contents Quick Start Guide 6 Checking supplied accessories 8 Getting started Using this manual 9 Step 1 Preparing the power supply ... 11 Installing the battery pack ...Nightshot 21 Self-timer recording 23 Checking the recording - PB ZOOM 52 Quickly locating a scene using the zero set memory function 53 Searching a recording by date - Memory Photo recording 79 Advanced Recording Operations Recording a still image on a moving image - Digital effect 38 Using ...

Operating Instructions
Page 6
...protect tab on the cassette up . See the page in parentheses "( )" for more information. The cassette compartment automatically goes down. Quick Start Guide 6 AC power adaptor (supplied) Inserting a cassette (p. 16) 1 Open the lid of the cassette compartment. Quick Start Guide This chapter introduces you to the basic features of your camcorder outdoors...and press EJECT. Connect the plug with its v mark facing up . 3 Close the cassette compartment by pressing the mark on the cassette compartment. Connecting the power cord (p. 15) Use the battery pack when using your camcorder.
...protect tab on the cassette up . See the page in parentheses "( )" for more information. The cassette compartment automatically goes down. Quick Start Guide 6 AC power adaptor (supplied) Inserting a cassette (p. 16) 1 Open the lid of the cassette compartment. Quick Start Guide This chapter introduces you to the basic features of your camcorder outdoors...and press EJECT. Connect the plug with its v mark facing up . 3 Close the cassette compartment by pressing the mark on the cassette compartment. Connecting the power cord (p. 15) Use the battery pack when using your camcorder.

Operating Instructions
Page 8
... Make sure that the following accessories are supplied with your camcorder. 1 2 3 4 5 6 7 8 9 0 qa qs qd qf qg 1 Wireless Remote Commander (1) (p. 151) 2 AC-L10A/L10B/L10C AC power adaptor (1), Power cord (1) (p. 12) 3 NP-F330 battery pack (1) (p. 11, 12) 4 CR2025 lithium battery (1) (p. 125) The lithium battery is... type (20 sheets × 1) Sticker type/Standard size (10 sheets × 1) Sticker type/9 split size (10 sheets × 1) DCR-TRV820 only qd Print cartridge (2) (p. 106) DCR-TRV820 only qf Head cleaner (1) (p. 139) DCR-TRV820 only qg Platen roller cleaner (1) (p. 140...
... Make sure that the following accessories are supplied with your camcorder. 1 2 3 4 5 6 7 8 9 0 qa qs qd qf qg 1 Wireless Remote Commander (1) (p. 151) 2 AC-L10A/L10B/L10C AC power adaptor (1), Power cord (1) (p. 12) 3 NP-F330 battery pack (1) (p. 11, 12) 4 CR2025 lithium battery (1) (p. 125) The lithium battery is... type (20 sheets × 1) Sticker type/Standard size (10 sheets × 1) Sticker type/9 split size (10 sheets × 1) DCR-TRV820 only qd Print cartridge (2) (p. 106) DCR-TRV820 only qf Head cleaner (1) (p. 139) DCR-TRV820 only qg Platen roller cleaner (1) (p. 140...

Operating Instructions
Page 11
Slide the battery pack down . To remove the battery pack Slide the battery pack out in the direction of the arrow while pressing BATT RELEASE down until it clicks. BATT RELEASE After installing the battery pack Do not carry your camcorder. 11 If you do so, the battery pack may slide off your camcorder unintentionally, damaging your camcorder by holding the battery pack. Getting started Step 1 Preparing the power supply Installing the battery pack Install the battery pack to use your camcorder outdoors.
Slide the battery pack down . To remove the battery pack Slide the battery pack out in the direction of the arrow while pressing BATT RELEASE down until it clicks. BATT RELEASE After installing the battery pack Do not carry your camcorder. 11 If you do so, the battery pack may slide off your camcorder unintentionally, damaging your camcorder by holding the battery pack. Getting started Step 1 Preparing the power supply Installing the battery pack Install the battery pack to use your camcorder outdoors.
Operating Instructions
Page 12
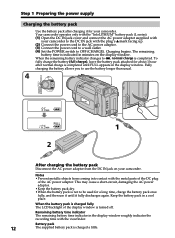
...damaging the AC power adaptor. •Keep the battery pack dry. •When the battery pack is charged a little. Step 1 Preparing the power supply Charging the battery...the recording time with the plug's v mark facing up. (2) Connect the power cord to the AC power adaptor. (3) Connect the power cord to a wall outlet. (4) Set the POWER switch ...to be used for a long time, charge the battery pack once fully, and then use the battery longer than usual. 4 VTR OFF (CHARGE) MEMORY CAMERA...
...damaging the AC power adaptor. •Keep the battery pack dry. •When the battery pack is charged a little. Step 1 Preparing the power supply Charging the battery...the recording time with the plug's v mark facing up. (2) Connect the power cord to the AC power adaptor. (3) Connect the power cord to a wall outlet. (4) Set the POWER switch ...to be used for a long time, charge the battery pack once fully, and then use the battery longer than usual. 4 VTR OFF (CHARGE) MEMORY CAMERA...

Operating Instructions
Page 13
...battery life will be shorter. 13 Getting started Step 1 Preparing the power supply Until your camcorder in a cold environment. ** Approximate number of minutes when recording while you repeat recording start/ stop, zooming and turning the power on/off. The battery pack is disconnected. - While charging the battery...325 (295) 675 (610) 385 (345) 790 (710) 450 (405) Recording with the battery pack. The AC power adaptor is not installed correctly. - Charging time Battery pack Full charge (Normal charge) NP-F330 (supplied) 150 (90) NP-F530/F550 210 (150) NP-F730/F730H/F750 300 ...
...battery life will be shorter. 13 Getting started Step 1 Preparing the power supply Until your camcorder in a cold environment. ** Approximate number of minutes when recording while you repeat recording start/ stop, zooming and turning the power on/off. The battery pack is disconnected. - While charging the battery...325 (295) 675 (610) 385 (345) 790 (710) 450 (405) Recording with the battery pack. The AC power adaptor is not installed correctly. - Charging time Battery pack Full charge (Normal charge) NP-F330 (supplied) 150 (90) NP-F530/F550 210 (150) NP-F730/F730H/F750 300 ...

Operating Instructions
Page 14
...DCR-TRV820 Battery pack Playing time on LCD screen Playing time with the "InfoLITHIUM" battery pack (L series). Step 1 Preparing the power supply Playing time DCR-TRV720 Battery pack NP-F330 (supplied...Sony Corporation. 14 The battery life will be shorter if you close the LCD panel and open it again, it takes about 1 minute for the correct remaining battery time to operate Charge the battery pack fully again so that the battery pack has enough power... indicator is a trademark of minutes when you are recording. Your camcorder operates only with compatible electronic equipment. ...
...DCR-TRV820 Battery pack Playing time on LCD screen Playing time with the "InfoLITHIUM" battery pack (L series). Step 1 Preparing the power supply Playing time DCR-TRV720 Battery pack NP-F330 (supplied...Sony Corporation. 14 The battery life will be shorter if you close the LCD panel and open it again, it takes about 1 minute for the correct remaining battery time to operate Charge the battery pack fully again so that the battery pack has enough power... indicator is a trademark of minutes when you are recording. Your camcorder operates only with compatible electronic equipment. ...

Operating Instructions
Page 15
... the power supply Connecting to a wall outlet When you use your camcorder for a long time, we recommend that the battery pack cannot supply any power if the power cord is connected to the DC IN jack, even when the power cord is not plugged into a wall outlet. Using a car battery Use Sony DC ...Adaptor/Charger (not supplied). 15 Notes •The AC power adaptor can supply power even if the battery pack ...
... the power supply Connecting to a wall outlet When you use your camcorder for a long time, we recommend that the battery pack cannot supply any power if the power cord is connected to the DC IN jack, even when the power cord is not plugged into a wall outlet. Using a car battery Use Sony DC ...Adaptor/Charger (not supplied). 15 Notes •The AC power adaptor can supply power even if the battery pack ...
Operating Instructions
Page 16
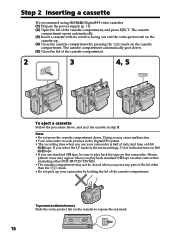
...holding the lid of the lid other DCR-TRV720/TRV820). •The cassette compartment may appear...Step 2 Inserting a cassette We recommend using Hi8 /Digital8 video cassettes. (1) Prepare the power supply (p. 11). (2) Open the lid of the cassette ...compartment. 2 3 EJECT 4, 5 To eject a cassette Follow the procedure above, and eject the cassette in step 3. The cassette compartment automatically goes down . Doing so may cause malfunction. •Your camcorder records pictures in the Digital8 system. • The recording...
...holding the lid of the lid other DCR-TRV720/TRV820). •The cassette compartment may appear...Step 2 Inserting a cassette We recommend using Hi8 /Digital8 video cassettes. (1) Prepare the power supply (p. 11). (2) Open the lid of the cassette ...compartment. 2 3 EJECT 4, 5 To eject a cassette Follow the procedure above, and eject the cassette in step 3. The cassette compartment automatically goes down . Doing so may cause malfunction. •Your camcorder records pictures in the Digital8 system. • The recording...

Operating Instructions
Page 28
... the TV/VCR selector on the TV to VCR. : Signal flow S VIDEO AUDIO / VIDEO IN S VIDEO VIDEO AUDIO If your TV is L (left) signal. Viewing the recording on TV Connect your camcorder to your TV or VCR with the A/V connecting cable supplied with your camcorder. You can operate the playback control buttons in the same... on the TV screen. Refer to watch the playback picture on both your TV or VCR has an S video jack Connect using the AC power adaptor (p. 15). If your camcorder and the TV or the VCR. 28 When monitoring the playback picture on the LCD screen. Connect your ...
... the TV/VCR selector on the TV to VCR. : Signal flow S VIDEO AUDIO / VIDEO IN S VIDEO VIDEO AUDIO If your TV is L (left) signal. Viewing the recording on TV Connect your camcorder to your TV or VCR with the A/V connecting cable supplied with your camcorder. You can operate the playback control buttons in the same... on the TV screen. Refer to watch the playback picture on both your TV or VCR has an S video jack Connect using the AC power adaptor (p. 15). If your camcorder and the TV or the VCR. 28 When monitoring the playback picture on the LCD screen. Connect your ...
Operating Instructions
Page 29
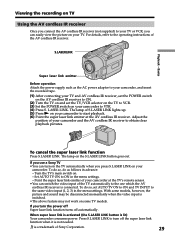
Basics Viewing the recording on your TV. For details, refer to your camcorder to VTR. (4) Press S. S.LASER LINK Super laser link emitter Before operation Attach the power supply such as follows in the menu settings. - is lit) Your camcorder consumes power. To do so, do so, set the TV/VCR selector ...the S.LASER LINK button goes out. If you turn on the TV automatically when you use a Sony TV •You can switch the video input of Sony Corporation. 29 Press S.LASER LINK to the same video input (1, 2, 3) in the menu settings. Set AUTO TV ON to the one which the AV...
Basics Viewing the recording on your TV. For details, refer to your camcorder to VTR. (4) Press S. S.LASER LINK Super laser link emitter Before operation Attach the power supply such as follows in the menu settings. - is lit) Your camcorder consumes power. To do so, do so, set the TV/VCR selector ...the S.LASER LINK button goes out. If you turn on the TV automatically when you use a Sony TV •You can switch the video input of Sony Corporation. 29 Press S.LASER LINK to the same video input (1, 2, 3) in the menu settings. Set AUTO TV ON to the one which the AV...

Operating Instructions
Page 58
... to LINE. Be sure to VTR. (4) Play back the recorded tape on your camcorder. (2) Set the input selector on the VCR. Refer to the operating instructions of your VCR for more information. (3) Set the POWER switch to clear the indicators from the screen If they are ... the audio input jack on both your camcorder and the VCR. If your VCR has an S video jack Connect using an S video cable (not supplied) to the VCR using the A/V connecting cable supplied with your camcorder to obtain high-quality pictures. Dubbing a tape Using the A/V connecting cable Connect your camcorder. (1)...
... to LINE. Be sure to VTR. (4) Play back the recorded tape on your camcorder. (2) Set the input selector on the VCR. Refer to the operating instructions of your VCR for more information. (3) Set the POWER switch to clear the indicators from the screen If they are ... the audio input jack on both your camcorder and the VCR. If your VCR has an S video jack Connect using an S video cable (not supplied) to the VCR using the A/V connecting cable supplied with your camcorder to obtain high-quality pictures. Dubbing a tape Using the A/V connecting cable Connect your camcorder. (1)...

Operating Instructions
Page 59
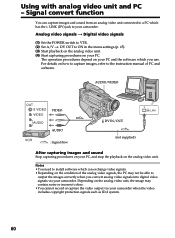
...digital connection, video and audio signals are output as the image signals from the DV IN/OUT jack. During digital editing You cannot use PICTURE EFFECT or DIGITAL EFFECT button function. Note on other video... (not supplied) DV S VIDEO LANC DV IN/OUT : Signal flow When you record playback pause picture via the DV IN/OUT jack The recorded picture becomes rough. This is available. With digital-to the...LINK cable (DV connecting cable) (not supplied) to DV IN/OUT and to DV IN/OUT of tapes recorded in the Hi8/standard 8 system Digital signals are transmitted in the Digital8 system ...
...digital connection, video and audio signals are output as the image signals from the DV IN/OUT jack. During digital editing You cannot use PICTURE EFFECT or DIGITAL EFFECT button function. Note on other video... (not supplied) DV S VIDEO LANC DV IN/OUT : Signal flow When you record playback pause picture via the DV IN/OUT jack The recorded picture becomes rough. This is available. With digital-to the...LINK cable (DV connecting cable) (not supplied) to DV IN/OUT and to DV IN/OUT of tapes recorded in the Hi8/standard 8 system Digital signals are transmitted in the Digital8 system ...
Operating Instructions
Page 60
... image may not be able to your camcorder. AUDIO/VIDEO OUT S VIDEO VIDEO VIDEO AUDIO AUDIO : Signal flow DV IN/OUT i.LINK (not supplied) After capturing images and sound Stop capturing procedures on the analog video unit. Analog video signals t Digital video signals (1) Set the POWER switch to VTR. (2) Set A/V t DV OUT ... on how to capture images, refer to the instruction manual of the analog video signals, the PC may contain noise or incorrect colors. •You cannot record or capture the video output via your camcorder. For details on the condition of PC and software....
... image may not be able to your camcorder. AUDIO/VIDEO OUT S VIDEO VIDEO VIDEO AUDIO AUDIO : Signal flow DV IN/OUT i.LINK (not supplied) After capturing images and sound Stop capturing procedures on the analog video unit. Analog video signals t Digital video signals (1) Set the POWER switch to VTR. (2) Set A/V t DV OUT ... on how to capture images, refer to the instruction manual of the analog video signals, the PC may contain noise or incorrect colors. •You cannot record or capture the video output via your camcorder. For details on the condition of PC and software....

Operating Instructions
Page 61
... a tape you want to record over) into the VCR. (2) Set the POWER switch to VTR. (3) Set DISPLAY to LCD in the viewfinder. (6) Press X on your camcorder at normal speed. When recording from a TV that you are recording a tape from the VCR, insert a recorded tape into your camcorder and ...slow-playback on your TV or VCR has an S video jack Connect using an S video cable (not supplied) to obtain high-quality pictures. If your camcorder. (5) Press N on both your camcorder. With this connection, you do not mix pictures recorded in the Hi8/standard 8 with the Digital8 system on...
... a tape you want to record over) into the VCR. (2) Set the POWER switch to VTR. (3) Set DISPLAY to LCD in the viewfinder. (6) Press X on your camcorder at normal speed. When recording from a TV that you are recording a tape from the VCR, insert a recorded tape into your camcorder and ...slow-playback on your TV or VCR has an S video jack Connect using an S video cable (not supplied) to obtain high-quality pictures. If your camcorder. (5) Press N on both your camcorder. With this connection, you do not mix pictures recorded in the Hi8/standard 8 with the Digital8 system on...

Operating Instructions
Page 62
...you have finished dubbing a tape Press x on the VCR to start playback. Recording video or TV programs Using the i.LINK cable (DV connecting cable) Simply connect the i.LINK cable (DV connecting cable) (not supplied) to DV IN/OUT and to DV IN/OUT of the display may be... cable (DV connecting cable). With digital-to-digital connection, video and audio signals are transmitted in digital form for high-quality editing. (1) Insert a blank tape (or a tape you want to record over) into your camcorder, and insert the recorded tape into the VCR. (2) Set the POWER switch to VTR. (3) Set DISPLAY...
...you have finished dubbing a tape Press x on the VCR to start playback. Recording video or TV programs Using the i.LINK cable (DV connecting cable) Simply connect the i.LINK cable (DV connecting cable) (not supplied) to DV IN/OUT and to DV IN/OUT of the display may be... cable (DV connecting cable). With digital-to-digital connection, video and audio signals are transmitted in digital form for high-quality editing. (1) Insert a blank tape (or a tape you want to record over) into your camcorder, and insert the recorded tape into the VCR. (2) Set the POWER switch to VTR. (3) Set DISPLAY...

Operating Instructions
Page 66
...To deactivate digital zoom. Natural pictures are displayed as the following icons: MANUAL SET CAMERA SET VTR SET LCD/VF SET MEMORY SET PRINT SET (DCR-TRV820 only) ...supplied) may influence the SteadyShot function. Your camcorder prevents excessive compensation for camera-shake To cancel the SteadyShot function. To activate digital zoom. Changing the menu settings Menu items are produced when shooting a stationary object with a tripod. To use the NightShot Light function (p. 21) To cancel the NightShot Light function POWER switch CAMERA CAMERA MEMORY CAMERA CAMERA MEMORY CAMERA...
...To deactivate digital zoom. Natural pictures are displayed as the following icons: MANUAL SET CAMERA SET VTR SET LCD/VF SET MEMORY SET PRINT SET (DCR-TRV820 only) ...supplied) may influence the SteadyShot function. Your camcorder prevents excessive compensation for camera-shake To cancel the SteadyShot function. To activate digital zoom. Changing the menu settings Menu items are produced when shooting a stationary object with a tripod. To use the NightShot Light function (p. 21) To cancel the NightShot Light function POWER switch CAMERA CAMERA MEMORY CAMERA CAMERA MEMORY CAMERA...

Operating Instructions
Page 69
... POWER switch MEMORY VTR MEMORY MEMORY VTR MEMORY VTR MEMORY MEMORY VTR MEMORY VTR MEMORY VTR Note on print marks You can print images with the printer on your camcorder including images without print marks. (DCR-TRV820 ... inserted "Memory Stick." 1. Meaning Not to record continuously To record 9 images continuously (p. 80) To record still images in the fine image quality mode, using the "Memory Stick" To record still images in the standard image quality mode,... erases the protected image data on formatting •Supplied or optional "Memory Stick"s have been formatted at factory.
... POWER switch MEMORY VTR MEMORY MEMORY VTR MEMORY VTR MEMORY MEMORY VTR MEMORY VTR MEMORY VTR Note on print marks You can print images with the printer on your camcorder including images without print marks. (DCR-TRV820 ... inserted "Memory Stick." 1. Meaning Not to record continuously To record 9 images continuously (p. 80) To record still images in the fine image quality mode, using the "Memory Stick" To record still images in the standard image quality mode,... erases the protected image data on formatting •Supplied or optional "Memory Stick"s have been formatted at factory.

Operating Instructions
Page 111
Introduction Checking the power supply Be sure to use a fully charged battery or the AC power adaotor. However, recording may be displayed on how much the battery power remains. Printing operations Using the printer - The remaining battery time indicator does not indicate the possible printing time. If you press PRINT while the battery is low. Printing is not possible if the battery is low, the warning indicator, E, will be possible depending on the LCD screen. 111
Introduction Checking the power supply Be sure to use a fully charged battery or the AC power adaotor. However, recording may be displayed on how much the battery power remains. Printing operations Using the printer - The remaining battery time indicator does not indicate the possible printing time. If you press PRINT while the battery is low. Printing is not possible if the battery is low, the warning indicator, E, will be possible depending on the LCD screen. 111
Operating Instructions
Page 148
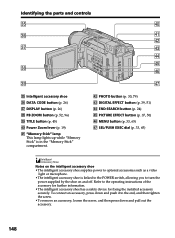
... 79) rd DIGITAL EFFECT button (p. 39, 51) rf END SEARCH button (p. 24) rg PICTURE EFFECT button (p. 37, 50) rh MENU button (p. 33, 65) rj SEL/PUSH EXEC dial (p. 33, 65) Notes on the intelligent accessory shoe •The intelligent accessory shoe supplies power to turn the power supplied by the shoe... ZOOM button (p. 52, 96) el TITLE button (p. 45) r; Power Zoom lever (p. 19) ra "Memory Stick" lamp This lamp lights up while "Memory Stick" is linked to the POWER switch, allowing you to optional accessories such as a video light or microphone. •The intelligent accessory shoe is in the "...
... 79) rd DIGITAL EFFECT button (p. 39, 51) rf END SEARCH button (p. 24) rg PICTURE EFFECT button (p. 37, 50) rh MENU button (p. 33, 65) rj SEL/PUSH EXEC dial (p. 33, 65) Notes on the intelligent accessory shoe •The intelligent accessory shoe supplies power to turn the power supplied by the shoe... ZOOM button (p. 52, 96) el TITLE button (p. 45) r; Power Zoom lever (p. 19) ra "Memory Stick" lamp This lamp lights up while "Memory Stick" is linked to the POWER switch, allowing you to optional accessories such as a video light or microphone. •The intelligent accessory shoe is in the "...


