

Operating Instructions
Page 4
... IP address automatically (DHCP) .... 42 (GB) Setting an IP address manually (Manual 42 (GB) Setting a communication speed 43 (GB) Self-diagnosis Function 43 (GB) Operating a Specific Display With the Remote Commander 44 (GB...
... IP address automatically (DHCP) .... 42 (GB) Setting an IP address manually (Manual 42 (GB) Setting a communication speed 43 (GB) Self-diagnosis Function 43 (GB) Operating a Specific Display With the Remote Commander 44 (GB...

Operating Instructions
Page 12
Location and Function of Parts and Controls Remote Commander RM-980 1 2 MUTING DISPLAY STBY ON 3 4 5 qf 6 qg 7 qh 8 qj 9 ENTER 123 0 456 789 qa 0 qk qs ON SET qd ql MONITOR RM-980 1POWER ON switch Press to power on the screen. Each press toggles between RGB and COMPONENT. 7PICTURE button Selects Picture mode. If this displayed information is left undisturbed for five minutes, it will disappear automatically. 5INPUT1 button Press to select the signal input to the INPUT1 connectors. 6INPUT2 button Press to select the signal input to hide them. Each press ...
Location and Function of Parts and Controls Remote Commander RM-980 1 2 MUTING DISPLAY STBY ON 3 4 5 qf 6 qg 7 qh 8 qj 9 ENTER 123 0 456 789 qa 0 qk qs ON SET qd ql MONITOR RM-980 1POWER ON switch Press to power on the screen. Each press toggles between RGB and COMPONENT. 7PICTURE button Selects Picture mode. If this displayed information is left undisturbed for five minutes, it will disappear automatically. 5INPUT1 button Press to select the signal input to the INPUT1 connectors. 6INPUT2 button Press to select the signal input to hide them. Each press ...

Operating Instructions
Page 20
.... Note When operating this item to "On," the display unit automatically enters the standby mode when a signal is input. 20 (GB) For details, see "Operating a Specific Display With the Remote Commander" on . Color System Selects the Color System of the display. The display unit automatically enters the power saving mode when...
.... Note When operating this item to "On," the display unit automatically enters the standby mode when a signal is input. 20 (GB) For details, see "Operating a Specific Display With the Remote Commander" on . Color System Selects the Color System of the display. The display unit automatically enters the power saving mode when...
Operating Instructions
Page 39
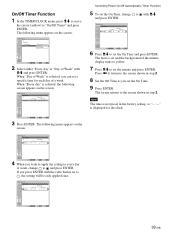
...) TIMER/CLOCK On/Off Timer Repeat Every Day [On Time] [Off Time] 000 :: 0000 000 :: 0000 Select Set ENTER Exit MENU 4 When you can set a specific time for the clock. TIMER/CLOCK On/Off Timer Repeat Every Day [On Time] [Off Time] 000 :: 0000 000 :: 0000 Select Set ENTER Exit MENU...
...) TIMER/CLOCK On/Off Timer Repeat Every Day [On Time] [Off Time] 000 :: 0000 000 :: 0000 Select Set ENTER Exit MENU 4 When you can set a specific time for the clock. TIMER/CLOCK On/Off Timer Repeat Every Day [On Time] [Off Time] 000 :: 0000 000 :: 0000 Select Set ENTER Exit MENU...

Operating Instructions
Page 44
... the index number using the 0 - 9 buttons on the Remote Commander. ON SET OFF To change the index number You can operate a specific display without affecting other displays, as well.) 44 (GB) Select Set ENTER Exit MENU 2 Select "CUSTOM SETUP" and press ENTER. When ...PB/PR 1080i DTV H/Comp Select Set ENTER Exit MENU 3 Select "Remote" with M /m and press ENTER. Operating a Specific Display With the Remote Commander Operating a Specific Display With the Remote Commander Using the supplied Remote Commander, you change the index number if necessary. The characters on the screen...
... the index number using the 0 - 9 buttons on the Remote Commander. ON SET OFF To change the index number You can operate a specific display without affecting other displays, as well.) 44 (GB) Select Set ENTER Exit MENU 2 Select "CUSTOM SETUP" and press ENTER. When ...PB/PR 1080i DTV H/Comp Select Set ENTER Exit MENU 3 Select "Remote" with M /m and press ENTER. Operating a Specific Display With the Remote Commander Operating a Specific Display With the Remote Commander Using the supplied Remote Commander, you change the index number if necessary. The characters on the screen...

Operating Instructions
Page 45
...Minijack (×2) AUDIO OUT Pinjack (×2) 500 mVrms, high impedance REMOTE (RS-232C) D-sub 9-pin (×1) Specifications VIDEO/S VIDEO input/output adaptor BKM-FW10 (only for the FWD-42LX1/ 32LX1) VIDEO (NTSC, PAL, SECAM, NTSC4.43, PAL60, PAL-M, PAL-N)1) VIDEO IN BNC (×1) ...FWD-42PV1P: Pixel pitch Picture size Panel size 1.08 (horizontal) × 1.08 (vertical) mm (1⁄16 × 1⁄16 inches) 518 (horizontal) × 920 (vertical) mm (20 1⁄2 × 36 1⁄4 inches) 42-inch (diagonal 1056 mm) Inputs and Outputs INPUT1 DVI AUDIO DVI (DVI Specification...
...Minijack (×2) AUDIO OUT Pinjack (×2) 500 mVrms, high impedance REMOTE (RS-232C) D-sub 9-pin (×1) Specifications VIDEO/S VIDEO input/output adaptor BKM-FW10 (only for the FWD-42LX1/ 32LX1) VIDEO (NTSC, PAL, SECAM, NTSC4.43, PAL60, PAL-M, PAL-N)1) VIDEO IN BNC (×1) ...FWD-42PV1P: Pixel pitch Picture size Panel size 1.08 (horizontal) × 1.08 (vertical) mm (1⁄16 × 1⁄16 inches) 518 (horizontal) × 920 (vertical) mm (20 1⁄2 × 36 1⁄4 inches) 42-inch (diagonal 1056 mm) Inputs and Outputs INPUT1 DVI AUDIO DVI (DVI Specification...

Operating Instructions
Page 46
...ground Not used Ground Ground SDA H sync or composite sync V sync SCL 46 (GB) Specifications Dimensions FWD-42PV1/42PV1A: 1033 × 631 × 121 mm (40 3⁄4 × 24 7⁄8 × 4 7⁄8 inches) FWD-42PV1P: 631 × 1033 × 121 mm (24 7⁄8 × 40 3⁄...;4 × 4 7⁄8 inches) (w/h/d, excluding projections) Mass FWD-42PV1/42PV1P/42PV1A: Approx. 29 kg (63 lb 15 oz) Supplied accessories AC power cord (1) ...
...ground Not used Ground Ground SDA H sync or composite sync V sync SCL 46 (GB) Specifications Dimensions FWD-42PV1/42PV1A: 1033 × 631 × 121 mm (40 3⁄4 × 24 7⁄8 × 4 7⁄8 inches) FWD-42PV1P: 631 × 1033 × 121 mm (24 7⁄8 × 40 3⁄...;4 × 4 7⁄8 inches) (w/h/d, excluding projections) Mass FWD-42PV1/42PV1P/42PV1A: Approx. 29 kg (63 lb 15 oz) Supplied accessories AC power cord (1) ...
