

Operating Instructions
Page 15
... Inversion) inverts the tint of the picture and/or display video source in Wide Zoom or Full Mode. Precautions to a normal image, select "Off" or reset the specified time in "Auto." To return to avoid/reduce burn-in and picture retention A Use the SCREEN SAVER function. The image looks like a film...
... Inversion) inverts the tint of the picture and/or display video source in Wide Zoom or Full Mode. Precautions to a normal image, select "Off" or reset the specified time in "Auto." To return to avoid/reduce burn-in and picture retention A Use the SCREEN SAVER function. The image looks like a film...
Operating Instructions
Page 28
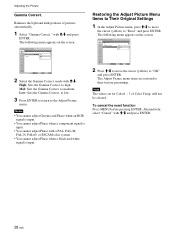
...RGB signal is input. • You cannot adjust Phase when a component signal is input. PICTURE/SOUND CONTROL Adjust Picture Gamma Correct.: Reset Mid Cancel OK Select Set ENTER Exit MENU 2 Press M/m to move the cursor (yellow) to the Adjust Picture menu. The Adjust...with M/m and press ENTER. 28 (GB) High: Sets the Gamma Correct. To cancel the reset function Press MENU before pressing ENTER. PICTURE/SOUND CONTROL Adjust Picture Gamma Correct.: High Reset Mid Low Select Set ENTER Exit MENU 2 Select the Gamma Correct. to high. Restoring the ...
...RGB signal is input. • You cannot adjust Phase when a component signal is input. PICTURE/SOUND CONTROL Adjust Picture Gamma Correct.: Reset Mid Cancel OK Select Set ENTER Exit MENU 2 Press M/m to move the cursor (yellow) to the Adjust Picture menu. The Adjust...with M/m and press ENTER. 28 (GB) High: Sets the Gamma Correct. To cancel the reset function Press MENU before pressing ENTER. PICTURE/SOUND CONTROL Adjust Picture Gamma Correct.: High Reset Mid Low Select Set ENTER Exit MENU 2 Select the Gamma Correct. to high. Restoring the ...

Operating Instructions
Page 30
... cannot set the Aspect while using the PICTURE AND PICTURE function or the Multi Display. • If you want to use the Auto Wide function, reset it . 3 Press ENTER. On: The image is . SCREEN CONTROL Wide Setup Auto Wide: 4:3 Mode: On NWoidrme aZloom Wide Zoom Select Set ENTER Exit MENU 8 Select...
... cannot set the Aspect while using the PICTURE AND PICTURE function or the Multi Display. • If you want to use the Auto Wide function, reset it . 3 Press ENTER. On: The image is . SCREEN CONTROL Wide Setup Auto Wide: 4:3 Mode: On NWoidrme aZloom Wide Zoom Select Set ENTER Exit MENU 8 Select...

Operating Instructions
Page 31
... "Adjust screen" menu are adjusted automatically. SCREEN CONTROL Adjust Screen Auto Adjust Dot Phase: Total H Pixel: H Size: H Shift: V Size: V Shift: Reset Cancel O28K 1344 30 30 30 30 Select Set ENTER Exit MENU Resizing and Positioning the Picture (2) Select "OK" with M/m and press ENTER. Note Due.... (When you select "Dot Phase") SCREEN CONTROL Adjust Screen Auto Adjust Dot Phase: Total H Pixel: H Size: H Shift: V Size: V Shift: Reset 28 1344 30 30 30 30 Select Set ENTER Exit MENU (2) Adjust the screen with M/m and press ENTER. Adjusting manually (1) Select the item you have...
... "Adjust screen" menu are adjusted automatically. SCREEN CONTROL Adjust Screen Auto Adjust Dot Phase: Total H Pixel: H Size: H Shift: V Size: V Shift: Reset Cancel O28K 1344 30 30 30 30 Select Set ENTER Exit MENU Resizing and Positioning the Picture (2) Select "OK" with M/m and press ENTER. Note Due.... (When you select "Dot Phase") SCREEN CONTROL Adjust Screen Auto Adjust Dot Phase: Total H Pixel: H Size: H Shift: V Size: V Shift: Reset 28 1344 30 30 30 30 Select Set ENTER Exit MENU (2) Adjust the screen with M/m and press ENTER. Adjusting manually (1) Select the item you have...

Operating Instructions
Page 32
Adjust the horizontal size of the picture with M/m and press ENTER. Resizing and Positioning the Picture H Size Select "H Size" with M/m/
Adjust the horizontal size of the picture with M/m and press ENTER. Resizing and Positioning the Picture H Size Select "H Size" with M/m/

Operating Instructions
Page 36
Adjusting the Sound Quality Adjusting the Sound Quality When a speaker SS-SP42FW (not supplied) installed, you can also be set. The surround mode can adjust sound treble level, bass level, or balance of the speaker (left and right) volume. Press MENU to show the main menu and adjust "Treble," "Bass," "Balance," or "Surround" from the Adjust Sound menu. Adjusting the Treble, Bass, and Balance, etc. Treble Select "Treble" with M/m/ Adjust the treble with M/m and press ENTER.
Adjusting the Sound Quality Adjusting the Sound Quality When a speaker SS-SP42FW (not supplied) installed, you can also be set. The surround mode can adjust sound treble level, bass level, or balance of the speaker (left and right) volume. Press MENU to show the main menu and adjust "Treble," "Bass," "Balance," or "Surround" from the Adjust Sound menu. Adjusting the Treble, Bass, and Balance, etc. Treble Select "Treble" with M/m/ Adjust the treble with M/m and press ENTER.
Protocol Manual
Page 18
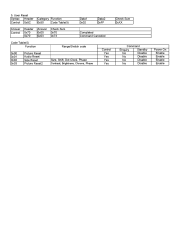
5. User Reset Syntax Header Control 0x8C Answer Control Header 0x70 0x70 Category Function 0x50 Code Table(5) Answer 0x00 0x03 Check Sum 0x70 0x73 Data1 0x02 Data2 0xFF Check Sum 0xXX Completed Command Canceled Code Table(5) Function 0x00 0x01 0x02 0x03 Picture Reset Audio Reset Size Reset Picture Reset2 Range/Switch code Control Yes Yes Yes Yes Size, Shift, Dot Clock, Phase Contrast, Brightness, Chroma, Phase Command Standby Enquiry Disable No Disable No Disable No Disable No Power On Enable Enable Enable Enable
5. User Reset Syntax Header Control 0x8C Answer Control Header 0x70 0x70 Category Function 0x50 Code Table(5) Answer 0x00 0x03 Check Sum 0x70 0x73 Data1 0x02 Data2 0xFF Check Sum 0xXX Completed Command Canceled Code Table(5) Function 0x00 0x01 0x02 0x03 Picture Reset Audio Reset Size Reset Picture Reset2 Range/Switch code Control Yes Yes Yes Yes Size, Shift, Dot Clock, Phase Contrast, Brightness, Chroma, Phase Command Standby Enquiry Disable No Disable No Disable No Disable No Power On Enable Enable Enable Enable
