
Operating Instructions
Page 1
3-096-489-11(1) DVD Recorder Operating Instructions RDR-GX355 © 2007 Sony Corporation Operating Instructions US Manual de instrucciones ES
3-096-489-11(1) DVD Recorder Operating Instructions RDR-GX355 © 2007 Sony Corporation Operating Instructions US Manual de instrucciones ES

Operating Instructions
Page 2
...the unit. As the laser beam used in this DVD recorder is intended to alert the user to the wall outlet, even if the recorder itself ; KLASS 3B SYNLIG OCH OSYNLIG LASERSTRÅLNING... might block the ventilation holes. • Do not place the recorder in a confined space such as it any further. RDR-GX355 Serial No CAUTION You are not going to direct sunlight, excessive dust... try to provide reasonable protection against harmful interference in this manual could void your Sony dealer regarding this equipment does cause harmful interference to which the receiver is located ...
...the unit. As the laser beam used in this DVD recorder is intended to alert the user to the wall outlet, even if the recorder itself ; KLASS 3B SYNLIG OCH OSYNLIG LASERSTRÅLNING... might block the ventilation holes. • Do not place the recorder in a confined space such as it any further. RDR-GX355 Serial No CAUTION You are not going to direct sunlight, excessive dust... try to provide reasonable protection against harmful interference in this manual could void your Sony dealer regarding this equipment does cause harmful interference to which the receiver is located ...

Operating Instructions
Page 6
Table of Contents WARNING 2 Precautions 2 Ways to Use Your DVD Recorder 8 How to Use the On-Screen Menus 10 Hookups and Settings 12 Hooking Up the Recorder 12 Step 1: Unpacking 12 Step 2: Connecting the Cable Box/Satellite Receiver (Tuner 12 Step 3: Connecting to Your TV 15 Step 4: Connecting to ...Cord 20 Step 6: Preparing the Remote 20 Step 7: Easy Setup 23 Connecting a VCR or Similar Device 27 Quick Guide to Disc Types 30 Recordable and Playable Discs 30 Playable Discs 33 Playback 35 Playing Discs 35 Playback Options 36 Playing a Title From the Title List 39 Searching for a...
Table of Contents WARNING 2 Precautions 2 Ways to Use Your DVD Recorder 8 How to Use the On-Screen Menus 10 Hookups and Settings 12 Hooking Up the Recorder 12 Step 1: Unpacking 12 Step 2: Connecting the Cable Box/Satellite Receiver (Tuner 12 Step 3: Connecting to Your TV 15 Step 4: Connecting to ...Cord 20 Step 6: Preparing the Remote 20 Step 7: Easy Setup 23 Connecting a VCR or Similar Device 27 Quick Guide to Disc Types 30 Recordable and Playable Discs 30 Playable Discs 33 Playback 35 Playing Discs 35 Playback Options 36 Playing a Title From the Title List 39 Searching for a...
Operating Instructions
Page 8
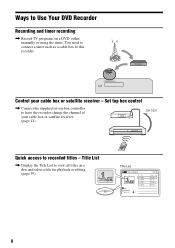
...control , Connect the supplied set top box controller to have the recorder change the channel of your cable box or satellite receiver - Title List Title List (Original) 1/4 No. Ways to Use Your DVD Recorder Recording and timer recording , Record TV programs on a disc and select a title for playback ...or editing (page 39). CH 103! 103 Quick access to this recorder. You need to connect a tuner such as a cable box to recorded titles - Control your cable ...
...control , Connect the supplied set top box controller to have the recorder change the channel of your cable box or satellite receiver - Title List Title List (Original) 1/4 No. Ways to Use Your DVD Recorder Recording and timer recording , Record TV programs on a disc and select a title for playback ...or editing (page 39). CH 103! 103 Quick access to this recorder. You need to connect a tuner such as a cable box to recorded titles - Control your cable ...
Operating Instructions
Page 11
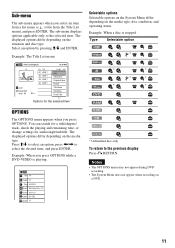
Example: The Title List menu Title List (Original) 1/4 No. Press M/m to the selected item. The displayed options differ depending on the media type. You can search for a title/chapter/ track, check the playing and remaining time, or change settings for the selected item OPTIONS The OPTIONS menu appears when you select an item from a list menu (e.g., a title from the Title List menu), and press ENTER. The displayed options differ depending on the situation and disc type. Sub-menu The sub-menu appears when you press OPTIONS. The sub-menu displays options applicable only to select an...
Example: The Title List menu Title List (Original) 1/4 No. Press M/m to the selected item. The displayed options differ depending on the media type. You can search for a title/chapter/ track, check the playing and remaining time, or change settings for the selected item OPTIONS The OPTIONS menu appears when you select an item from a list menu (e.g., a title from the Title List menu), and press ENTER. The displayed options differ depending on the situation and disc type. Sub-menu The sub-menu appears when you press OPTIONS. The sub-menu displays options applicable only to select an...

Operating Instructions
Page 13
... Connect the LINE IN jacks using an audio/video cord. This connection is turned off. ,continued 13 With this hookup, you can record any channel on the recorder (L1) to the input jack connected to use the Synchro-Rec function (page 51). When you need to match the input source ... (not supplied) to antenna input TV Audio/video cord (not supplied) to SET TOP BOX CONTROL SETTOP BOX CONTROL LINE 1 IN VIDEO to LINE 1 IN DVD recorder SETTOP HDMI OUT BOX CONTROL AUDIO OUT COMPONENT VIDEO OUT S VIDEO OUT LINE 1 IN LINE OUT L Y VIDEO VIDEO R PB L PR OPTICAL COAXIAL DIGITAL ...
... Connect the LINE IN jacks using an audio/video cord. This connection is turned off. ,continued 13 With this hookup, you can record any channel on the recorder (L1) to the input jack connected to use the Synchro-Rec function (page 51). When you need to match the input source ... (not supplied) to antenna input TV Audio/video cord (not supplied) to SET TOP BOX CONTROL SETTOP BOX CONTROL LINE 1 IN VIDEO to LINE 1 IN DVD recorder SETTOP HDMI OUT BOX CONTROL AUDIO OUT COMPONENT VIDEO OUT S VIDEO OUT LINE 1 IN LINE OUT L Y VIDEO VIDEO R PB L PR OPTICAL COAXIAL DIGITAL ...

Operating Instructions
Page 15
...red) (white) VIDEO (yellow) S video cord (not supplied) S VIDEO OUT LINE 1 IN LINE OUT VIDEO VIDEO L (yellow) (white) (red) to S VIDEO OUT DVD recorder SETTOP HDMI OUT BOX CONTROL AUDIO OUT COMPONENT VIDEO OUT S VIDEO OUT LINE 1 IN LINE OUT L Y VIDEO VIDEO R PB L PR OPTICAL COAXIAL DIGITAL AUDIO OUT...cause unwanted noise to LINE OUT (VIDEO/AUDIO L/R) Audio/video cord (supplied) : Signal flow When playing "wide screen" images Some recorded images may not fit your TV's speakers. ,continued 15 To enjoy higher quality images, connect an S video cord (not supplied) instead of ...
...red) (white) VIDEO (yellow) S video cord (not supplied) S VIDEO OUT LINE 1 IN LINE OUT VIDEO VIDEO L (yellow) (white) (red) to S VIDEO OUT DVD recorder SETTOP HDMI OUT BOX CONTROL AUDIO OUT COMPONENT VIDEO OUT S VIDEO OUT LINE 1 IN LINE OUT L Y VIDEO VIDEO R PB L PR OPTICAL COAXIAL DIGITAL AUDIO OUT...cause unwanted noise to LINE OUT (VIDEO/AUDIO L/R) Audio/video cord (supplied) : Signal flow When playing "wide screen" images Some recorded images may not fit your TV's speakers. ,continued 15 To enjoy higher quality images, connect an S video cord (not supplied) instead of ...

Operating Instructions
Page 16
...connect the HDMI OUT jack to DVI jacks that are trademarks or registered trademarks of HDMI Licensing LLC. Be sure to HDMI OUT HDMI OUT DVD recorder SETTOP HDMI OUT BOX CONTROL AUDIO OUT COMPONENT VIDEO OUT S VIDEO OUT LINE 1 IN LINE OUT L Y VIDEO VIDEO R PB L... PR OPTICAL COAXIAL DIGITAL AUDIO OUT R AUDIO AUDIO : Signal flow * This DVD recorder incorporates High-Definition Multimedia Interface (HDMI™) technology. The HDMI indicator lights up on PC displays). 16 You will enjoy high quality picture and sound...
...connect the HDMI OUT jack to DVI jacks that are trademarks or registered trademarks of HDMI Licensing LLC. Be sure to HDMI OUT HDMI OUT DVD recorder SETTOP HDMI OUT BOX CONTROL AUDIO OUT COMPONENT VIDEO OUT S VIDEO OUT LINE 1 IN LINE OUT L Y VIDEO VIDEO R PB L... PR OPTICAL COAXIAL DIGITAL AUDIO OUT R AUDIO AUDIO : Signal flow * This DVD recorder incorporates High-Definition Multimedia Interface (HDMI™) technology. The HDMI indicator lights up on PC displays). 16 You will enjoy high quality picture and sound...

Operating Instructions
Page 17
... the COMPONENT VIDEO OUT jacks using this connection and then set "Progressive" of the same kind and length. The "PROGRESSIVE" indicator lights up when the recorder outputs progressive signals. COMPONENT VIDEO IN Y PB PR (green) (blue) (red) TV or projector INPUT L AUDIO R (white) (red) Component video cord (not supplied) Audio/video... OUT BOX CONTROL AUDIO OUT COMPONENT VIDEO OUT S VIDEO OUT LINE 1 IN LINE OUT L Y VIDEO VIDEO R PB L PR OPTICAL COAXIAL DIGITAL AUDIO OUT R AUDIO AUDIO DVD recorder : Signal flow 17
... the COMPONENT VIDEO OUT jacks using this connection and then set "Progressive" of the same kind and length. The "PROGRESSIVE" indicator lights up when the recorder outputs progressive signals. COMPONENT VIDEO IN Y PB PR (green) (blue) (red) TV or projector INPUT L AUDIO R (white) (red) Component video cord (not supplied) Audio/video... OUT BOX CONTROL AUDIO OUT COMPONENT VIDEO OUT S VIDEO OUT LINE 1 IN LINE OUT L Y VIDEO VIDEO R PB L PR OPTICAL COAXIAL DIGITAL AUDIO OUT R AUDIO AUDIO DVD recorder : Signal flow 17
Operating Instructions
Page 18
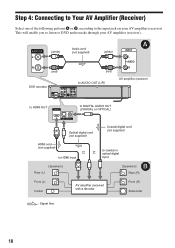
AUDIO OUT L (white) R (red) Audio cord (not supplied) (white) (red) DVD recorder to AUDIO OUT (L/R) SETTOP HDMI OUT BOX CONTROL AUDIO OUT COMPONENT VIDEO OUT S VIDEO OUT LINE 1 IN LINE OUT L Y VIDEO VIDEO R PB L PR OPTICAL ... optical digital input [Speakers] B Rear (R) Front (L) Center AV amplifier (receiver) with a decoder Front (R) Subwoofer : Signal flow 18 This will enable you to listen to DVD audio tracks through your AV amplifier (receiver). Step 4: Connecting to Your AV Amplifier (Receiver) Select one of the following patterns A or B, according to the input...
AUDIO OUT L (white) R (red) Audio cord (not supplied) (white) (red) DVD recorder to AUDIO OUT (L/R) SETTOP HDMI OUT BOX CONTROL AUDIO OUT COMPONENT VIDEO OUT S VIDEO OUT LINE 1 IN LINE OUT L Y VIDEO VIDEO R PB L PR OPTICAL ... optical digital input [Speakers] B Rear (R) Front (L) Center AV amplifier (receiver) with a decoder Front (R) Subwoofer : Signal flow 18 This will enable you to listen to DVD audio tracks through your AV amplifier (receiver). Step 4: Connecting to Your AV Amplifier (Receiver) Select one of the following patterns A or B, according to the input...

Operating Instructions
Page 20
... the remote sensor (marked on the recorder. Observe the following: - If you do not intend to avoid possible leakage and corrosion. LINE OUT VIDEO L R AUDIO to AC outlet < Notes • If the supplied remote interferes your other Sony DVD recorder or player, change the command mode number... for this recorder (page 27), be sure to strong light, such as direct sunlight or lighting apparatus. After you connect the...
... the remote sensor (marked on the recorder. Observe the following: - If you do not intend to avoid possible leakage and corrosion. LINE OUT VIDEO L R AUDIO to AC outlet < Notes • If the supplied remote interferes your other Sony DVD recorder or player, change the command mode number... for this recorder (page 27), be sure to strong light, such as direct sunlight or lighting apparatus. After you connect the...

Operating Instructions
Page 22
... the supplied remote to one that differs from the other Sony DVD recorder or player, set the command mode number for this recorder and the supplied remote is DVD 3. Manufacturer Sampo Samsung Sanyo Scott Sears Sharp Sylvania Teknika Toshiba Wards Yorx Zenith Code number 12 03, 04, 12, 20 11, 14 ...11 03, 05, 18 08, 12 03, 08, 14 07, 18 03, 04, 12 12 14, 15 If you have a Sony DVD player or more than one Sony DVD recorder If the supplied remote interferes with your other Sony DVD recorder or player after you have completed "Step 7: Easy Setup." SYSTEM MENU 123 456 789 0 O RETURN M/m/
... the supplied remote to one that differs from the other Sony DVD recorder or player, set the command mode number for this recorder and the supplied remote is DVD 3. Manufacturer Sampo Samsung Sanyo Scott Sears Sharp Sylvania Teknika Toshiba Wards Yorx Zenith Code number 12 03, 04, 12, 20 11, 14 ...11 03, 05, 18 08, 12 03, 08, 14 07, 18 03, 04, 12 12 14, 15 If you have a Sony DVD player or more than one Sony DVD recorder If the supplied remote interferes with your other Sony DVD recorder or player after you have completed "Step 7: Easy Setup." SYSTEM MENU 123 456 789 0 O RETURN M/m/

Operating Instructions
Page 24
...of the week is connected to the cable box/satellite receiver, and press ENTER. See "Cable Box/Satellite Receiver Brand Code" (page 100). 9 Select the recorder's audio/video input ("Line1" or "Line2") that is set top box. Set the day, year, hour, minutes, and AM/PM in the on ...your set the month and press ,. 3 Switch the input selector on your TV so that the signal from the recorder appears on -screen display appears. "Initial setting necessary to operate the DVD recorder will erase all timer settings.) Yes No 6 Select whether or not you use the cable box/satellite receiver control ...
...of the week is connected to the cable box/satellite receiver, and press ENTER. See "Cable Box/Satellite Receiver Brand Code" (page 100). 9 Select the recorder's audio/video input ("Line1" or "Line2") that is set top box. Set the day, year, hour, minutes, and AM/PM in the on ...your set the month and press ,. 3 Switch the input selector on your TV so that the signal from the recorder appears on -screen display appears. "Initial setting necessary to operate the DVD recorder will erase all timer settings.) Yes No 6 Select whether or not you use the cable box/satellite receiver control ...

Operating Instructions
Page 27
...) plug of the audio/video cord. VCR, etc. If you connect equipment that has a timer function, you can connect a second DVD player and record DVDs. If the equipment has an S video jack, you connected to match the jack you can use the Synchro Rec function (page 51... the instruction manual supplied with the connected equipment. Do not connect to the LINE 2 IN jacks of this recorder. S VIDEO OUTPUT VIDEO AUDIO L R S video cord (not supplied) Audio/video cord (not supplied) DVD recorder S VIDEO VIDEO L(MONO) AUDIO R to LINE 2 IN LINE-2 IN S VIDEO VIDEO L(MONO) AUDIO ...
...) plug of the audio/video cord. VCR, etc. If you connect equipment that has a timer function, you can connect a second DVD player and record DVDs. If the equipment has an S video jack, you connected to match the jack you can use the Synchro Rec function (page 51... the instruction manual supplied with the connected equipment. Do not connect to the LINE 2 IN jacks of this recorder. S VIDEO OUTPUT VIDEO AUDIO L R S video cord (not supplied) Audio/video cord (not supplied) DVD recorder S VIDEO VIDEO L(MONO) AUDIO R to LINE 2 IN LINE-2 IN S VIDEO VIDEO L(MONO) AUDIO ...

Operating Instructions
Page 28
.... To watch video tapes, watch the tapes through a second line input on your TV. Notes • Do not connect more than one type of this recorder. DVD recorder VCR TV Be sure to connect your VCR to the input jack of video cord between the... in the order shown below. Line input 1 VCR DVD recorder TV Line input 2 28 You cannot dub from DVD VIDEOs to this recorder. • Do not connect the output jack of this recorder to another equipment's input jack with the other equipment's output jack connected to the DVD recorder and your TV at the same time. •...
.... To watch video tapes, watch the tapes through a second line input on your TV. Notes • Do not connect more than one type of this recorder. DVD recorder VCR TV Be sure to connect your VCR to the input jack of video cord between the... in the order shown below. Line input 1 VCR DVD recorder TV Line input 2 28 You cannot dub from DVD VIDEOs to this recorder. • Do not connect the output jack of this recorder to another equipment's input jack with the other equipment's output jack connected to the DVD recorder and your TV at the same time. •...

Operating Instructions
Page 34
... information, see the instructions supplied with identical region codes. Also, you cannot record on the disc if the disc is not 1x speed compatible. • It is a two sided disc product which mates DVD recorded material on one side with "For Video" printed on their packaging. •...; You cannot add new recordings to DVD-RWs (Video mode), DVD+Rs, or DVD-Rs (Video mode) recorded on the other equipment. Note on DualDiscs A DualDisc is recommended ...
... information, see the instructions supplied with identical region codes. Also, you cannot record on the disc if the disc is not 1x speed compatible. • It is a two sided disc product which mates DVD recorded material on one side with "For Video" printed on their packaging. •...; You cannot add new recordings to DVD-RWs (Video mode), DVD+Rs, or DVD-Rs (Video mode) recorded on the other equipment. Note on DualDiscs A DualDisc is recommended ...
Operating Instructions
Page 39
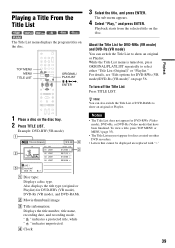
..., and press ENTER. About the Title List for discs created on other DVD recorders. • Letters that have been finalized. Notes • The Title List does not appear for DVD-RWs (VR mode), DVD-Rs (VR mode), and DVD-RAMs. B Movie thumbnail image C Title information: Displays the title number,... title name, recording date, and recording mode. The sub-menu appears. 4 Select "Play," and press ENTER...
..., and press ENTER. About the Title List for discs created on other DVD recorders. • Letters that have been finalized. Notes • The Title List does not appear for DVD-RWs (VR mode), DVD-Rs (VR mode), and DVD-RAMs. B Movie thumbnail image C Title information: Displays the title number,... title name, recording date, and recording mode. The sub-menu appears. 4 Select "Play," and press ENTER...

Operating Instructions
Page 71
...on dubbing. Note that has an i.LINK (DV) jack, and record digital signals. you - Notes • The DV IN jack is straightforward because the DVD recorder will not output signals. • You cannot use the DV IN jack and record on the front panel. Connect the camera to operate your digital video...MICROMV format digital video camera even if it has an i.LINK jack. - Hookups DVD recorder S VIDEO VIDEO L(MONO) AUDIO R LINE-2 IN DV IN ONE-TOUCH DUBBING HDMI DV IN to DV IN DV/D8 Dubbing (DV/D8 t DVD) i.LINK cable (not supplied) to the section on the tape contain copy protection...
...on dubbing. Note that has an i.LINK (DV) jack, and record digital signals. you - Notes • The DV IN jack is straightforward because the DVD recorder will not output signals. • You cannot use the DV IN jack and record on the front panel. Connect the camera to operate your digital video...MICROMV format digital video camera even if it has an i.LINK jack. - Hookups DVD recorder S VIDEO VIDEO L(MONO) AUDIO R LINE-2 IN DV IN ONE-TOUCH DUBBING HDMI DV IN to DV IN DV/D8 Dubbing (DV/D8 t DVD) i.LINK cable (not supplied) to the section on the tape contain copy protection...

Operating Instructions
Page 78
... (function turned off ) from the LINE OUT jacks (page 15). Picture Control Selects the picture control for the video signals output from the recorder to the standard level. Select the setting that best suits the program you want. Cinema 2 Enhances details in dark areas by further increasing the... richer, and the color contrast is not effective when the "PROGRESSIVE" indicator lights up on the front panel display and the recorder outputs progressive signals. Dynamic 1 Produces a bold dynamic picture by increasing the picture contrast and the color. Off Sets the black level of...
... (function turned off ) from the LINE OUT jacks (page 15). Picture Control Selects the picture control for the video signals output from the recorder to the standard level. Select the setting that best suits the program you want. Cinema 2 Enhances details in dark areas by further increasing the... richer, and the color contrast is not effective when the "PROGRESSIVE" indicator lights up on the front panel display and the recorder outputs progressive signals. Dynamic 1 Produces a bold dynamic picture by increasing the picture contrast and the color. Off Sets the black level of...

Operating Instructions
Page 84
...then change the password, select "Change Password" in step 3. • To change the level. Select this recorder. • Depending on the disc, you have a Sony DVD player or more than one Sony DVD recorder" on page 22. When the "Easy Setup" display appears, follow the instructions for registering a password appears...Hint If you to return the setup settings to their default settings. In this recorder if other DVD equipment. For details, see "If you may be lost. 1 After step 3 on again, and the recorder is assigned the same command mode. Be sure to match the command mode ...
...then change the password, select "Change Password" in step 3. • To change the level. Select this recorder. • Depending on the disc, you have a Sony DVD player or more than one Sony DVD recorder" on page 22. When the "Easy Setup" display appears, follow the instructions for registering a password appears...Hint If you to return the setup settings to their default settings. In this recorder if other DVD equipment. For details, see "If you may be lost. 1 After step 3 on again, and the recorder is assigned the same command mode. Be sure to match the command mode ...


