

Quick Setup Guide
Page 1
... "123" for numbers). Press the corresponding numeric/text button to enter the desired character, then press to move the cursor to the next input position. Press ENTER to various music services offered on the system. 2 2 Press HOME NETWORK. Server (PC) Stream audio content Music Services Home Network DLNA player Play audio content stored on music services http://www.sony.net/audio/musicservices The...
... "123" for numbers). Press the corresponding numeric/text button to enter the desired character, then press to move the cursor to the next input position. Press ENTER to various music services offered on the system. 2 2 Press HOME NETWORK. Server (PC) Stream audio content Music Services Home Network DLNA player Play audio content stored on music services http://www.sony.net/audio/musicservices The...
Quick Setup Guide
Page 2
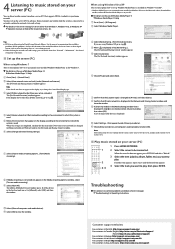
...; Select [Change advanced sharing settings]. Select [Choose media streaming options...] from [Media streaming]. Select [Media Sharing...] from the [Library] menu. 4 Listening to music stored on your server (PC) You can be connected. When using Windows XP, go to step . Select [Home network] or [Work network] according to the environment in Asia and Oceania: http://www.sony-asia.com/support It...
...; Select [Change advanced sharing settings]. Select [Choose media streaming options...] from [Media streaming]. Select [Media Sharing...] from the [Library] menu. 4 Listening to music stored on your server (PC) You can be connected. When using Windows XP, go to step . Select [Home network] or [Work network] according to the environment in Asia and Oceania: http://www.sony-asia.com/support It...

Operating Instructions
Page 3
... Service Center at least 20cm or more of the following measures: - Increase the separation between the equipment and receiver. - The telephone number below is Sony Deutschland GmbH, Hedelfinger Strasse 61, 70327 Stuttgart, Germany. Regulatory Information Declaration of Conformity Trade Name: SONY Model: HCD-MX700Ni Responsible Party: Sony Electronics Inc. However, there is no guarantee that this equipment is in a particular installation...
... Service Center at least 20cm or more of the following measures: - Increase the separation between the equipment and receiver. - The telephone number below is Sony Deutschland GmbH, Hedelfinger Strasse 61, 70327 Stuttgart, Germany. Regulatory Information Declaration of Conformity Trade Name: SONY Model: HCD-MX700Ni Responsible Party: Sony Electronics Inc. However, there is no guarantee that this equipment is in a particular installation...
Operating Instructions
Page 5
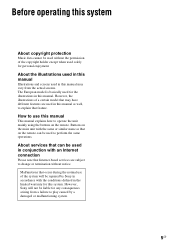
... model is basically used solely for the illustrations in this manual. Buttons on the main unit with an Internet connection Please note that on the remote. Before operating this system About copyright protection Music data cannot be used without notice. About the illustrations used in this manual Illustrations and screens used in conjunction with the same or similar name as well, to play caused by Sony...
... model is basically used solely for the illustrations in this manual. Buttons on the main unit with an Internet connection Please note that on the remote. Before operating this system About copyright protection Music data cannot be used without notice. About the illustrations used in this manual Illustrations and screens used in conjunction with the same or similar name as well, to play caused by Sony...

Operating Instructions
Page 7
... using a keyword 50 Additional information Setting functions related to network operations 51 Checking the network settings 51 Setting the network standby mode 51 Setting the auto access permission 52 Setting the PARTY STREAMING function 53 Renaming the unit 53 Changing the sound settings 54 Generating a more dynamic sound (Dynamic Sound Generator X-tra) .... 54 Adjusting the bass and treble 54 Using the timers 55 Using the Sleep Timer 55 Using the Play Timer 56 Changing the display settings...
... using a keyword 50 Additional information Setting functions related to network operations 51 Checking the network settings 51 Setting the network standby mode 51 Setting the auto access permission 52 Setting the PARTY STREAMING function 53 Renaming the unit 53 Changing the sound settings 54 Generating a more dynamic sound (Dynamic Sound Generator X-tra) .... 54 Adjusting the bass and treble 54 Using the timers 55 Using the Sleep Timer 55 Using the Play Timer 56 Changing the display settings...
Operating Instructions
Page 10
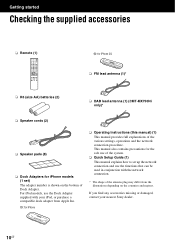
... supplied accessories Remote (1) qg: for iPhone 3G FM lead antenna (1)* R6 (size AA) batteries (2) DAB lead antenna (1) (CMT-MX750Ni only)* Speaker cords (2) Speaker pads (8) Dock Adapters for iPhone models (1 set up the network connection and use of the antenna plug may differ from Apple Inc. qs: for the safe use the functions that can be used in conjunction with your nearest Sony dealer. 10GB For iPod models, use the...
... supplied accessories Remote (1) qg: for iPhone 3G FM lead antenna (1)* R6 (size AA) batteries (2) DAB lead antenna (1) (CMT-MX750Ni only)* Speaker cords (2) Speaker pads (8) Dock Adapters for iPhone models (1 set up the network connection and use of the antenna plug may differ from Apple Inc. qs: for the safe use the functions that can be used in conjunction with your nearest Sony dealer. 10GB For iPod models, use the...
Operating Instructions
Page 13
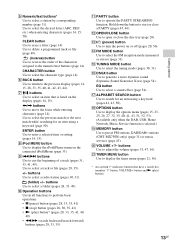
... Use to select a radio station (pages 30, 31). (folder) +/- J Operation buttons Use in all functions to reverse the order of a track (pages 31, 33, 41, 49). N FM MODE button Use to generate a more dynamic sound (Dynamic Sound Generator X-tra) (page 54). P DSGX button Use to select the FM reception mode (monaural or stereo) (page 31). T VOLUME +*/- U TIMER MENU button Use to display the timer menu (pages 21, 56). * An asterisk (*) indicates buttons that is selected.) S MEMORY button Use...
... Use to select a radio station (pages 30, 31). (folder) +/- J Operation buttons Use in all functions to reverse the order of a track (pages 31, 33, 41, 49). N FM MODE button Use to generate a more dynamic sound (Dynamic Sound Generator X-tra) (page 54). P DSGX button Use to select the FM reception mode (monaural or stereo) (page 31). T VOLUME +*/- U TIMER MENU button Use to display the timer menu (pages 21, 56). * An asterisk (*) indicates buttons that is selected.) S MEMORY button Use...
Operating Instructions
Page 20
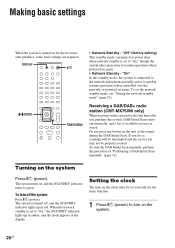
... function. 1 Press =/1 (power) to turn off , and the STANDBY indicator lights up in amber, and the clock appears in red. The system is turned off the system Press =/1 (power). When the network standby is set to "On," though the system takes more time to "On," the STANDBY indicator lights up in the display. "Off" (factory setting) This standby mode consumes less power than when network standby is set to resume operations when powered...
... function. 1 Press =/1 (power) to turn off , and the STANDBY indicator lights up in amber, and the clock appears in red. The system is turned off the system Press =/1 (power). When the network standby is set to "On," though the system takes more time to "On," the STANDBY indicator lights up in the display. "Off" (factory setting) This standby mode consumes less power than when network standby is set to resume operations when powered...

Operating Instructions
Page 21
... enters standby mode automatically after plugging in the following cases: - To display the clock Press DISPLAY while the system is no operation or audio signal output. If "PLAY SET?" By default, the automatic standby function is detected. - when an audio signal is turned on until "AUTO STANDBY ON" appears. Turning off . The demonstration display turns off the automatic standby function. 4 Use the same procedure to set the minutes. Getting started 2 Press TIMER MENU to select the clock set the...
... enters standby mode automatically after plugging in the following cases: - To display the clock Press DISPLAY while the system is no operation or audio signal output. If "PLAY SET?" By default, the automatic standby function is detected. - when an audio signal is turned on until "AUTO STANDBY ON" appears. Turning off . The demonstration display turns off the automatic standby function. 4 Use the same procedure to set the minutes. Getting started 2 Press TIMER MENU to select the clock set the...
Operating Instructions
Page 26
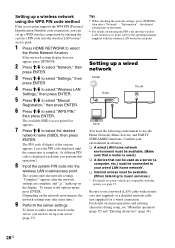
...) list appears. 7 Press M/m to select the Home Network function. Tips • When checking the network settings, press OPTIONS, then select "Network" - Setting up a wireless network using the WPS PIN code method If the access point supports the WPS PIN (Personal Identification Number) code connection, you can be used .) A device that a router is displayed each time you perform this system, see "Menu/list operation" (page 15) and "Entering...
...) list appears. 7 Press M/m to select the Home Network function. Tips • When checking the network settings, press OPTIONS, then select "Network" - Setting up a wireless network using the WPS PIN code method If the access point supports the WPS PIN (Personal Identification Number) code connection, you can be used .) A device that a router is displayed each time you perform this system, see "Menu/list operation" (page 15) and "Entering...
Operating Instructions
Page 30
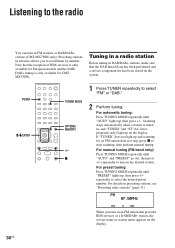
... stop scanning, then perform manual tuning. Tuning in a radio station Before tuning in DAB/DAB+ stations, make sure that provides RDS services or a DAB/DAB+ station, the service name or station name appears on the system. 1 Press TUNER repeatedly to select the desired preset number. For manual tuning (FM band only): Press TUNING MODE repeatedly until "PRESET" lights up on the display. For automatic tuning: Press TUNING MODE repeatedly until "AUTO" lights up and scanning for an...
... stop scanning, then perform manual tuning. Tuning in a radio station Before tuning in DAB/DAB+ stations, make sure that provides RDS services or a DAB/DAB+ station, the service name or station name appears on the system. 1 Press TUNER repeatedly to select the desired preset number. For manual tuning (FM band only): Press TUNING MODE repeatedly until "PRESET" lights up on the display. For automatic tuning: Press TUNING MODE repeatedly until "AUTO" lights up and scanning for an...
Operating Instructions
Page 31
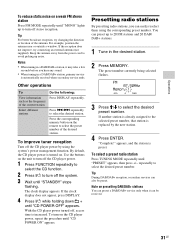
... FUNCTION repeatedly to select the CD function. 2 Press ?/1 to 20 FM stations and 20 DAB/ DAB+ stations. 1 Tune in a DAB/DAB+ station, primary service is replaced by using the corresponding preset number. Use the buttons on . To select a preset radio station Press TUNING MODE repeatedly until "CD POWER OFF" appears. Tip During DAB/DAB+ reception, secondary services can preset up to turn off stereo reception. Other operations To View information such as the frequency of the antenna. Presetting radio stations By presetting radio stations...
... FUNCTION repeatedly to select the CD function. 2 Press ?/1 to 20 FM stations and 20 DAB/ DAB+ stations. 1 Tune in a DAB/DAB+ station, primary service is replaced by using the corresponding preset number. Use the buttons on . To select a preset radio station Press TUNING MODE repeatedly until "CD POWER OFF" appears. Tip During DAB/DAB+ reception, secondary services can preset up to turn off stereo reception. Other operations To View information such as the frequency of the antenna. Presetting radio stations By presetting radio stations...

Operating Instructions
Page 52
... system is turned off, and resumes operations when controlled over the network. 3 Press M/m to the device list. The STANDBY indicator lights up in red. This system can set access permission for the devices on the home network are permitted to the device list. The selected device is accessing the system. The STANDBY indicator lights up in amber. * Factory setting Setting the auto access permission You...
... system is turned off, and resumes operations when controlled over the network. 3 Press M/m to the device list. The STANDBY indicator lights up in red. This system can set access permission for the devices on the home network are permitted to the device list. The selected device is accessing the system. The STANDBY indicator lights up in amber. * Factory setting Setting the auto access permission You...
Operating Instructions
Page 56
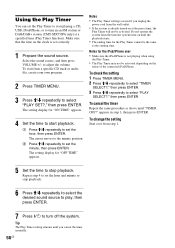
...?" Select the sound source, and then press VOLUME +/- to select "PLAY SELECT?," then press ENTER. Do not operate the system from a specific CD track or audio file, create your own program. 2 Press TIMER MENU. 3 Press M/m repeatedly to select "PLAY SET?," then press ENTER. appears in an FM station or DAB/DAB+ station (CMT-MX750Ni only) at the preset time, the Play Timer will not be activated. Using the Play Timer You can set...
...?" Select the sound source, and then press VOLUME +/- to select "PLAY SELECT?," then press ENTER. Do not operate the system from a specific CD track or audio file, create your own program. 2 Press TIMER MENU. 3 Press M/m repeatedly to select "PLAY SET?," then press ENTER. appears in an FM station or DAB/DAB+ station (CMT-MX750Ni only) at the preset time, the Play Timer will not be activated. Using the Play Timer You can set...

Operating Instructions
Page 57
... normal play mode is selected and the player or USB device is on . The setting procedures for changing the display mode and information differ depending on whether the unit is on , you can also view DAB/DAB+ station information (CMT-MX750Ni only) such as the service name, channel label, preset number, frequency, DLS (Dynamic Label Segment), or ensemble label. To Do the following are used...
... normal play mode is selected and the player or USB device is on . The setting procedures for changing the display mode and information differ depending on whether the unit is on , you can also view DAB/DAB+ station information (CMT-MX750Ni only) such as the service name, channel label, preset number, frequency, DLS (Dynamic Label Segment), or ensemble label. To Do the following are used...
Operating Instructions
Page 59
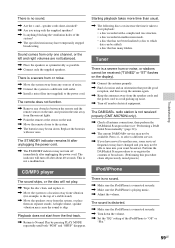
... new ones. Tuner There is no sound. , Make sure the iPod/iPhone is connected securely. , Make sure the iPod/iPhone is playing music. , Adjust the volume. Troubleshooting There is a severe hum or noise, or stations cannot be received ("TUNED" or "ST" flashes on the display). , Connect the antenna properly. , Find a location and an orientation that has many folders. CD/MP3 player The sound skips, or the disc will turn off immediately...
... new ones. Tuner There is no sound. , Make sure the iPod/iPhone is connected securely. , Make sure the iPod/iPhone is playing music. , Adjust the volume. Troubleshooting There is a severe hum or noise, or stations cannot be received ("TUNED" or "ST" flashes on the display). , Connect the antenna properly. , Find a location and an orientation that has many folders. CD/MP3 player The sound skips, or the disc will turn off immediately...
Operating Instructions
Page 60
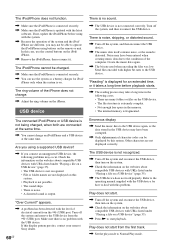
... iPhone does not change. , Adjust the ring volume on the USB device. • The file structure is fragmented. Make sure there is updated with the USB device for iPod/ iPhone only when the system is output. Refer to the operating manual supplied with the latest software. In this problem. Are you using with higher bit rates to Normal Play mode. Send files...
... iPhone does not change. , Adjust the ring volume on the USB device. • The file structure is fragmented. Make sure there is updated with the USB device for iPod/ iPhone only when the system is output. Refer to the operating manual supplied with the latest software. In this problem. Are you using with higher bit rates to Normal Play mode. Send files...
Operating Instructions
Page 63
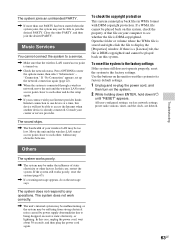
..., hold down ?/1 until "RESET" appears. To check the copyright protection This system cannot play back files in WMA format with your computer to each other and do as network settings, preset radio stations, timer, and the clock, are deleted. In this case, unplug the power cord, wait about 30 seconds, and then plug the power cord again. 63GB Troubleshooting The system joins an...
..., hold down ?/1 until "RESET" appears. To check the copyright protection This system cannot play back files in WMA format with your computer to each other and do as network settings, preset radio stations, timer, and the clock, are deleted. In this case, unplug the power cord, wait about 30 seconds, and then plug the power cord again. 63GB Troubleshooting The system joins an...
Operating Instructions
Page 73
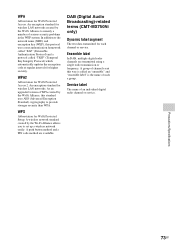
... (Digital Audio Broadcasting)-related terms (CMT-MX750Ni only) Dynamic label segment The text data transmitted for Wi-Fi Protected Setup. In addition to set up a wireless network easily. WPS Abbreviation for each channel or service. WPA Abbreviation for Wi-Fi Protected Access 2. WPA2 Abbreviation for Wi-Fi Protected Access. A push button method and a PIN code method are transmitted using a single radio transmission or frequency. Service...
... (Digital Audio Broadcasting)-related terms (CMT-MX750Ni only) Dynamic label segment The text data transmitted for Wi-Fi Protected Setup. In addition to set up a wireless network easily. WPS Abbreviation for each channel or service. WPA Abbreviation for Wi-Fi Protected Access 2. WPA2 Abbreviation for Wi-Fi Protected Access. A push button method and a PIN code method are transmitted using a single radio transmission or frequency. Service...
Operating Instructions
Page 74
... 23 Alphabet search 50 Audio format 35, 40 Auto standby 21 B Bass 54 C CD 28 Character input 14 Clock 20 Connecting the unit 16 Connections Antenna 16, 17 AUDIO IN 47 DLNA 9 Dock adapters for iPhone 18 Home network 22 Network cable 17 Power cord 16, 17 Speaker cords 16, 17 Wired 26 Wireless 23 Creating programs 49 D DAB lead antenna 17 DAB tuner 30 Default Gateway 24, 27 Demonstration...
... 23 Alphabet search 50 Audio format 35, 40 Auto standby 21 B Bass 54 C CD 28 Character input 14 Clock 20 Connecting the unit 16 Connections Antenna 16, 17 AUDIO IN 47 DLNA 9 Dock adapters for iPhone 18 Home network 22 Network cable 17 Power cord 16, 17 Speaker cords 16, 17 Wired 26 Wireless 23 Creating programs 49 D DAB lead antenna 17 DAB tuner 30 Default Gateway 24, 27 Demonstration...


