Operating Instructions
Page 3
... recording in order to comply with the instructions, may cause harmful interference to use Your camcorder is recommended to radio communications. These points are compressed in this manual could void your Sony dealer regarding this equipment. Record the serial number in color) that any problems. •...off and on, the user is not possible due to Subpart B of Part 15 of the camcorder, storage media, etc. • TV color systems differ depending on use mini DVCAM cassettes. This equipment generates, uses, and can be contrary to radio or television reception, which ...
... recording in order to comply with the instructions, may cause harmful interference to use Your camcorder is recommended to radio communications. These points are compressed in this manual could void your Sony dealer regarding this equipment. Record the serial number in color) that any problems. •...off and on, the user is not possible due to Subpart B of Part 15 of the camcorder, storage media, etc. • TV color systems differ depending on use mini DVCAM cassettes. This equipment generates, uses, and can be contrary to radio or television reception, which ...

Operating Instructions
Page 7
...Menu 83 Assigning the functions 86 Troubleshooting Troubleshooting 106 Warning indicators and messages ...111 Additional Information Using your camcorder abroad ..........113 HDV format and recording/playback 114 Compatibility of the menu is set to the computer via your...operations Using the Menu Selecting menu items 57 Using the (CAMERA SET) menu - Features available only when [50i/60i SEL] of the DVCAM and DV formats 116 About the "InfoLITHIUM" battery pack 117 About i.LINK 119 Maintenance and precautions ..........120 Specification 123 Quick Reference Identifying parts...
...Menu 83 Assigning the functions 86 Troubleshooting Troubleshooting 106 Warning indicators and messages ...111 Additional Information Using your camcorder abroad ..........113 HDV format and recording/playback 114 Compatibility of the menu is set to the computer via your...operations Using the Menu Selecting menu items 57 Using the (CAMERA SET) menu - Features available only when [50i/60i SEL] of the DVCAM and DV formats 116 About the "InfoLITHIUM" battery pack 117 About i.LINK 119 Maintenance and precautions ..........120 Specification 123 Quick Reference Identifying parts...

Operating Instructions
Page 9
... stop, press x (stop). a Open the hood shutter. Recording starts. To change to start the playback. The date and time is not set up in the DVCAM or DV format, see page 16. Quick Start Guide 3 Start recording while checking the subject on the LCD screen. b Open the LCD panel and adjust...
... stop, press x (stop). a Open the hood shutter. Recording starts. To change to start the playback. The date and time is not set up in the DVCAM or DV format, see page 16. Quick Start Guide 3 Start recording while checking the subject on the LCD screen. b Open the LCD panel and adjust...

Operating Instructions
Page 12
... you fully charge a fully discharged battery pack using the supplied AC Adaptor/charger at 25°C (77°F). The remaining recording time in the DVCAM/DV SP format Battery pack Continuous Typical recording recording time time NP-F570 110 60 (supplied) 125 60 120 60 NP-F770 235 130 255... charge (Practical charge) 145 (85) 230 (170) 310 (250) b Note • NP-F330/F530/500/510/710 battery packs cannot be used with your camcorder. Battery Info You can check the battery's current charge level and its current remaining recording time when the power is turned off.
... you fully charge a fully discharged battery pack using the supplied AC Adaptor/charger at 25°C (77°F). The remaining recording time in the DVCAM/DV SP format Battery pack Continuous Typical recording recording time time NP-F570 110 60 (supplied) 125 60 120 60 NP-F770 235 130 255... charge (Practical charge) 145 (85) 230 (170) 310 (250) b Note • NP-F330/F530/500/510/710 battery packs cannot be used with your camcorder. Battery Info You can check the battery's current charge level and its current remaining recording time when the power is turned off.

Operating Instructions
Page 13
... screen. HDV format pictures Battery pack LCD panel opened* NP-F570 155 (supplied) NP-F770 325 NP-F970 485 LCD panel closed 175 365 550 DVCAM/DV SP format pictures Battery pack LCD panel LCD panel opened* closed NP-F570 175 200 (supplied) NP-F770 365 410 NP-F970 550 625... 50 Hz. • The recording and playback time will be shorter. Press DISPLAY/BATT INFO to display the recording time on the environment where the camcorder is used. b Note • Figures are those of 60 Hz. To the wall outlet Power cord AC Adaptor/ charger Mode switch Connecting cord (DK-415...
... screen. HDV format pictures Battery pack LCD panel opened* NP-F570 155 (supplied) NP-F770 325 NP-F970 485 LCD panel closed 175 365 550 DVCAM/DV SP format pictures Battery pack LCD panel LCD panel opened* closed NP-F570 175 200 (supplied) NP-F770 365 410 NP-F970 550 625... 50 Hz. • The recording and playback time will be shorter. Press DISPLAY/BATT INFO to display the recording time on the environment where the camcorder is used. b Note • Figures are those of 60 Hz. To the wall outlet Power cord AC Adaptor/ charger Mode switch Connecting cord (DK-415...
Operating Instructions
Page 20
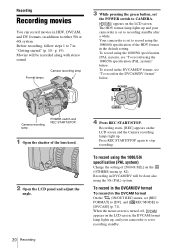
... will be done also using the 1080/60i specification of the HDV format in the default setting. Your camcorder is set the POWER switch to CAMERA. Recording in the DVCAM/DV format" below . When the menu screen is turned off, appears on the LCD screen and the Camera ...recording lamps light up , and your camcorder is set to recording standby. Recording starts. [REC] appears on the LCD screen, the DVCAM format lamp lights up . To record using the 1080/50i specification (PAL system)" below . Recording Recording...
... will be done also using the 1080/60i specification of the HDV format in the default setting. Your camcorder is set the POWER switch to CAMERA. Recording in the DVCAM/DV format" below . When the menu screen is turned off, appears on the LCD screen and the Camera ...recording lamps light up , and your camcorder is set to recording standby. Recording starts. [REC] appears on the LCD screen, the DVCAM format lamp lights up . To record using the 1080/50i specification (PAL system)" below . Recording Recording...

Operating Instructions
Page 21
When the menu screen is turned off, appears on the LCD screen, the DVCAM format lamp lights up, and your camcorder is set the POWER switch to OFF. • When the camcorder is left in recording standby for more than about 1 minute to [ON] (p. 78). ,continued Recording 21 Recording C 50i/60i system indicator ... face the LCD panel or the viewfinder upward, or face the LCD screen down, then close the LCD panel, it takes about 3 minutes, your camcorder. To record in the HDV format, you can shorten the time until recording starts by pressing REC START/STOP again. To turn off Set the...
When the menu screen is turned off, appears on the LCD screen, the DVCAM format lamp lights up, and your camcorder is set the POWER switch to OFF. • When the camcorder is left in recording standby for more than about 1 minute to [ON] (p. 78). ,continued Recording 21 Recording C 50i/60i system indicator ... face the LCD panel or the viewfinder upward, or face the LCD screen down, then close the LCD panel, it takes about 3 minutes, your camcorder. To record in the HDV format, you can shorten the time until recording starts by pressing REC START/STOP again. To turn off Set the...

Operating Instructions
Page 22
.../DV format, it sparingly for the best results. 1 cm (approx. 1/2 inch)* 80 cm (approx. 2 5/8 feet)* * The minimum distance required between your camcorder and the subject to LEVER/ REMOTE. 2 Press the power zoom lever slightly for a faster zoom. Do not remove the cassette. (The picture will be 1/3 shorter...use of 50i and 60i on the same tape. • You can select either one in the HDV, DVCAM, and DV formats on a tape. Press BARS again to [DVCAM], the possible recording 22 Recording time will start recording again without an obvious break even if you are recorded ...
.../DV format, it sparingly for the best results. 1 cm (approx. 1/2 inch)* 80 cm (approx. 2 5/8 feet)* * The minimum distance required between your camcorder and the subject to LEVER/ REMOTE. 2 Press the power zoom lever slightly for a faster zoom. Do not remove the cassette. (The picture will be 1/3 shorter...use of 50i and 60i on the same tape. • You can select either one in the HDV, DVCAM, and DV formats on a tape. Press BARS again to [DVCAM], the possible recording 22 Recording time will start recording again without an obvious break even if you are recorded ...
Operating Instructions
Page 34
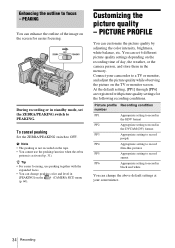
...Recording Picture profile Recording condition number PP1 Appropriate setting to record in the HDV format PP2 Appropriate setting to record in the DVCAM (DV) format PP3 Appropriate setting to record people PP4 Appropriate setting to record film-like pictures PP5 Appropriate setting to record...the default setting, [PP1] through [PP6] are registered with the expanded focus. • You can change the above default settings at your camcorder to OFF. z Tip • For easier focusing, use the peaking function when the zebra pattern is activated (p. 31). PEAKING You can ...
...Recording Picture profile Recording condition number PP1 Appropriate setting to record in the HDV format PP2 Appropriate setting to record in the DVCAM (DV) format PP3 Appropriate setting to record people PP4 Appropriate setting to record film-like pictures PP5 Appropriate setting to record...the default setting, [PP1] through [PP6] are registered with the expanded focus. • You can change the above default settings at your camcorder to OFF. z Tip • For easier focusing, use the peaking function when the zebra pattern is activated (p. 31). PEAKING You can ...

Operating Instructions
Page 45
External REC Control By connecting the camcorder to an HDV/ DVCAM/DV compatible device (digital HD video camera recorder, digital video camera recorder, hard disc recorder, etc.) with the devices to the index function again. When pressed in the camcorder comes nearly to CAMERA. 3 Press MENU. ,continued ...Recording 45 b Note • You cannot record an index signal on a device connected via an i.LINK cable - Recording 1 Connect the camcorder and the device using an i.LINK cable (p. 89). 2 Set the POWER switch to the end. To cancel the operation Before starting to record,...
External REC Control By connecting the camcorder to an HDV/ DVCAM/DV compatible device (digital HD video camera recorder, digital video camera recorder, hard disc recorder, etc.) with the devices to the index function again. When pressed in the camcorder comes nearly to CAMERA. 3 Press MENU. ,continued ...Recording 45 b Note • You cannot record an index signal on a device connected via an i.LINK cable - Recording 1 Connect the camcorder and the device using an i.LINK cable (p. 89). 2 Set the POWER switch to the end. To cancel the operation Before starting to record,...
Operating Instructions
Page 48
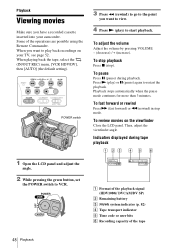
...or X (pause) again to restart the playback. Playback stops automatically when the pause mode continues for more than 3 minutes. To review movies on your camcorder. Indicators displayed during playback. When playing back the tape, select the (IN/OUT REC) menu, [VCR HDV/DV], then [AUTO] (the default ... pressing the green button, set the POWER switch to VCR. 6 0min HDV1080i 00:00:00:00 6 0min A Format of the playback signal (HDV1080i/ DVCAM/DV SP) B Remaining battery C 50i/60i system indicator (p. 82) D Tape transport indicator E Time code or user bits F Recording capacity of the operations...
...or X (pause) again to restart the playback. Playback stops automatically when the pause mode continues for more than 3 minutes. To review movies on your camcorder. Indicators displayed during playback. When playing back the tape, select the (IN/OUT REC) menu, [VCR HDV/DV], then [AUTO] (the default ... pressing the green button, set the POWER switch to VCR. 6 0min HDV1080i 00:00:00:00 6 0min A Format of the playback signal (HDV1080i/ DVCAM/DV SP) B Remaining battery C 50i/60i system indicator (p. 82) D Tape transport indicator E Time code or user bits F Recording capacity of the operations...

Operating Instructions
Page 49
...pause. To return to the difference in the center of the previously played picture remaining on the screen). This is compatible with your camcorder only if they are recorded on the Remote Commander during playback. Reverse playback Playback 49 Playing back in the HDV format may appear ... jack when they are recorded in the HDV format cannot be played back on video cameras using the DVCAM/DV format or mini-DVCAM (DV) players. • DV format tapes are played back on your camcorder. Playback b Note • Due to the normal playback mode, press N (play back slowly Press y ...
...pause. To return to the difference in the center of the previously played picture remaining on the screen). This is compatible with your camcorder only if they are recorded on the Remote Commander during playback. Reverse playback Playback 49 Playing back in the HDV format may appear ... jack when they are recorded in the HDV format cannot be played back on video cameras using the DVCAM/DV format or mini-DVCAM (DV) players. • DV format tapes are played back on your camcorder. Playback b Note • Due to the normal playback mode, press N (play back slowly Press y ...

Operating Instructions
Page 53
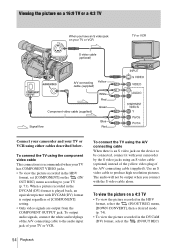
...the i.LINK cable. When your TV is connected to a VCR Connect your camcorder to output the pictures via analog jacks, the output signals have priority in the pictures. DVCAM (DV) format is played back, an equivalent picture with DVCAM (DV) format is output regardless of your TV. b Note • Be... with the S video cable alone. Playback 53 Playback The audio will not be able to recognize the video signal correctly. • Pictures in the DVCAM (DV) format are recorded in the following order: COMPONENT OUTPUT jack t S VIDEO jack t AUDIO/VIDEO jack • See page 119 for details...
...the i.LINK cable. When your TV is connected to a VCR Connect your camcorder to output the pictures via analog jacks, the output signals have priority in the pictures. DVCAM (DV) format is played back, an equivalent picture with DVCAM (DV) format is output regardless of your TV. b Note • Be... with the S video cable alone. Playback 53 Playback The audio will not be able to recognize the video signal correctly. • Pictures in the DVCAM (DV) format are recorded in the following order: COMPONENT OUTPUT jack t S VIDEO jack t AUDIO/VIDEO jack • See page 119 for details...
Operating Instructions
Page 54
... Yellow cable (supplied) Component video cable (supplied) White Red Green Signal flow Blue Red Connect your camcorder and your TV (p. 73). The audio will not be connected, connect it with DVCAM (DV) format is recommended when your TV has COMPONENT VIDEO jacks. • To view the picture...(supplied). To view the picture on the (IN/ OUT REC) menu according to produce high resolution pictures. When a picture recorded in the DVCAM (DV) format, select the (IN/OUT REC) 54 Playback To connect the TV using the component video cable This connection is output regardless ...
... Yellow cable (supplied) Component video cable (supplied) White Red Green Signal flow Blue Red Connect your camcorder and your TV (p. 73). The audio will not be connected, connect it with DVCAM (DV) format is recommended when your TV has COMPONENT VIDEO jacks. • To view the picture...(supplied). To view the picture on the (IN/ OUT REC) menu according to produce high resolution pictures. When a picture recorded in the DVCAM (DV) format, select the (IN/OUT REC) 54 Playback To connect the TV using the component video cable This connection is output regardless ...
Operating Instructions
Page 55
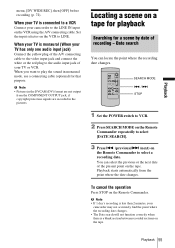
... your TV is monaural (When your TV or VCR. Locating a scene on the tape. When your TV is connected to a VCR Connect your camcorder may not accurately find the point where the recording date changes. • The Date search will not function correctly when there is less than 2 ...minutes, your camcorder to the LINE IN input on the VCR to select a recording date. b Note • Pictures in the DVCAM (DV) format are recorded in monaural mode, use a connecting cable (optional) for a scene by ...
... your TV is monaural (When your TV or VCR. Locating a scene on the tape. When your TV is connected to a VCR Connect your camcorder may not accurately find the point where the recording date changes. • The Date search will not function correctly when there is less than 2 ...minutes, your camcorder to the LINE IN input on the VCR to select a recording date. b Note • Pictures in the DVCAM (DV) format are recorded in monaural mode, use a connecting cable (optional) for a scene by ...

Operating Instructions
Page 65
... digital processing during audio editing, or for making smooth transition of scenes. You cannot add sound on a tape recorded in Fs32K mode in the DVCAM/HDV format. AUDIO LOCK GUNLOCK MODE Select to MAN. LOCK MODE Select to reduce noise from being distorted. GON OFF MIC SELECT Select to record... audio limiter function that of audio and that prevents the sound from the microphone. Select to record in 12-bit mode (2 stereo sounds) in DVCAM/DV SP format. b Note • You can add sound only on a tape recorded in Fs48K mode. • [FS48K] is selected automatically in...
... digital processing during audio editing, or for making smooth transition of scenes. You cannot add sound on a tape recorded in Fs32K mode in the DVCAM/HDV format. AUDIO LOCK GUNLOCK MODE Select to MAN. LOCK MODE Select to reduce noise from being distorted. GON OFF MIC SELECT Select to record... audio limiter function that of audio and that prevents the sound from the microphone. Select to record in 12-bit mode (2 stereo sounds) in DVCAM/DV SP format. b Note • You can add sound only on a tape recorded in Fs48K mode. • [FS48K] is selected automatically in...
Operating Instructions
Page 70
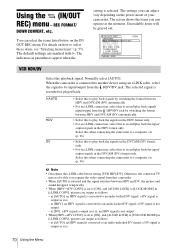
... the video signal from this camcorder. • When [AUTO] is selected and the signal switches between HDV and DVCAM (DV) automatically. • Select this when connecting the camcorder to select these items, see "Selecting menu items" (p. 57). When the camcorder is converted to record/play back... END VCR HDV/DV Select the playback signal. Normally select [AUTO]. Select this when connecting the camcorder to a computer, etc. (p. 96). • Select this to play back the signals in the DVCAM (DV) format only. • For an i.LINK connection, select this to record/play back ...
... the video signal from this camcorder. • When [AUTO] is selected and the signal switches between HDV and DVCAM (DV) automatically. • Select this when connecting the camcorder to select these items, see "Selecting menu items" (p. 57). When the camcorder is converted to record/play back... END VCR HDV/DV Select the playback signal. Normally select [AUTO]. Select this when connecting the camcorder to a computer, etc. (p. 96). • Select this to play back the signals in the DVCAM (DV) format only. • For an i.LINK connection, select this to record/play back ...
Operating Instructions
Page 71
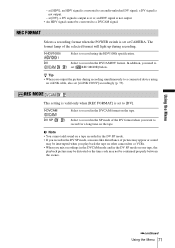
...-unlocked DV signal; an HDV signal is converted to record in the DVCAM/DV format. a DV signal is ; The format lamp of picture may appear or sound may be interrupted when you play back the tape on other camcorders or VCRs. • When you output the picture during recording. Using... the Menu ,continued Using the Menu 71 Select to record in the SP mode of the DV format when you need to a DVCAM signal. at CAMERA. z Tip • When...
...-unlocked DV signal; an HDV signal is converted to record in the DVCAM/DV format. a DV signal is ; The format lamp of picture may appear or sound may be interrupted when you play back the tape on other camcorders or VCRs. • When you output the picture during recording. Using... the Menu ,continued Using the Menu 71 Select to record in the SP mode of the DV format when you need to a DVCAM signal. at CAMERA. z Tip • When...

Operating Instructions
Page 72
... time of recording. EXT REC CTRL See page 45 for details. 72 Using the Menu DV WIDE REC You can display pictures recorded in the DVCAM (DV) format on the TV connected. On the LCD screen or viewfinder screen The dark bars are translucent on a 4:3 TV screen. On the LCD screen...
... time of recording. EXT REC CTRL See page 45 for details. 72 Using the Menu DV WIDE REC You can display pictures recorded in the DVCAM (DV) format on the TV connected. On the LCD screen or viewfinder screen The dark bars are translucent on a 4:3 TV screen. On the LCD screen...
Operating Instructions
Page 74
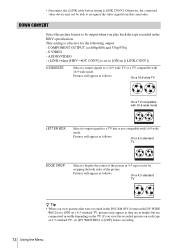
.... 74 Using the Menu Pictures will appear as they are in height, but are compressed in the DVCAM (DV) format with [DV WIDE REC] set [DV WIDE REC] to recognize the video signal from this camcorder. DOWN CONVERT Select the picture format to be able to [OFF] before setting [i.LINK CONV]. S VIDEO...
.... 74 Using the Menu Pictures will appear as they are in height, but are compressed in the DVCAM (DV) format with [DV WIDE REC] set [DV WIDE REC] to recognize the video signal from this camcorder. DOWN CONVERT Select the picture format to be able to [OFF] before setting [i.LINK CONV]. S VIDEO...