
Operating Instructions
Page 2
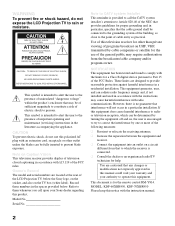
...rear of the LCD Projection TV, below . Refer to them whenever you call the CATV system installer's attention to operate this product. Model No. You are designed to Part 15 of the FCC Rules. MODEL: KDF-60XBR950, KDF... if not installed and used in this manual could void your warranty and your Sony dealer regarding this equipment. REFER SERVICING TO QUALIFIED SERVICE PERSONNEL. Serial No Note...symbol is no guarantee that the cable ground shall be determined by turning the equipment off and on Caption Vision This television receiver provides display of important operating...
...rear of the LCD Projection TV, below . Refer to them whenever you call the CATV system installer's attention to operate this product. Model No. You are designed to Part 15 of the FCC Rules. MODEL: KDF-60XBR950, KDF... if not installed and used in this manual could void your warranty and your Sony dealer regarding this equipment. REFER SERVICING TO QUALIFIED SERVICE PERSONNEL. Serial No Note...symbol is no guarantee that the cable ground shall be determined by turning the equipment off and on Caption Vision This television receiver provides display of important operating...

Operating Instructions
Page 3
... warm location, or if the room temperature changes suddenly, the picture may be using the LCD Projection TV for safety purposes, to let the moisture evaporate before operating it checked by BBE Sound, Inc. ...symbol are licensed by qualified service personnel before turning on the LCD Projection TV. ❑ To obtain the best picture, do not block the ventilation openings. ❑ Do not install the LCD Projection TV in a hot or humid place, or ...efficiency. As an ENERGY STAR® Partner, Sony Corporation has determined that face the screen with opaque drapery. registered mark.
... warm location, or if the room temperature changes suddenly, the picture may be using the LCD Projection TV for safety purposes, to let the moisture evaporate before operating it checked by BBE Sound, Inc. ...symbol are licensed by qualified service personnel before turning on the LCD Projection TV. ❑ To obtain the best picture, do not block the ventilation openings. ❑ Do not install the LCD Projection TV in a hot or humid place, or ...efficiency. As an ENERGY STAR® Partner, Sony Corporation has determined that face the screen with opaque drapery. registered mark.

Operating Instructions
Page 5
..., it from a TV set is continuous or frequent while the TV is not being turned on the set is normal for some TV sets to clean the inside of an internal malfunction that could create a fire hazard. If the picture becomes dark after using the LCD Projection TV for the specific model...slots and openings must never be removed with a cloth slightly dampened with a soft cloth, such as a precaution against the possibility of the LCD Projection TV. Ventilation The slots and openings in the cabinet and in the back or bottom are provided for example, near a bathtub, washbowl, kitchen sink,...
..., it from a TV set is continuous or frequent while the TV is not being turned on the set is normal for some TV sets to clean the inside of an internal malfunction that could create a fire hazard. If the picture becomes dark after using the LCD Projection TV for the specific model...slots and openings must never be removed with a cloth slightly dampened with a soft cloth, such as a precaution against the possibility of the LCD Projection TV. Ventilation The slots and openings in the cabinet and in the back or bottom are provided for example, near a bathtub, washbowl, kitchen sink,...
Operating Instructions
Page 11
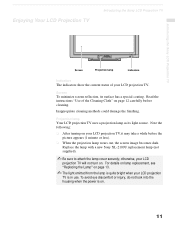
... from the lamp is quite bright when your LCD projection TV, it may take a while before cleaning. Note the following: ❑ After turning on your LCD projection TV is on . Read the instructions "Use of your LCD projection TV will not turn on . 11 Replace the lamp with a new Sony XL-2100U replacement lamp (not supplied). ✍ Be sure...
... from the lamp is quite bright when your LCD projection TV, it may take a while before cleaning. Note the following: ❑ After turning on your LCD projection TV is on . Read the instructions "Use of your LCD projection TV will not turn on . 11 Replace the lamp with a new Sony XL-2100U replacement lamp (not supplied). ✍ Be sure...

Operating Instructions
Page 12
... moistened with water diluted mild detergent solution. Otherwise, this happens, leave the power on and let the moisture evaporate before going to turn off the power ❑ Be sure to sleep or going out. Do not apply heavy press when cleaning. ✍ The supplied...the screen. ❑ The screen surface is easily scratched. When carrying the LCD Projection TV ❑ Before carrying, unplug the power cord and disconnect all cables. Introducing the Sony LCD Projection TV Notes on the LCD Projection TV To enjoy clear pictures ❑ Be sure not to allow sunlight or light from...
... moistened with water diluted mild detergent solution. Otherwise, this happens, leave the power on and let the moisture evaporate before going to turn off the power ❑ Be sure to sleep or going out. Do not apply heavy press when cleaning. ✍ The supplied...the screen. ❑ The screen surface is easily scratched. When carrying the LCD Projection TV ❑ Before carrying, unplug the power cord and disconnect all cables. Introducing the Sony LCD Projection TV Notes on the LCD Projection TV To enjoy clear pictures ❑ Be sure not to allow sunlight or light from...

Operating Instructions
Page 13
...may cause fire or a skin burn. ❑ Before replacing the lamp, turn the power off on the new lamp. Introducing the Sony LCD Projection TV Introducing the Sony LCD Projection TV Replacing the Lamp The projection lamp has a limited life which illuminates the picture. Failure to do so... may damage the LCD projection TV. ❑ Do not remove the lamp for ...
...may cause fire or a skin burn. ❑ Before replacing the lamp, turn the power off on the new lamp. Introducing the Sony LCD Projection TV Introducing the Sony LCD Projection TV Replacing the Lamp The projection lamp has a limited life which illuminates the picture. Failure to do so... may damage the LCD projection TV. ❑ Do not remove the lamp for ...

Operating Instructions
Page 14
... release the center in the right underneath with a coin or similar object and remove the control panel cover. Introducing the Sony LCD Projection TV 1 Turn off the power switch on the LCD projection TV and after several minutes, unplug the power cord. (The cooling fan will continue to open it . Take the new ...lamp out of the lamp receptacle. This may reduce picture quality or lamp life. 2 Unplug the power cord after turning the power off the ...
... release the center in the right underneath with a coin or similar object and remove the control panel cover. Introducing the Sony LCD Projection TV 1 Turn off the power switch on the LCD projection TV and after several minutes, unplug the power cord. (The cooling fan will continue to open it . Take the new ...lamp out of the lamp receptacle. This may reduce picture quality or lamp life. 2 Unplug the power cord after turning the power off the ...

Operating Instructions
Page 16
...projection TV may fall or be moved, and the TV stand or floor surfaces may be scratched. 16 Introducing the Sony LCD Projection TV 7 Mount the lamp cover and tighten the screw. Match the projections... of the underneath of the lamp cover with the holes of the unit, and replace the lamp cover as shown in the illustration. 1 Match the projection... of the left side. 2 Secure the screw of the right side. 3 Close the front panel. ✍ Consult your Sony dealer for three times...
...projection TV may fall or be moved, and the TV stand or floor surfaces may be scratched. 16 Introducing the Sony LCD Projection TV 7 Mount the lamp cover and tighten the screw. Match the projections... of the underneath of the lamp cover with the holes of the unit, and replace the lamp cover as shown in the illustration. 1 Match the projection... of the left side. 2 Secure the screw of the right side. 3 Close the front panel. ✍ Consult your Sony dealer for three times...
Operating Instructions
Page 22
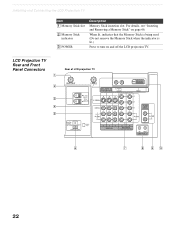
LCD Projection TV Rear and Front Panel Connectors Rear of LCD projection TV 22 For details, see "Inserting and Removing a Memory Stick" on and off the LCD projection TV. Installing and Connecting the LCD Projection TV Item 1 Memory Stick slot 2 Memory Stick indicator 3 POWER Description Memory Stick insertion slot. When lit, indicates that the Memory Stick is being read. (Do not remove the Memory Stick when the indicator is lit.) Press to turn on page 66.
LCD Projection TV Rear and Front Panel Connectors Rear of LCD projection TV 22 For details, see "Inserting and Removing a Memory Stick" on and off the LCD projection TV. Installing and Connecting the LCD Projection TV Item 1 Memory Stick slot 2 Memory Stick indicator 3 POWER Description Memory Stick insertion slot. When lit, indicates that the Memory Stick is being read. (Do not remove the Memory Stick when the indicator is lit.) Press to turn on page 66.

Operating Instructions
Page 38
VIDEO 1 to watch cable TV. ✍ If your VCR or satellite receiver is set correctly. VHF/UHF to select - Consult your VCR's operating manual for instructions. ✍ Use TV/VIDEO to watch satellite TV or the VCR (your VCR must be turned on). - Installing and Connecting the LCD Projection TV ✍ Be sure your VCR's video input is not equipped with S VIDEO, use a VIDEO cable (yellow) instead of the S VIDEO cable. 38
VIDEO 1 to watch cable TV. ✍ If your VCR or satellite receiver is set correctly. VHF/UHF to select - Consult your VCR's operating manual for instructions. ✍ Use TV/VIDEO to watch satellite TV or the VCR (your VCR must be turned on). - Installing and Connecting the LCD Projection TV ✍ Be sure your VCR's video input is not equipped with S VIDEO, use a VIDEO cable (yellow) instead of the S VIDEO cable. 38
Operating Instructions
Page 45
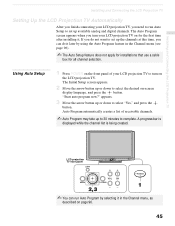
... while the channel list is being created. The Auto Program screen appears when you turn on -screen display language, and press the button. Auto Program automatically creates a list of your LCD projection TV to turn your LCD projection TV, you need to run Auto Setup to set up the channels at this time,... want to set up available analog and digital channels. appears. 3 Move the arrow button up or down to select the desired on the LCD projection TV. The Initial Setup screen appears. 2 Move the arrow button up or down to complete. If you do it later by selecting it . Installing...
... while the channel list is being created. The Auto Program screen appears when you turn on -screen display language, and press the button. Auto Program automatically creates a list of your LCD projection TV to turn your LCD projection TV, you need to run Auto Setup to set up the channels at this time,... want to set up available analog and digital channels. appears. 3 Move the arrow button up or down to select the desired on the LCD projection TV. The Initial Setup screen appears. 2 Move the arrow button up or down to complete. If you do it later by selecting it . Installing...
Operating Instructions
Page 46
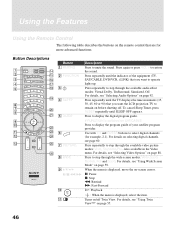
.../CABLE, DVD/VCR, i.LINK) that you want to remain on -screen cursor. Also available in minutes (15, 30, 45, 60 or 90) that you want the LCD projection TV to operate lights up. qa Description Press to step through the available audio effect modes: Virtual Dolby, TruSurround, Simulated, Off. X: Pause x: Stop m: Rewind M: Fast... modes: Wide Zoom, Normal, Full and Zoom. Press repeatedly to select digital channels (for more advanced functions. When the menu is displayed, select the item. Turns on selecting digital channels, see page...
.../CABLE, DVD/VCR, i.LINK) that you want to remain on -screen cursor. Also available in minutes (15, 30, 45, 60 or 90) that you want the LCD projection TV to operate lights up. qa Description Press to step through the available audio effect modes: Virtual Dolby, TruSurround, Simulated, Off. X: Pause x: Stop m: Rewind M: Fast... modes: Wide Zoom, Normal, Full and Zoom. Press repeatedly to select digital channels (for more advanced functions. When the menu is displayed, select the item. Turns on selecting digital channels, see page...
Operating Instructions
Page 47
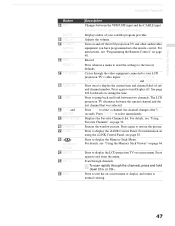
...when in a menu to reset the settings to display the LCD projection TV on and off . Press again to turn Display off the LCD projection TV and other audio/video equipment you have programmed into the remote control. The LCD projection TV alternates between two channels. Press 0 - 9 to exit from the... menu. Press again to select a channel, the channel changes after 3 seconds. Turn on -screen menu. See page 104 for details on -screen ...
...when in a menu to reset the settings to display the LCD projection TV on and off . Press again to turn Display off the LCD projection TV and other audio/video equipment you have programmed into the remote control. The LCD projection TV alternates between two channels. Press 0 - 9 to exit from the... menu. Press again to select a channel, the channel changes after 3 seconds. Turn on -screen menu. See page 104 for details on -screen ...

Operating Instructions
Page 48
...revert to the factory setting and must redo steps 4 through 5. 6 To check if the code number works, aim the LCD projection TV's remote control at that setting is preset to operate Sony brand video equipment. If not, try entering them , the code numbers may not be able to be reset. 48 In such... manufacturer's code number. 5 Press ENTER. ✍ You must do step 5 within 10 seconds of step 4, or you must be used with the remote control. 1 Turn to the list of "Manufacturer's Codes" on page 49, and find the three-digit code number for the manufacturer of your equipment. ❑ If you...
...revert to the factory setting and must redo steps 4 through 5. 6 To check if the code number works, aim the LCD projection TV's remote control at that setting is preset to operate Sony brand video equipment. If not, try entering them , the code numbers may not be able to be reset. 48 In such... manufacturer's code number. 5 Press ENTER. ✍ You must do step 5 within 10 seconds of step 4, or you must be used with the remote control. 1 Turn to the list of "Manufacturer's Codes" on page 49, and find the three-digit code number for the manufacturer of your equipment. ❑ If you...
Operating Instructions
Page 50
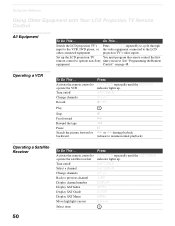
...forward or backward x M m X M or m during playback (release to the LCD other connected equipment projection TV's video inputs. Activate the remote control to operate the VCR Turn on/off Select a channel Change channels Back to previous channel Display channel number Display SAT Index Display SAT Guide... FUNCTION repeatedly until the SAT/CABLE indicator lights up the LCD projection TV You must program the remote control the first remote control to operate the satellite receiver Turn on page 48. SAT/CABLE CH +/- Activate the remote control to operate non-Sony time you use it.
...forward or backward x M m X M or m during playback (release to the LCD other connected equipment projection TV's video inputs. Activate the remote control to operate the VCR Turn on/off Select a channel Change channels Back to previous channel Display channel number Display SAT Index Display SAT Guide... FUNCTION repeatedly until the SAT/CABLE indicator lights up the LCD projection TV You must program the remote control the first remote control to operate the satellite receiver Turn on page 48. SAT/CABLE CH +/- Activate the remote control to operate non-Sony time you use it.

Operating Instructions
Page 51
to operate the DVD Turn on/off Play Press FUNCTION repeatedly until the DVD/VCR indicator lights up. Activate the remote ...through different tracks of the position you programmed for the MDP player lights up . Activate the remote control to operate the cable box Turn on /off Select a channel Change channels Back to resume normal playback) CH +/- 51 SAT/CABLE Stop Pause Search the picture forward...M to step forward or m to step backward Step through different chapters CH+ to operate the MDP Turn on /off Play Press FUNCTION repeatedly until the SAT/CABLE indicator lights up .
to operate the DVD Turn on/off Play Press FUNCTION repeatedly until the DVD/VCR indicator lights up. Activate the remote ...through different tracks of the position you programmed for the MDP player lights up . Activate the remote control to operate the cable box Turn on /off Select a channel Change channels Back to resume normal playback) CH +/- 51 SAT/CABLE Stop Pause Search the picture forward...M to step forward or m to step backward Step through different chapters CH+ to operate the MDP Turn on /off Play Press FUNCTION repeatedly until the SAT/CABLE indicator lights up .
Operating Instructions
Page 52
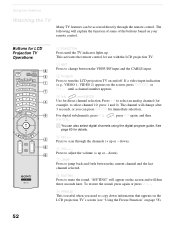
... to adjust the volume (+ up or - Using the Features Watching the TV Many TV features can also select digital channels using the digital program guide. See page 60 for immediate selection. Press to turn the LCD projection TV on your remote control. down). 7 JUMP Press to jump back and...8 MUTING Press to copy down ). 6 VOL +/- until a channel number appears. 4 0-9, and ENTER Use for LCD Projection TV Operations RM-Y1000 1 FUNCTION Press until the TV indicator lights up. To restore the sound, press again or press VOL +. 9 FREEZE This is useful when you can press...
... to adjust the volume (+ up or - Using the Features Watching the TV Many TV features can also select digital channels using the digital program guide. See page 60 for immediate selection. Press to turn the LCD projection TV on your remote control. down). 7 JUMP Press to jump back and...8 MUTING Press to copy down ). 6 VOL +/- until a channel number appears. 4 0-9, and ENTER Use for LCD Projection TV Operations RM-Y1000 1 FUNCTION Press until the TV indicator lights up. To restore the sound, press again or press VOL +. 9 FREEZE This is useful when you can press...

Operating Instructions
Page 53
...skip the video input you want the LCD projection TV to suit your taste. See page 83 for enhanced picture contrast and sharpness. qs TV/VIDEO Press repeatedly to display a list of three different video modes that you selected (see "Mode" on page 103). To turn the display off . For details, see ..." on page 88. 53 qa i.LINK Press to scroll through available video inputs: TV, VIDEO 1, VIDEO 2, VIDEO 3, VIDEO 4, VIDEO 5, VIDEO 6 and VIDEO 7. If you select Skip as a Video Label in minutes (15, 30, 45, 60 or 90) that best suits the program you can also adjust the picture quality (...
...skip the video input you want the LCD projection TV to suit your taste. See page 83 for enhanced picture contrast and sharpness. qs TV/VIDEO Press repeatedly to display a list of three different video modes that you selected (see "Mode" on page 103). To turn the display off . For details, see ..." on page 88. 53 qa i.LINK Press to scroll through available video inputs: TV, VIDEO 1, VIDEO 2, VIDEO 3, VIDEO 4, VIDEO 5, VIDEO 6 and VIDEO 7. If you select Skip as a Video Label in minutes (15, 30, 45, 60 or 90) that best suits the program you can also adjust the picture quality (...

Operating Instructions
Page 62
... channels from the following digital setup functions are displayed. Digital Signal Strength Displays the current strength of digital channels that your LCD projection TV is able to receive has recently been increased, but you do not want your antenna for optimal reception. (Does not apply ...(see "Using the Setup Menu" on page 96. Using the Digital Program Guide Using the Caption Vision Menu The Caption Vision menu allows you to turn on/off closed captioning for digital programs XXX = language (English, Spanish, French, etc.) YYY = reader level (standard*, easy) ZZZ = aspect ...
... channels from the following digital setup functions are displayed. Digital Signal Strength Displays the current strength of digital channels that your LCD projection TV is able to receive has recently been increased, but you do not want your antenna for optimal reception. (Does not apply ...(see "Using the Setup Menu" on page 96. Using the Digital Program Guide Using the Caption Vision Menu The Caption Vision menu allows you to turn on/off closed captioning for digital programs XXX = language (English, Spanish, French, etc.) YYY = reader level (standard*, easy) ZZZ = aspect ...

Operating Instructions
Page 69
... Thumbnails of the files stored on the Memory Stick. Using the Memory Stick Viewer Using the Memory Stick Viewer Using the Memory Stick Index Turn on the LCD projection TV and insert a Memory Stick that contains the photo or movie files you want to insert a Memory Stick, see "Protect" on page 77. 69...
... Thumbnails of the files stored on the Memory Stick. Using the Memory Stick Viewer Using the Memory Stick Viewer Using the Memory Stick Index Turn on the LCD projection TV and insert a Memory Stick that contains the photo or movie files you want to insert a Memory Stick, see "Protect" on page 77. 69...


