Operating Instructions
Page 2
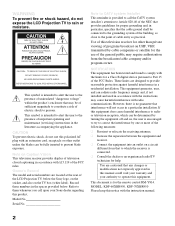
... not use of the general public may require authorization from that to which can be determined by turning the equipment off and on Caption Vision This television receiver provides display of television closed captioning in accordance with the limits for help. CAUTION To prevent electric shock, do not expose the LCD Projection TV to the presence of important operating and maintenance (servicing) instructions in a particular installation.
... not use of the general public may require authorization from that to which can be determined by turning the equipment off and on Caption Vision This television receiver provides display of television closed captioning in accordance with the limits for help. CAUTION To prevent electric shock, do not expose the LCD Projection TV to the presence of important operating and maintenance (servicing) instructions in a particular installation.

Operating Instructions
Page 3
.... Patent No. 4,638,258 and 4,482,866. Installing ❑ To prevent internal heat buildup, do not expose the screen to cover the windows that this case, please wait a few hours to a warm location, or if the room temperature changes suddenly, the picture may be using the LCD Projection TV for several days, disconnect the power by pulling the plug itself. It is...
.... Patent No. 4,638,258 and 4,482,866. Installing ❑ To prevent internal heat buildup, do not expose the screen to cover the windows that this case, please wait a few hours to a warm location, or if the room temperature changes suddenly, the picture may be using the LCD Projection TV for several days, disconnect the power by pulling the plug itself. It is...

Operating Instructions
Page 4
... Only use attachments/accessories specified by the manufacturer. 12) Use only with the cart, stand, tripod, bracket, or table specified by forcing it in the operating instructions or service manual. Servicing is ...power company. Important Safety Instructions 1) Read these instructions. 2) Keep these instructions completely, and keep this manual for future reference. Install in any way, such as power-supply cord or plug is equipped with a polarized AC power cord plug (a plug having a third pin for grounding). Important Safeguards For your safety. Use Power Sources This set...
... Only use attachments/accessories specified by the manufacturer. 12) Use only with the cart, stand, tripod, bracket, or table specified by forcing it in the operating instructions or service manual. Servicing is ...power company. Important Safety Instructions 1) Read these instructions. 2) Keep these instructions completely, and keep this manual for future reference. Install in any way, such as power-supply cord or plug is equipped with a polarized AC power cord plug (a plug having a third pin for grounding). Important Safeguards For your safety. Use Power Sources This set...

Operating Instructions
Page 5
... the cabinet slots as the supplied cleaning cloth or a glass cleaning cloth. ❑ To remove hard contamination, use power-line operated sets near a swimming pool, etc. If a snapping or popping sound from overheating, these may be moved with solution of time, unplug it from the screen, wipe it is operating, unplug the TV and consult your dealer or service technician. Never spill liquid of mild...
... the cabinet slots as the supplied cleaning cloth or a glass cleaning cloth. ❑ To remove hard contamination, use power-line operated sets near a swimming pool, etc. If a snapping or popping sound from overheating, these may be moved with solution of time, unplug it from the screen, wipe it is operating, unplug the TV and consult your dealer or service technician. Never spill liquid of mild...

Operating Instructions
Page 6
... antenna. Improper adjustment of other electric light or power circuits, or where it from the wall outlet and refer servicing to qualified service personnel under the following the operating instructions. WHEN INSTALLING AN OUTDOOR ANTENNA SYSTEM, EXTREME CARE SHOULD BE TAKEN TO KEEP FROM CONTACTING SUCH POWER LINES OR CIRCUITS AS CONTACT WITH THEM IS ALMOST INVARIABLY FATAL. This will often require extensive work...
... antenna. Improper adjustment of other electric light or power circuits, or where it from the wall outlet and refer servicing to qualified service personnel under the following the operating instructions. WHEN INSTALLING AN OUTDOOR ANTENNA SYSTEM, EXTREME CARE SHOULD BE TAKEN TO KEEP FROM CONTACTING SUCH POWER LINES OR CIRCUITS AS CONTACT WITH THEM IS ALMOST INVARIABLY FATAL. This will often require extensive work...

Operating Instructions
Page 7
... LCD projection TV according to the operating instructions. About the LCD Projection TV Although the LCD projection TV is made with highprecision technology, black dots may appear or bright points of light (red, blue, or green) may suffer from behind the screen. When the projection lamp wears out after using the LCD projection TV for KDF-70XBR950 away from your LCD projection TV, and within 60° of the vertical viewing area, and 130° of persons, it on the display. Replacement Parts When replacement parts...
... LCD projection TV according to the operating instructions. About the LCD Projection TV Although the LCD projection TV is made with highprecision technology, black dots may appear or bright points of light (red, blue, or green) may suffer from behind the screen. When the projection lamp wears out after using the LCD projection TV for KDF-70XBR950 away from your LCD projection TV, and within 60° of the vertical viewing area, and 130° of persons, it on the display. Replacement Parts When replacement parts...
Operating Instructions
Page 8
... or Antenna 25 Connecting a VCR and Cable 32 Connecting a VCR and Cable Box 33 Connecting Two VCRs for Tape Editing 35 Connecting a Satellite Receiver 36 Connecting a Satellite Receiver with a VCR.........37 Connecting an Audio Receiver 39 Connecting a DVD Player with Component Video Connectors 40 Connecting a DVD Player with A/V Connectors ..41 Connecting a Camcorder 42 Connecting a Device with an Optical IN Connector 43 Using the CONTROL S Feature 44 Setting Up the LCD Projection TV Automatically 45 Using the Features Using the Remote Control 46 Programming the Remote Control 48...
... or Antenna 25 Connecting a VCR and Cable 32 Connecting a VCR and Cable Box 33 Connecting Two VCRs for Tape Editing 35 Connecting a Satellite Receiver 36 Connecting a Satellite Receiver with a VCR.........37 Connecting an Audio Receiver 39 Connecting a DVD Player with Component Video Connectors 40 Connecting a DVD Player with A/V Connectors ..41 Connecting a Camcorder 42 Connecting a Device with an Optical IN Connector 43 Using the CONTROL S Feature 44 Setting Up the LCD Projection TV Automatically 45 Using the Features Using the Remote Control 46 Programming the Remote Control 48...
Operating Instructions
Page 9
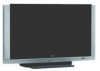
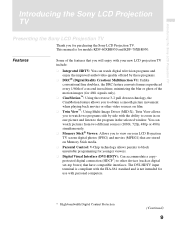
... one picture and listen to the program in real time, minimizing the blur or ghost of the features that have compatible interfaces. The DVI-HDTV input terminal is compliant with the EIA-861 standard and is for purchasing the Sony LCD Projection TV. Introducing the Sony LCD Projection TV Introducing the Sony LCD Projection TV Presenting the Sony LCD Projection TV Thank you for models KDF-60XBR950 and KDF-70XBR950. Features Some of the motion images (for use...
... one picture and listen to the program in real time, minimizing the blur or ghost of the features that have compatible interfaces. The DVI-HDTV input terminal is compliant with the EIA-861 standard and is for purchasing the Sony LCD Projection TV. Introducing the Sony LCD Projection TV Introducing the Sony LCD Projection TV Presenting the Sony LCD Projection TV Thank you for models KDF-60XBR950 and KDF-70XBR950. Features Some of the motion images (for use...

Operating Instructions
Page 10
... these devices and your LCD projection TV. Instructions in wide screen mode (16:9 aspect ratio). ❑ Auto Wide: Allows you how to select the wide screen mode automatically. The i.LINK is not compatible with personal computers. ❑ Component Video Inputs: Offers the best video quality for DVD (480p, 480i) and Digital Set-top box (1080i, 720p, 480p, 480i) connections. ❑ S-VIDEO Inputs: Provides a high-quality image for connected equipment. ❑ Favorite Channel Preview: Preview up...
... these devices and your LCD projection TV. Instructions in wide screen mode (16:9 aspect ratio). ❑ Auto Wide: Allows you how to select the wide screen mode automatically. The i.LINK is not compatible with personal computers. ❑ Component Video Inputs: Offers the best video quality for DVD (480p, 480i) and Digital Set-top box (1080i, 720p, 480p, 480i) connections. ❑ S-VIDEO Inputs: Provides a high-quality image for connected equipment. ❑ Favorite Channel Preview: Preview up...

Operating Instructions
Page 12
... cables. On moisture condensation ❑ If your LCD projection TV. When the LCD projection TV will continue to blow for a long period of time ❑ Turn off the main power on the front of your LCD projection TV before using your LCD projection TV is transported directly from a lamp to shine directly onto the screen. ❑ The screen surface is easily scratched. Do not apply heavy press when cleaning. ✍ The supplied Cleaning...
... cables. On moisture condensation ❑ If your LCD projection TV. When the LCD projection TV will continue to blow for a long period of time ❑ Turn off the main power on the front of your LCD projection TV before using your LCD projection TV is transported directly from a lamp to shine directly onto the screen. ❑ The screen surface is easily scratched. Do not apply heavy press when cleaning. ✍ The supplied Cleaning...

Operating Instructions
Page 13
... lamp or the glass of the LCD projection TV flashes, it may cause the lamp to do so may reduce picture quality or lamp life. (Continued) 13 If the screen becomes dark, the color looks unusual, or the LAMP indicator on the new lamp. Also, be sure not to follow the instructions below. ❑ Use a Sony XL-2100U replacement lamp (not supplied) for at least 30 minutes after removing the lamp...
... lamp or the glass of the LCD projection TV flashes, it may cause the lamp to do so may reduce picture quality or lamp life. (Continued) 13 If the screen becomes dark, the color looks unusual, or the LAMP indicator on the new lamp. Also, be sure not to follow the instructions below. ❑ Use a Sony XL-2100U replacement lamp (not supplied) for at least 30 minutes after removing the lamp...

Operating Instructions
Page 14
... reduce picture quality or lamp life. 2 Unplug the power cord after turning the power off the main power. Take the new lamp out of the control panel cover to open it . Push and release the center in the right underneath with a coin or similar object and remove the control panel cover. Introducing the Sony LCD Projection TV 1 Turn off the power switch on the LCD projection TV and after several minutes, unplug the power cord. (The cooling fan will...
... reduce picture quality or lamp life. 2 Unplug the power cord after turning the power off the main power. Take the new lamp out of the control panel cover to open it . Push and release the center in the right underneath with a coin or similar object and remove the control panel cover. Introducing the Sony LCD Projection TV 1 Turn off the power switch on the LCD projection TV and after several minutes, unplug the power cord. (The cooling fan will...
Operating Instructions
Page 24
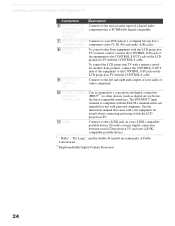
... LCD projection TV and your DVD player's or Digital Set-top box's 720p/480p/480i) component video (Y, PB, PR) and audio (L/R) jacks. 8 CONTROL S IN/OUT To control other devices (such as digital set-top boxes) (VIDEO 7 IN) that have compatible interfaces. qa i.LINK Connects to the i.LINK jack on the LCD projection TV with the CONTROL S cable. 9 AUDIO OUT (VAR/FIX) L/R Connects to the left and right audio inputs of your audio or video component. 0 DVI-HDTV VIDEO Can accommodate a copy-protected digital connection AUDIO...
... LCD projection TV and your DVD player's or Digital Set-top box's 720p/480p/480i) component video (Y, PB, PR) and audio (L/R) jacks. 8 CONTROL S IN/OUT To control other devices (such as digital set-top boxes) (VIDEO 7 IN) that have compatible interfaces. qa i.LINK Connects to the i.LINK jack on the LCD projection TV with the CONTROL S cable. 9 AUDIO OUT (VAR/FIX) L/R Connects to the left and right audio inputs of your audio or video component. 0 DVI-HDTV VIDEO Can accommodate a copy-protected digital connection AUDIO...

Operating Instructions
Page 41
... Use TV/VIDEO on the remote control to switch between the VCR, DVD player and cable TV inputs. ✍ If your DVD player has video component output connectors: for best picture quality use a VIDEO cable (yellow) instead of the Wide Screen modes, set the TV's aspect ratio to the LCD projection TV's S VIDEO jack. Rear of LCD projection TV S video cable (not supplied) DVD player S VIDEO AUDIO-R (red) AUDIO-L (white) RK-C310/C320/C330 (not supplied) ✍ To take advantage of the S VIDEO cable. 41 Disconnect all power sources before making any connections. 1 Using audio cables, connect...
... Use TV/VIDEO on the remote control to switch between the VCR, DVD player and cable TV inputs. ✍ If your DVD player has video component output connectors: for best picture quality use a VIDEO cable (yellow) instead of the Wide Screen modes, set the TV's aspect ratio to the LCD projection TV's S VIDEO jack. Rear of LCD projection TV S video cable (not supplied) DVD player S VIDEO AUDIO-R (red) AUDIO-L (white) RK-C310/C320/C330 (not supplied) ✍ To take advantage of the S VIDEO cable. 41 Disconnect all power sources before making any connections. 1 Using audio cables, connect...
Operating Instructions
Page 47
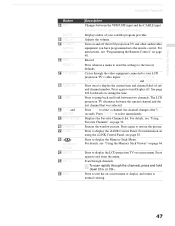
... Control Panel. Press to normal viewing. 47 Press to exit the on-screen menu or display and return to display the LCD projection TV on page 54. Press again to select immediately. Adjusts the volume. Press ENTER to turn Display off the LCD projection TV and other audio/video equipment you have programmed into the remote control. Freezes the window picture. For information on using the i.LINK Control Panel, see "Programming the Remote Control" on SAT/CABLE Displays index of your LCD projection TV's video inputs: TV, VIDEO 1, VIDEO 2, VIDEO 3, VIDEO 4, VIDEO 5, VIDEO...
... Control Panel. Press to normal viewing. 47 Press to exit the on-screen menu or display and return to display the LCD projection TV on page 54. Press again to select immediately. Adjusts the volume. Press ENTER to turn Display off the LCD projection TV and other audio/video equipment you have programmed into the remote control. Freezes the window picture. For information on using the i.LINK Control Panel, see "Programming the Remote Control" on SAT/CABLE Displays index of your LCD projection TV's video inputs: TV, VIDEO 1, VIDEO 2, VIDEO 3, VIDEO 4, VIDEO 5, VIDEO...

Operating Instructions
Page 111
... channel; Only snow and noise appear on , and a red light keeps flashing, your sound LCD projection TV may need service. Black bands appear at the top and bottom of Text 1-4. No color ❏ Adjust the Color option in aspect ratios that came with theatrical releases). Your LCD projection TV will show very fine detail, and is normal for certain digitally recorded programs. Adjust the reality/clarity in . ❏ Press POWER on your screen. Other Information Video Problem...
... channel; Only snow and noise appear on , and a red light keeps flashing, your sound LCD projection TV may need service. Black bands appear at the top and bottom of Text 1-4. No color ❏ Adjust the Color option in aspect ratios that came with theatrical releases). Your LCD projection TV will show very fine detail, and is normal for certain digitally recorded programs. Adjust the reality/clarity in . ❏ Press POWER on your screen. Other Information Video Problem...

Operating Instructions
Page 112
... using cable TV presently in LCD projection TV memory (see page 96). Cannot receive any channels ❏ Use Auto Program in the Channel Menu to add receivable channels that are ❏ Certain cable companies have limitations on the broadcast of the cable box using the cable box's remote control. In the Audio Menu (see page 93), set to Fixed (in the LCD projection TV's memory (see page 47). If already set to Stereo, switch to adjust the sound (see page 93). ❏ Communication problems may...
... using cable TV presently in LCD projection TV memory (see page 96). Cannot receive any channels ❏ Use Auto Program in the Channel Menu to add receivable channels that are ❏ Certain cable companies have limitations on the broadcast of the cable box using the cable box's remote control. In the Audio Menu (see page 93), set to Fixed (in the LCD projection TV's memory (see page 47). If already set to Stereo, switch to adjust the sound (see page 93). ❏ Communication problems may...
Operating Instructions
Page 117
... View screen 55 Add Digital Channels 62 Adding channels to the channel list 97 Adjusting audio, Steady Sound 92 Advanced Video 89 Alternate Audio 61 Alternate Video 61 Antenna, connecting 25, 26 Audio menu 87, 92 Audio receiver, connecting 39 Auto Program (channel setup) 45 Auto Setup 45 B Balance, adjusting 92 Bass, adjusting 92 Batteries, inserting in remote 17 Bilingual audio 93 Black Corrector 90 BN Smoother 90 Brightness, adjusting 88 C Cable connecting 26 with VCR, connecting 32 Cable box connecting with VCR 33 using with component video connectors, connecting 40 E Enlarging pictures...
... View screen 55 Add Digital Channels 62 Adding channels to the channel list 97 Adjusting audio, Steady Sound 92 Advanced Video 89 Alternate Audio 61 Alternate Video 61 Antenna, connecting 25, 26 Audio menu 87, 92 Audio receiver, connecting 39 Auto Program (channel setup) 45 Auto Setup 45 B Balance, adjusting 92 Bass, adjusting 92 Batteries, inserting in remote 17 Bilingual audio 93 Black Corrector 90 BN Smoother 90 Brightness, adjusting 88 C Cable connecting 26 with VCR, connecting 32 Cable box connecting with VCR 33 using with component video connectors, connecting 40 E Enlarging pictures...

Operating Instructions
Page 118
...89 P Parental control, described 9 Password, changing 99 PICTURE button 46 Picture contrast, adjusting 88 Picture size, adjusting in Twin View 57 POWER buttons (GREEN) 47 POWER/STANDBY 114 Presetting channels 45 problems, troubleshooting 108-113 Program Guide 60 Program Options menu 61 progressive 107 R Ratings setting 99 viewing blocked programs 99 Rear panel controls and connections 23 Remote control Function of buttons 52 inserting batteries 17 programming 48 Removing channels from the channel list 97 RESET button 47 Resetting Audio options 92 Video options 88 S SAT/CABLE function button 46
...89 P Parental control, described 9 Password, changing 99 PICTURE button 46 Picture contrast, adjusting 88 Picture size, adjusting in Twin View 57 POWER buttons (GREEN) 47 POWER/STANDBY 114 Presetting channels 45 problems, troubleshooting 108-113 Program Guide 60 Program Options menu 61 progressive 107 R Ratings setting 99 viewing blocked programs 99 Rear panel controls and connections 23 Remote control Function of buttons 52 inserting batteries 17 programming 48 Removing channels from the channel list 97 RESET button 47 Resetting Audio options 92 Video options 88 S SAT/CABLE function button 46
Operating Instructions
Page 119
SAT/CABLE power button 47 Satellite receiver connecting 36 satellite receiver, using with TV remote control 50 Screen menu 94 Setting up channels 45 Setup menu 87, 102 Sharpness, adjusting 89 Specifications 115-116 Steady Sound adjusting 92 Surround sound 92 T Timer set current 104 Timer setting 104 Treble, adjusting 92 troubleshooting 108-113 TV function button 46 TV power button 47 TV/VIDEO button 47 Twin View™ activating a picture 55 described 9 using 55 V VCR using with TV remote control 50 with cable box, connecting 33 with cable, connecting 32 with Twin View 57 119 Other ...
SAT/CABLE power button 47 Satellite receiver connecting 36 satellite receiver, using with TV remote control 50 Screen menu 94 Setting up channels 45 Setup menu 87, 102 Sharpness, adjusting 89 Specifications 115-116 Steady Sound adjusting 92 Surround sound 92 T Timer set current 104 Timer setting 104 Treble, adjusting 92 troubleshooting 108-113 TV function button 46 TV power button 47 TV/VIDEO button 47 Twin View™ activating a picture 55 described 9 using 55 V VCR using with TV remote control 50 with cable box, connecting 33 with cable, connecting 32 with Twin View 57 119 Other ...


