Operating Instructions
Page 2
...KDF-60XBR950, KDF-70XBR950 Please keep this polarized AC plug with an extension cord, receptacle or other than private viewing of programs broadcast on the TV box (white label). NO USER-SERVICEABLE PARTS INSIDE. CAUTION To prevent electric shock, do not expose the LCD Projection TV...located at the rear of the FCC Rules. NOTIFICATION This equipment has been tested and found to Part 15 of the LCD Projection TV, below . ... interference in this manual could void your warranty and your Sony dealer regarding this television receiver for a Class B digital device pursuant ...
...KDF-60XBR950, KDF-70XBR950 Please keep this polarized AC plug with an extension cord, receptacle or other than private viewing of programs broadcast on the TV box (white label). NO USER-SERVICEABLE PARTS INSIDE. CAUTION To prevent electric shock, do not expose the LCD Projection TV...located at the rear of the FCC Rules. NOTIFICATION This equipment has been tested and found to Part 15 of the LCD Projection TV, below . ... interference in this manual could void your warranty and your Sony dealer regarding this television receiver for a Class B digital device pursuant ...
Operating Instructions
Page 8
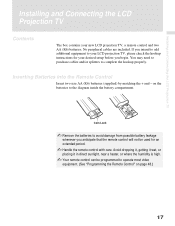
Contents Introducing the Sony LCD Projection TV Presenting the Sony LCD Projection TV 9 Using This Manual 10 Enjoying Your LCD Projection TV 11 Replacing the Lamp 13 Using Twin View 55 Using the Freeze Function 58 Using Wide Screen Mode 59 Using the Digital Program Guide Displaying the Digital Program Guide 60 Installing and Connecting the LCD Projection TV Contents 17...
Contents Introducing the Sony LCD Projection TV Presenting the Sony LCD Projection TV 9 Using This Manual 10 Enjoying Your LCD Projection TV 11 Replacing the Lamp 13 Using Twin View 55 Using the Freeze Function 58 Using Wide Screen Mode 59 Using the Digital Program Guide Displaying the Digital Program Guide 60 Installing and Connecting the LCD Projection TV Contents 17...
Operating Instructions
Page 9
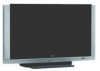
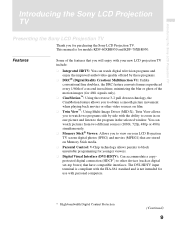
...watch pictures from two different sources (1080i, 720p, 480p or 480i) simultaneously. ❑ Memory Stick® Viewer: Allows you for purchasing the Sony LCD Projection TV. This manual is not intended for use with the ability to zoom in on Memory Stick media. ❑ Parental Control: V-Chip technology allows parents..., the CineMotion feature allows you to obtain a smooth picture movement when playing back movies or other devices (such as digital set-top boxes) that are stored on one picture and listen to block unsuitable programming for models KDF-60XBR950 and KDF-70XBR950.
...watch pictures from two different sources (1080i, 720p, 480p or 480i) simultaneously. ❑ Memory Stick® Viewer: Allows you for purchasing the Sony LCD Projection TV. This manual is not intended for use with the ability to zoom in on Memory Stick media. ❑ Parental Control: V-Chip technology allows parents..., the CineMotion feature allows you to obtain a smooth picture movement when playing back movies or other devices (such as digital set-top boxes) that are stored on one picture and listen to block unsuitable programming for models KDF-60XBR950 and KDF-70XBR950.

Operating Instructions
Page 10
... with personal computers. ❑ Component Video Inputs: Offers the best video quality for DVD (480p, 480i) and Digital Set-top box (1080i, 720p, 480p, 480i) connections. ❑ S-VIDEO Inputs: Provides a high-quality image for connected equipment. ❑ Favorite...Mode: Allows you through your LCD projection TV. Similar controls are written for the secure transfer of your new LCD projection TV. 1 Installing and Connecting the LCD Projection TV This section guides you to other digital home entertainment devices. Introducing the Sony LCD Projection TV ❑ i.LINK: Provides a...
... with personal computers. ❑ Component Video Inputs: Offers the best video quality for DVD (480p, 480i) and Digital Set-top box (1080i, 720p, 480p, 480i) connections. ❑ S-VIDEO Inputs: Provides a high-quality image for connected equipment. ❑ Favorite...Mode: Allows you through your LCD projection TV. Similar controls are written for the secure transfer of your new LCD projection TV. 1 Installing and Connecting the LCD Projection TV This section guides you to other digital home entertainment devices. Introducing the Sony LCD Projection TV ❑ i.LINK: Provides a...

Operating Instructions
Page 14
... reduce picture quality or lamp life. 2 Unplug the power cord after turning the power off the main power. Take the new lamp out of the box. 3 Remove the control panel cover. Push and release the center in the upper of the control panel cover to cool down before replacing it . 14... object and remove the control panel cover. Wait at least 30 minutes to allow the lamp to open it . Introducing the Sony LCD Projection TV 1 Turn off the power switch on the LCD projection TV and after several minutes, unplug the power cord. (The cooling fan will continue to blow for about two minutes after...
... reduce picture quality or lamp life. 2 Unplug the power cord after turning the power off the main power. Take the new lamp out of the box. 3 Remove the control panel cover. Push and release the center in the upper of the control panel cover to cool down before replacing it . 14... object and remove the control panel cover. Wait at least 30 minutes to allow the lamp to open it . Introducing the Sony LCD Projection TV 1 Turn off the power switch on the LCD projection TV and after several minutes, unplug the power cord. (The cooling fan will continue to blow for about two minutes after...

Operating Instructions
Page 15
...straight out. ✍ After it has cooled, place the removed lamp into the empty box of the lamp or the surrounding parts. Mount the new lamp securely into a plastic bag. 6 Mount the new lamp. Introducing the Sony LCD Projection TV 5 Loosen the two screws that secure the lamp, then pull out the lamp. ...The lamp is very hot immediately after use. Introducing the Sony LCD Projection TV 4 Loosen the screw with the lamp. Tighten the two screws securely as shown in the illustration using the hex key supplied with a coin or ...
...straight out. ✍ After it has cooled, place the removed lamp into the empty box of the lamp or the surrounding parts. Mount the new lamp securely into a plastic bag. 6 Mount the new lamp. Introducing the Sony LCD Projection TV 5 Loosen the two screws that secure the lamp, then pull out the lamp. ...The lamp is very hot immediately after use. Introducing the Sony LCD Projection TV 4 Loosen the screw with the lamp. Tighten the two screws securely as shown in the illustration using the hex key supplied with a coin or ...
Operating Instructions
Page 17
... the humidity is high. ✍ Your remote control can be used for your new LCD projection TV, a remote control and two AA (R6) batteries. Installing and Connecting the LCD Projection TV Installing and Connecting the LCD Projection TV Contents The box contains your desired setup before you anticipate that the remote control will not be programmed to...
... the humidity is high. ✍ Your remote control can be used for your new LCD projection TV, a remote control and two AA (R6) batteries. Installing and Connecting the LCD Projection TV Installing and Connecting the LCD Projection TV Contents The box contains your desired setup before you anticipate that the remote control will not be programmed to...
Operating Instructions
Page 23
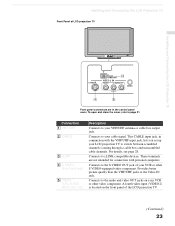
...jacks on the front panel of the LCD projection TV. (Continued) 23 Connection 1 VHF/UHF 2 CABLE 3 i.LINK 4 S VIDEO (Front and rear) 5 VIDEO/ (L/R) AUDIO (Front and rear) Description Connects to your cable signal. ...Connects to the S VIDEO OUT jack of your VCR or other video component. Connects to your VHF/UHF antenna or cable box output jack. These terminals are in conjunction with personal computers. Installing and Connecting the LCD Projection TV Front Panel of LCD projection TV...
...jacks on the front panel of the LCD projection TV. (Continued) 23 Connection 1 VHF/UHF 2 CABLE 3 i.LINK 4 S VIDEO (Front and rear) 5 VIDEO/ (L/R) AUDIO (Front and rear) Description Connects to your cable signal. ...Connects to the S VIDEO OUT jack of your VCR or other video component. Connects to your VHF/UHF antenna or cable box output jack. These terminals are in conjunction with personal computers. Installing and Connecting the LCD Projection TV Front Panel of LCD projection TV...
Operating Instructions
Page 24
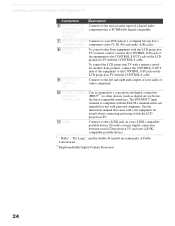
...audio (L/R) jacks. 8 CONTROL S IN/OUT To control other devices (such as digital set-top boxes) (VIDEO 7 IN) that have compatible interfaces. qa i.LINK Connects to the i.LINK jack on the LCD projection TV with the CONTROL S cable. 9 AUDIO OUT (VAR/FIX) L/R Connects to the left and right...Digital Content Protection 24 See the instruction manual that is not intended for use with personal computers. To control the LCD projection TV with a remote control for another Sony product, connect the CONTROL S OUT jack of the equipment to the CONTROL S IN jack on your i.LINK-compatible ...
...audio (L/R) jacks. 8 CONTROL S IN/OUT To control other devices (such as digital set-top boxes) (VIDEO 7 IN) that have compatible interfaces. qa i.LINK Connects to the i.LINK jack on the LCD projection TV with the CONTROL S cable. 9 AUDIO OUT (VAR/FIX) L/R Connects to the left and right...Digital Content Protection 24 See the instruction manual that is not intended for use with personal computers. To control the LCD projection TV with a remote control for another Sony product, connect the CONTROL S OUT jack of the equipment to the CONTROL S IN jack on your i.LINK-compatible ...
Operating Instructions
Page 25
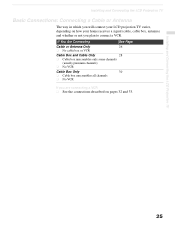
...premium channels) ❏ No VCR Cable Box Only 30 ❏ Cable box unscrambles all channels ❏ No VCR If you plan to connect a VCR. Installing and Connecting the LCD Projection TV Installing and Connecting the LCD Projection TV Basic Connections: Connecting a Cable or Antenna... The way in which you will connect your LCD projection TV varies, depending on how your home receives a signal (cable, cable box, antenna) and whether or not...
...premium channels) ❏ No VCR Cable Box Only 30 ❏ Cable box unscrambles all channels ❏ No VCR If you plan to connect a VCR. Installing and Connecting the LCD Projection TV Installing and Connecting the LCD Projection TV Basic Connections: Connecting a Cable or Antenna... The way in which you will connect your LCD projection TV varies, depending on how your home receives a signal (cable, cable box, antenna) and whether or not...
Operating Instructions
Page 26
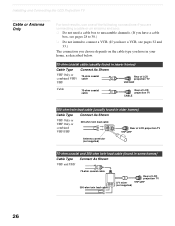
Installing and Connecting the LCD Projection TV Cable or Antenna Only For best results, use one of the following connections if you are connecting a cable or an antenna and you: ❑ Do not need a cable box to unscramble channels. (If you have a cable box, see pages 28 to 30.) ❑ Do not ...found in newer homes) Cable Type Connect As Shown VHF Only or combined VHF/ UHF 75-ohm coaxial cable Rear of LCD projection TV VHF/UHF Cable 75-ohm coaxial cable Rear of LCD projection TV CABLE 300-ohm twin lead cable (usually found in older homes) Cable Type Connect As Shown VHF Only ...
Installing and Connecting the LCD Projection TV Cable or Antenna Only For best results, use one of the following connections if you are connecting a cable or an antenna and you: ❑ Do not need a cable box to unscramble channels. (If you have a cable box, see pages 28 to 30.) ❑ Do not ...found in newer homes) Cable Type Connect As Shown VHF Only or combined VHF/ UHF 75-ohm coaxial cable Rear of LCD projection TV VHF/UHF Cable 75-ohm coaxial cable Rear of LCD projection TV CABLE 300-ohm twin lead cable (usually found in older homes) Cable Type Connect As Shown VHF Only ...
Operating Instructions
Page 28
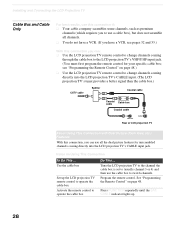
...see pages 32 and 33.) With this connection, you can: ❑ Use the LCD projection TV remote control to change channels coming through the cable box to the LCD projection TV's VHF/UHF input jack. (You must first program the remote control for unscrambled channels coming ...directly into the LCD projection TV's CABLE input. (The LCD projection TV's tuner provides a better signal than the cable box.) CATV cable Splitter Coaxial cable Coaxial cable IN OUT Cable box Coaxial cable VHF/UHF CABLE Rear of LCD projection TV About Using This Connection with Dual Picture...
...see pages 32 and 33.) With this connection, you can: ❑ Use the LCD projection TV remote control to change channels coming through the cable box to the LCD projection TV's VHF/UHF input jack. (You must first program the remote control for unscrambled channels coming ...directly into the LCD projection TV's CABLE input. (The LCD projection TV's tuner provides a better signal than the cable box.) CATV cable Splitter Coaxial cable Coaxial cable IN OUT Cable box Coaxial cable VHF/UHF CABLE Rear of LCD projection TV About Using This Connection with Dual Picture...
Operating Instructions
Page 29
...ANT to switch back and forth between the cable box and cable When using the cable box, you need the LCD projection TV to stay on page 96. For details, see "Using the Channel Menu" on the channel the cable box is set to lock in a specific channel. ...Installing and Connecting the LCD Projection TV 29 Installing and Connecting the LCD Projection TV Prevent the accidental switching of TV channels Switch the LCD projection TV's input between the LCD projection TV's VHF/UHF (scrambled channels) and CABLE ...
...ANT to switch back and forth between the cable box and cable When using the cable box, you need the LCD projection TV to stay on page 96. For details, see "Using the Channel Menu" on the channel the cable box is set to lock in a specific channel. ...Installing and Connecting the LCD Projection TV 29 Installing and Connecting the LCD Projection TV Prevent the accidental switching of TV channels Switch the LCD projection TV's input between the LCD projection TV's VHF/UHF (scrambled channels) and CABLE ...
Operating Instructions
Page 30
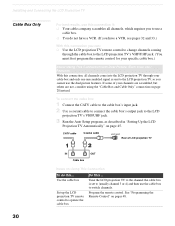
... With this ... CATV cable Coaxial cable VHF/UHF Rear of your cable box and only one unscrambled signal is set to (usually channel 3 or 4) and then use the dual picture features. Tune the LCD projection TV to the channel the cable box is sent to the LCD projection TV's VHF/UHF jack. 3 Run the Auto Setup program...
... With this ... CATV cable Coaxial cable VHF/UHF Rear of your cable box and only one unscrambled signal is set to (usually channel 3 or 4) and then use the dual picture features. Tune the LCD projection TV to the channel the cable box is sent to the LCD projection TV's VHF/UHF jack. 3 Run the Auto Setup program...

Operating Instructions
Page 31
Installing and Connecting the LCD Projection TV 31 You can use the LCD projection TV's Channel Fix feature to (usually channel 3 or 4). For details, see "Using the Channel Menu" on the channel the cable box is set to lock in a specific channel. When using the cable box, you need the LCD projection TV to stay on page 96. Installing and Connecting the LCD Projection TV Activate the remote control to operate the cable box Prevent the accidental switching of TV channels Press FUNCTION repeatedly until the SAT/CABLE indicator lights up.
Installing and Connecting the LCD Projection TV 31 You can use the LCD projection TV's Channel Fix feature to (usually channel 3 or 4). For details, see "Using the Channel Menu" on the channel the cable box is set to lock in a specific channel. When using the cable box, you need the LCD projection TV to stay on page 96. Installing and Connecting the LCD Projection TV Activate the remote control to operate the cable box Prevent the accidental switching of TV channels Press FUNCTION repeatedly until the SAT/CABLE indicator lights up.

Operating Instructions
Page 32
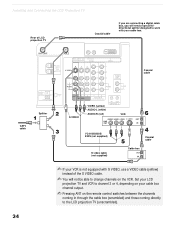
Rear of LCD projection TV Coaxial cable 32 S VIDEO VIDEO (yellow) AUDIO-L (white) AUDIO-R (red) VCR ... all power sources before making any connections. 1 Connect the cable TV cable to the VCR's IN jack. 2 Using a coaxial cable, connect the VCR's OUT jack to the LCD projection TV's CABLE jack. 3 Using AUDIO and S VIDEO cables, connect ...the VCR's Audio and S Video OUT jacks to the LCD projection TV's AUDIO and S VIDEO IN jacks. Installing and Connecting the LCD Projection TV Connecting a VCR and Cable...
Rear of LCD projection TV Coaxial cable 32 S VIDEO VIDEO (yellow) AUDIO-L (white) AUDIO-R (red) VCR ... all power sources before making any connections. 1 Connect the cable TV cable to the VCR's IN jack. 2 Using a coaxial cable, connect the VCR's OUT jack to the LCD projection TV's CABLE jack. 3 Using AUDIO and S VIDEO cables, connect ...the VCR's Audio and S Video OUT jacks to the LCD projection TV's AUDIO and S VIDEO IN jacks. Installing and Connecting the LCD Projection TV Connecting a VCR and Cable...
Operating Instructions
Page 33
To program your Sony remote control to operate your cable box, see "Programming the Remote Control" on page 48. ❑ Use the LCD projection TV remote control to change channels on your cable box output). Change channels using your cable box, only one of them (pay channels vs. With this hookup if: ❑ Your cable TV company scrambles...
To program your Sony remote control to operate your cable box, see "Programming the Remote Control" on page 48. ❑ Use the LCD projection TV remote control to change channels on your cable box output). Change channels using your cable box, only one of them (pay channels vs. With this hookup if: ❑ Your cable TV company scrambles...
Operating Instructions
Page 34
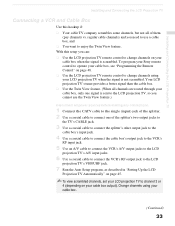
... S VIDEO, use a VIDEO cable (yellow) instead of LCD projection TV Coaxial cable If you are connecting a digital cable box, you will not be able to the LCD projection TV (unscrambled). Set your LCD projection TV and VCR to channel 3 or 4, depending on the VCR. Installing and Connecting the LCD Projection TV Rear of the S VIDEO cable. ✍ You will need...
... S VIDEO, use a VIDEO cable (yellow) instead of LCD projection TV Coaxial cable If you are connecting a digital cable box, you will not be able to the LCD projection TV (unscrambled). Set your LCD projection TV and VCR to channel 3 or 4, depending on the VCR. Installing and Connecting the LCD Projection TV Rear of the S VIDEO cable. ✍ You will need...
Operating Instructions
Page 45
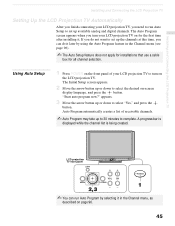
...cable box for the first time after installing it. The Initial Setup screen appears. 2 Move the arrow button up or down to complete. Installing and Connecting the LCD Projection TV Installing and Connecting the LCD Projection TV Setting Up the LCD Projection TV Automatically After you finish connecting your LCD projection TV ... to select the desired on-screen display language, and press the button. Auto Program automatically creates a list of your LCD projection TV to run Auto Program by using the Auto Program feature in the Channel menu, as described on page 96. 45 The ...
...cable box for the first time after installing it. The Initial Setup screen appears. 2 Move the arrow button up or down to complete. Installing and Connecting the LCD Projection TV Installing and Connecting the LCD Projection TV Setting Up the LCD Projection TV Automatically After you finish connecting your LCD projection TV ... to select the desired on-screen display language, and press the button. Auto Program automatically creates a list of your LCD projection TV to run Auto Program by using the Auto Program feature in the Channel menu, as described on page 96. 45 The ...
Operating Instructions
Page 49
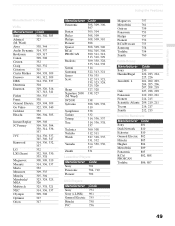
... Panasonic 219, 220, 221 Pioneer 214, 215 Scientific Atlanta 209, 210, 211 Tocom 216, 217 Zenith 212, 213 Satellite Receivers Manufacturer Code Sony 801 Dish Network 810 Echostar 810 General Electric 802 Hitachi 805 Hughes 804 Mitsubishi 809 Panasonic 803 RCA/ PROSCAN 802, 808 Toshiba 806, 807 ...757 Mitsubishi 761 Oritron 759 Panasonic 753 Philips 757 Pioneer 752 RCA/Proscan 755 Samsung 758 Toshiba 754 Zenith 760 Cable Boxes Manufacturer Code Sony 230 Hamlin/Regal 222, 223, 224, 225, 226 Jerrold/G. Manufacturer's Codes VCRs Manufacturer Code...
... Panasonic 219, 220, 221 Pioneer 214, 215 Scientific Atlanta 209, 210, 211 Tocom 216, 217 Zenith 212, 213 Satellite Receivers Manufacturer Code Sony 801 Dish Network 810 Echostar 810 General Electric 802 Hitachi 805 Hughes 804 Mitsubishi 809 Panasonic 803 RCA/ PROSCAN 802, 808 Toshiba 806, 807 ...757 Mitsubishi 761 Oritron 759 Panasonic 753 Philips 757 Pioneer 752 RCA/Proscan 755 Samsung 758 Toshiba 754 Zenith 760 Cable Boxes Manufacturer Code Sony 230 Hamlin/Regal 222, 223, 224, 225, 226 Jerrold/G. Manufacturer's Codes VCRs Manufacturer Code...


