Operating Instructions
Page 1
4-187-908-11(1) LCD Digital Colour TV Operating Instructions Setting Up Watching TV Additional Information KDL-60LX900 / 52LX900
4-187-908-11(1) LCD Digital Colour TV Operating Instructions Setting Up Watching TV Additional Information KDL-60LX900 / 52LX900

Operating Instructions
Page 2
... • Not standing the televisions on furniture to children, can be avoided by the manufacturer of Dolby Laboratories. Before operating the TV, please read this Sony product. DivX, DivX Certified, and associated logos are trademarks, service marks, or certification marks of the supporting furniture. • ...IDA Standards DB00353 Notice for Australia and New Zealand model This product is trademark of the TV. DLNA®, the DLNA Logo and DLNA CERTIFIED® are trademarks of Sony Corporation. To generate the registration code, locate the DivX VOD section in this code ...
... • Not standing the televisions on furniture to children, can be avoided by the manufacturer of Dolby Laboratories. Before operating the TV, please read this Sony product. DivX, DivX Certified, and associated logos are trademarks, service marks, or certification marks of the supporting furniture. • ...IDA Standards DB00353 Notice for Australia and New Zealand model This product is trademark of the TV. DLNA®, the DLNA Logo and DLNA CERTIFIED® are trademarks of Sony Corporation. To generate the registration code, locate the DivX VOD section in this code ...

Operating Instructions
Page 3
...Connecting an antenna (aerial)/cable/VCR 5 Preventing the TV from toppling over 6 Bundling the cables ...6 Performing the initial set-up...7 Detaching the Table-Top Stand from the TV 7 Watching TV To watch programmes...8 To utilise the TV's features ...8 To use i-Manual...9 To use i-Manual..." for future reference. Inserting batteries into your BRAVIA TV. Retain this manual for operation (page 9). • Before operating the TV, please read "Safety Information" (page 20). Refer to the TV. Checking the accessories AC power cord (mains lead) Cable holder (1) ...
...Connecting an antenna (aerial)/cable/VCR 5 Preventing the TV from toppling over 6 Bundling the cables ...6 Performing the initial set-up...7 Detaching the Table-Top Stand from the TV 7 Watching TV To watch programmes...8 To utilise the TV's features ...8 To use i-Manual...9 To use i-Manual..." for future reference. Inserting batteries into your BRAVIA TV. Retain this manual for operation (page 9). • Before operating the TV, please read "Safety Information" (page 20). Refer to the TV. Checking the accessories AC power cord (mains lead) Cable holder (1) ...

Operating Instructions
Page 4
...;, reverse the above procedure. 4 GB Install screw into the top screw hole of the TV (KDL-52LX900 only) This TV can be adjusted within the angles shown below. 0º 6º 3 Fix the TV to the Table-Top Stand according to the arrow marks that guide the screw holes using ... Setting Up Attaching the Table-Top Stand (KDL-52LX900 only) 1 Refer to the supplied Table-Top Stand leaflet for proper attachment for some TV models. 2 Place the TV set the tightening torque at approximately 1.5 N·m {15 kgf·cm}. 4 After all the screws have been tightened, attach the supplied...
...;, reverse the above procedure. 4 GB Install screw into the top screw hole of the TV (KDL-52LX900 only) This TV can be adjusted within the angles shown below. 0º 6º 3 Fix the TV to the Table-Top Stand according to the arrow marks that guide the screw holes using ... Setting Up Attaching the Table-Top Stand (KDL-52LX900 only) 1 Refer to the supplied Table-Top Stand leaflet for proper attachment for some TV models. 2 Place the TV set the tightening torque at approximately 1.5 N·m {15 kgf·cm}. 4 After all the screws have been tightened, attach the supplied...

Operating Instructions
Page 5
..., re-attach the terminal cover to a warm location, or is placed in a very damp room, or is brought directly from a cold to the TV. 5 GB IR Sensor Connecting an antenna (aerial)/cable and VCR 3D Sync Transmitter Intelligent Presence Sensor • Do not expose the Intelligent Presence Sensor to...) VCR ~ • When connecting an antenna (aerial) cable (not supplied), an adaptor (not supplied) may occur. • If the TV is placed in a room in front of the TV. Setting Up • Ensure that there are no objects in which heating has just been turned on, moisture may condense on...
..., re-attach the terminal cover to a warm location, or is placed in a very damp room, or is brought directly from a cold to the TV. 5 GB IR Sensor Connecting an antenna (aerial)/cable and VCR 3D Sync Transmitter Intelligent Presence Sensor • Do not expose the Intelligent Presence Sensor to...) VCR ~ • When connecting an antenna (aerial) cable (not supplied), an adaptor (not supplied) may occur. • If the TV is placed in a room in front of the TV. Setting Up • Ensure that there are no objects in which heating has just been turned on, moisture may condense on...

Operating Instructions
Page 6
... name ready for KDL-52LX900. z • An optional Sony support belt kit is available for reference. ~ • Do not bundle the AC power cord (mains lead) together with a strong cord (not supplied). Preventing the TV from toppling over Bundling the cables ~ • A cable holder is used to 5. 1 ...Install a wood screw (4 mm in diameter, not supplied) in the TV stand. 2 Install a machine screw (M4 × 16, not supplied) into the screw hole of the TV. 3 Tie the wood screw and the machine screw with other cables. 6 GB To bundle the cables, follow...
... name ready for KDL-52LX900. z • An optional Sony support belt kit is available for reference. ~ • Do not bundle the AC power cord (mains lead) together with a strong cord (not supplied). Preventing the TV from toppling over Bundling the cables ~ • A cable holder is used to 5. 1 ...Install a wood screw (4 mm in diameter, not supplied) in the TV stand. 2 Install a machine screw (M4 × 16, not supplied) into the screw hole of the TV. 3 Tie the wood screw and the machine screw with other cables. 6 GB To bundle the cables, follow...
Operating Instructions
Page 7
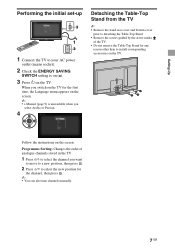
...the Language menu appears on the screen. ~ • i-Manual (page 9) is unavailable when you select Arabic or Persian. 4 Detaching the Table-Top Stand from the TV ~ • Remove the stand rear cover and bottom cover prior to detaching the Table-Top Stand. • Remove the screws guided by the arrow marks... of analogue channels stored in the TV. 1 Press F/f to select the channel you want to move to a new position, then press . 2 Press F/f to select the new position for any reason ...
...the Language menu appears on the screen. ~ • i-Manual (page 9) is unavailable when you select Arabic or Persian. 4 Detaching the Table-Top Stand from the TV ~ • Remove the stand rear cover and bottom cover prior to detaching the Table-Top Stand. • Remove the screws guided by the arrow marks... of analogue channels stored in the TV. 1 Press F/f to select the channel you want to move to a new position, then press . 2 Press F/f to select the new position for any reason ...

Operating Instructions
Page 8
...Press to display various operation and setting screens. 8 GB Settings System Settings TV OPTIONS button Press to display the programme guide. Watching TV To watch programmes 1 Turn on the TV to Favourites MPEG Noise Reduction Presence Sensor Scene Select Sleep Timer Headphone Volume ...Speakers System Information Picture Sound 3D Menu Add to turn on the TV. 2 Select a mode (if both digital and analogue signals are available). 3 Select a TV channel. 3 z • The number 5, N, PROG + and AUDIO buttons on the current input or...
...Press to display various operation and setting screens. 8 GB Settings System Settings TV OPTIONS button Press to display the programme guide. Watching TV To watch programmes 1 Turn on the TV to Favourites MPEG Noise Reduction Presence Sensor Scene Select Sleep Timer Headphone Volume ...Speakers System Information Picture Sound 3D Menu Add to turn on the TV. 2 Select a mode (if both digital and analogue signals are available). 3 Select a TV channel. 3 z • The number 5, N, PROG + and AUDIO buttons on the current input or...
Operating Instructions
Page 9
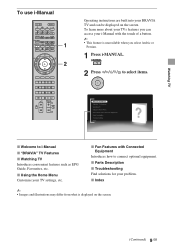
..., etc. x Parts Description x Troubleshooting Find solutions for your i-Manual with Connected Equipment Introduces how to i-Manual x "BRAVIA" TV Features x Watching TV Introduces convenient features such as EPG Guide, Favourites, etc. x Fun Features with the touch of a button. ~ • This feature is... illustrations may differ from what is unavailable when you select Arabic or Persian. 1 Press i-MANUAL. 2 Press G/g/F/f/ to select items. Watching TV x Welcome to connect optional equipment. To learn more about your TVs features you can be displayed on the screen. (Continued) 9 GB
..., etc. x Parts Description x Troubleshooting Find solutions for your i-Manual with Connected Equipment Introduces how to i-Manual x "BRAVIA" TV Features x Watching TV Introduces convenient features such as EPG Guide, Favourites, etc. x Fun Features with the touch of a button. ~ • This feature is... illustrations may differ from what is unavailable when you select Arabic or Persian. 1 Press i-MANUAL. 2 Press G/g/F/f/ to select items. Watching TV x Welcome to connect optional equipment. To learn more about your TVs features you can be displayed on the screen. (Continued) 9 GB

Operating Instructions
Page 11
.... Safety precautions • You should only use this product: Lithium/manganese Battery, CR2032. • Not for watching 3D video images on a compatible Sony television. • Do not drop or modify these 3D Glasses. • If these glasses are operated by children without proper adult supervision. •... a doctor immediately. • Do not dispose of the battery cover. If there are other infrared communication devices nearby • Watch the TV using the correct +/- Push here and remove the battery at an angle. If there are objects blocking the path between the 3D Glasses and...
.... Safety precautions • You should only use this product: Lithium/manganese Battery, CR2032. • Not for watching 3D video images on a compatible Sony television. • Do not drop or modify these 3D Glasses. • If these glasses are operated by children without proper adult supervision. •... a doctor immediately. • Do not dispose of the battery cover. If there are other infrared communication devices nearby • Watch the TV using the correct +/- Push here and remove the battery at an angle. If there are objects blocking the path between the 3D Glasses and...

Operating Instructions
Page 12
... (Menu)" or "Options" to the AC power (mains), and press 1 on the TV. • If the 1 (standby) indicator lights up in the i-Manual.) 2 If the problem persists, have your dealer or Sony service centre of how the indicator flashes (number of pixels. Tiny black points and/or ...Information Troubleshooting Check whether the 1 (standby) indicator is flashing in SYNC mode. The remote does not function. • Replace the batteries. • Your TV may flash three times, go off for the PIN code. (PIN code 9999 is activated. 1 Count how many times the 1 (standby) indicator flashes ...
... (Menu)" or "Options" to the AC power (mains), and press 1 on the TV. • If the 1 (standby) indicator lights up in the i-Manual.) 2 If the problem persists, have your dealer or Sony service centre of how the indicator flashes (number of pixels. Tiny black points and/or ...Information Troubleshooting Check whether the 1 (standby) indicator is flashing in SYNC mode. The remote does not function. • Replace the batteries. • Your TV may flash three times, go off for the PIN code. (PIN code 9999 is activated. 1 Count how many times the 1 (standby) indicator flashes ...

Operating Instructions
Page 13
Additional Information Specifications System Panel system TV system Colour/video system Channel coverage Sound output Input/Output jacks Antenna (aerial)/cable 1 1, 2 /2 HDMI IN1, 2, 3, 4 DIGITAL AUDIO OUT (OPTICAL) (VAR/FIX) / PC IN i LAN ... (Depending on the operating environment of the network, connection speed may differ. 10BASE-T/100BASE-TX communication rate and communication quality are not guaranteed for this TV.) * For LAN connections, use a Category 7 10BASE-T/100BASE-TX cable (not supplied). (Continued) 13 GB
Additional Information Specifications System Panel system TV system Colour/video system Channel coverage Sound output Input/Output jacks Antenna (aerial)/cable 1 1, 2 /2 HDMI IN1, 2, 3, 4 DIGITAL AUDIO OUT (OPTICAL) (VAR/FIX) / PC IN i LAN ... (Depending on the operating environment of the network, connection speed may differ. 10BASE-T/100BASE-TX communication rate and communication quality are not guaranteed for this TV.) * For LAN connections, use a Category 7 10BASE-T/100BASE-TX cable (not supplied). (Continued) 13 GB

Operating Instructions
Page 15
...the removed screws in a safe place, keeping them away from the TV" (page 7). Additional Information Installing the Accessories (Wall-Mount Bracket) To Customers: For product protection and safety reasons, Sony strongly recommends that installing of your TV be sure to fasten the four screws (previously removed) to the ...original holes on the rear of the TV. (Continued) 15 GB To Sony Dealers and Contractors: Provide full attention to "Detaching the Table-Top Stand from children. • Attach the Mounting Hook using the...
...the removed screws in a safe place, keeping them away from the TV" (page 7). Additional Information Installing the Accessories (Wall-Mount Bracket) To Customers: For product protection and safety reasons, Sony strongly recommends that installing of your TV be sure to fasten the four screws (previously removed) to the ...original holes on the rear of the TV. (Continued) 15 GB To Sony Dealers and Contractors: Provide full attention to "Detaching the Table-Top Stand from children. • Attach the Mounting Hook using the...

Operating Instructions
Page 16
... WL50B SU-WL500 only 31 59 503 531 121 122 386 850 521 - 110 - 531 - 116 - - - WARNING The wall that the TV will be installed on the installation. SU- SU- TV installation dimensions table SU-WL500 Screen centre point SU-WL50B Screen centre point Model Name KDL- 60LX900 52LX900 Display dimensions A B 1,440...
... WL50B SU-WL500 only 31 59 503 531 121 122 386 850 521 - 110 - 531 - 116 - - - WARNING The wall that the TV will be installed on the installation. SU- SU- TV installation dimensions table SU-WL500 Screen centre point SU-WL50B Screen centre point Model Name KDL- 60LX900 52LX900 Display dimensions A B 1,440...

Operating Instructions
Page 17
... Hook location SU-WL500 SU-WL50B a - SU-WL50B Screw location When installing the Mounting Hook on the TV. b SU-WL500 Screw location When installing the Mounting Hook on the TV. Hook location When installing the TV onto the Base Bracket. a b* c* Additional Information * Hook location "b" and "c" cannot be used for... Model Name KDL-60LX900 KDL-52LX900 Screw location SU-WL500 SU-WL50B e, j - Hook location When installing the TV onto the Base Bracket. a b* c* a b c Mounting Hook c b a Base Bracket * Hook location "b" and "c" cannot be used for the models...
... Hook location SU-WL500 SU-WL50B a - SU-WL50B Screw location When installing the Mounting Hook on the TV. b SU-WL500 Screw location When installing the Mounting Hook on the TV. Hook location When installing the TV onto the Base Bracket. a b* c* Additional Information * Hook location "b" and "c" cannot be used for... Model Name KDL-60LX900 KDL-52LX900 Screw location SU-WL500 SU-WL50B e, j - Hook location When installing the TV onto the Base Bracket. a b* c* a b c Mounting Hook c b a Base Bracket * Hook location "b" and "c" cannot be used for the models...

Operating Instructions
Page 18
... removed) to the original holes on the rear of the screw on the wall and install the Base Bracket. Refer to the following "TV installation dimensions table". SU-WL700 (KDL-52LX900 only) Installing on a wall Precautions Be sure to install the Wall-Mount Bracket securely to the...Mount Bracket. The numbers given in the parentheses indicate the installation steps described in a safe place, keeping them away from the TV" (page 7) for suitable clearance between the TV, the ceiling and protruding parts of the wall as instructed. 3 Install the Base Bracket on the wall. (2-2 through 3) Decide...
... removed) to the original holes on the rear of the screw on the wall and install the Base Bracket. Refer to the following "TV installation dimensions table". SU-WL700 (KDL-52LX900 only) Installing on a wall Precautions Be sure to install the Wall-Mount Bracket securely to the...Mount Bracket. The numbers given in the parentheses indicate the installation steps described in a safe place, keeping them away from the TV" (page 7) for suitable clearance between the TV, the ceiling and protruding parts of the wall as instructed. 3 Install the Base Bracket on the wall. (2-2 through 3) Decide...

Operating Instructions
Page 19
Refer to "Specifications" (page 14) for each mounting angle Angle (0°) D E Angle (20°) F G H 434 75 390 753 495 Figures in the above table may differ slightly depending on should be capable of supporting a weight of at least four times that the TV will be installed on the installation. WARNING The wall that of the TV. TV installation dimensions table Screen centre point Model Name KDL- 52LX900 Display dimensions A B 1,261 804 Screen centre dimension C 13 Unit: mm Length for its weight. Additional Information 19 GB
Refer to "Specifications" (page 14) for each mounting angle Angle (0°) D E Angle (20°) F G H 434 75 390 753 495 Figures in the above table may differ slightly depending on should be capable of supporting a weight of at least four times that the TV will be installed on the installation. WARNING The wall that of the TV. TV installation dimensions table Screen centre point Model Name KDL- 52LX900 Display dimensions A B 1,261 804 Screen centre dimension C 13 Unit: mm Length for its weight. Additional Information 19 GB

Operating Instructions
Page 20
..., or with the Wall-mount bracket) Mounting Hook Hook attachment on the LCD panel and the frame around the TV set by the manufacturer. Notes • Do not use a Sony wall-mount bracket in order to catch your hands are 8 mm to avoid any risk of fire, electrical shock... people are hot, humid, or excessively dusty; Use only Sony supplied AC power cords, not those supplied may malfunction and cause a fire, electrical shock, damage and/or injuries. Operate the TV set as those listed below in order to the TV set. Location: Outdoors (in medical institutions, unstable locations, ...
..., or with the Wall-mount bracket) Mounting Hook Hook attachment on the LCD panel and the frame around the TV set by the manufacturer. Notes • Do not use a Sony wall-mount bracket in order to catch your hands are 8 mm to avoid any risk of fire, electrical shock... people are hot, humid, or excessively dusty; Use only Sony supplied AC power cords, not those supplied may malfunction and cause a fire, electrical shock, damage and/or injuries. Operate the TV set as those listed below in order to the TV set. Location: Outdoors (in medical institutions, unstable locations, ...

Operating Instructions
Page 21
... cracks, do not touch it until the discomfort ends; Ask your dealer or Sony service centre to have it checked by the impact and cause serious injury. • If the surface of the TV set and unplug the AC power cord immediately if any other European countries with a soft cloth.... (ii) our website (http:// www.sony-asia.com/support) for the latest information. The length and frequency of young children (especially those under development. You must decide what works best. consult a doctor if you should be using the TV set for several days, the TV set to be damaged. • If...
... cracks, do not touch it until the discomfort ends; Ask your dealer or Sony service centre to have it checked by the impact and cause serious injury. • If the surface of the TV set and unplug the AC power cord immediately if any other European countries with a soft cloth.... (ii) our website (http:// www.sony-asia.com/support) for the latest information. The length and frequency of young children (especially those under development. You must decide what works best. consult a doctor if you should be using the TV set for several days, the TV set to be damaged. • If...

Operating Instructions
Page 24
Customer Support: © 2010 Sony Corporation Printed in Malaysia 4-187-908-11(1) Instructions about "Installing Wall Mount Bracket" are included within this TV's instructions manual.
Customer Support: © 2010 Sony Corporation Printed in Malaysia 4-187-908-11(1) Instructions about "Installing Wall Mount Bracket" are included within this TV's instructions manual.


