Operating Instructions
Page 3
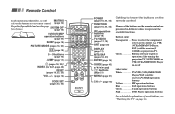
... CC MTS/SAP DISPLAY 123 456 789 JUMP ENTER 0 INDEX GUIDE RESET VOL MENU CH CODE SET TV POWER (pages 16, 44, 45) FUNCTION (pages 16, 44, 45) PIP operation buttons (page 19) TV/VIDEO (pages 17, 19) ANT (page 20) DISPLAY (page 17) MTS/SAP (pages 18, 23) ENTER (page 16... 21) CH +/- (page 16) Getting to know the buttons on the remote control Names of the buttons on the remote control are presented in different colors to represent the available functions. Press to select the component you want to control; Remote Control In the instructions that follow, we will MUTING refer...
... CC MTS/SAP DISPLAY 123 456 789 JUMP ENTER 0 INDEX GUIDE RESET VOL MENU CH CODE SET TV POWER (pages 16, 44, 45) FUNCTION (pages 16, 44, 45) PIP operation buttons (page 19) TV/VIDEO (pages 17, 19) ANT (page 20) DISPLAY (page 17) MTS/SAP (pages 18, 23) ENTER (page 16... 21) CH +/- (page 16) Getting to know the buttons on the remote control Names of the buttons on the remote control are presented in different colors to represent the available functions. Press to select the component you want to control; Remote Control In the instructions that follow, we will MUTING refer...
Operating Instructions
Page 6
...the windows that face the screen with a soft cloth. If the picture becomes dark after using the projection TV for several days, disconnect the power by pulling the plug itself. Consult qualified service personnel. It is desirable to fit into the outlet, contact your dealer. • If ... is transported directly from a cold to a warm location, or if the room temperature changes suddenly, the picture may be blurred or show poor color. Note on cleaning Clean the cabinet of the projection TV with solution of a reflective material. 2 It is recommended to clean the inside the ...
...the windows that face the screen with a soft cloth. If the picture becomes dark after using the projection TV for several days, disconnect the power by pulling the plug itself. Consult qualified service personnel. It is desirable to fit into the outlet, contact your dealer. • If ... is transported directly from a cold to a warm location, or if the room temperature changes suddenly, the picture may be blurred or show poor color. Note on cleaning Clean the cabinet of the projection TV with solution of a reflective material. 2 It is recommended to clean the inside the ...
Operating Instructions
Page 10
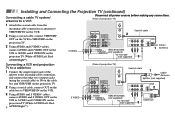
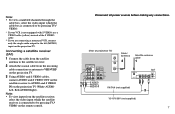
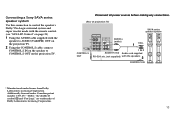
... on the VCR to AUDIO and S VIDEO IN on the projection TV (White-AUDIO Left, Red6 AUDIO Right**). Installing and Connecting the Projection TV (continued) Connecting a cable TV system/ antenna to a VCR Disconnect all power sources before making any connections. (Rear of projection TV) 1 Attach the coaxial cable from the incoming cable connection...
... on the VCR to AUDIO and S VIDEO IN on the projection TV (White-AUDIO Left, Red6 AUDIO Right**). Installing and Connecting the Projection TV (continued) Connecting a cable TV system/ antenna to a VCR Disconnect all power sources before making any connections. (Rear of projection TV) 1 Attach the coaxial cable from the incoming cable connection...
Operating Instructions
Page 11
... projection TV. 3 Using AUDIO and S VIDEO cables, connect AUDIO and S VIDEO OUT on the satellite receiver to AUDIO and S VIDEO IN on the projection TV (White-AUDIO Left, Red-AUDIO Right). Disconnect all power sources before making any connections. (Rear of the S VIDEO cable. ** If you are connecting a ...monaural VCR, connect only the single audio output to by pressing TV/ VIDEO. * If your VCR is connected to the left (MONO...
... projection TV. 3 Using AUDIO and S VIDEO cables, connect AUDIO and S VIDEO OUT on the satellite receiver to AUDIO and S VIDEO IN on the projection TV (White-AUDIO Left, Red-AUDIO Right). Disconnect all power sources before making any connections. (Rear of the S VIDEO cable. ** If you are connecting a ...monaural VCR, connect only the single audio output to by pressing TV/ VIDEO. * If your VCR is connected to the left (MONO...
Operating Instructions
Page 12
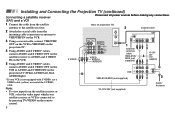
... IN S VIDEO VHF/UHF OUT LINE VCR OUT IN 5 VMC-810S/820S (not supplied) 2 YC-15V/30V (not supplied) Cable/ Antenna 8 Installing and Connecting the Projection TV (continued) Connecting a satellite receiver Disconnect all power sources before making ...any connections. (SAT) and a VCR 1 Connect the cable from the satellite antenna to the satellite receiver. 2 Attach the coaxial cable from the satellite receiver or VCR, select the video input which your VCR is connected to AUDIO and S VIDEO IN on the remote control. S VIDEO (Rear of the S VIDEO...
... IN S VIDEO VHF/UHF OUT LINE VCR OUT IN 5 VMC-810S/820S (not supplied) 2 YC-15V/30V (not supplied) Cable/ Antenna 8 Installing and Connecting the Projection TV (continued) Connecting a satellite receiver Disconnect all power sources before making ...any connections. (SAT) and a VCR 1 Connect the cable from the satellite antenna to the satellite receiver. 2 Attach the coaxial cable from the satellite receiver or VCR, select the video input which your VCR is connected to AUDIO and S VIDEO IN on the remote control. S VIDEO (Rear of the S VIDEO...
Operating Instructions
Page 13
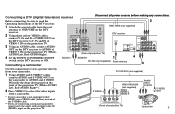
...Disconnect all power sources before making any connections. Before connecting, be sure to read the Operating Instructions of the DTV receiver. 1 Attach the coaxial cable from a camcorder. * If your camcorder is not equipped with S VIDEO, use a VIDEO cable (yellow) instead of VIDEO 3 IN...audio output to ON. Connecting a camcorder 2 AUX Y PB TO PR CONVERTER IN VIDEO 1 VIDEO 3 S VIDEO OUT MONITOR AUDIO (VAR/FIX) VHF/UHF VIDEO Y VIDEO L (MONO) AUDIO R L PB (MONO) AUDIO PR R COMPONENT (Rear of projection TV) AUDIO-L AUDIO-R VMC-10HG (not supplied) DTV receiver VHF/UHF ...
...Disconnect all power sources before making any connections. Before connecting, be sure to read the Operating Instructions of the DTV receiver. 1 Attach the coaxial cable from a camcorder. * If your camcorder is not equipped with S VIDEO, use a VIDEO cable (yellow) instead of VIDEO 3 IN...audio output to ON. Connecting a camcorder 2 AUX Y PB TO PR CONVERTER IN VIDEO 1 VIDEO 3 S VIDEO OUT MONITOR AUDIO (VAR/FIX) VHF/UHF VIDEO Y VIDEO L (MONO) AUDIO R L PB (MONO) AUDIO PR R COMPONENT (Rear of projection TV) AUDIO-L AUDIO-R VMC-10HG (not supplied) DTV receiver VHF/UHF ...

Operating Instructions
Page 14
... playback) AUDIO R AUDIO L VIDEO LINE OUT OUT IN VIDEO AUDIO-L AUDIO-R 1 VMC-810S/820S (not supplied) IN VIDEO 1 VIDEO 3 S VIDEO OUT MONITOR AUDIO (VAR/FIX) VHF/UHF VIDEO L (MONO) AUDIO R Y PB PR COMPONENT VIDEO L (MONO) AUDIO R VCR (for tape Disconnect all power sources before making any connections. ...editing By connecting a second VCR to MONITOR OUT, you can record a program being played by the primary VCR to the second VCR or perform tape editing and dubbing. (Rear ...
... playback) AUDIO R AUDIO L VIDEO LINE OUT OUT IN VIDEO AUDIO-L AUDIO-R 1 VMC-810S/820S (not supplied) IN VIDEO 1 VIDEO 3 S VIDEO OUT MONITOR AUDIO (VAR/FIX) VHF/UHF VIDEO L (MONO) AUDIO R Y PB PR COMPONENT VIDEO L (MONO) AUDIO R VCR (for tape Disconnect all power sources before making any connections. ...editing By connecting a second VCR to MONITOR OUT, you can record a program being played by the primary VCR to the second VCR or perform tape editing and dubbing. (Rear ...
Operating Instructions
Page 15
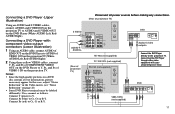
...) to CB, Cb or B-Y. Connecting the DVD Player through other video equipment will cause unwanted picture noise. Connect PB (blue) to CR, Cr or R-Y. Disconnect all power sources before making any connections. (Rear of projection TV) AUX S VIDEO IN VIDEO 1 VIDEO 3 S VIDEO OUT MONITOR AUDIO (VAR/FIX) VIDEO Y VIDEO L (MONO) AUDIO R AUDIO-R AUDIO-L PB PR COMPONENT L (MONO) AUDIO R TO...
...) to CB, Cb or B-Y. Connecting the DVD Player through other video equipment will cause unwanted picture noise. Connect PB (blue) to CR, Cr or R-Y. Disconnect all power sources before making any connections. (Rear of projection TV) AUX S VIDEO IN VIDEO 1 VIDEO 3 S VIDEO OUT MONITOR AUDIO (VAR/FIX) VIDEO Y VIDEO L (MONO) AUDIO R AUDIO-R AUDIO-L PB PR COMPONENT L (MONO) AUDIO R TO...

Operating Instructions
Page 16
... amplifier one of the unused Line inputs (e.g. Installing and Connecting the Projection TV (continued) Connecting an audio system Disconnect all power sources before making any connections. Tape2, AUX1, etc.) on the stereo. 2 Set the stereo to the chosen Line input...Audio Out" and "Speaker" on the projection TV to the projection TV. (Rear of projection TV) 1 Using an AUDIO cable, connect AUDIO (VAR/FIX) OUT on page 24) Note: CONTROL S OUT IN VIDEO 1 VIDEO 3 S VIDEO OUT MONITOR AUDIO (VAR/FIX) VIDEO Y VIDEO L (MONO) AUDIO R L PB (MONO) AUDIO PR R COMPONENT AUDIO-L...
... amplifier one of the unused Line inputs (e.g. Installing and Connecting the Projection TV (continued) Connecting an audio system Disconnect all power sources before making any connections. Tape2, AUX1, etc.) on the stereo. 2 Set the stereo to the chosen Line input...Audio Out" and "Speaker" on the projection TV to the projection TV. (Rear of projection TV) 1 Using an AUDIO cable, connect AUDIO (VAR/FIX) OUT on page 24) Note: CONTROL S OUT IN VIDEO 1 VIDEO 3 S VIDEO OUT MONITOR AUDIO (VAR/FIX) VIDEO Y VIDEO L (MONO) AUDIO R L PB (MONO) AUDIO PR R COMPONENT AUDIO-L...
Operating Instructions
Page 17
"Dolby," the double-D symbol a and "Pro Logic" are trademarks of projection TV) SAVA series speaker system IN VIDEO 1 VIDEO 3 S VIDEO CONTROL S OUT VIDEO L (MONO) AUDIO R OUT MONITOR AUDIO (VAR/FIX) Y VIDEO L PB (MONO) AUDIO PR R COMPONENT AUDIO-L (white) 1 1 IN L 1 IN R CONTROL S AUDIO-R (red) ... remote control. (see "SAVA SP Control" on the projection TV. Disconnect all power sources before making any connections. (Rear of Dolby Laboratories Licensing Corporation. 13 Connecting a Sony SAVA series speaker system Use this connection to CONTROL S OUT on page 24)...
"Dolby," the double-D symbol a and "Pro Logic" are trademarks of projection TV) SAVA series speaker system IN VIDEO 1 VIDEO 3 S VIDEO CONTROL S OUT VIDEO L (MONO) AUDIO R OUT MONITOR AUDIO (VAR/FIX) Y VIDEO L PB (MONO) AUDIO PR R COMPONENT AUDIO-L (white) 1 1 IN L 1 IN R CONTROL S AUDIO-R (red) ... remote control. (see "SAVA SP Control" on the projection TV. Disconnect all power sources before making any connections. (Rear of Dolby Laboratories Licensing Corporation. 13 Connecting a Sony SAVA series speaker system Use this connection to CONTROL S OUT on page 24)...
Operating Instructions
Page 18
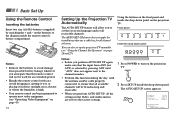
...front panel and inside the drop-down panel. Avoid dropping it, getting it wet, or placing it in the Video, and Audio menus are reset to the factory settings. 1 Press POWER to turn on the batteries to the diagram inside the drop-down panel on -screen language and set up the... • Before you perform AUTO SET UP, all receivable channels. The AUTO SET UP screen appears. CHANNEL + POWER TIMER/STAND BY Inside the drop-down panel: SET UP MENU FLASH FOCUS TV/VIDEO Notes: • Remove the batteries to avoid damage from possible battery leakage whenever you anticipate that the remote...
...front panel and inside the drop-down panel. Avoid dropping it, getting it wet, or placing it in the Video, and Audio menus are reset to the factory settings. 1 Press POWER to turn on the batteries to the diagram inside the drop-down panel on -screen language and set up the... • Before you perform AUTO SET UP, all receivable channels. The AUTO SET UP screen appears. CHANNEL + POWER TIMER/STAND BY Inside the drop-down panel: SET UP MENU FLASH FOCUS TV/VIDEO Notes: • Remove the batteries to avoid damage from possible battery leakage whenever you anticipate that the remote...
Operating Instructions
Page 20
... 16 PICTURE MODE Press PICTURE MODE repeatedly to directly choose one of five different video modes that best suits the program you can also perform the "Picture Adjustment" (such as "Brightness," "Color," etc.) to customize the "Picture Adjustment" of some buttons found on the...screen and will explain the function of the Video menu according to display a standard picture for direct channel selection. Personal 1, Personal 2: Select to suit your taste. MUTING Activates the remote control for Projection TV Operations TV (FUNCTION) TV POWER 0-9 and ENTER CH +/- Speed Surf 1...
... 16 PICTURE MODE Press PICTURE MODE repeatedly to directly choose one of five different video modes that best suits the program you can also perform the "Picture Adjustment" (such as "Brightness," "Color," etc.) to customize the "Picture Adjustment" of some buttons found on the...screen and will explain the function of the Video menu according to display a standard picture for direct channel selection. Personal 1, Personal 2: Select to suit your taste. MUTING Activates the remote control for Projection TV Operations TV (FUNCTION) TV POWER 0-9 and ENTER CH +/- Speed Surf 1...

Operating Instructions
Page 22
.../VTR Press when you are finished using a VCR and you want to switch to the TV input. The VCR power will remain on before shutting off the projection TV and all other Sony equipment. 18 REFER TO THE ILLUSTRATION OF THE REMOTE CONTROL ON THE INSIDE FRONT COVER OF THIS MANUAL AS...
.../VTR Press when you are finished using a VCR and you want to switch to the TV input. The VCR power will remain on before shutting off the projection TV and all other Sony equipment. 18 REFER TO THE ILLUSTRATION OF THE REMOTE CONTROL ON THE INSIDE FRONT COVER OF THIS MANUAL AS...

Operating Instructions
Page 29
... on and off. h ch - - - To cancel your projection TV will erase all Timer settings. 25 Every Saturday) is now set the time duration (maximum of power will cause these settings to "Learning Menu Selection" on using the remote control to modify menu settings, refer to be lit. For detailed information on...
... on and off. h ch - - - To cancel your projection TV will erase all Timer settings. 25 Every Saturday) is now set the time duration (maximum of power will cause these settings to "Learning Menu Selection" on using the remote control to modify menu settings, refer to be lit. For detailed information on...

Operating Instructions
Page 48
...754 Tips z • In some rare cases, you remove the batteries, the code number may not be able to operate your non-Sony video equipment with the supplied remote control. To play Press (. Press again to step backward. Press again to resume normal playback. Operating an ...MDP using the remote control To turn On/Off Press DVD/VTR (POWER). [Green Button] To select a channel Press the 0 - 9 buttons. To record Press ( while pressing r. Release to resume normal playback. Release ...
...754 Tips z • In some rare cases, you remove the batteries, the code number may not be able to operate your non-Sony video equipment with the supplied remote control. To play Press (. Press again to step backward. Press again to resume normal playback. Operating an ...MDP using the remote control To turn On/Off Press DVD/VTR (POWER). [Green Button] To select a channel Press the 0 - 9 buttons. To record Press ( while pressing r. Release to resume normal playback. Release ...

Operating Instructions
Page 49
... 207, 208, 218 227, 228, 229 219, 220, 221 214, 215 209, 210, 211 216, 217 212, 213 Manufacturer code numbers (satellite receiver) Manufacturer Sony General Electric Hitachi Hughes Panasonic RCA/PROSCAN Toshiba Code number 801 (preset code for remote control) 802, 808 805 804 803 802 806, 807 To... operate the cable box or satellite receiver (SAT) 1 Press SAT/CABLE (POWER) [Green Button] to turn on/off the cable box or satellite receiver. 2 Press SAT/CABLE (FUNCTION). 3 For other codes listed for example - The ...
... 207, 208, 218 227, 228, 229 219, 220, 221 214, 215 209, 210, 211 216, 217 212, 213 Manufacturer code numbers (satellite receiver) Manufacturer Sony General Electric Hitachi Hughes Panasonic RCA/PROSCAN Toshiba Code number 801 (preset code for remote control) 802, 808 805 804 803 802 806, 807 To... operate the cable box or satellite receiver (SAT) 1 Press SAT/CABLE (POWER) [Green Button] to turn on/off the cable box or satellite receiver. 2 Press SAT/CABLE (FUNCTION). 3 For other codes listed for example - The ...

Operating Instructions
Page 50
... related to the use of your projection TV. • Make sure the projection TV's power cord is activated. (see if the TV/VIDEO setting is correct: when watching TV, set to TV, and when watching video tapes, set to "On" in . • Operate with a self-diagnosis function. ...least 3-4 feet away from fluorescent lights. • Check the polarity of flashes. Replace the batteries. • Press TV (FUNCTION) when operating your Sony projection TV, please call one of the projection TV's condition. function) No picture (screen not lit), no sound • Press MUTING so that "...
... related to the use of your projection TV. • Make sure the projection TV's power cord is activated. (see if the TV/VIDEO setting is correct: when watching TV, set to TV, and when watching video tapes, set to "On" in . • Operate with a self-diagnosis function. ...least 3-4 feet away from fluorescent lights. • Check the polarity of flashes. Replace the batteries. • Press TV (FUNCTION) when operating your Sony projection TV, please call one of the projection TV's condition. function) No picture (screen not lit), no sound • Press MUTING so that "...
Operating Instructions
Page 51
...are not presently in the TV's memory. (see "Auto Program" on page 27) No color • Adjust "Color" in the Video menu. (see "Picture Adjustment" on page 22) • Black and white programs cannot be seen in color. • Perform AUTO SET UP again using the SET UP button to return to the...picture and you switch to add receivable channels that are not presently in the TV's memory. (see "Video Label" on page 31) appear when you cannot select it. • Press the projection TV's power button off and on page 27) Double images or ghosts • Use a highly directional outdoor antenna ...
...are not presently in the TV's memory. (see "Auto Program" on page 27) No color • Adjust "Color" in the Video menu. (see "Picture Adjustment" on page 22) • Black and white programs cannot be seen in color. • Perform AUTO SET UP again using the SET UP button to return to the...picture and you switch to add receivable channels that are not presently in the TV's memory. (see "Video Label" on page 31) appear when you cannot select it. • Press the projection TV's power button off and on page 27) Double images or ghosts • Use a highly directional outdoor antenna ...

Operating Instructions
Page 52
...75 ohm external terminal for VHF/UHF Screen size (measured diagonally) 43 inches (KP-43T70) 46 inches (KP-46C70) 48 inches (KP-48S70/48S72) 53 inches (KP-53S70/53N74) 61 inches (KP-61S70) Inputs/outputs VIDEO 1 IN VIDEO 2 INPUT S VIDEO IN (4-pin mini DIN): Y: 1 Vp-p, 75-ohms unbalanced, sync negative ... For KP-53N74 Tweeter: 66 mm (2 5/8") × 2 Woofer: 130 mm (5 1/8") × 2 For KP-43T70/46C70/48S70/48S72/53S70/61S70 Woofer: 100 mm (4") × 2 Speaker output 15W × 2 (KP-43T70/46C70/48S70/48S72/53S70/ 61S70) 20 W × 2 (KP-53N74) Power requirement 120 V AC, 60 Hz Power consumption...
...75 ohm external terminal for VHF/UHF Screen size (measured diagonally) 43 inches (KP-43T70) 46 inches (KP-46C70) 48 inches (KP-48S70/48S72) 53 inches (KP-53S70/53N74) 61 inches (KP-61S70) Inputs/outputs VIDEO 1 IN VIDEO 2 INPUT S VIDEO IN (4-pin mini DIN): Y: 1 Vp-p, 75-ohms unbalanced, sync negative ... For KP-53N74 Tweeter: 66 mm (2 5/8") × 2 Woofer: 130 mm (5 1/8") × 2 For KP-43T70/46C70/48S70/48S72/53S70/61S70 Woofer: 100 mm (4") × 2 Speaker output 15W × 2 (KP-43T70/46C70/48S70/48S72/53S70/ 61S70) 20 W × 2 (KP-53N74) Power requirement 120 V AC, 60 Hz Power consumption...

Operating Instructions
Page 54
... States contact the Direct Response Center at : (416) 499-SONY (7669) Index (continued) CH 20 FREEZE 20 PIP 19 POSITION 19 SWAP 20 TV/VIDEO 19 R Remote control 14 Graphic Illustration ... (inside cover) RESET button 22, 23 S S Video cable 4 Safety 2 SAP 23 SAT/CABLE (FUNCTION 45 Satellite...U Timer menu operations 25 Treble 23 Troubleshooting 46, 47 TV (FUNCTION) button 16 TV POWER button 16 TV rating 35 TV/VIDEO button 17, 19 TV/VTR button 18 V, W VCR connection 6, 8, 10 operation 44 Video Label 31 Video menu operations 22 VOL 16 VOLUME 14, 15 X XDS 18 Y, Z Y/PB/PR...
... States contact the Direct Response Center at : (416) 499-SONY (7669) Index (continued) CH 20 FREEZE 20 PIP 19 POSITION 19 SWAP 20 TV/VIDEO 19 R Remote control 14 Graphic Illustration ... (inside cover) RESET button 22, 23 S S Video cable 4 Safety 2 SAP 23 SAT/CABLE (FUNCTION 45 Satellite...U Timer menu operations 25 Treble 23 Troubleshooting 46, 47 TV (FUNCTION) button 16 TV POWER button 16 TV rating 35 TV/VIDEO button 17, 19 TV/VTR button 18 V, W VCR connection 6, 8, 10 operation 44 Video Label 31 Video menu operations 22 VOL 16 VOLUME 14, 15 X XDS 18 Y, Z Y/PB/PR...


