
Operating Instructions
Page 2
...the separation between the equipment and receiver. • Connect the equipment into an outlet on the screen, keep this product meets the ENERGY STAR guidelines for a Class B digital device pursuant to Part... transmitted by cable companies for the remote control RM-Y906 MODELS: KP-43T70, KP-46C70, KP-48S70, KP-48S72, KP-53S70, KP-53N74, KP-61S70 Please keep the brightness and contrast functions at a high brightness or...your projection TV, make sure to rain or moisture. As an ENERGY STAR Partner, Sony Corporation has determined that to Article 820-40 of cable entry as a station logo...
...the separation between the equipment and receiver. • Connect the equipment into an outlet on the screen, keep this product meets the ENERGY STAR guidelines for a Class B digital device pursuant to Part... transmitted by cable companies for the remote control RM-Y906 MODELS: KP-43T70, KP-46C70, KP-48S70, KP-48S72, KP-53S70, KP-53N74, KP-61S70 Please keep the brightness and contrast functions at a high brightness or...your projection TV, make sure to rain or moisture. As an ENERGY STAR Partner, Sony Corporation has determined that to Article 820-40 of cable entry as a station logo...

Operating Instructions
Page 5
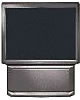
... favorite channels • Y/PB/PR inputs for purchasing the Sony Color Rear Video Projection TV. We recommend that you carefully review the contents ...Sony logo, on the sticker, and also on the TV box (white label). Similar controls may be found on -screen...Video Equipment 43 Setting the Manufacturer's Code 43 Operating a Cable Box or Satellite Receiver (SAT 45 Setting the Manufacturer's Code 45 Troubleshooting 46 Specifications 48 Index 49 Owner's Record The model and serial numbers are written for models KP-43T70, KP46C70, KP-48S70, KP-48S72, KP-53S70, KP53N74 and KP-61S70...
... favorite channels • Y/PB/PR inputs for purchasing the Sony Color Rear Video Projection TV. We recommend that you carefully review the contents ...Sony logo, on the sticker, and also on the TV box (white label). Similar controls may be found on -screen...Video Equipment 43 Setting the Manufacturer's Code 43 Operating a Cable Box or Satellite Receiver (SAT 45 Setting the Manufacturer's Code 45 Troubleshooting 46 Specifications 48 Index 49 Owner's Record The model and serial numbers are written for models KP-43T70, KP46C70, KP-48S70, KP-48S72, KP-53S70, KP53N74 and KP-61S70...
Operating Instructions
Page 6
... with a dry soft cloth. Consult qualified service personnel. Never use spot lighting directed down from the screen, wipe it gently with opaque drapery. If you will not be blurred or show poor color. It is recommended to use strong solvents such as thinner or benzine for several days, disconnect the ...Clean the cabinet of the projection TV with solution of the projection TV. Installing • To prevent internal heat buildup, do not expose the screen to let the moisture evaporate before operating it further. • If you are not of a reflective material. 2
... with a dry soft cloth. Consult qualified service personnel. Never use spot lighting directed down from the screen, wipe it gently with opaque drapery. If you will not be blurred or show poor color. It is recommended to use strong solvents such as thinner or benzine for several days, disconnect the ...Clean the cabinet of the projection TV with solution of the projection TV. Installing • To prevent internal heat buildup, do not expose the screen to let the moisture evaporate before operating it further. • If you are not of a reflective material. 2
Operating Instructions
Page 18
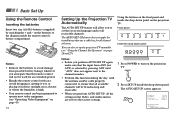
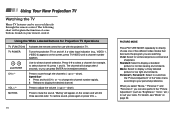
...leakage whenever you anticipate that all available channels will be used for all receivable channels. The AUTO SET UP screen appears. Avoid dropping it, getting it wet, or placing it in the Video, and Audio menus are reset to the factory settings. 1 Press POWER to exit. Press [ SET UP...batteries to set all channel selection. CHANNEL + POWER TIMER/STAND BY Inside the drop-down panel on -screen language and set the on the projection TV: Front panel: - + FLASH FOCUS TV/VIDEO VOLUME - Basic Set Up Using the Remote Control Inserting the batteries Insert two size AA (R6) ...
...leakage whenever you anticipate that all available channels will be used for all receivable channels. The AUTO SET UP screen appears. Avoid dropping it, getting it wet, or placing it in the Video, and Audio menus are reset to the factory settings. 1 Press POWER to exit. Press [ SET UP...batteries to set all channel selection. CHANNEL + POWER TIMER/STAND BY Inside the drop-down panel on -screen language and set the on the projection TV: Front panel: - + FLASH FOCUS TV/VIDEO VOLUME - Basic Set Up Using the Remote Control Inserting the batteries Insert two size AA (R6) ...
Operating Instructions
Page 19
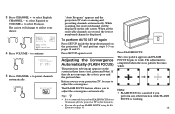
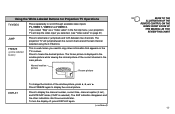
...adjustment is first turned on. • You can also perform FLASH FOCUS using the Set Up menu on the sub screen. VOLUME + - While scanning, the received channel will change to adjust the convergence. CHANNEL + English : Españ...FLASH FOCUS. 3 Press CHANNEL + to continue. - Oprima [ SET UP ] para salir. 4 Press VOLUME - The screen will be sure to reflect your projection TV, be displayed on page 31. to select English, CHANNEL - CHANNEL + Auto...and 15. If they do not converge, the color is poor and the picture blurs. to select Español or VOLUME + to work.
...adjustment is first turned on. • You can also perform FLASH FOCUS using the Set Up menu on the sub screen. VOLUME + - While scanning, the received channel will change to adjust the convergence. CHANNEL + English : Españ...FLASH FOCUS. 3 Press CHANNEL + to continue. - Oprima [ SET UP ] para salir. 4 Press VOLUME - The screen will be sure to reflect your projection TV, be displayed on page 31. to select English, CHANNEL - CHANNEL + Auto...and 15. If they do not converge, the color is poor and the picture blurs. to select Español or VOLUME + to work.
Operating Instructions
Page 20
... you select "Movie," "Personal 1" and "Personal 2," you are watching. If a video input indication (e.g., VIDEO 1, VIDEO 2) appears on the screen and will change the channel number rapidly. 2 Release to display a finely detailed picture for... example, to mute the sound. down ). "Muting" will explain the function of five different video modes that best suits the program you can also perform the "Picture Adjustment" (such as "Brightness," "Color...
... you select "Movie," "Personal 1" and "Personal 2," you are watching. If a video input indication (e.g., VIDEO 1, VIDEO 2) appears on the screen and will change the channel number rapidly. 2 Release to display a finely detailed picture for... example, to mute the sound. down ). "Muting" will explain the function of five different video modes that best suits the program you can also perform the "Picture Adjustment" (such as "Brightness," "Color...
Operating Instructions
Page 21
...V, v, B or b. The projection TV will skip the video input you selected. (see "Video Label" on the TV's screen. Using the White Labeled Buttons for Projection TV Operations TV/VIDEO Press repeatedly to freeze the desired picture. The frozen picture ...is useful when you select "Skip" as a "Video Label" in the main picture. Normal motion picture 6 Reciipe flour - - - - 2 sugar ...
...V, v, B or b. The projection TV will skip the video input you selected. (see "Video Label" on the TV's screen. Using the White Labeled Buttons for Projection TV Operations TV/VIDEO Press repeatedly to freeze the desired picture. The frozen picture ...is useful when you select "Skip" as a "Video Label" in the main picture. Normal motion picture 6 Reciipe flour - - - - 2 sugar ...

Operating Instructions
Page 22
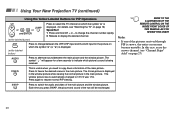
... time in minutes (30, 60, or 90) that you want the projection TV to remain on before shutting off the projection TV and all other Sony equipment. 18 REFER TO THE ILLUSTRATION OF THE REMOTE CONTROL ON THE INSIDE FRONT COVER OF THIS MANUAL AS YOU REVIEW THIS CHART Caption Vision... Displayed on the screen if the broadcaster offers this service. ANT (AUX input) Press to change between the VHF/UHF input and the AUX input. (for Projection TV Operations...
... time in minutes (30, 60, or 90) that you want the projection TV to remain on before shutting off the projection TV and all other Sony equipment. 18 REFER TO THE ILLUSTRATION OF THE REMOTE CONTROL ON THE INSIDE FRONT COVER OF THIS MANUAL AS YOU REVIEW THIS CHART Caption Vision... Displayed on the screen if the broadcaster offers this service. ANT (AUX input) Press to change between the VHF/UHF input and the AUX input. (for Projection TV Operations...

Operating Instructions
Page 23
... picture TV channel or inputsource mode for the main picture* (yellowgreen-colored) TV channel or inputsource mode for the window picture* (white-colored) * It will move the window picture to scroll through the available video inputs for PIP Operations PIP POSITION or Press to the bottom right ...location by pressing the V, v, B or b button. The symbol "b" or "B" indicates which picture's sound is displayed. (see "TV/VIDEO" on the screen. Each time you press RESET in PIP mode, the window picture will dim in the direction of the window picture (counterclockwise) around the main...
... picture TV channel or inputsource mode for the main picture* (yellowgreen-colored) TV channel or inputsource mode for the window picture* (white-colored) * It will move the window picture to scroll through the available video inputs for PIP Operations PIP POSITION or Press to the bottom right ...location by pressing the V, v, B or b button. The symbol "b" or "B" indicates which picture's sound is displayed. (see "TV/VIDEO" on the screen. Each time you press RESET in PIP mode, the window picture will dim in the direction of the window picture (counterclockwise) around the main...
Operating Instructions
Page 24
...(for details, see "Channel Skip/ Add" on page 16) Speed Surf 1 Press and hold CH + or - The window picture size is snowy, the entire screen may become unstable. Press again to 1/9 if it was 1/16. ANT (white labeled button) Press to indicate which picture's sound is displayed. In this case...) Using the Yellow Labeled Buttons for PIP Operations CH JUMP or 0 - 9 or and ENTER (white labeled button) Press to switch the audio and video of the main picture and the window picture. SWAP Press to select the TV channel on which the symbol "b" is displayed in the window picture...
...(for details, see "Channel Skip/ Add" on page 16) Speed Surf 1 Press and hold CH + or - The window picture size is snowy, the entire screen may become unstable. Press again to 1/9 if it was 1/16. ANT (white labeled button) Press to indicate which picture's sound is displayed. In this case...) Using the Yellow Labeled Buttons for PIP Operations CH JUMP or 0 - 9 or and ENTER (white labeled button) Press to switch the audio and video of the main picture and the window picture. SWAP Press to select the TV channel on which the symbol "b" is displayed in the window picture...

Operating Instructions
Page 25
...F o c u sF: r a n ç aNi so ch Adjusting menu Video Label VIDEO1: VIDEO2: VIDEO3: VIDEO1 VIDEO2 VIDEO3 Move Select Exit MENU Move Select Exit MENU 5 Press V or v to make your selection. To return to the previous screen (except for the slider adjustment menus), choose " " at any time Press MENU... Once you have completed all menu corrections, press MENU to alter the settings. The previous screen will be displayed. Set Up Parental Control Caption Vision: CC1 Language: English Video Label Flash Focus: No ch Move Select Exit MENU Some adjustment menus may also press b...
...F o c u sF: r a n ç aNi so ch Adjusting menu Video Label VIDEO1: VIDEO2: VIDEO3: VIDEO1 VIDEO2 VIDEO3 Move Select Exit MENU Move Select Exit MENU 5 Press V or v to make your selection. To return to the previous screen (except for the slider adjustment menus), choose " " at any time Press MENU... Once you have completed all menu corrections, press MENU to alter the settings. The previous screen will be displayed. Set Up Parental Control Caption Vision: CC1 Language: English Video Label Flash Focus: No ch Move Select Exit MENU Some adjustment menus may also press b...

Operating Instructions
Page 30
... five digits are watching Favorite Channel User's favorite channels You can view the channel that is selected with the Channel Caption menu in the sub screen. 2 Press . 3 Press V or v to the eight channels that you preset (or the last channel that you are selected. 4 Press . To erase a caption, press RESET. Repeat...
... five digits are watching Favorite Channel User's favorite channels You can view the channel that is selected with the Channel Caption menu in the sub screen. 2 Press . 3 Press V or v to the eight channels that you preset (or the last channel that you are selected. 4 Press . To erase a caption, press RESET. Repeat...

Operating Instructions
Page 31
... 9: Add Select a channel Move Select Exit MENU CH +/- Select On if your projection TV is selected with the Channel Skip/Add menu in the sub screen. With the Channel Skip/Add window open: 1 Press V or v to an antenna. 27 The selected channel will be erased.
... 9: Add Select a channel Move Select Exit MENU CH +/- Select On if your projection TV is selected with the Channel Skip/Add menu in the sub screen. With the Channel Skip/Add window open: 1 Press V or v to an antenna. 27 The selected channel will be erased.

Operating Instructions
Page 33
... 40 50 100 Exit 2 Press V or v to view from the menu. Changing Favorite Channel choices You have the option of returning to the Favorite Channel screen to select "Exit" at the bottom of the menu and press . 1 CNN 2 10 SPTN 20 30 40 50 100 Exit 29 The selected channel will...
... 40 50 100 Exit 2 Press V or v to view from the menu. Changing Favorite Channel choices You have the option of returning to the Favorite Channel screen to select "Exit" at the bottom of the menu and press . 1 CNN 2 10 SPTN 20 30 40 50 100 Exit 29 The selected channel will...

Operating Instructions
Page 34
... intended text. • XDS, Caption Vision, and the status display cannot be set to CC 1 for children. Set Up Parental Control Caption Vision: C C 1 Language: CC2 Video Label CC3 F l a s h F o c u s : C CN4o ch Text1 Text2 Text3 Text4 CC 1, CC 2, CC 3 or CC 4 displays a printed Move Select Exit MENU version of the ... on page 21. Adjusting Your SET UP (menus) (continued) Using the Set Up Menu Set Up Parental Control Caption Vision: CC1 Language: English Video Label Flash Focus: No ch Move Select Exit MENU For detailed information on using either half or the whole...
... intended text. • XDS, Caption Vision, and the status display cannot be set to CC 1 for children. Set Up Parental Control Caption Vision: C C 1 Language: CC2 Video Label CC3 F l a s h F o c u s : C CN4o ch Text1 Text2 Text3 Text4 CC 1, CC 2, CC 3 or CC 4 displays a printed Move Select Exit MENU version of the ... on page 21. Adjusting Your SET UP (menus) (continued) Using the Set Up Menu Set Up Parental Control Caption Vision: CC1 Language: English Video Label Flash Focus: No ch Move Select Exit MENU For detailed information on using either half or the whole...

Operating Instructions
Page 35
...and press . 2 Press V or v to select the input mode you can label VIDEO 1 IN as VHS). Select Yes and press to cancel Flash Focus. 31 When the adjustment is completed, the cross pattern on the screen becomes white. (for details, see page 15) Select No to start Flash Focus ...adjustment. Video Label VIDEO1: VIDEO2: VIDEO3: VIDEO1 VIDEO2 VIDEO3 With the Video Label window open: Move Select Exit MENU 1 Press V or v to select...
...and press . 2 Press V or v to select the input mode you can label VIDEO 1 IN as VHS). Select Yes and press to cancel Flash Focus. 31 When the adjustment is completed, the cross pattern on the screen becomes white. (for details, see page 15) Select No to start Flash Focus ...adjustment. Video Label VIDEO1: VIDEO2: VIDEO3: VIDEO1 VIDEO2 VIDEO3 With the Video Label window open: Move Select Exit MENU 1 Press V or v to select...

Operating Instructions
Page 38
...Control menu appears. For a detailed description of each rating, see page 30) Set Up Parental Control C a p t i o n VPi saisosnw: o r dC C 1 L a n g u a g e :_ _ _ _ Video Label ch Flash Focus: No 3 Press V or v to select "Custom," and press . P a r e n t a l L o c k : On Rating: Child C h a n g e P a s s w... Custom Rating in U.S.A. To view the program, follow the procedure below . 1 Press ENTER to display the "Password" screen. 2 Enter your four digit password using the 0-9 buttons. Parental Control Country: U.S.A. Parental Control will appear. Adjusting Your ...
...Control menu appears. For a detailed description of each rating, see page 30) Set Up Parental Control C a p t i o n VPi saisosnw: o r dC C 1 L a n g u a g e :_ _ _ _ Video Label ch Flash Focus: No 3 Press V or v to select "Custom," and press . P a r e n t a l L o c k : On Rating: Child C h a n g e P a s s w... Custom Rating in U.S.A. To view the program, follow the procedure below . 1 Press ENTER to display the "Password" screen. 2 Enter your four digit password using the 0-9 buttons. Parental Control Country: U.S.A. Parental Control will appear. Adjusting Your ...

Operating Instructions
Page 43
... TV ratings: TV-Y, TV-Y7, TV- G, TV-PG, TV-14, and TV-NR (continued) 39 If you to "HELP" on the screen, you enter "4357." (see step 2 of each rating. If you have forgotten your password the first time, you entered "4357" as follows.... a new four digit password using the 0-9 buttons. You can then store a new password. Viewable U.S. Sony's predetermined ratings These are original ratings that program even if you cannot view that Sony predetermined according to exit the menu. Parental Control Country: U.S.A Parental Lock: On Rating: Child Change Password...
... TV ratings: TV-Y, TV-Y7, TV- G, TV-PG, TV-14, and TV-NR (continued) 39 If you to "HELP" on the screen, you enter "4357." (see step 2 of each rating. If you have forgotten your password the first time, you entered "4357" as follows.... a new four digit password using the 0-9 buttons. You can then store a new password. Viewable U.S. Sony's predetermined ratings These are original ratings that program even if you cannot view that Sony predetermined according to exit the menu. Parental Control Country: U.S.A Parental Lock: On Rating: Child Change Password...

Operating Instructions
Page 50
... Center of the number of the following instructions, you inform qualified Sony personnel of the batteries. Dark, poor or no picture (screen lit), good sound • Adjust "Picture" in the Video menu. (see "Picture Adjustment" on page 22) • Adjust "Brightness" in the Video menu. (see "Picture Adjustment" on page 22) • Check antenna...
... Center of the number of the following instructions, you inform qualified Sony personnel of the batteries. Dark, poor or no picture (screen lit), good sound • Adjust "Picture" in the Video menu. (see "Picture Adjustment" on page 22) • Adjust "Brightness" in the Video menu. (see "Picture Adjustment" on page 22) • Check antenna...
Operating Instructions
Page 51
...'s memory. (see "Auto Program" on page 27) Cannot gain enough volume when • Increase the volume at the TV screen with an electronic gun or rifle cannot be used with the video game software. 47 using a cable box Favorite Channel does not display • Verify that "Favorite Channel" is set to ... are not presently in the TV's memory. (see "Auto Program" on page 27) No color • Adjust "Color" in the Video menu. (see "Picture Adjustment" on page 22) • Black and white programs cannot be seen in color. • Perform AUTO SET UP again using the SET UP button to return to the...
...'s memory. (see "Auto Program" on page 27) Cannot gain enough volume when • Increase the volume at the TV screen with an electronic gun or rifle cannot be used with the video game software. 47 using a cable box Favorite Channel does not display • Verify that "Favorite Channel" is set to ... are not presently in the TV's memory. (see "Auto Program" on page 27) No color • Adjust "Color" in the Video menu. (see "Picture Adjustment" on page 22) • Black and white programs cannot be seen in color. • Perform AUTO SET UP again using the SET UP button to return to the...


