
Operating Instructions
Page 3
...LF-X5 Base Station: Contains FCC ID : AK8IRF302U Contains IC : 409B-IRF302U Monitor: Contains FCC ID : AK8IRF303U Contains IC : 409B-IRF303U This device complies with the same or equivalent type. Never spill liquid of any liquid or solid object fall through the unit, do not expose the TV...rain or moisture. CAUTION Danger of important operating and maintenance (servicing) instructions in the literature accompanying the appliance. Low power Wireless devices emit low levels of low level RF exposures have not been confirmed by heating tissue), exposure to the presence of ...
...LF-X5 Base Station: Contains FCC ID : AK8IRF302U Contains IC : 409B-IRF302U Monitor: Contains FCC ID : AK8IRF303U Contains IC : 409B-IRF303U This device complies with the same or equivalent type. Never spill liquid of any liquid or solid object fall through the unit, do not expose the TV...rain or moisture. CAUTION Danger of important operating and maintenance (servicing) instructions in the literature accompanying the appliance. Low power Wireless devices emit low levels of low level RF exposures have not been confirmed by heating tissue), exposure to the presence of ...

Operating Instructions
Page 4
... equipment does cause harmful interference to Part 15 of the following measures: Reorient or relocate the receiving antenna. Consult the dealer or an experienced radio/TV technician for a Class B digital device, pursuant to radio or television reception, which the receiver is no guarantee that to the collection and recycling location nearest...
... equipment does cause harmful interference to Part 15 of the following measures: Reorient or relocate the receiving antenna. Consult the dealer or an experienced radio/TV technician for a Class B digital device, pursuant to radio or television reception, which the receiver is no guarantee that to the collection and recycling location nearest...

Operating Instructions
Page 5
...the Power 23 Carrying and Positioning the Monitor 28 Setting Up TV Channels 30 Using the On-screen Remote Control 33 Connecting to the Internet 37 Configuring Network Settings 40 Setting Up Mail 43 Guide to On-screen Icons 45 Wireless Connection at Home 47 Wired LAN Connection at Home 48 Wired... LAN Connection On the Go 48 Wireless Connection On the Go 49 About Wireless Security 51 Enable Wired LAN 53 Setting Up the Monitor 54 What's NetAV...
...the Power 23 Carrying and Positioning the Monitor 28 Setting Up TV Channels 30 Using the On-screen Remote Control 33 Connecting to the Internet 37 Configuring Network Settings 40 Setting Up Mail 43 Guide to On-screen Icons 45 Wireless Connection at Home 47 Wired LAN Connection at Home 48 Wired... LAN Connection On the Go 48 Wireless Connection On the Go 49 About Wireless Security 51 Enable Wired LAN 53 Setting Up the Monitor 54 What's NetAV...

Operating Instructions
Page 6
... the [Index] Window 64 Watching TV and Video 65 Using the TV/Video Screen 67 Selecting a Secondary Audio Program (SAP 68 Optimizing Picture Quality 68 Using the Sub-Screen (LF-X1 only 69 Capturing Images 70 Using the Wide Screen Mode (LF-X5 only 71 Adjusting the Picture Position (LF-X5 only 71 Web 73 Viewing Web...
... the [Index] Window 64 Watching TV and Video 65 Using the TV/Video Screen 67 Selecting a Secondary Audio Program (SAP 68 Optimizing Picture Quality 68 Using the Sub-Screen (LF-X1 only 69 Capturing Images 70 Using the Wide Screen Mode (LF-X5 only 71 Adjusting the Picture Position (LF-X5 only 71 Web 73 Viewing Web...

Operating Instructions
Page 7
... 117 Using an External Keyboard (LF-X1 only 119 Memory Stick (LF-X1)/CompactFlash (LF-X5) ........ 121 Using a "Memory Stick" (LF-X1 Only 122 Using a CompactFlash Card (LF-X5 Only 124 Initializing a "Memory Stick"/CompactFlash Card 126 Functions and Settings 127 Basic Settings ...128 Setting Up TV Channels Manually 129 Changing the Wireless Channel Manually 131 Using the Base...
... 117 Using an External Keyboard (LF-X1 only 119 Memory Stick (LF-X1)/CompactFlash (LF-X5) ........ 121 Using a "Memory Stick" (LF-X1 Only 122 Using a CompactFlash Card (LF-X5 Only 124 Initializing a "Memory Stick"/CompactFlash Card 126 Functions and Settings 127 Basic Settings ...128 Setting Up TV Channels Manually 129 Changing the Wireless Channel Manually 131 Using the Base...

Operating Instructions
Page 9
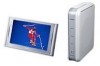
.... The LocationFreeTV is composed of locations. What is in order to enjoy video images and other over a wireless connection. This allows you to use , but not for the LF-X5.) • When the power is a LocationFreeTV? If other registered monitors. The monitor must be recharged while... variety of a monitor and a base station that embodies the LocationFreeTM concept-the ability to enjoy TV, videos, DVDs, Internet browsing, mail, and digital photos wherever you can access your TV, videos, and DVDs by using the system's NetAV function to connect to your digital albums. You...
.... The LocationFreeTV is composed of locations. What is in order to enjoy video images and other over a wireless connection. This allows you to use , but not for the LF-X5.) • When the power is a LocationFreeTV? If other registered monitors. The monitor must be recharged while... variety of a monitor and a base station that embodies the LocationFreeTM concept-the ability to enjoy TV, videos, DVDs, Internet browsing, mail, and digital photos wherever you can access your TV, videos, and DVDs by using the system's NetAV function to connect to your digital albums. You...

Operating Instructions
Page 17
Setup and Connections BASIC: Installing and Connecting Attaching the Base Station Stand page 19 Connecting to a TV Antenna page 20 Connecting to an External TV Tuner (STB page 20 Connecting Other Devices page 21 Turning On the Power page 23 Carrying and Positioning the Monitor page 28 BASIC: Basic Setting Setting Up TV Channels page 30 Using the On-screen Remote Control page 33 Connecting to the Internet page 37 Configuring Network Settings page 40 Setting Up Mail page 43 BASIC: Guide to On-screen Icons Guide to On-screen Icons page 45 17
Setup and Connections BASIC: Installing and Connecting Attaching the Base Station Stand page 19 Connecting to a TV Antenna page 20 Connecting to an External TV Tuner (STB page 20 Connecting Other Devices page 21 Turning On the Power page 23 Carrying and Positioning the Monitor page 28 BASIC: Basic Setting Setting Up TV Channels page 30 Using the On-screen Remote Control page 33 Connecting to the Internet page 37 Configuring Network Settings page 40 Setting Up Mail page 43 BASIC: Guide to On-screen Icons Guide to On-screen Icons page 45 17

Operating Instructions
Page 20
... other power cords and cables. Rear of antenna jack in your Sony dealer. Connecting to a TV Antenna The procedure for connecting to a TV antenna differs depending on the type of base station to antenna Antenna cable (not supplied) Connecting to an External TV Tuner (STB) There are two different procedures for connecting a set-top...
... other power cords and cables. Rear of antenna jack in your Sony dealer. Connecting to a TV Antenna The procedure for connecting to a TV antenna differs depending on the type of base station to antenna Antenna cable (not supplied) Connecting to an External TV Tuner (STB) There are two different procedures for connecting a set-top...

Operating Instructions
Page 22
Using a VCR and TV Connect the VCR to the VIDEO INPUT 2 terminal on the base station, and then ...UHF input jack VCR to VHF/UHF output jack Audio/video signal flow Connecting a Digital Video Camera Directly to the Monitor (LF-X1 Only) Use a mini AV cable (not supplied: VMCN320TP, VMC-N120TT) to connect a digital video camera directly to the... AV IN jack on the TV, as shown below. Antenna cable (not supplied) A/V cable (not supplied) from the device connected to the A/V input terminal on...
Using a VCR and TV Connect the VCR to the VIDEO INPUT 2 terminal on the base station, and then ...UHF input jack VCR to VHF/UHF output jack Audio/video signal flow Connecting a Digital Video Camera Directly to the Monitor (LF-X1 Only) Use a mini AV cable (not supplied: VMCN320TP, VMC-N120TT) to connect a digital video camera directly to the... AV IN jack on the TV, as shown below. Antenna cable (not supplied) A/V cable (not supplied) from the device connected to the A/V input terminal on...

Operating Instructions
Page 26
... again. The POWER indicator on the front of the base station lights green. ◆For the LF-X5 Slide POWER on top of the monitor to turn it on. AC-LX5M AC power adapter (supplied... POWER on the front of the base station to turn it on. 2 Turn on the monitor. ◆For the LF-X1 Press POWER on the top of the monitor to a wall outlet Do not remove the ferrite core. Power indicator ...The POWER indicator on the top of the monitor lights green, and the TV picture appears. For the LF-X5, slide POWER again. 26 ◆For the LF-X5 Power cord (supplied) to turn it on.
... again. The POWER indicator on the front of the base station lights green. ◆For the LF-X5 Slide POWER on top of the monitor to turn it on. AC-LX5M AC power adapter (supplied... POWER on the front of the base station to turn it on. 2 Turn on the monitor. ◆For the LF-X1 Press POWER on the top of the monitor to a wall outlet Do not remove the ferrite core. Power indicator ...The POWER indicator on the top of the monitor lights green, and the TV picture appears. For the LF-X5, slide POWER again. 26 ◆For the LF-X5 Power cord (supplied) to turn it on.

Operating Instructions
Page 27
...Charging the Battery Connect the monitor AC power adapter (ACLX1M) to finish starting up , please wait..." For the LF-X5, you cannot charge the battery while using Home-Wireless mode, if no TV picture appears after you press INDEX on the top of the monitor or touch the screen, the message "Starting up... . It is turned on. • For the LF-X5, when the safety function detects that the monitor has reached extreme ...
...Charging the Battery Connect the monitor AC power adapter (ACLX1M) to finish starting up , please wait..." For the LF-X5, you cannot charge the battery while using Home-Wireless mode, if no TV picture appears after you press INDEX on the top of the monitor or touch the screen, the message "Starting up... . It is turned on. • For the LF-X5, when the safety function detects that the monitor has reached extreme ...
Operating Instructions
Page 30
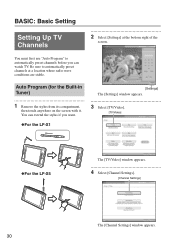
You can watch TV. BASIC: Basic Setting Setting Up TV Channels 2 Select [Settings] at a location where radio wave conditions are stable. Auto Program (for the Built-in Tuner) [Settings] The [Settings] window appears. 1 Remove the ... screen with it. Be sure to automatically preset channels before you can extend the stylus if you want. ◆For the LF-X1 3 Select [TV/Video]. [TV/Video] ◆For the LF-X5 The [TV/Video] window appears. 4 Select [Channel Settings]. [Channel Settings] The [Channel Settings] window appears. 30 You must first use "Auto Program" to...
You can watch TV. BASIC: Basic Setting Setting Up TV Channels 2 Select [Settings] at a location where radio wave conditions are stable. Auto Program (for the Built-in Tuner) [Settings] The [Settings] window appears. 1 Remove the ... screen with it. Be sure to automatically preset channels before you can extend the stylus if you want. ◆For the LF-X1 3 Select [TV/Video]. [TV/Video] ◆For the LF-X5 The [TV/Video] window appears. 4 Select [Channel Settings]. [Channel Settings] The [Channel Settings] window appears. 30 You must first use "Auto Program" to...

Operating Instructions
Page 31
...37 to complete scanning. 6 When scanning ends successfully, the message "Automatic channel scan has finished." The [TV] window appears. The [Remote Settings] window appears. 9 Select [TV]. On the [Remote Settings] window, you selected appears. The on -screen remote control. [Settings] The... -screen remote control appears. 13 Select a TV channel. 8 Select [Remote Settings]. The [Remote Settings] window reappears. 11 Select [Back], [Settings], then select [Exit]. The [TV/Video] window reappears. 12 Select [TV] in step 5. The [TV/Video] window reappears. It may take several ...
...37 to complete scanning. 6 When scanning ends successfully, the message "Automatic channel scan has finished." The [TV] window appears. The [Remote Settings] window appears. 9 Select [TV]. On the [Remote Settings] window, you selected appears. The on -screen remote control. [Settings] The... -screen remote control appears. 13 Select a TV channel. 8 Select [Remote Settings]. The [Remote Settings] window reappears. 11 Select [Back], [Settings], then select [Exit]. The [TV/Video] window reappears. 12 Select [TV] in step 5. The [TV/Video] window reappears. It may take several ...

Operating Instructions
Page 32
..., then press [Power]. 4 When channel scanning ends successfully, the message "Automatic channel scan has finished." The [Remote] window appears. 10 Select [TV]. appears. 5 Confirm the message, and then select [OK]. 6 Select [Back]. If selecting [Power] several times does not turn on how to... remote control settings. 32 When the device is turned on -screen remote to confirm that the buttons are enabled by selecting [Power]. The [TV/Video] window reappears. 7 Select [Settings], then select [Exit]. Make sure the programs that appear are correct. If this happens, select [Video...
..., then press [Power]. 4 When channel scanning ends successfully, the message "Automatic channel scan has finished." The [Remote] window appears. 10 Select [TV]. appears. 5 Confirm the message, and then select [OK]. 6 Select [Back]. If selecting [Power] several times does not turn on how to... remote control settings. 32 When the device is turned on -screen remote to confirm that the buttons are enabled by selecting [Power]. The [TV/Video] window reappears. 7 Select [Settings], then select [Exit]. Make sure the programs that appear are correct. If this happens, select [Video...

Operating Instructions
Page 33
... the buttons are enabled. 12 Select [Back]. Make sure to IR BLASTER port 2 Position the IR Blaster above the infrared receiver. 33 Continued DVR). The [TV/Video] window reappears. 14 Select [Settings], then select [Exit]. For more on the external device. Setup and Connections Using the On-screen Remote Control •...
... the buttons are enabled. 12 Select [Back]. Make sure to IR BLASTER port 2 Position the IR Blaster above the infrared receiver. 33 Continued DVR). The [TV/Video] window reappears. 14 Select [Settings], then select [Exit]. For more on the external device. Setup and Connections Using the On-screen Remote Control •...

Operating Instructions
Page 34
... the upper part of the window, select the make . [Power] Select a type. Notes • Even if the power turns on and off . The [TV/Video] window appears. 34 When the device is connected. IR Blaster 4 Select [Remote Settings]. Select a make and type of the connected device, then select [...Power]. Use the sub-screen to a port on Sony VCRs and other buttons may not have selected are displayed. With the on-screen remote that the power turns on the base station and connect...
... the upper part of the window, select the make . [Power] Select a type. Notes • Even if the power turns on and off . The [TV/Video] window appears. 34 When the device is connected. IR Blaster 4 Select [Remote Settings]. Select a make and type of the connected device, then select [...Power]. Use the sub-screen to a port on Sony VCRs and other buttons may not have selected are displayed. With the on-screen remote that the power turns on the base station and connect...

Operating Instructions
Page 35
...Follow steps 3 to 6 in the location you can change channels by sliding the stylus across the screen from the [Type] list (e.g., Sony "VCR+DVD Player"). The [TV/Video] window reappears. 9 Select [Settings], then select [Exit]. 13 Secure the IR Blaster in "Setting Up and Connecting the IR ... device displayed as allin-one device (e.g., a VCR+DVD player) The second remote control is now replaced with [DVD Player]. For more information, see "Watching TV and Video" (1 page 65). 12 After checking that you determined in step 2 (1 page 33). 10 Open the [Index] window. [Video 1] or...
...Follow steps 3 to 6 in the location you can change channels by sliding the stylus across the screen from the [Type] list (e.g., Sony "VCR+DVD Player"). The [TV/Video] window reappears. 9 Select [Settings], then select [Exit]. 13 Secure the IR Blaster in "Setting Up and Connecting the IR ... device displayed as allin-one device (e.g., a VCR+DVD player) The second remote control is now replaced with [DVD Player]. For more information, see "Watching TV and Video" (1 page 65). 12 After checking that you determined in step 2 (1 page 33). 10 Open the [Index] window. [Video 1] or...

Operating Instructions
Page 37
...USB interface are not available on devices connecting to the Internet. • requires you need to the Internet through a cable TV line, or DSL line. Note You cannot connect the LocationFreeTV to the Internet. Internet connection type Necessary equipment Necessary cables Cable connection (...Cable TV line) DSL connection (Analog telephone line) Cable modem LAN cable DSL modem and splitter LAN cable For connection example, see...
...USB interface are not available on devices connecting to the Internet. • requires you need to the Internet through a cable TV line, or DSL line. Note You cannot connect the LocationFreeTV to the Internet. Internet connection type Necessary equipment Necessary cables Cable connection (...Cable TV line) DSL connection (Analog telephone line) Cable modem LAN cable DSL modem and splitter LAN cable For connection example, see...

Operating Instructions
Page 38
... Ethernet port on the base station to connect your modem, contact your cable or DSL modem. If your apartment building is equipped with your cable TV company, DSL network administrator, or ISP. 38 For more information on setting up the connection to your cable or DSL modem, see the operating instructions...
... Ethernet port on the base station to connect your modem, contact your cable or DSL modem. If your apartment building is equipped with your cable TV company, DSL network administrator, or ISP. 38 For more information on setting up the connection to your cable or DSL modem, see the operating instructions...

Operating Instructions
Page 39
... Netscape Navigator) to configure router settings. 39 You must also configure network settings for the LocationFreeTV (1 page 40). • For more information, contact your cable TV company, DSL network administrator, or ISP. • To determine what kind of equipment that relays signals between networks. Using a router allows several other computers. In...
... Netscape Navigator) to configure router settings. 39 You must also configure network settings for the LocationFreeTV (1 page 40). • For more information, contact your cable TV company, DSL network administrator, or ISP. • To determine what kind of equipment that relays signals between networks. Using a router allows several other computers. In...


