
User Guide
Page 1
4-668-815-11(1) CD-RW/DVD-ROM Drive User's Guide MPD-AP20U 2002 Sony Corporation
4-668-815-11(1) CD-RW/DVD-ROM Drive User's Guide MPD-AP20U 2002 Sony Corporation
User Guide
Page 3
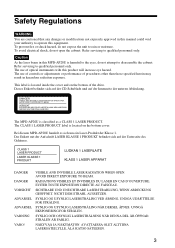
... 3 The use of controls or adjustments or performance of optical instruments with this product will increase eye hazard. The MPD-AP20U is located on the bottom of the drive. Das Etikett mit der Aufschrift LASER KLASSE 1 PRODUKT befindet sich auf der Unterseite des Gehäuses. SYNLIG OG...DANGER VISIBLE AND INVISIBLE LASER RADIATION WHEN OPEN. AVOID DIRECT EXPOSURE TO BEAM VORSICHT SICHTBARE UND UNSICHTBARE LASERSTRAHLUNG. Bei diesem MPD-AP20U handelt es sich um ein Laser-Produkt der Klasse 1. SYNLIG OCH OSYNLIG LASERSTRÅLNING NÄR DENNA DEL ÄR ÖPPNAD....
... 3 The use of controls or adjustments or performance of optical instruments with this product will increase eye hazard. The MPD-AP20U is located on the bottom of the drive. Das Etikett mit der Aufschrift LASER KLASSE 1 PRODUKT befindet sich auf der Unterseite des Gehäuses. SYNLIG OG...DANGER VISIBLE AND INVISIBLE LASER RADIATION WHEN OPEN. AVOID DIRECT EXPOSURE TO BEAM VORSICHT SICHTBARE UND UNSICHTBARE LASERSTRAHLUNG. Bei diesem MPD-AP20U handelt es sich um ein Laser-Produkt der Klasse 1. SYNLIG OCH OSYNLIG LASERSTRÅLNING NÄR DENNA DEL ÄR ÖPPNAD....

User Guide
Page 6
...Guide, or loaning the software, without notice in the interest of software. • Power-Burn and are trademarks of Sony Corporation. • "Memory Stick" and are trademarks of Sony Corporation. • Microsoft, MS, MS-DOS and Windows are registered trademarks of Microsoft Corporation. • Macintosh and...that might occur when using the supplied software. ❑ The supplied software can only be used with this portable CD-RW/DVD-ROM drive. Please Record Responsibly Before copying anything onto a CD-R or CD-RW disc, or "Memory Stick", please be changed without obtaining ...
...Guide, or loaning the software, without notice in the interest of software. • Power-Burn and are trademarks of Sony Corporation. • "Memory Stick" and are trademarks of Sony Corporation. • Microsoft, MS, MS-DOS and Windows are registered trademarks of Microsoft Corporation. • Macintosh and...that might occur when using the supplied software. ❑ The supplied software can only be used with this portable CD-RW/DVD-ROM drive. Please Record Responsibly Before copying anything onto a CD-R or CD-RW disc, or "Memory Stick", please be changed without obtaining ...

User Guide
Page 7
... 12 Name and Function of Parts 13 Drive 13 Cradle 15 Preparation Using the Drive When Connected to the Power Outlet ... 16 Connecting the drive 16 Using the Drive on the Cradle 17 Removing the drive from the cradle 19 Using the Drive on Internal Power 20 Charging the internal...Provided Software 25 Using "Memory Stick 26 Inserting a "Memory Stick" into the drive 26 Ejecting a "Memory Stick" from the drive 26 Accessing "Memory Stick" data from your computer ........ 27 Listening to Music (Using the Drive as a CD Player) ......28 Remote control part names and functions 28 Starting ...
... 12 Name and Function of Parts 13 Drive 13 Cradle 15 Preparation Using the Drive When Connected to the Power Outlet ... 16 Connecting the drive 16 Using the Drive on the Cradle 17 Removing the drive from the cradle 19 Using the Drive on Internal Power 20 Charging the internal...Provided Software 25 Using "Memory Stick 26 Inserting a "Memory Stick" into the drive 26 Ejecting a "Memory Stick" from the drive 26 Accessing "Memory Stick" data from your computer ........ 27 Listening to Music (Using the Drive as a CD Player) ......28 Remote control part names and functions 28 Starting ...
User Guide
Page 10
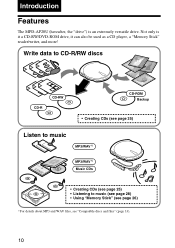
Write data to CD-R/RW discs CD-R CD-RW CD-ROM Backup • Creating CDs (see page 25) Listen to music MP3/WAV 1) LOVE MP3/WAV 1) Music CDs • Creating CDs (see page 25) • Listening to music (see page 28) • Using "Memory Stick" (see page 26) 1) For details about MP3 and WAV files, see "Compatible discs and files" (page 33). 10 Introduction Features The MPD-AP20U (hereafter, the "drive") is it a CD-RW/DVD-ROM drive, it can also be used as a CD player, a "Memory Stick" reader/writer, and more! Not only is an extremely versatile drive.
Write data to CD-R/RW discs CD-R CD-RW CD-ROM Backup • Creating CDs (see page 25) Listen to music MP3/WAV 1) LOVE MP3/WAV 1) Music CDs • Creating CDs (see page 25) • Listening to music (see page 28) • Using "Memory Stick" (see page 26) 1) For details about MP3 and WAV files, see "Compatible discs and files" (page 33). 10 Introduction Features The MPD-AP20U (hereafter, the "drive") is it a CD-RW/DVD-ROM drive, it can also be used as a CD player, a "Memory Stick" reader/writer, and more! Not only is an extremely versatile drive.
User Guide
Page 11
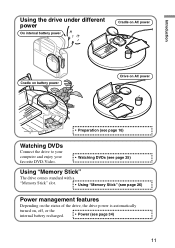
...Cradle on AC power Cradle on battery power Drive on AC power • Preparation (see page 16) Watching DVDs Connect the drive to your computer and enjoy your favorite DVD-Video. • Watching DVDs (see page 25) Using "Memory Stick" The drive comes standard with a "Memory Stick" ...slot. • Using "Memory Stick" (see page 26) Power management features Depending on the status of the drive, the drive power is automatically turned on, off, or the internal battery recharged. ...
...Cradle on AC power Cradle on battery power Drive on AC power • Preparation (see page 16) Watching DVDs Connect the drive to your computer and enjoy your favorite DVD-Video. • Watching DVDs (see page 25) Using "Memory Stick" The drive comes standard with a "Memory Stick" ...slot. • Using "Memory Stick" (see page 26) Power management features Depending on the status of the drive, the drive power is automatically turned on, off, or the internal battery recharged. ...

User Guide
Page 12
... or Professional (Windows XP) ❏ USB connector1) ❏ If you are using Windows 98 SE, you are using the MPD-AP20U CD-RW/DVD-ROM drive features, make sure that your system meets the necessary requirements of problems when playing back DVD-Video, for smooth writing to a computer... equipped with a USB 1.1-compliant USB connector can be the cause of the software that you need a CD-ROM drive or a connection to the Internet to use the MPD-AP20U. Connecting the drive to CD-R and CD-RW discs. iMac, eMac, or iBook; When using . For details, see "Watching DVDs" ...
... or Professional (Windows XP) ❏ USB connector1) ❏ If you are using Windows 98 SE, you are using the MPD-AP20U CD-RW/DVD-ROM drive features, make sure that your system meets the necessary requirements of problems when playing back DVD-Video, for smooth writing to a computer... equipped with a USB 1.1-compliant USB connector can be the cause of the software that you need a CD-ROM drive or a connection to the Internet to use the MPD-AP20U. Connecting the drive to CD-R and CD-RW discs. iMac, eMac, or iBook; When using . For details, see "Watching DVDs" ...
User Guide
Page 13
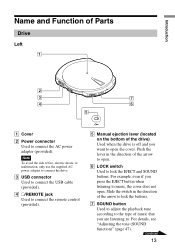
Introduction Name and Function of the drive) Used when the drive is off and you press the EJECT button when listening to music, the cover does not open . 6 LOCK switch Used to lock the EJECT and ... adapter (provided). Continued 13 Note To avoid the risk of fire, electric shock, or malfunction, only use the supplied AC power adapter to connect the drive. 3 USB connector Used to connect the USB cable (provided). 4 i/REMOTE jack Used to connect the remote control (provided). 5 Manual ejection lever (located on the bottom...
Introduction Name and Function of the drive) Used when the drive is off and you press the EJECT button when listening to music, the cover does not open . 6 LOCK switch Used to lock the EJECT and ... adapter (provided). Continued 13 Note To avoid the risk of fire, electric shock, or malfunction, only use the supplied AC power adapter to connect the drive. 3 USB connector Used to connect the USB cable (provided). 4 i/REMOTE jack Used to connect the remote control (provided). 5 Manual ejection lever (located on the bottom...

User Guide
Page 14
...equipped with a power button. For details, see "Power" (page 34). 2 EJECT button Used to open . Note Do not eject the "Memory Stick" from the drive" (page 23). 3 Cradle connector (located on , off , the cover does not open the cover. on the bottom of a few seconds before the cover opens.... data on the software that you are using, when you press the EJECT button, there may be a lag of the drive) Used to connect to computer Battery charging Red Note The drive is off , recharge). A cover protects the connector. 4 "Memory Stick" busy indicator The indicator lights orange when the...
...equipped with a power button. For details, see "Power" (page 34). 2 EJECT button Used to open . Note Do not eject the "Memory Stick" from the drive" (page 23). 3 Cradle connector (located on , off , the cover does not open the cover. on the bottom of a few seconds before the cover opens.... data on the software that you are using, when you press the EJECT button, there may be a lag of the drive) Used to connect to computer Battery charging Red Note The drive is off , recharge). A cover protects the connector. 4 "Memory Stick" busy indicator The indicator lights orange when the...
User Guide
Page 15
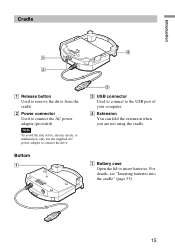
Bottom 1 3 3 USB connector Used to connect to the USB port of fire, electric shock, or malfunction, only use the supplied AC power adapter to insert batteries. For details, see "Inserting batteries into the cradle" (page 35). 15 Note To avoid the risk of your computer. 4 Extension You can fold the extension when you are not using the cradle. 1 Battery case Open the lid to connect the drive. Introduction Cradle 4 1 2 1 Release button Used to remove the drive from the cradle. 2 Power connector Used to connect the AC power adapter (provided).
Bottom 1 3 3 USB connector Used to connect to the USB port of fire, electric shock, or malfunction, only use the supplied AC power adapter to insert batteries. For details, see "Inserting batteries into the cradle" (page 35). 15 Note To avoid the risk of your computer. 4 Extension You can fold the extension when you are not using the cradle. 1 Battery case Open the lid to connect the drive. Introduction Cradle 4 1 2 1 Release button Used to remove the drive from the cradle. 2 Power connector Used to connect the AC power adapter (provided).
User Guide
Page 16
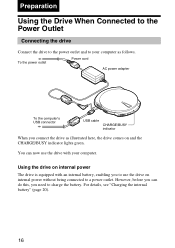
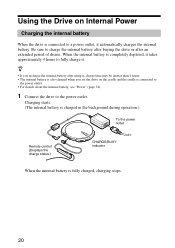
However, before you can now use the drive on internal power The drive is equipped with an internal battery, enabling you to use the drive with your computer as illustrated here, the drive comes on and the CHARGE/BUSY indicator lights green. To the power outlet Power cord AC power...USB connector USB cable CHARGE/BUSY indicator When you need to charge the battery. Using the drive on internal power without being connected to a power outlet. You can do this, you connect the drive as follows. For details, see "Charging the internal battery" (page 20). 16 Preparation ...
However, before you can now use the drive on internal power The drive is equipped with an internal battery, enabling you to use the drive with your computer as illustrated here, the drive comes on and the CHARGE/BUSY indicator lights green. To the power outlet Power cord AC power...USB connector USB cable CHARGE/BUSY indicator When you need to charge the battery. Using the drive on internal power without being connected to a power outlet. You can do this, you connect the drive as follows. For details, see "Charging the internal battery" (page 20). 16 Preparation ...
User Guide
Page 17
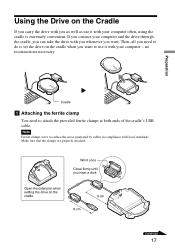
... you whenever you hear a click Open the extension when setting the drive on the cradle. 8 cm 8 cm Continued 17 no reconnections necessary. Wind once Close firmly until you want to ...of the cradle's USB cable. Then, all you need to use it with your computer often, using the cradle is set the drive on the cradle when you as well as use it with your computer - Preparation Cradle 1 Attaching the ferrite clamp You need ... sure that the clamps are properly attached. Note Ferrite clamps serve to do is extremely convenient. Using the Drive on the Cradle If you carry the...
... you whenever you hear a click Open the extension when setting the drive on the cradle. 8 cm 8 cm Continued 17 no reconnections necessary. Wind once Close firmly until you want to ...of the cradle's USB cable. Then, all you need to use it with your computer often, using the cradle is set the drive on the cradle when you as well as use it with your computer - Preparation Cradle 1 Attaching the ferrite clamp You need ... sure that the clamps are properly attached. Note Ferrite clamps serve to do is extremely convenient. Using the Drive on the Cradle If you carry the...
User Guide
Page 19
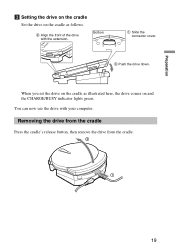
Removing the drive from the cradle Press the cradle's release button, then remove the drive from the cradle. 2 1 19 Bottom 1 Slide the connector cover. 3 Push the drive down. You can now use the drive with the extension. Preparation 3 Setting the drive on the cradle Set the drive on the cradle as illustrated here, the drive comes on the cradle as follows. 2 Align the front of the drive with your computer. When you set the drive on and the CHARGE/BUSY indicator lights green.
Removing the drive from the cradle Press the cradle's release button, then remove the drive from the cradle. 2 1 19 Bottom 1 Slide the connector cover. 3 Push the drive down. You can now use the drive with the extension. Preparation 3 Setting the drive on the cradle Set the drive on the cradle as illustrated here, the drive comes on the cradle as follows. 2 Align the front of the drive with your computer. When you set the drive on and the CHARGE/BUSY indicator lights green.
User Guide
Page 20
Using the Drive on the cradle and the cradle is fully charged, charging stops. 20 Charging starts. (The internal battery ...• For details about the internal battery, see "Power" (page 34). 1 Connect the drive to the power outlet. Be sure to charge the internal battery after buying the drive or after using it automatically charges the internal battery. When the internal battery is completely depleted,... also charged when you recharge the internal battery after an extended period of disuse. z • If you set the drive on Internal Power Charging the internal battery When the...
Using the Drive on the cradle and the cradle is fully charged, charging stops. 20 Charging starts. (The internal battery ...• For details about the internal battery, see "Power" (page 34). 1 Connect the drive to the power outlet. Be sure to charge the internal battery after buying the drive or after using it automatically charges the internal battery. When the internal battery is completely depleted,... also charged when you recharge the internal battery after an extended period of disuse. z • If you set the drive on Internal Power Charging the internal battery When the...
User Guide
Page 21
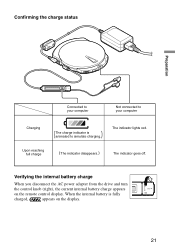
The indicator goes off. Confirming the charge status Preparation Connected to your computer Not connected to your computer Charging The charge indicator is fully charged, appears on the remote control display. Upon reaching full charge The indicator disappears. When the internal battery is animated to simulate charging. Verifying the internal battery charge When you disconnect the AC power adapter from the drive and turn the control knob (right), the current internal battery charge appears on the display. 21 The indicator lights red.
The indicator goes off. Confirming the charge status Preparation Connected to your computer Not connected to your computer Charging The charge indicator is fully charged, appears on the remote control display. Upon reaching full charge The indicator disappears. When the internal battery is animated to simulate charging. Verifying the internal battery charge When you disconnect the AC power adapter from the drive and turn the control knob (right), the current internal battery charge appears on the display. 21 The indicator lights red.
User Guide
Page 22
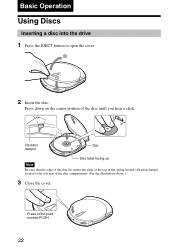
Press down on the center portion of the disc compartment. (See the illustration above.) 3 Close the cover. Vibration Disc damper Disc label facing up Note Be sure that the edge of the disc fits under the ridge at the top of the spring-loaded vibration damper located at the point marked PUSH. 22 Basic Operation Using Discs Inserting a disc into the drive 1 Press the EJECT button to open the cover. 2 1 2 Insert the disc. Press at the left rear of the disc until you hear a click.
Press down on the center portion of the disc compartment. (See the illustration above.) 3 Close the cover. Vibration Disc damper Disc label facing up Note Be sure that the edge of the disc fits under the ridge at the top of the spring-loaded vibration damper located at the point marked PUSH. 22 Basic Operation Using Discs Inserting a disc into the drive 1 Press the EJECT button to open the cover. 2 1 2 Insert the disc. Press at the left rear of the disc until you hear a click.

User Guide
Page 23
... also open the cover by moving the disc icon to remove it. Basic Operation Ejecting a disc from the drive Note Do not attempt to eject a disc from the software, rather than open the drive by pressing the EJECT button. • Except when writing to a disc, if the EJECT button is being accessed...). 1 Press the EJECT button to open the cover. 2 1 CHARGE/BUSY indicator With a Windows computer, you can also open the cover by right-clicking the drive icon and clicking Eject on the shortcut menu. z • Depending on the hub while lifting the disc to the [Trash] icon.
... also open the cover by moving the disc icon to remove it. Basic Operation Ejecting a disc from the drive Note Do not attempt to eject a disc from the software, rather than open the drive by pressing the EJECT button. • Except when writing to a disc, if the EJECT button is being accessed...). 1 Press the EJECT button to open the cover. 2 1 CHARGE/BUSY indicator With a Windows computer, you can also open the cover by right-clicking the drive icon and clicking Eject on the shortcut menu. z • Depending on the hub while lifting the disc to the [Trash] icon.
User Guide
Page 24
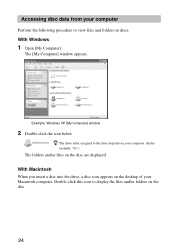
With Windows 1 Open [My Computer]. With Macintosh When you insert a disc into the drive, a disc icon appears on the desktop of your computer. (In the example, "G".) The folders and/or files on your Macintosh computer. The [My Computer] window appears. z The drive letter assigned to the drive depends on the disc are displayed. Accessing disc data from your computer Perform the following procedure to view files and folders on the disc. 24 Example: Windows XP [My Computer] window 2 Double-click the icon below. Double-click this icon to display the files and/or folders on discs.
With Windows 1 Open [My Computer]. With Macintosh When you insert a disc into the drive, a disc icon appears on the desktop of your computer. (In the example, "G".) The folders and/or files on your Macintosh computer. The [My Computer] window appears. z The drive letter assigned to the drive depends on the disc are displayed. Accessing disc data from your computer Perform the following procedure to view files and folders on the disc. 24 Example: Windows XP [My Computer] window 2 Double-click the icon below. Double-click this icon to display the files and/or folders on discs.

User Guide
Page 25
... Start Guide", as well as the user's guide and Help for each program on the software disc accompanying the drive to write data to experience smoother playback of the drive. Watching DVDs (Using the Provided Software) You can use instead of the provided writing software. If you connect ...audio may be choppy during playback. z Windows XP and Mac OS X computers have built-in CD writing functions that you connect the drive to the software manuals1). For details about the installation procedures, various functions and operation procedures, refer to your operating system Help.
... Start Guide", as well as the user's guide and Help for each program on the software disc accompanying the drive to write data to experience smoother playback of the drive. Watching DVDs (Using the Provided Software) You can use instead of the provided writing software. If you connect ...audio may be choppy during playback. z Windows XP and Mac OS X computers have built-in CD writing functions that you connect the drive to the software manuals1). For details about the installation procedures, various functions and operation procedures, refer to your operating system Help.
User Guide
Page 26
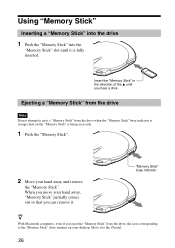
... Stick" partially comes out so that you hear a click. Insert the "Memory Stick" in the direction of the v until it to the "Memory Stick" drive remains on the "Memory Stick" is being accessed). 1 Push the "Memory Stick". 2 Move your hand away and remove the "Memory Stick". Using "Memory Stick..." Inserting a "Memory Stick" into the drive 1 Push the "Memory Stick" into the "Memory Stick" slot until you can remove it. When you move your desktop. Ejecting a "Memory Stick" from the...
... Stick" partially comes out so that you hear a click. Insert the "Memory Stick" in the direction of the v until it to the "Memory Stick" drive remains on the "Memory Stick" is being accessed). 1 Push the "Memory Stick". 2 Move your hand away and remove the "Memory Stick". Using "Memory Stick..." Inserting a "Memory Stick" into the drive 1 Push the "Memory Stick" into the "Memory Stick" slot until you can remove it. When you move your desktop. Ejecting a "Memory Stick" from the...


