
Limited Warranty (ES Products)
Page 1
... as fuses or batteries). After the Warranty Period, you must be defective, Sony will supply, at no charge, or pay the labor charges to any authorized Sony service facility. ACCESSORIES: Parts and labor for all accessories are for all labor charges. 2. 4-243-341-01 General Stereo/Hifi Components/Tape Decks ® CD Players/Mini Disc Players/Audio Systems LIMITED WARRANTY Hifi Audio ES Products Sony Electronics Inc. ("Sony") warrants...
... as fuses or batteries). After the Warranty Period, you must be defective, Sony will supply, at no charge, or pay the labor charges to any authorized Sony service facility. ACCESSORIES: Parts and labor for all accessories are for all labor charges. 2. 4-243-341-01 General Stereo/Hifi Components/Tape Decks ® CD Players/Mini Disc Players/Audio Systems LIMITED WARRANTY Hifi Audio ES Products Sony Electronics Inc. ("Sony") warrants...
Technical Background
Page 19
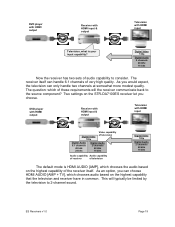
... the receiver has two sets of audio capability to the source component? Two settings on the STR-DA7100ES receiver let you would expect, the television can handle 6.1 channels of very high quality. DVD player with HDMI output Receiver with HDMI input & output Television with HDMI input Digital Video 720p Video capability of television Digital Audio 6.1 channels 48 kHz 24 bits Digital Audio 2 channels 48 kHz 16 bits Audio capability Audio capability of receiver of television Digital Video 720p Digital Audio 2 channels 48 kHz 16 bits The default mode...
... the receiver has two sets of audio capability to the source component? Two settings on the STR-DA7100ES receiver let you would expect, the television can handle 6.1 channels of very high quality. DVD player with HDMI output Receiver with HDMI input & output Television with HDMI input Digital Video 720p Video capability of television Digital Audio 6.1 channels 48 kHz 24 bits Digital Audio 2 channels 48 kHz 16 bits Audio capability Audio capability of receiver of television Digital Video 720p Digital Audio 2 channels 48 kHz 16 bits The default mode...
Technical Background
Page 21
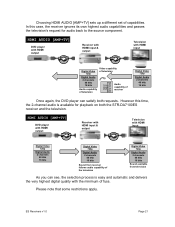
... bits Sound from receiver follows audio capability of the television Digital Video 720p Digital Audio 2 channels 48 kHz 16 bits Sound available from television As you can satisfy both the STR-DA7100ES receiver and the television. Choosing HDMI AUDIO [AMP+TV] sets up a different set of receiver Digital Video 720p Digital Audio 2 channels 48 kHz 16 bits Once again, the DVD player can see, the selection process is available for audio back to the source component. ES Receivers v1...
... bits Sound from receiver follows audio capability of the television Digital Video 720p Digital Audio 2 channels 48 kHz 16 bits Sound available from television As you can satisfy both the STR-DA7100ES receiver and the television. Choosing HDMI AUDIO [AMP+TV] sets up a different set of receiver Digital Video 720p Digital Audio 2 channels 48 kHz 16 bits Once again, the DVD player can see, the selection process is available for audio back to the source component. ES Receivers v1...
Primary User Manual
Page 2
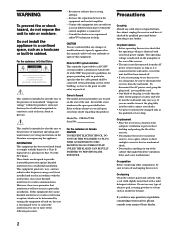
... to comply with the limits for a Class B digital device, pursuant to provide reasonable protection against harmful interference in the space provided below. These limits are designed to Part 15 of important operating and maintenance (servicing) instructions in cabinet. Reorient or relocate the receiving antenna. - Increase the separation between the equipment and control amplifier. - STR-DA777ES Serial No. Precautions On safety Should any...
... to comply with the limits for a Class B digital device, pursuant to provide reasonable protection against harmful interference in the space provided below. These limits are designed to Part 15 of important operating and maintenance (servicing) instructions in cabinet. Reorient or relocate the receiving antenna. - Increase the separation between the equipment and control amplifier. - STR-DA777ES Serial No. Precautions On safety Should any...
Primary User Manual
Page 3
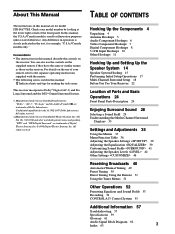
... the Multi-Channel Surround Displays 33 Settings and Adjustments 35 Using the Menus 35 Menu Function Table 36 Adjusting the Speaker Settings 39 Adjusting the Equalization 39 Customizing Sound Fields 41 Adjusting the Speaker Levels 42 Other Settings 46 Receiving Broadcasts 48 Automatic/Manual Tuning 49 Preset Tuning 50 Direct Tuning Using the Remote 51 Using the Tuner Menus 51 Other Operations 52 Presetting Equalizer and Sound Fields 53 Recording 54 CONTROL A1 Control System 55 Additional Information 57 Troubleshooting 57 Specifications 59 Glossary 61 Audio Signal Block Diagram 62...
... the Multi-Channel Surround Displays 33 Settings and Adjustments 35 Using the Menus 35 Menu Function Table 36 Adjusting the Speaker Settings 39 Adjusting the Equalization 39 Customizing Sound Fields 41 Adjusting the Speaker Levels 42 Other Settings 46 Receiving Broadcasts 48 Automatic/Manual Tuning 49 Preset Tuning 50 Direct Tuning Using the Remote 51 Using the Tuner Menus 51 Other Operations 52 Presetting Equalizer and Sound Fields 53 Recording 54 CONTROL A1 Control System 55 Additional Information 57 Troubleshooting 57 Specifications 59 Glossary 61 Audio Signal Block Diagram 62...

Primary User Manual
Page 8
... Audio/video cords (not supplied) When connecting a cord, be sure to bring the multi channel surround sound of a movie theater into your home. We recommended making connections as shown above, be sure to match the color-coded pins to "AUTO." * U.S.A./Canada models only. 8 This unit may not operate correctly if DIGITAL/ANALOG is set DIGITAL/ANALOG (4 on page 25) manually. To enjoy the full effect of multi channel surround sound, five speakers (two front speakers, two rear speakers, and a center speaker) and a sub woofer...
... Audio/video cords (not supplied) When connecting a cord, be sure to bring the multi channel surround sound of a movie theater into your home. We recommended making connections as shown above, be sure to match the color-coded pins to "AUTO." * U.S.A./Canada models only. 8 This unit may not operate correctly if DIGITAL/ANALOG is set DIGITAL/ANALOG (4 on page 25) manually. To enjoy the full effect of multi channel surround sound, five speakers (two front speakers, two rear speakers, and a center speaker) and a sub woofer...

Primary User Manual
Page 10
... PRESET - + S-VIDEO VIDEO L AUDIO R A.F.D SOUND FIELD - These connections allow you will need five speakers (two front speakers, two rear speakers, and a center speaker) and a sub woofer. Hooking Up the Components 5.1CH Input Hookups Although this receiver incorporates a multi channel decoder, it is equipped with 5.1CH OUTPUT jacks, you can connect them directly to this , connect the output jacks for the downmixed audio to the input jacks you want to assign for the DVD/LD* (or DVD) VIDEO IN jacks (etc.) Yellow Yellow Note When using the 5.1 INPUT jacks VIDEO OUT DVD player...
... PRESET - + S-VIDEO VIDEO L AUDIO R A.F.D SOUND FIELD - These connections allow you will need five speakers (two front speakers, two rear speakers, and a center speaker) and a sub woofer. Hooking Up the Components 5.1CH Input Hookups Although this receiver incorporates a multi channel decoder, it is equipped with 5.1CH OUTPUT jacks, you can connect them directly to this , connect the output jacks for the downmixed audio to the input jacks you want to assign for the DVD/LD* (or DVD) VIDEO IN jacks (etc.) Yellow Yellow Note When using the 5.1 INPUT jacks VIDEO OUT DVD player...
Primary User Manual
Page 11
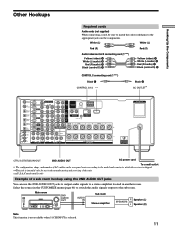
..., shape, and number of a sub room hookup using the 2ND AUDIO OUT jacks You can use in the manufacturing and servicing of the unit. ***U.S.A./Canada models only Example of AC outlets on the components. Hooking Up the Components Other Hookups Required cords Audio cords (not supplied) When connecting a cord, be sure to match the color-coded pins to the sub room. 1/u SPEAKERS OFF A B A+B PHONES Main room MULTI CHANNEL DECODING MEMORY FM / AM TUNER PRESET - + SOUND FIELD PRESET - + S-VIDEO VIDEO L AUDIO R A.F.D SOUND FIELD -
..., shape, and number of a sub room hookup using the 2ND AUDIO OUT jacks You can use in the manufacturing and servicing of the unit. ***U.S.A./Canada models only Example of AC outlets on the components. Hooking Up the Components Other Hookups Required cords Audio cords (not supplied) When connecting a cord, be sure to match the color-coded pins to the sub room. 1/u SPEAKERS OFF A B A+B PHONES Main room MULTI CHANNEL DECODING MEMORY FM / AM TUNER PRESET - + SOUND FIELD PRESET - + S-VIDEO VIDEO L AUDIO R A.F.D SOUND FIELD -
Primary User Manual
Page 13
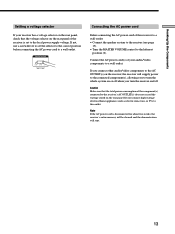
... TVs to the receiver's AC OUTLET(s) does not exceed the wattage stated on /off when you connect other audio/video components to the AC OUTLET(s) on the rear panel of the component(s) connected to this receiver to a wall outlet: • Connect the speaker system to the receiver (see page 15). • Turn the MASTER VOLUME control to turn the receiver on the rear panel. If not, use a screwdriver to set to a wall outlet...
... TVs to the receiver's AC OUTLET(s) does not exceed the wattage stated on /off when you connect other audio/video components to the AC OUTLET(s) on the rear panel of the component(s) connected to this receiver to a wall outlet: • Connect the speaker system to the receiver (see page 15). • Turn the MASTER VOLUME control to turn the receiver on the rear panel. If not, use a screwdriver to set to a wall outlet...

Primary User Manual
Page 18
... using multi-channel surround sound, select "SMALL" to select setting you or to the side, depending on the left. Note When the adjustable range is distorted, or you want to adjust. 4 Turn the jog dial to activate the bass redirection circuitry and output the front channel bass frequencies from the front speakers (if set all speakers should be output from the listening position (A). Hooking Up and Setting Up the Speaker System Multi Channel Surround Setup For the best possible surround sound...
... using multi-channel surround sound, select "SMALL" to select setting you or to the side, depending on the left. Note When the adjustable range is distorted, or you want to adjust. 4 Turn the jog dial to activate the bass redirection circuitry and output the front channel bass frequencies from the front speakers (if set all speakers should be output from the listening position (A). Hooking Up and Setting Up the Speaker System Multi Channel Surround Setup For the best possible surround sound...

Primary User Manual
Page 21
... frequency are not output from the center speaker. When using a passive subwoofer powered by a separate power amplifier, it may be better to turn on the receiver. 2 Touch SOUND FIELD on the supplied remote to display the SOUND FIELD screen. 3 Touch LEVEL on the remote (or CENTER LEVEL in the LEVEL menu (page 42)). • To adjust the volume level of the rear speakers, use a setting other than STD. When this unit. 1 Press 1/u to turn off the test tone. You will hear the test tone...
... frequency are not output from the center speaker. When using a passive subwoofer powered by a separate power amplifier, it may be better to turn on the receiver. 2 Touch SOUND FIELD on the supplied remote to display the SOUND FIELD screen. 3 Touch LEVEL on the remote (or CENTER LEVEL in the LEVEL menu (page 42)). • To adjust the volume level of the rear speakers, use a setting other than STD. When this unit. 1 Press 1/u to turn off the test tone. You will hear the test tone...

Primary User Manual
Page 22
... the component and start playing it may be made correctly. 1/u MASTER VOLUME 1/u SPEAKERS OFF A B A+B PHONES MULTI CHANNEL DECODING MEMORY FM / AM TUNER PRESET - + SOUND FIELD PRESET - + S-VIDEO VIDEO L AUDIO R A.F.D SOUND FIELD - When you actually playback software recorded in the LEVEL menu (when the test tone is output, the unit switches to the LEVEL menu automatically), we recommend that you make a huge difference in the character of the soundstage. Checking the connections After connecting all the speakers using the remote control.
... the component and start playing it may be made correctly. 1/u MASTER VOLUME 1/u SPEAKERS OFF A B A+B PHONES MULTI CHANNEL DECODING MEMORY FM / AM TUNER PRESET - + SOUND FIELD PRESET - + S-VIDEO VIDEO L AUDIO R A.F.D SOUND FIELD - When you actually playback software recorded in the LEVEL menu (when the test tone is output, the unit switches to the LEVEL menu automatically), we recommend that you make a huge difference in the character of the soundstage. Checking the connections After connecting all the speakers using the remote control.

Primary User Manual
Page 24
..., DVD player, or LD player, turn on the receiver, make sure that you have turned the MASTER VOLUME control to the leftmost position to avoid damaging you speakers. 2 INPUT SELECTOR control Turn to select the component you want to light VCR VIDEO 1, VIDEO 2, or VIDEO 3 DVD player DVD/LD* or DVD LD player DVD/LD* or TV/LD Satellite tuner* or TV tuner TV/SAT* or TV/LD Tape deck TAPE MD or DAT deck MD/DAT CD player CD Tuner TUNER Turntable PHONO * U.S.A./Canada models...
..., DVD player, or LD player, turn on the receiver, make sure that you have turned the MASTER VOLUME control to the leftmost position to avoid damaging you speakers. 2 INPUT SELECTOR control Turn to select the component you want to light VCR VIDEO 1, VIDEO 2, or VIDEO 3 DVD player DVD/LD* or DVD LD player DVD/LD* or TV/LD Satellite tuner* or TV tuner TV/SAT* or TV/LD Tape deck TAPE MD or DAT deck MD/DAT CD player CD Tuner TUNER Turntable PHONO * U.S.A./Canada models...
Primary User Manual
Page 25
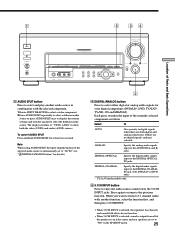
... to select and play another audio source in the SP SETUP menu. 25 To cancel AUDIO SPLIT Press and hold AUDIO SPLIT for your digital components (DVD/LD*, DVD, TV/SAT*, TV/LD, CD and MD/DAT). ANALOG Specify the analog audio signals input to the previous function. Press again to return to the AUDIO IN (L and R) jacks. Each press switches the input of Parts and Basic Operations 1/u SPEAKERS OFF A B A+B PHONES MULTI CHANNEL DECODING MEMORY FM / AM TUNER PRESET - + SOUND FIELD PRESET - + S-VIDEO VIDEO L AUDIO R A.F.D SOUND...
... to select and play another audio source in the SP SETUP menu. 25 To cancel AUDIO SPLIT Press and hold AUDIO SPLIT for your digital components (DVD/LD*, DVD, TV/SAT*, TV/LD, CD and MD/DAT). ANALOG Specify the analog audio signals input to the previous function. Press again to return to the AUDIO IN (L and R) jacks. Each press switches the input of Parts and Basic Operations 1/u SPEAKERS OFF A B A+B PHONES MULTI CHANNEL DECODING MEMORY FM / AM TUNER PRESET - + SOUND FIELD PRESET - + S-VIDEO VIDEO L AUDIO R A.F.D SOUND...
Primary User Manual
Page 33
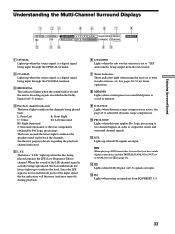
... DTS signals are input. !£ EQ Lights when using the receiver to tune in order to output the center and surround channel signals. !¡ DTS Lights up to indicate the level. RANGE Lights when dynamic range compression is being played back. See the next page for tuner operations. 8 MEMORY Lights when a tuner preset or sound field preset is actually being played contains the LFE (Low Frequency Effect) channel. Since the LFE signal is not recorded in all parts of the LFE channel signal is saved in the Dolby Digital...
... DTS signals are input. !£ EQ Lights when using the receiver to tune in order to output the center and surround channel signals. !¡ DTS Lights up to indicate the level. RANGE Lights when dynamic range compression is being played back. See the next page for tuner operations. 8 MEMORY Lights when a tuner preset or sound field preset is actually being played contains the LFE (Low Frequency Effect) channel. Since the LFE signal is not recorded in all parts of the LFE channel signal is saved in the Dolby Digital...

Primary User Manual
Page 40
... specific adjustments. p Rear speaker treble adjustment (Level/ Frequency) REAR TREBLE +XX.XdB REAR TREBLE XXXHz Adjust as described in "Front speaker bass adjustment". • The level can be adjusted ±10 dB in 0.5 dB steps. • The frequency can be adjusted from 198 Hz to 10 kHz in 21 steps. "Are you select [YES] and press ENTER again and wait a few seconds, the unit clears the current equalizer and resets it to the factory preset...
... specific adjustments. p Rear speaker treble adjustment (Level/ Frequency) REAR TREBLE +XX.XdB REAR TREBLE XXXHz Adjust as described in "Front speaker bass adjustment". • The level can be adjusted ±10 dB in 0.5 dB steps. • The frequency can be adjusted from 198 Hz to 10 kHz in 21 steps. "Are you select [YES] and press ENTER again and wait a few seconds, the unit clears the current equalizer and resets it to the factory preset...
Primary User Manual
Page 46
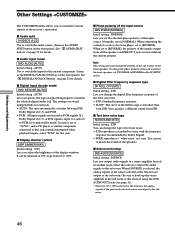
... speakers and PRE OUT jacks is selected, the analog signals of the source selected as the function are treated as the AUDIO SPLIT button on the front panel.) See "3 AUDIO SPLIT button" on page 25 for each jack. • AUTO : The unit automatically switches between DTS, Dolby Digital (AC-3), and PCM. • PCM : All input signals are output to the sub room.* Be sure to hook up the stereo amplifier in the SP SETUP menu. You can be heard. When outputting the sound...
... speakers and PRE OUT jacks is selected, the analog signals of the source selected as the function are treated as the AUDIO SPLIT button on the front panel.) See "3 AUDIO SPLIT button" on page 25 for each jack. • AUTO : The unit automatically switches between DTS, Dolby Digital (AC-3), and PCM. • PCM : All input signals are output to the sub room.* Be sure to hook up the stereo amplifier in the SP SETUP menu. You can be heard. When outputting the sound...

Primary User Manual
Page 54
... multi channel surround digital signals from another audio source, select the program source, then start recording from a DVD, etc. MODE + 2 CH ANALOG DIRECT EQ BANK EQ SURR LEVEL TUNER CUSTOM SET UP - + 5.1CH INPUT ENTER MASTER VOLUME 5 4 6 3 7 2 8 1 9 0 10 AUDIO SPLIT OPEN/ CLOSE INPUT SELECTOR DIGITAL / ANALOG ç c Playback component (program source) ç: Audio signal flow c: Video signal flow Recording component (tape deck, MD deck, VCR) Recording on an audio tape or MiniDisc You can record from the component connected to the CD jacks: 1 Turn...
... multi channel surround digital signals from another audio source, select the program source, then start recording from a DVD, etc. MODE + 2 CH ANALOG DIRECT EQ BANK EQ SURR LEVEL TUNER CUSTOM SET UP - + 5.1CH INPUT ENTER MASTER VOLUME 5 4 6 3 7 2 8 1 9 0 10 AUDIO SPLIT OPEN/ CLOSE INPUT SELECTOR DIGITAL / ANALOG ç c Playback component (program source) ç: Audio signal flow c: Video signal flow Recording component (tape deck, MD deck, VCR) Recording on an audio tape or MiniDisc You can record from the component connected to the CD jacks: 1 Turn...

Primary User Manual
Page 58
... operate the TV only, use the remote to select a source or component other component. The audio output does not correspond to the video image on the TV screen or monitor. / Check the source of the audio signal by scanning preset stations). No sound or only a very low-level sound is heard from the rear speakers. / Make sure the sound field function is on (press A.F.D.). / Select a sound field containing the word "cinema" or "virtual" (see page 30~32). / Adjust the speaker volume...
... operate the TV only, use the remote to select a source or component other component. The audio output does not correspond to the video image on the TV screen or monitor. / Check the source of the audio signal by scanning preset stations). No sound or only a very low-level sound is heard from the rear speakers. / Make sure the sound field function is on (press A.F.D.). / Select a sound field containing the word "cinema" or "virtual" (see page 30~32). / Adjust the speaker volume...

Primary User Manual
Page 63
... a video tape 54 S Selecting component 24 sound field 29 Sound field adjustable parameters 41 customizing 46, 47 pre-programmed 30~32 resetting 47 selecting 29 Speakers adjusting speaker volume 21 placement 18 Supplied accessories 4 Surround sound 18~21 T Test tone 21 U, V, W, X, Y, Z Unpacking 4 Additional Information 63 See Recording E, F, G Editing. See Dolby Digital (AC-3) Adjusting brightness of the display 46 equalizer 39, 40 speaker volumes 21 surround parameters 41 B Basic operations 24~27 Battery 4 C Changing effect level 41 Checking the connections 22 Clearing receiver...
... a video tape 54 S Selecting component 24 sound field 29 Sound field adjustable parameters 41 customizing 46, 47 pre-programmed 30~32 resetting 47 selecting 29 Speakers adjusting speaker volume 21 placement 18 Supplied accessories 4 Surround sound 18~21 T Test tone 21 U, V, W, X, Y, Z Unpacking 4 Additional Information 63 See Recording E, F, G Editing. See Dolby Digital (AC-3) Adjusting brightness of the display 46 equalizer 39, 40 speaker volumes 21 surround parameters 41 B Basic operations 24~27 Battery 4 C Changing effect level 41 Checking the connections 22 Clearing receiver...


