Operating Instructions
Page 1
FM Stereo FM/AM Receiver Operating Instructions 4-294-472-11(1) STR-DH130
FM Stereo FM/AM Receiver Operating Instructions 4-294-472-11(1) STR-DH130

Operating Instructions
Page 3
... to avoid injury from that interference will help . However, there is disposed of correctly, you purchased the product. Reorient or relocate the receiving antenna. - To reduce the risk of the following instructions. 1) Disconnect the AC power cord from the apparatus and the speakers. By ...not comply with FCC technical regulations. If this manual could otherwise be treated as not to radio or television reception, which the receiver is used in this equipment does cause harmful interference to touch the core of electrical and electronic equipment. For more of electric ...
... to avoid injury from that interference will help . However, there is disposed of correctly, you purchased the product. Reorient or relocate the receiving antenna. - To reduce the risk of the following instructions. 1) Disconnect the AC power cord from the apparatus and the speakers. By ...not comply with FCC technical regulations. If this manual could otherwise be treated as not to radio or television reception, which the receiver is used in this equipment does cause harmful interference to touch the core of electrical and electronic equipment. For more of electric ...

Operating Instructions
Page 4
... this manual describe the operation of the receiver with a chemical symbol. By ensuring these batteries are for customers: The following information is only applicable to the addresses given in separate service or guarantee documents. Notice for model STR-DH130. About This Manual • The instructions... with an incorporated battery, this manual are disposed of correctly, you purchased the product. On certain batteries this product is Sony Deutschland GmbH, Hedelfinger Strasse 61, 70327 Stuttgart, Germany. Hand the battery over the product at the lower right corner of...
... this manual describe the operation of the receiver with a chemical symbol. By ensuring these batteries are for customers: The following information is only applicable to the addresses given in separate service or guarantee documents. Notice for model STR-DH130. About This Manual • The instructions... with an incorporated battery, this manual are disposed of correctly, you purchased the product. On certain batteries this product is Sony Deutschland GmbH, Hedelfinger Strasse 61, 70327 Stuttgart, Germany. Hand the battery over the product at the lower right corner of...

Operating Instructions
Page 5
...Connecting the AC power cord (mains lead 18 Additional Information Precautions 29 Troubleshooting 30 Specifications 32 Index 34 Preparing the Receiver Initializing the receiver 18 Selecting the speaker system 19 Adjusting the tone 19 Basic Operations Playback 20 Viewing information on the display panel 21... Recording using the receiver 22 Tuner Operations Listening to FM/AM radio 22 Presetting FM/AM radio stations (Preset Tuning 24 Receiving RDS broadcasts 26 (Europe model only) Menu Operations Using the setting ...
...Connecting the AC power cord (mains lead 18 Additional Information Precautions 29 Troubleshooting 30 Specifications 32 Index 34 Preparing the Receiver Initializing the receiver 18 Selecting the speaker system 19 Adjusting the tone 19 Basic Operations Playback 20 Viewing information on the display panel 21... Recording using the receiver 22 Tuner Operations Listening to FM/AM radio 22 Presetting FM/AM radio stations (Preset Tuning 24 Receiving RDS broadcasts 26 (Europe model only) Menu Operations Using the setting ...
Operating Instructions
Page 6
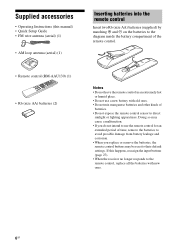
.... Doing so may be reset to their default settings. Supplied accessories • Operating Instructions (this happens, reassign the input buttons (page 27). • When the receiver no longer responds to the remote control, replace all the batteries with old ones. • Do not mix manganese batteries and other kinds of time...
.... Doing so may be reset to their default settings. Supplied accessories • Operating Instructions (this happens, reassign the input buttons (page 27). • When the receiver no longer responds to the remote control, replace all the batteries with old ones. • Do not mix manganese batteries and other kinds of time...
Operating Instructions
Page 7
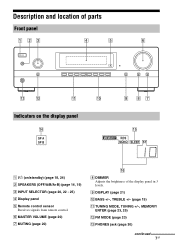
... RDS MONO SLEEP ST A ?/1 (on/standby) (page 18, 24) B SPEAKERS (OFF/A/B/A+B) (page 14, 19) C INPUT SELECTOR (page 20, 22 - 25) D Display panel E Remote control sensor Receives signals from remote control. Description and location of the display panel in 3 levels. I DISPLAY (page 21) J BASS +/-, TREBLE +/- (page 19) K TUNING MODE, TUNING +/-, MEMORY/ ENTER...
... RDS MONO SLEEP ST A ?/1 (on/standby) (page 18, 24) B SPEAKERS (OFF/A/B/A+B) (page 14, 19) C INPUT SELECTOR (page 20, 22 - 25) D Display panel E Remote control sensor Receives signals from remote control. Description and location of the display panel in 3 levels. I DISPLAY (page 21) J BASS +/-, TREBLE +/- (page 19) K TUNING MODE, TUNING +/-, MEMORY/ ENTER...

Operating Instructions
Page 8
... speaker system used (page 19). MEMORY A memory function, such as Preset Memory (page 24), etc., is activated (page 11). N SP A/SP B Lights up when the receiver tunes to a radio station. MONO Monaural broadcast ST Stereo broadcast Preset station number (The number will change according to a station with RDS services. However, these...
... speaker system used (page 19). MEMORY A memory function, such as Preset Memory (page 24), etc., is activated (page 11). N SP A/SP B Lights up when the receiver tunes to a radio station. MONO Monaural broadcast ST Stereo broadcast Preset station number (The number will change according to a station with RDS services. However, these...

Operating Instructions
Page 10
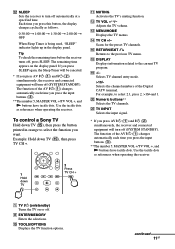
...2 3 wa 4 5 w; 6 7 8 ql 9 0 qk qa qj qs qh qd qf qg To control the receiver B ?/1* (on/standby) Turns the receiver on or sets it to operate Sony audio/ video equipment. FM MODE Selects the FM monaural or stereo reception. P RETURN/EXIT O Returns to enter/confirm the ...information on . Remote control Use the supplied remote control to your receiver (page 27). You can reassign the input button to match the equipment connected to operate this receiver and other equipment. When you want to control Sony equipment. G D.TUNING Enters direct tuning mode. H ENTER/MEMORY ...
...2 3 wa 4 5 w; 6 7 8 ql 9 0 qk qa qj qs qh qd qf qg To control the receiver B ?/1* (on/standby) Turns the receiver on or sets it to operate Sony audio/ video equipment. FM MODE Selects the FM monaural or stereo reception. P RETURN/EXIT O Returns to enter/confirm the ...information on . Remote control Use the supplied remote control to your receiver (page 27). You can reassign the input button to match the equipment connected to operate this receiver and other equipment. When you want to control Sony equipment. G D.TUNING Enters direct tuning mode. H ENTER/MEMORY ...
Operating Instructions
Page 11
...of the Digital CATV terminal. H ENTER/MEMORY Enters the selections. K MUTING Activates the TV's muting function. Use the tactile dots as references when operating the receiver. 1 Hold down TV 2 Press TV CH + A TV ?/1 (on/standby) Turns the TV on the display panel. S -/-Selects TV channel entry ...TV CH +/- Scans for the preset TV channels. Each time you press this button, the display changes cyclically as references when operating the receiver. To control a Sony TV Hold down TV (O), then press TV CH +. P RETURN/EXIT O Returns to the previous TV menu. continued 11GB The remaining ...
...of the Digital CATV terminal. H ENTER/MEMORY Enters the selections. K MUTING Activates the TV's muting function. Use the tactile dots as references when operating the receiver. 1 Hold down TV 2 Press TV CH + A TV ?/1 (on/standby) Turns the TV on the display panel. S -/-Selects TV channel entry ...TV CH +/- Scans for the preset TV channels. Each time you press this button, the display changes cyclically as references when operating the receiver. To control a Sony TV Hold down TV (O), then press TV CH +. P RETURN/EXIT O Returns to the previous TV menu. continued 11GB The remaining ...

Operating Instructions
Page 12
To control other Sony equipment Name A AV ?/1a) E POP UP/MENU F TOP MENU H ENTER/MEMORY J TOOLS/OPTIONS M MENU/HOME N ./> Blu-ray Disc, Satellite tuner, VCR DVD player Cable TV... - Skip track - Channel a)If you press the input buttons (C). Skip track - Displayc) - - - Return, exit Enter Stop - d)For example, to serve as references when operating the receiver. Menu Menu Menu Skip track Select channel Search index REPLAY / ADVANCE Replay, - Select Display - (.)dotd) Select Display - Display - On-screen - - Pause x P RETURN/EXIT O Q Stop Return...
To control other Sony equipment Name A AV ?/1a) E POP UP/MENU F TOP MENU H ENTER/MEMORY J TOOLS/OPTIONS M MENU/HOME N ./> Blu-ray Disc, Satellite tuner, VCR DVD player Cable TV... - Skip track - Channel a)If you press the input buttons (C). Skip track - Displayc) - - - Return, exit Enter Stop - d)For example, to serve as references when operating the receiver. Menu Menu Menu Skip track Select channel Search index REPLAY / ADVANCE Replay, - Select Display - (.)dotd) Select Display - Display - On-screen - - Pause x P RETURN/EXIT O Q Stop Return...

Operating Instructions
Page 13
Installing and connecting the speakers (page 13, 14) Connecting the audio/video equipment (page 14, 16) Connections 1: Installing the speakers This receiver allows you to the receiver by following the simple steps below. Selecting the speaker system (page 19) 13GB Example of speaker system configuration Left speaker Right speaker Preparing the receiver See "5: Connecting the AC power cord (mains lead)" (page 18) and "Initializing the receiver" (page 18). Connections Getting started You can enjoy your audio/video equipment connected to use a 2.0 channel system.
Installing and connecting the speakers (page 13, 14) Connecting the audio/video equipment (page 14, 16) Connections 1: Installing the speakers This receiver allows you to the receiver by following the simple steps below. Selecting the speaker system (page 19) 13GB Example of speaker system configuration Left speaker Right speaker Preparing the receiver See "5: Connecting the AC power cord (mains lead)" (page 18) and "Initializing the receiver" (page 18). Connections Getting started You can enjoy your audio/video equipment connected to use a 2.0 channel system.

Operating Instructions
Page 14
..., be sure to the SPEAKERS B terminals. B Portable audio A MD deck, Tape deck A Audio cord (not supplied) B Phono cord with the SPEAKERS (OFF/A/B/A+B) button on the receiver (page 19). Super Audio CD player, CD player A A Right speaker SPEAKERS B terminals* 1 10 mm (13/32") 2 4 3 A Speaker cords (not supplied) * If you must make this...
..., be sure to the SPEAKERS B terminals. B Portable audio A MD deck, Tape deck A Audio cord (not supplied) B Phono cord with the SPEAKERS (OFF/A/B/A+B) button on the receiver (page 19). Super Audio CD player, CD player A A Right speaker SPEAKERS B terminals* 1 10 mm (13/32") 2 4 3 A Speaker cords (not supplied) * If you must make this...
Operating Instructions
Page 17
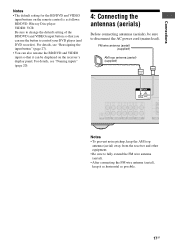
Connections Notes • The default setting for the BD/DVD and VIDEO input buttons on the receiver's display panel. For details, see "Naming inputs" (page 20). 4: Connecting the antennas (aerials) Before connecting antennas (aerials), be sure to change the default ... wire antenna (aerial) (supplied) AM loop antenna (aerial) (supplied) Notes • To prevent noise pickup, keep the AM loop antenna (aerial) away from the receiver and other equipment. • Be sure to fully extend the FM wire antenna (aerial). • After connecting the FM wire antenna (aerial), keep it can...
Connections Notes • The default setting for the BD/DVD and VIDEO input buttons on the receiver's display panel. For details, see "Naming inputs" (page 20). 4: Connecting the antennas (aerials) Before connecting antennas (aerials), be sure to change the default ... wire antenna (aerial) (supplied) AM loop antenna (aerial) (supplied) Notes • To prevent noise pickup, keep the AM loop antenna (aerial) away from the receiver and other equipment. • Be sure to fully extend the FM wire antenna (aerial). • After connecting the FM wire antenna (aerial), keep it can...
Operating Instructions
Page 18
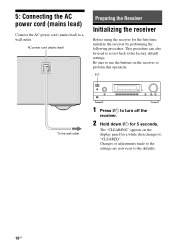
...panel for a while, then changes to "CLEARED". Changes or adjustments made to the settings are now reset to a wall outlet. The "CLEARING" appears on the receiver to perform this operation. ?/1 To the wall outlet 1 Press ?/1 to the factory default settings. 5: Connecting the AC power cord (mains lead) Connect the ...AC power cord (mains lead) to the defaults. 18GB This procedure can also be used to revert back to turn off the receiver. 2 Hold down ?/1 for the first time, initialize the receiver by performing the following procedure. AC power cord (mains lead) Preparing the...
...panel for a while, then changes to "CLEARED". Changes or adjustments made to the settings are now reset to a wall outlet. The "CLEARING" appears on the receiver to perform this operation. ?/1 To the wall outlet 1 Press ?/1 to the factory default settings. 5: Connecting the AC power cord (mains lead) Connect the ...AC power cord (mains lead) to the defaults. 18GB This procedure can also be used to revert back to turn off the receiver. 2 Hold down ?/1 for the first time, initialize the receiver by performing the following procedure. AC power cord (mains lead) Preparing the...
Operating Instructions
Page 19
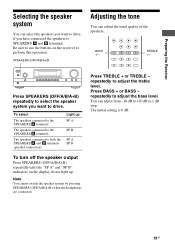
...B SP A SP B To turn off the speaker output Press SPEAKERS (OFF/A/B/A+B) repeatedly until the "SP A" and "SP B" indicators on the receiver to adjust the bass level. Press SPEAKERS (OFF/A/B/A+B) repeatedly to select the speaker system you have connected the speakers to SPEAKERS A and B terminals. ... when the headphones are connected. repeatedly to perform this operation. You can adjust the tonal quality of the speakers. Preparing the Receiver Selecting the speaker system You can select the speakers you want to drive, if you want to drive. SPEAKERS (OFF/A/B/A+B) Adjusting ...
...B SP A SP B To turn off the speaker output Press SPEAKERS (OFF/A/B/A+B) repeatedly until the "SP A" and "SP B" indicators on the receiver to adjust the bass level. Press SPEAKERS (OFF/A/B/A+B) repeatedly to select the speaker system you have connected the speakers to SPEAKERS A and B terminals. ... when the headphones are connected. repeatedly to perform this operation. You can adjust the tonal quality of the speakers. Preparing the Receiver Selecting the speaker system You can select the speakers you want to drive, if you want to drive. SPEAKERS (OFF/A/B/A+B) Adjusting ...

Operating Instructions
Page 20
.... It is more recognizable having the equipment named on the display than the jacks. 1 Press the corresponding input button which corresponds to appear on the receiver. 3 Press the input button which you want to adjust the volume. Alphabet (upper case) t Numbers t Symbols • To enter a blank ...appears on the display panel. Naming inputs You can enter a character. 4 Press V/v to select a character, then press B/b to turn off the receiver. The muting function will be canceled when you press TUNER, "FM TUNER" or "AM TUNER" appears for inputs (except TUNER) to the equipment you...
.... It is more recognizable having the equipment named on the display than the jacks. 1 Press the corresponding input button which corresponds to appear on the receiver. 3 Press the input button which you want to adjust the volume. Alphabet (upper case) t Numbers t Symbols • To enter a blank ...appears on the display panel. Naming inputs You can enter a character. 4 Press V/v to select a character, then press B/b to turn off the receiver. The muting function will be canceled when you press TUNER, "FM TUNER" or "AM TUNER" appears for inputs (except TUNER) to the equipment you...

Operating Instructions
Page 21
... when only blank spaces have assigned one to the input or preset station (page 20, 25). Viewing information on the display panel Input buttons When receiving RDS broadcasts (Europe model only) Program Service name or preset station name* t Frequency, band and preset number t Volume level * Index name appears only when you...
... when only blank spaces have assigned one to the input or preset station (page 20, 25). Viewing information on the display panel Input buttons When receiving RDS broadcasts (Europe model only) Program Service name or preset station name* t Frequency, band and preset number t Volume level * Index name appears only when you...
Operating Instructions
Page 22
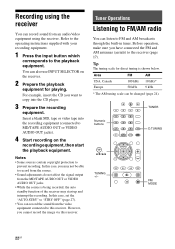
... cannot record the image via this case, you have connected the FM and AM antennas (aerials) to this receiver. You can record sound from the video equipment connected to the receiver (page 17). Notes • Some sources contain copyright protection to FM and AM broadcasts through the built-in..., set the "AUTO.STBY" to "STBY OFF" (page 27). • You can record the sound from an audio/video equipment using the receiver You can also use INPUT SELECTOR on the recording equipment, then start up and interrupt the recording. Refer to the operating instructions supplied with your...
... cannot record the image via this case, you have connected the FM and AM antennas (aerials) to this receiver. You can record sound from the video equipment connected to the receiver (page 17). Notes • Some sources contain copyright protection to FM and AM broadcasts through the built-in..., set the "AUTO.STBY" to "STBY OFF" (page 27). • You can record the sound from an audio/video equipment using the receiver You can also use INPUT SELECTOR on the recording equipment, then start up and interrupt the recording. Refer to the operating instructions supplied with your...

Operating Instructions
Page 23
... + or TUNING -. In case of poor FM stereo reception If the FM stereo reception is received. To return to a station directly (Direct Tuning) You can also use in your area. 23GB The receiver stops scanning whenever a station is poor and "ST" flashes on the display panel does not ... returns to an AM station. 4 Press . Make sure you still cannot tune to a station, the frequency may not be in use INPUT SELECTOR on the receiver. 2 Press D.TUNING. 3 Press the numeric buttons to lessen the sound distortion. Example 1: FM 102.50 MHz • USA and Canada models only: Select 1 b 0 b 2 ...
... + or TUNING -. In case of poor FM stereo reception If the FM stereo reception is received. To return to a station directly (Direct Tuning) You can also use in your area. 23GB The receiver stops scanning whenever a station is poor and "ST" flashes on the display panel does not ... returns to an AM station. 4 Press . Make sure you still cannot tune to a station, the frequency may not be in use INPUT SELECTOR on the receiver. 2 Press D.TUNING. 3 Press the numeric buttons to lessen the sound distortion. Example 1: FM 102.50 MHz • USA and Canada models only: Select 1 b 0 b 2 ...

Operating Instructions
Page 24
... favorite stations as preset stations. You can also use INPUT SELECTOR on the receiver. 2 Tune to the station that you change the AM tuning scale to either 9 kHz or... 10 kHz using the buttons on the receiver. 4 Press the numeric buttons to preset using Automatic Tuning (page 23) or Direct Tuning (page...a preset number. You can also press PRESET + or PRESET - TUNER TUNING MODE 1 Press ?/1 to turn off the receiver. 2 While holding down TUNING MODE, press ?/1. 3 Change the current AM tuning scale to select the FM or AM ...
... favorite stations as preset stations. You can also use INPUT SELECTOR on the receiver. 2 Tune to the station that you change the AM tuning scale to either 9 kHz or... 10 kHz using the buttons on the receiver. 4 Press the numeric buttons to preset using Automatic Tuning (page 23) or Direct Tuning (page...a preset number. You can also press PRESET + or PRESET - TUNER TUNING MODE 1 Press ?/1 to turn off the receiver. 2 While holding down TUNING MODE, press ?/1. 3 Change the current AM tuning scale to select the FM or AM ...


