
Safety Information
Page 10
... reception, which the receiver is encouraged to try to correct the interference by the ACTA. If this computer product. If this equipment to maintain uninterrupted service. A telephone plug and jack used to connect this ...information, please contact the Sony Customer Information Service Center at http://esupport.sony.com/EN/VAIO/. Operation with noncompliant peripherals is used to determine the quantity of devices which may be determined by turning the equipment off and on... of the FCC rules and the requirements adopted by one or more of the RENs should not exceed five (5.0).
... reception, which the receiver is encouraged to try to correct the interference by the ACTA. If this computer product. If this equipment to maintain uninterrupted service. A telephone plug and jack used to connect this ...information, please contact the Sony Customer Information Service Center at http://esupport.sony.com/EN/VAIO/. Operation with noncompliant peripherals is used to determine the quantity of devices which may be determined by turning the equipment off and on... of the FCC rules and the requirements adopted by one or more of the RENs should not exceed five (5.0).

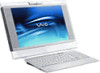
User Guide
Page 10
...) C Built-in its help file. See Setting Up Your Computer with VAIO Central (page 98) and find out more in MOTION EYE camera (page 33) D Power indicator (page 15) E Power button F MONITOR OFF button / MONITOR OFF indicator (page 15) Press this button to turn off the LCD backlight and the speaker volume. ✍...
...) C Built-in its help file. See Setting Up Your Computer with VAIO Central (page 98) and find out more in MOTION EYE camera (page 33) D Power indicator (page 15) E Power button F MONITOR OFF button / MONITOR OFF indicator (page 15) Press this button to turn off the LCD backlight and the speaker volume. ✍...

User Guide
Page 15
... is on , illuminates in orange when the computer is in Standby mode, and turns off when the computer is in Hibernate mode or off , the optical disc is not being used . n 15 N Getting Started About the Indicator Lights Your computer is equipped with VAIO Central (page 98) and find out more ...in orange when the LCD backlight and the speaker volume are turned off. Media Access Illuminates when data is read from or written to a memory card....
... is on , illuminates in orange when the computer is in Standby mode, and turns off when the computer is in Hibernate mode or off , the optical disc is not being used . n 15 N Getting Started About the Indicator Lights Your computer is equipped with VAIO Central (page 98) and find out more ...in orange when the LCD backlight and the speaker volume are turned off. Media Access Illuminates when data is read from or written to a memory card....
User Guide
Page 19
n 19 N Getting Started Shutting Down Your Computer Safely To avoid losing unsaved data, be sure to turn off automatically. The power indicator light turns off any prompts warning you to save documents or to consider other users and wait for the computer to shut down your computer properly, as described below. The Turn off computer window appears. 3 Click Turn Off. 4 Respond to any peripherals connected to the computer. 2 Click Start and then Turn Off Computer. To shut down your computer 1 Turn off .
n 19 N Getting Started Shutting Down Your Computer Safely To avoid losing unsaved data, be sure to turn off automatically. The power indicator light turns off any prompts warning you to save documents or to consider other users and wait for the computer to shut down your computer properly, as described below. The Turn off computer window appears. 3 Click Turn Off. 4 Respond to any peripherals connected to the computer. 2 Click Start and then Turn Off Computer. To shut down your computer 1 Turn off .

User Guide
Page 22
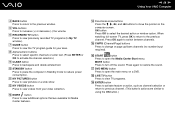
Using the Wireless Keyboard n 22 N Using Your VAIO Computer A Function keys Perform certain tasks. Fn + F5: Decreases lightness intensity of the LCD screen. B Muting button Turns the volume on and off. D Shortcut buttons Perform the pre-assigned tasks. S2: Launches Internet Explorer.... Fn + F6: Increases lightness intensity of the LCD screen. The task associated with each function key varies among software applications except the following combinations with VAIO Central. One...
Using the Wireless Keyboard n 22 N Using Your VAIO Computer A Function keys Perform certain tasks. Fn + F5: Decreases lightness intensity of the LCD screen. B Muting button Turns the volume on and off. D Shortcut buttons Perform the pre-assigned tasks. S2: Launches Internet Explorer.... Fn + F6: Increases lightness intensity of the LCD screen. The task associated with each function key varies among software applications except the following combinations with VAIO Central. One...
User Guide
Page 23
... use (page 26). when the (Num lock): Turns on while in the Num Lock state. (Caps lock): Turns on while in the Caps Lock state. (Scroll lock): Turns on while in the Scroll Lock state. (Connect): Turns on and off the wireless keyboard. n 23 N Using Your VAIO Computer E Standby button Provides for the lower level of...
... use (page 26). when the (Num lock): Turns on while in the Num Lock state. (Caps lock): Turns on while in the Caps Lock state. (Scroll lock): Turns on while in the Scroll Lock state. (Connect): Turns on and off the wireless keyboard. n 23 N Using Your VAIO Computer E Standby button Provides for the lower level of...
User Guide
Page 26
...keyboard. If not, repeat the procedure. ! n 26 N Using Your VAIO Computer To connect the wireless keyboard 1 Insert the supplied four AA batteries (1) into the battery compartment (2) on the bottom of the wireless keyboard. 2 Turn on the computer. 3 Slide the POWER switch (3) at the top of the keyboard ...to check that the connection between the computer and the keyboard. Steps 4 and 5 must be completed within 10 seconds of the...
...keyboard. If not, repeat the procedure. ! n 26 N Using Your VAIO Computer To connect the wireless keyboard 1 Insert the supplied four AA batteries (1) into the battery compartment (2) on the bottom of the wireless keyboard. 2 Turn on the computer. 3 Slide the POWER switch (3) at the top of the keyboard ...to check that the connection between the computer and the keyboard. Steps 4 and 5 must be completed within 10 seconds of the...

User Guide
Page 28
...Rotate the central wheel to enable communication between the computer and the wireless mouse. This will help you save battery power. C Right button Press the right button once to turn the mouse on and off. n 28 N Using Your VAIO Computer Using the Mouse A wireless mouse is available only... with your computer. D Power switch Slide the switch to display a context-sensitive shortcut menu (not...
...Rotate the central wheel to enable communication between the computer and the wireless mouse. This will help you save battery power. C Right button Press the right button once to turn the mouse on and off. n 28 N Using Your VAIO Computer Using the Mouse A wireless mouse is available only... with your computer. D Power switch Slide the switch to display a context-sensitive shortcut menu (not...
User Guide
Page 30
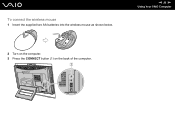
To connect the wireless mouse 1 Insert the supplied two AA batteries into the wireless mouse as shown below. n 30 N Using Your VAIO Computer 2 Turn on the computer. 3 Press the CONNECT button (1) on the back of the computer.
To connect the wireless mouse 1 Insert the supplied two AA batteries into the wireless mouse as shown below. n 30 N Using Your VAIO Computer 2 Turn on the computer. 3 Press the CONNECT button (1) on the back of the computer.

User Guide
Page 31
Communication between the wireless mouse and the computer should now be replaced. n 31 N Using Your VAIO Computer 4 Turn over the wireless mouse, slide the power switch to be established. ! Step 3 and 4 must be completed within 10 seconds of time, remove the batteries to avoid possible damage from battery leakage. If the wireless mouse is not being used for an extended period of each other. ✍ If the wireless mouse does not operate properly, the batteries may need to the ON position, and press the CONNECT button.
Communication between the wireless mouse and the computer should now be replaced. n 31 N Using Your VAIO Computer 4 Turn over the wireless mouse, slide the power switch to be established. ! Step 3 and 4 must be completed within 10 seconds of time, remove the batteries to avoid possible damage from battery leakage. If the wireless mouse is not being used for an extended period of each other. ✍ If the wireless mouse does not operate properly, the batteries may need to the ON position, and press the CONNECT button.

User Guide
Page 33
... exiting your instant messaging or video editing software does not activate or deactivate the built-in MOTION EYE camera, respectively. Turning on the computer activates the built-in MOTION EYE camera, so the computer is ready for example Windows Messenger and Windows MovieMaker. Note that the camera is equipped with a built-in MOTION... built-in MOTION EYE camera adds video functionality to instant messaging software and video editing software, for a video conference using the software. n 33 N Using Your VAIO Computer Using the Built-in MOTION EYE Camera Your...
... exiting your instant messaging or video editing software does not activate or deactivate the built-in MOTION EYE camera, respectively. Turning on the computer activates the built-in MOTION EYE camera, so the computer is ready for example Windows Messenger and Windows MovieMaker. Note that the camera is equipped with a built-in MOTION... built-in MOTION EYE camera adds video functionality to instant messaging software and video editing software, for a video conference using the software. n 33 N Using Your VAIO Computer Using the Built-in MOTION EYE Camera Your...
User Guide
Page 35
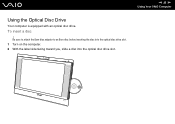
To insert a disc ! n 35 N Using Your VAIO Computer Be sure to attach the 8cm disc adapter to an 8cm disc before inserting the disc into the optical disc drive slot. 1 Turn on the computer. 2 With the label side facing toward you, slide a disc into the optical disc drive slot. Using the Optical Disc Drive Your computer is equipped with an optical disc drive.
To insert a disc ! n 35 N Using Your VAIO Computer Be sure to attach the 8cm disc adapter to an 8cm disc before inserting the disc into the optical disc drive slot. 1 Turn on the computer. 2 With the label side facing toward you, slide a disc into the optical disc drive slot. Using the Optical Disc Drive Your computer is equipped with an optical disc drive.
User Guide
Page 37
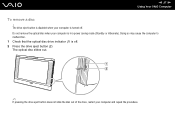
Do not remove the optical disc when your computer is off . The optical disc slides out. ✍ If pressing the drive eject button does not slide the disc out of the drive, restart your computer is turned off . 2 Press the drive eject button (2). Doing so may cause the computer to malfunction. 1 Check that the optical disc drive indicator (1) is in a power saving mode (Standby or Hibernate). The drive eject button is disabled when your computer and repeat the procedure. n 37 N Using Your VAIO Computer To remove a disc !
Do not remove the optical disc when your computer is off . The optical disc slides out. ✍ If pressing the drive eject button does not slide the disc out of the drive, restart your computer is turned off . 2 Press the drive eject button (2). Doing so may cause the computer to malfunction. 1 Check that the optical disc drive indicator (1) is in a power saving mode (Standby or Hibernate). The drive eject button is disabled when your computer and repeat the procedure. n 37 N Using Your VAIO Computer To remove a disc !
User Guide
Page 58
... are available for your video collection. G GUIDE button Press to view videos from your area. J STANDBY button Press to place the computer in Standby mode to view previously recorded TV programs (In My TV window). L MY VIDEOS button Press to view the TV program... guide for Media Center features. F RECORDED TV button Press to reduce power consumption. n 58 N Using Your VAIO Computer D BACK button Press to return to backspace and delete entered text. N Directional arrow buttons Press the M, m, H Alphanumeric buttons Press to select specific...
... are available for your video collection. G GUIDE button Press to view videos from your area. J STANDBY button Press to place the computer in Standby mode to view previously recorded TV programs (In My TV window). L MY VIDEOS button Press to view the TV program... guide for Media Center features. F RECORDED TV button Press to reduce power consumption. n 58 N Using Your VAIO Computer D BACK button Press to return to backspace and delete entered text. N Directional arrow buttons Press the M, m, H Alphanumeric buttons Press to select specific...

User Guide
Page 59
To insert batteries 1 Turn the remote commander over. 2 Press the tab (1) and lift the battery cover up. 3 Insert the supplied two AA batteries into the remote commander. 4 Align the ... leakage. When the remote commander has not been used for an extended period of time, remove the batteries to replace the batteries. n 59 N Using Your VAIO Computer Before you use the remote commander Before using the remote commander, you may need to insert the supplied AA manganese batteries and connect the remote...
To insert batteries 1 Turn the remote commander over. 2 Press the tab (1) and lift the battery cover up. 3 Insert the supplied two AA batteries into the remote commander. 4 Align the ... leakage. When the remote commander has not been used for an extended period of time, remove the batteries to replace the batteries. n 59 N Using Your VAIO Computer Before you use the remote commander Before using the remote commander, you may need to insert the supplied AA manganese batteries and connect the remote...
User Guide
Page 73
If you do, you may pop out unexpectedly. n 73 N Using Your VAIO Computer Removing a Memory Stick Media To remove a Memory Stick media 1 Check that the Media Access indicator is off before removing the Memory Stick media. Large volumes ... may lose data. Do not remove the Memory Stick media while the Media Access indicator is off . 2 Push the Memory Stick media in toward the computer. The Memory Stick media ejects. 3 Pull the Memory Stick media out of data may take time to load, so be sure the indicator is...
If you do, you may pop out unexpectedly. n 73 N Using Your VAIO Computer Removing a Memory Stick Media To remove a Memory Stick media 1 Check that the Media Access indicator is off before removing the Memory Stick media. Large volumes ... may lose data. Do not remove the Memory Stick media while the Media Access indicator is off . 2 Push the Memory Stick media in toward the computer. The Memory Stick media ejects. 3 Pull the Memory Stick media out of data may take time to load, so be sure the indicator is...

User Guide
Page 81
... Panel. 3 Click Network and Internet Connections. 4 Click Network Connections. The Network Connections window appears. 5 Right-click Wireless Network Connection, then click Properties. n 81 N Using Your VAIO Computer To communicate without an access point (ad-hoc) 1 Turn on the WIRELESS LAN switch. The Wireless network properties window appears. 8 Enter a network name (SSID)*1.
... Panel. 3 Click Network and Internet Connections. 4 Click Network Connections. The Network Connections window appears. 5 Right-click Wireless Network Connection, then click Properties. n 81 N Using Your VAIO Computer To communicate without an access point (ad-hoc) 1 Turn on the WIRELESS LAN switch. The Wireless network properties window appears. 8 Enter a network name (SSID)*1.

User Guide
Page 83
n 83 N Using Your VAIO Computer To disconnect from a computer-to select Any available network (access point preferred), and click Close. 8 Click OK. 9 Close the Network Connections window. 10 Turn off the WIRELESS LAN switch. The Network Connections window appears. 4 In the right panel under LAN or High-Speed Internet, right-click Wireless Network Connection. 5 ...
n 83 N Using Your VAIO Computer To disconnect from a computer-to select Any available network (access point preferred), and click Close. 8 Click OK. 9 Close the Network Connections window. 10 Turn off the WIRELESS LAN switch. The Network Connections window appears. 4 In the right panel under LAN or High-Speed Internet, right-click Wireless Network Connection. 5 ...

User Guide
Page 85
... set up. The Wireless Setup Utility appears. 4 Follow the on the WIRELESS LAN switch. See the manual that came with more information. 2 Turn on -screen instructions. n 85 N Using Your VAIO Computer To connect to a wireless network 1 Make sure an access point is set up. To connect to a wireless network (models with your access...
... set up. The Wireless Setup Utility appears. 4 Follow the on the WIRELESS LAN switch. See the manual that came with more information. 2 Turn on -screen instructions. n 85 N Using Your VAIO Computer To connect to a wireless network 1 Make sure an access point is set up. To connect to a wireless network (models with your access...
User Guide
Page 86
n 86 N Using Your VAIO Computer To disconnect from a wireless network Turn off the wireless LAN functionality while accessing remote documents, files, or resources may result in data loss. ✍ For WPA-PSK or WPA2-PSK authentication, you must enter a network key of 8 to 64 alphanumeric characters long. Turning off the WIRELESS LAN switch. !
n 86 N Using Your VAIO Computer To disconnect from a wireless network Turn off the wireless LAN functionality while accessing remote documents, files, or resources may result in data loss. ✍ For WPA-PSK or WPA2-PSK authentication, you must enter a network key of 8 to 64 alphanumeric characters long. Turning off the WIRELESS LAN switch. !


