User Guide
Page 4
n4 N Precautions ...157 On Handling the LCD Screen ...158 On Using the Power Source ...159 On Handling Your Computer...160 On Using the Built-in MOTION EYE Camera...162 On Handling Floppy Disks ......
n4 N Precautions ...157 On Handling the LCD Screen ...158 On Using the Power Source ...159 On Handling Your Computer...160 On Using the Built-in MOTION EYE Camera...162 On Handling Floppy Disks ......
User Guide
Page 6
... views illustrated in audio, video, computing, and communications to the on-screen User Guide. Contains safety guidelines and owner information. Contains an overview of connections, setting up information, etc. ❑ Safety Information - Sony has combined leading-edge technology in this Sony VAIO® computer, and welcome to provide state-of-the-art personal computing...
... views illustrated in audio, video, computing, and communications to the on-screen User Guide. Contains safety guidelines and owner information. Contains an overview of connections, setting up information, etc. ❑ Safety Information - Sony has combined leading-edge technology in this Sony VAIO® computer, and welcome to provide state-of-the-art personal computing...

User Guide
Page 7
...common problems. ❑ Specifications - Contains features of your computer, as well as information on -screen guide: 1 Click Start and Help and Support. 2 Click Manuals & Specifications. 3 Click VAIO Recovery Guide. It also includes information about restoring individual software programs, software drivers, and drive partition... your entire hard disk drive to the Sony online support Web site at: http://esupport.sony.com/EN/VAIO/ for customers in USA, http://www.sony.ca/support for customers in Canada, http://esupport.sony.com/ES/VAIO/ for customers in Spanish speaking Latin American...
...common problems. ❑ Specifications - Contains features of your computer, as well as information on -screen guide: 1 Click Start and Help and Support. 2 Click Manuals & Specifications. 3 Click VAIO Recovery Guide. It also includes information about restoring individual software programs, software drivers, and drive partition... your entire hard disk drive to the Sony online support Web site at: http://esupport.sony.com/EN/VAIO/ for customers in USA, http://www.sony.ca/support for customers in Canada, http://esupport.sony.com/ES/VAIO/ for customers in Spanish speaking Latin American...
User Guide
Page 8
... various RAID levels (or types) that can be configured with your computer's RAID array, or to configure the hard disk drives, change your VAIO computer. To access this on -screen guide: 1 Click Start and Help and Support. 2 Click Manuals & Specifications. 3 Click MCE Guide. Provides information about using the RAID Recovery program to...
... various RAID levels (or types) that can be configured with your computer's RAID array, or to configure the hard disk drives, change your VAIO computer. To access this on -screen guide: 1 Click Start and Help and Support. 2 Click Manuals & Specifications. 3 Click MCE Guide. Provides information about using the RAID Recovery program to...
User Guide
Page 10
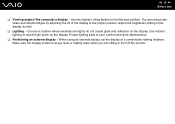
Make sure the display screen is at a comfortable viewing distance. Choose a location where windows and lights do not create glare and reflection on the display. Proper lighting adds to find ...
Make sure the display screen is at a comfortable viewing distance. Choose a location where windows and lights do not create glare and reflection on the display. Proper lighting adds to find ...
User Guide
Page 13
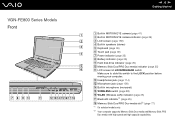
VGN-FE800 Series Models Front n 13 N Getting Started A Built-in MOTION EYE camera (page 41) B Built-in MOTION EYE camera indicator (page 25) C LCD screen (page 158) D Built-in microphone (monaural) O WIRELESS switch (page 88) P WLAN (Wireless LAN) indicator (page 25) Q Bluetooth indicator*1 (page 25) R Memory Stick Duo/PRO Duo...) G Power indicator (page 25) H Battery indicator (page 25) I Hard disk drive indicator (page 25) J Memory Stick Duo/PRO Duo media indicator (page 25) K LCD screen lid LOCK/RELEASE switch Make sure to slide this switch to the LOCK position before moving your computer.
VGN-FE800 Series Models Front n 13 N Getting Started A Built-in MOTION EYE camera (page 41) B Built-in MOTION EYE camera indicator (page 25) C LCD screen (page 158) D Built-in microphone (monaural) O WIRELESS switch (page 88) P WLAN (Wireless LAN) indicator (page 25) Q Bluetooth indicator*1 (page 25) R Memory Stick Duo/PRO Duo...) G Power indicator (page 25) H Battery indicator (page 25) I Hard disk drive indicator (page 25) J Memory Stick Duo/PRO Duo media indicator (page 25) K LCD screen lid LOCK/RELEASE switch Make sure to slide this switch to the LOCK position before moving your computer.
User Guide
Page 19
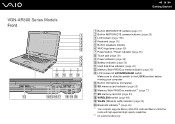
VGN-AR300 Series Models Front n 19 N Getting Started A Built-in MOTION EYE camera (page 41) B Built-in MOTION EYE camera indicator (page 25) C LCD screen (page 158) D Keyboard (page 36) E Built-in microphone (monaural) O SD memory card indicator (page 25) P Memory Stick PRO/Duo media slot*1...supports Memory Stick PRO media and Memory Stick Duo media with high speed and high capacity capabilities. *2 On selected models only. N Built-in speakers (stereo) F VAIO logo lamp (page 39) G Power button / Power indicator (page 25) H Touch pad (page 38) I Power indicator (page 25) J Battery indicator ...
VGN-AR300 Series Models Front n 19 N Getting Started A Built-in MOTION EYE camera (page 41) B Built-in MOTION EYE camera indicator (page 25) C LCD screen (page 158) D Keyboard (page 36) E Built-in microphone (monaural) O SD memory card indicator (page 25) P Memory Stick PRO/Duo media slot*1...supports Memory Stick PRO media and Memory Stick Duo media with high speed and high capacity capabilities. *2 On selected models only. N Built-in speakers (stereo) F VAIO logo lamp (page 39) G Power button / Power indicator (page 25) H Touch pad (page 38) I Power indicator (page 25) J Battery indicator ...
User Guide
Page 29
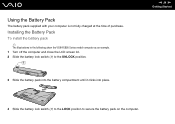
Installing the Battery Pack To install the battery pack ✍ The illustrations in the following show the VGN-FE800 Series model computer as an example. 1 Turn off the computer and close the LCD screen lid. 2 Slide the battery lock switch (1) to secure the battery pack on the computer. n 29 N Getting Started 4 Slide the battery lock switch (1) to the LOCK position to the UNLOCK position. 3 Slide the battery pack into the battery compartment until it clicks into place. Using the Battery Pack The battery pack supplied with your computer is not fully charged at the time of purchase.
Installing the Battery Pack To install the battery pack ✍ The illustrations in the following show the VGN-FE800 Series model computer as an example. 1 Turn off the computer and close the LCD screen lid. 2 Slide the battery lock switch (1) to secure the battery pack on the computer. n 29 N Getting Started 4 Slide the battery lock switch (1) to the LOCK position to the UNLOCK position. 3 Slide the battery pack into the battery compartment until it clicks into place. Using the Battery Pack The battery pack supplied with your computer is not fully charged at the time of purchase.
User Guide
Page 33
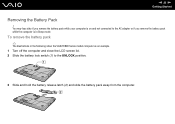
To remove the battery pack ✍ The illustrations in Sleep mode. n 33 N Getting Started Removing the Battery Pack ! You may lose data if you remove the battery pack while your computer is on and not connected to the AC adapter or if you remove the battery pack while the computer is in the following show the VGN-FE800 Series model computer as an example. 1 Turn off the computer and close the LCD screen lid. 2 Slide the battery lock switch (1) to the UNLOCK position. 3 Slide and hold the battery release latch (2) and slide the battery pack away from the computer.
To remove the battery pack ✍ The illustrations in Sleep mode. n 33 N Getting Started Removing the Battery Pack ! You may lose data if you remove the battery pack while your computer is on and not connected to the AC adapter or if you remove the battery pack while the computer is in the following show the VGN-FE800 Series model computer as an example. 1 Turn off the computer and close the LCD screen lid. 2 Slide the battery lock switch (1) to the UNLOCK position. 3 Slide and hold the battery release latch (2) and slide the battery pack away from the computer.
User Guide
Page 36
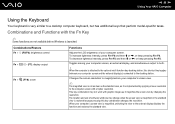
... model-specific tasks. Combinations/Feature Fn + 8 (F5/F6): brightness control Fn + /T (F7): display output Fn + (F10): zoom Functions Adjusts the LCD brightness of your computer screen. To increase lightness intensity, press Fn+F6 and then M or ,, or keep pressing Fn+F6. n 36 N Using Your...
... model-specific tasks. Combinations/Feature Fn + 8 (F5/F6): brightness control Fn + /T (F7): display output Fn + (F10): zoom Functions Adjusts the LCD brightness of your computer screen. To increase lightness intensity, press Fn+F6 and then M or ,, or keep pressing Fn+F6. n 36 N Using Your...
User Guide
Page 38
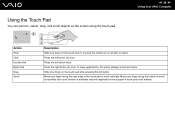
n 38 N Using Your VAIO Computer Action Point Click Double-click Right-click Drag Scroll Description Slide one finger on the touch pad while pressing the left button. Press the ... point to, select, drag, and scroll objects on an item or object. Slide one finger on the touch pad (1) to place the pointer (2) on the screen using the touch pad. In many applications, this action displays a shortcut menu.
n 38 N Using Your VAIO Computer Action Point Click Double-click Right-click Drag Scroll Description Slide one finger on the touch pad while pressing the left button. Press the ... point to, select, drag, and scroll objects on an item or object. Slide one finger on the touch pad (1) to place the pointer (2) on the screen using the touch pad. In many applications, this action displays a shortcut menu.

User Guide
Page 39
...and down. To display this window, press and hold either button or launch and navigate through VAIO Central. Decrease (-) and increase (+) the volume. Starts or pauses media playback. VGN-AR300 Series Models Special-function button CHANNEL buttons* TV REC button* Play/Pause button Stop button... Functions Change TV channels up ) Functions By default, the S1 button maximizes lightness intensity of the LCD screen and the S2 button toggles among your computer screen, an external display, and simultaneous output to help you use specific functions of the computer. To resume ...
...and down. To display this window, press and hold either button or launch and navigate through VAIO Central. Decrease (-) and increase (+) the volume. Starts or pauses media playback. VGN-AR300 Series Models Special-function button CHANNEL buttons* TV REC button* Play/Pause button Stop button... Functions Change TV channels up ) Functions By default, the S1 button maximizes lightness intensity of the LCD screen and the S2 button toggles among your computer screen, an external display, and simultaneous output to help you use specific functions of the computer. To resume ...

User Guide
Page 46
... the AC adapter to power your computer or make data on a disc readable on the optical disc drive, you need to a disc. ❑ Deactivate the screen saver and exit anti-virus software before you use the Roxio Easy Media Creator software to add some data to a disc. Fingerprints and dust on.... (e.g. To complete this may result. ❑ To make sure your software. ❑ Only use circular discs. Use of a disc may cause a failure. n 46 N Using Your VAIO Computer Notes on writing data to a disc ❑ Use only Sony Value-added software when writing to a used disc.
... the AC adapter to power your computer or make data on a disc readable on the optical disc drive, you need to a disc. ❑ Deactivate the screen saver and exit anti-virus software before you use the Roxio Easy Media Creator software to add some data to a disc. Fingerprints and dust on.... (e.g. To complete this may result. ❑ To make sure your software. ❑ Only use circular discs. Use of a disc may cause a failure. n 46 N Using Your VAIO Computer Notes on writing data to a disc ❑ Use only Sony Value-added software when writing to a used disc.
User Guide
Page 47
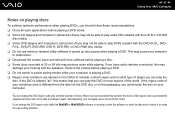
...not reset this may damage your computer is running, restart the software or eject the disc and re-insert it again. n 47 N Using Your VAIO Computer Notes on playing discs To achieve optimum performance when playing DVDs, you should follow these recommendations. ❑ Close all ," this DVD in ...DVD+R, DVD+RW, DVD-R, DVD-RW, or DVD-RAM disc media. ❑ Do not use memory-resident utility software to malfunction. ❑ Deactivate the screen saver and exit anti-virus software before playing a DVD. ❑ Do not switch to power saving modes while your hearing and the speakers.
...not reset this may damage your computer is running, restart the software or eject the disc and re-insert it again. n 47 N Using Your VAIO Computer Notes on playing discs To achieve optimum performance when playing DVDs, you should follow these recommendations. ❑ Close all ," this DVD in ...DVD+R, DVD+RW, DVD-R, DVD-RW, or DVD-RAM disc media. ❑ Do not use memory-resident utility software to malfunction. ❑ Deactivate the screen saver and exit anti-virus software before playing a DVD. ❑ Do not switch to power saving modes while your hearing and the speakers.
User Guide
Page 49
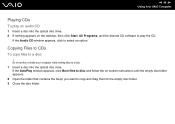
n 49 N Using Your VAIO Computer Playing CDs To play an audio CD 1 Insert a disc into the optical disc drive. Do not strike or shake your computer while writing data ... the desktop, then click Start, All Programs, and the desired CD software to a disc. 1 Insert a disc into the optical disc drive. 2 If nothing appears on -screen instructions until the empty disc folder appears. 2 Open the folder that contains the file(s) you want to copy and drag them to select an option...
n 49 N Using Your VAIO Computer Playing CDs To play an audio CD 1 Insert a disc into the optical disc drive. Do not strike or shake your computer while writing data ... the desktop, then click Start, All Programs, and the desired CD software to a disc. 1 Insert a disc into the optical disc drive. 2 If nothing appears on -screen instructions until the empty disc folder appears. 2 Open the folder that contains the file(s) you want to copy and drag them to select an option...
User Guide
Page 51
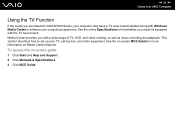
... up your model is VGN-AR300 Series, your computer may have a TV tuner board installed along with Windows Media Center to set -top box, and other equipment. Media Center provides you purchased is equipped with the TV tuner board. See the on-screen MCE Guide for more ...information on -screen guide 1 Click Start and Help and Support. 2 Click Manuals & Specifications. 3 Click MCE Guide. This section describes how to enhance your computing experience. To access this on Media Center features. n 51 N Using Your VAIO Computer Using the TV Function If the model you ...
... up your model is VGN-AR300 Series, your computer may have a TV tuner board installed along with Windows Media Center to set -top box, and other equipment. Media Center provides you purchased is equipped with the TV tuner board. See the on-screen MCE Guide for more ...information on -screen guide 1 Click Start and Help and Support. 2 Click Manuals & Specifications. 3 Click MCE Guide. This section describes how to enhance your computing experience. To access this on Media Center features. n 51 N Using Your VAIO Computer Using the TV Function If the model you ...
User Guide
Page 63
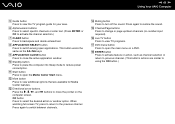
... button works the same as the Alt+Tab keys. K Start button Press to view the TV program guide for Media Center features. n 63 N Using Your VAIO Computer E Guide button Press to open applications. H APPLICATION SELECT button Press to switch among open the Media Center Start menu.
... button works the same as the Alt+Tab keys. K Start button Press to view the TV program guide for Media Center features. n 63 N Using Your VAIO Computer E Guide button Press to open applications. H APPLICATION SELECT button Press to switch among open the Media Center Start menu.
User Guide
Page 87
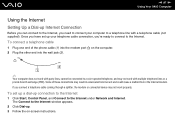
n 87 N Using Your VAIO Computer Using the Internet Setting Up a Dial-up Internet Connection Before you can connect to the Internet, you need to connect your telephone cable connection, ... the internal modem. To set up your computer to the Internet under Network and Internet. Some of the phone cable (1) into the modem port on -screen instructions. The Connect to the Internet. Once you 're ready to connect to the Internet window appears. 2 Click Dial-up connection to the Internet 1 Click...
n 87 N Using Your VAIO Computer Using the Internet Setting Up a Dial-up Internet Connection Before you can connect to the Internet, you need to connect your telephone cable connection, ... the internal modem. To set up your computer to the Internet under Network and Internet. Some of the phone cable (1) into the modem port on -screen instructions. The Connect to the Internet. Once you 're ready to connect to the Internet window appears. 2 Click Dial-up connection to the Internet 1 Click...
User Guide
Page 91
... on the left pane. You cannot select the 5 GHz bandwidth, which is used for the IEEE 802.11a standard, on ad-hoc networks. 1 Turn on -screen instructions. * See the online Specifications to display the Wireless Device Switch window. The Set up . The Wireless LAN indicator lights up a connection or network window... the on the WIRELESS or WIRELESS LAN switch. Select your model supports the Bluetooth functionality and/or the IEEE 802.11a/b/g standard. n 91 N Using Your VAIO Computer To communicate without an access point (ad-hoc) !
... on the left pane. You cannot select the 5 GHz bandwidth, which is used for the IEEE 802.11a standard, on ad-hoc networks. 1 Turn on -screen instructions. * See the online Specifications to display the Wireless Device Switch window. The Set up . The Wireless LAN indicator lights up a connection or network window... the on the WIRELESS or WIRELESS LAN switch. Select your model supports the Bluetooth functionality and/or the IEEE 802.11a/b/g standard. n 91 N Using Your VAIO Computer To communicate without an access point (ad-hoc) !

User Guide
Page 93
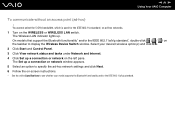
...functionality* and/or the IEEE 802.11a/b/g standard*, double-click ( / ) on the WIRELESS or WIRELESS LAN switch. n 93 N Using Your VAIO Computer To connect to a wireless network 1 Make sure an access point is set up . On models that came with your model supports the ... Control Panel. 4 Click View network status and tasks under Network and Internet. 5 Click Manage wireless networks. 6 Click Add. 7 Follow the on-screen instructions. * See the online Specifications to see whether your access point for more information. 2 Turn on the taskbar to 64 alphanumeric characters long. Turning...
...functionality* and/or the IEEE 802.11a/b/g standard*, double-click ( / ) on the WIRELESS or WIRELESS LAN switch. n 93 N Using Your VAIO Computer To connect to a wireless network 1 Make sure an access point is set up . On models that came with your model supports the ... Control Panel. 4 Click View network status and tasks under Network and Internet. 5 Click Manage wireless networks. 6 Click Add. 7 Follow the on-screen instructions. * See the online Specifications to see whether your access point for more information. 2 Turn on the taskbar to 64 alphanumeric characters long. Turning...

