User Guide
Page 2
... and Ports...14 About the Indicator Lights ...21 Connecting a Power Source ...22 Using the Battery Pack ...23 Shutting Down Your Computer Safely ...30 Using Your VAIO Computer ...31 Using the Keyboard ...32 Using the Touch Pad ...33 Using Special-function Buttons ...34 Using the Built-in MOTION EYE Camera...35 Using...
... and Ports...14 About the Indicator Lights ...21 Connecting a Power Source ...22 Using the Battery Pack ...23 Shutting Down Your Computer Safely ...30 Using Your VAIO Computer ...31 Using the Keyboard ...32 Using the Touch Pad ...33 Using Special-function Buttons ...34 Using the Built-in MOTION EYE Camera...35 Using...
User Guide
Page 3
...Bus (USB) Device...94 Connecting a Printer ...97 Connecting an i.LINK Device ...98 Connecting to a Network (LAN) ...100 Customizing Your VAIO Computer ...102 Setting the Password ...103 Using Fingerprint Authentication ...114 Using Trusted Platform Module (TPM)...122 Setting Up Your Computer with... VAIO Control Center 129 Using the Power Saving Modes ...130 Managing Power with VAIO Power Management ...135 Protecting Data from Unauthorized Use ...137 Protecting the Hard Disk ...140 Upgrading Your VAIO Computer...141 Adding and Removing Memory...142
...Bus (USB) Device...94 Connecting a Printer ...97 Connecting an i.LINK Device ...98 Connecting to a Network (LAN) ...100 Customizing Your VAIO Computer ...102 Setting the Password ...103 Using Fingerprint Authentication ...114 Using Trusted Platform Module (TPM)...122 Setting Up Your Computer with... VAIO Control Center 129 Using the Power Saving Modes ...130 Managing Power with VAIO Power Management ...135 Protecting Data from Unauthorized Use ...137 Protecting the Hard Disk ...140 Upgrading Your VAIO Computer...141 Adding and Removing Memory...142

User Guide
Page 6
Sony has combined leading-edge technology in this manual may look slightly different from those of your purchase of this Sony VAIO® computer, and welcome to provide state-of-the-art personal computing experience. ! n6 N Before Use Before Use Congratulations on -screen User Guide. External views illustrated in audio, video, computing, and communications to the on your computer.
Sony has combined leading-edge technology in this manual may look slightly different from those of your purchase of this Sony VAIO® computer, and welcome to provide state-of-the-art personal computing experience. ! n6 N Before Use Before Use Congratulations on -screen User Guide. External views illustrated in audio, video, computing, and communications to the on your computer.

User Guide
Page 7
...includes printed information and user guides to the Sony online support Web site at the following URLs: http://esupport.sony.com/EN/VAIO/ for customers in USA http://www.sony.ca/support/ for customers in Canada http://esupport.sony.com/ES/VAIO/ for customers in Spanish speaking Latin American ...countries or areas http://esupport.sony.com/ES/VAIO/BR/ for customers in this manual)...
...includes printed information and user guides to the Sony online support Web site at the following URLs: http://esupport.sony.com/EN/VAIO/ for customers in USA http://www.sony.ca/support/ for customers in Canada http://esupport.sony.com/ES/VAIO/ for customers in Spanish speaking Latin American ...countries or areas http://esupport.sony.com/ES/VAIO/BR/ for customers in this manual)...
User Guide
Page 8
Provides information about restoring individual software programs, hardware drivers, and drive partition(s) or your entire hard disk drive to the original factory installed settings. n8 N Before Use ❑ VAIO Recovery Center User Guide - To access this on-screen guide: 1 Click Start and Help and Support. 2 Click Manuals & Specifications. 3 Click VAIO Recovery Center User Guide.
Provides information about restoring individual software programs, hardware drivers, and drive partition(s) or your entire hard disk drive to the original factory installed settings. n8 N Before Use ❑ VAIO Recovery Center User Guide - To access this on-screen guide: 1 Click Start and Help and Support. 2 Click Manuals & Specifications. 3 Click VAIO Recovery Center User Guide.

User Guide
Page 9
... categories to find the answers you will find the on-screen User Guide, warranty information, other Internet sites you might find interesting and useful. ❑ VAIO Tutorials Sony provides guided help tutorials that help you accomplish a task. n9 N Before Use Help and Support Help and Support is easy to access and provides...
... categories to find the answers you will find the on-screen User Guide, warranty information, other Internet sites you might find interesting and useful. ❑ VAIO Tutorials Sony provides guided help tutorials that help you accomplish a task. n9 N Before Use Help and Support Help and Support is easy to access and provides...
User Guide
Page 10
Protect your VAIO computer to register your investment further by purchasing an optional Extended Service Plan. n 10 N Before Use ❑ VAIO Registration Please take a moment to enjoy the following benefits: ❑ Your computer will be registered with Sony Product Support. ❑ You will receive an e-coupon good for purchase of eligible accessories at SonyStyle.com. ❑ Extended Service Plan Sony VAIO products come with a 1 year Limited Warranty.
Protect your VAIO computer to register your investment further by purchasing an optional Extended Service Plan. n 10 N Before Use ❑ VAIO Registration Please take a moment to enjoy the following benefits: ❑ Your computer will be registered with Sony Product Support. ❑ You will receive an e-coupon good for purchase of eligible accessories at SonyStyle.com. ❑ Extended Service Plan Sony VAIO products come with a 1 year Limited Warranty.
User Guide
Page 13
... time, do not connect any other hardware that did not originally come with only the supplied accessories connected and set up your computer with your VAIO computer. ! n 13 N Getting Started Getting Started This section describes how to start up your system. Before starting your computer for example, a printer, an external hard...
... time, do not connect any other hardware that did not originally come with only the supplied accessories connected and set up your computer with your VAIO computer. ! n 13 N Getting Started Getting Started This section describes how to start up your system. Before starting your computer for example, a printer, an external hard...
User Guide
Page 21
... display. Press the Scr Lk key to turn off . Illuminates while data is turned on . Letters appear in lowercase if you are enabled in the VAIO Smart Network window. Illuminates while the built-in MOTION EYE camera is off the indicator. When the indicator is off when the computer is not...
... display. Press the Scr Lk key to turn off . Illuminates while data is turned on . Letters appear in lowercase if you are enabled in the VAIO Smart Network window. Illuminates while the built-in MOTION EYE camera is off the indicator. When the indicator is off when the computer is not...
User Guide
Page 28
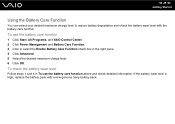
...charge level to select the Enable Battery Care Function check box in To use the battery care function 1 Click Start, All Programs, and VAIO Control Center. 2 Click Power Management and Battery Care Function. 3 Click to reduce battery degradation and check the battery wear level with a new ...genuine Sony battery pack. To use the battery care function above and check detailed information. If the battery wear level is high, replace the battery pack...
...charge level to select the Enable Battery Care Function check box in To use the battery care function 1 Click Start, All Programs, and VAIO Control Center. 2 Click Power Management and Battery Care Function. 3 Click to reduce battery degradation and check the battery wear level with a new ...genuine Sony battery pack. To use the battery care function above and check detailed information. If the battery wear level is high, replace the battery pack...
User Guide
Page 31
... This section describes how to get the most out of using your VAIO computer. ❑ Using the Keyboard (page 32) ❑ Using the Touch Pad (page 33) ❑ Using Special-function Buttons (page 34) ❑ Using the Built-... (page 56) ❑ Using the Internet (page 60) ❑ Using Wireless LAN (WLAN) (page 61) ❑ Using the Bluetooth Functionality (page 69) n 31 N Using Your VAIO Computer
... This section describes how to get the most out of using your VAIO computer. ❑ Using the Keyboard (page 32) ❑ Using the Touch Pad (page 33) ❑ Using Special-function Buttons (page 34) ❑ Using the Built-... (page 56) ❑ Using the Internet (page 60) ❑ Using Wireless LAN (WLAN) (page 61) ❑ Using the Bluetooth Functionality (page 69) n 31 N Using Your VAIO Computer
User Guide
Page 32
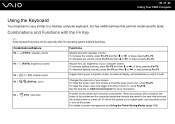
... volume, press Fn+F3 and then m or To increase the volume, press Fn+F4 and then M or ,, or keep pressing Fn+F4. n 32 N Using Your VAIO Computer Using the Keyboard Your keyboard is very similar to a desktop computer keyboard, but has additional keys that perform model-specific tasks.
... volume, press Fn+F3 and then m or To increase the volume, press Fn+F4 and then M or ,, or keep pressing Fn+F4. n 32 N Using Your VAIO Computer Using the Keyboard Your keyboard is very similar to a desktop computer keyboard, but has additional keys that perform model-specific tasks.
User Guide
Page 33
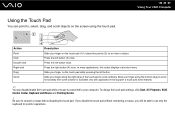
... left button twice. Slide your finger along the right edge of the touch pad to connect a mouse before disabling the touch pad. n 33 N Using Your VAIO Computer Action Point Click Double-click Right-click Drag Scroll Description Slide your finger along the bottom edge to scroll horizontally (the scroll function is... finger on the touch pad while pressing the left button. Press the left button (3) once. To change the touch pad settings, click Start, All Programs, VAIO Control Center, Keyboard and Mouse and Pointing Device. ! Be sure to scroll vertically.
... left button twice. Slide your finger along the right edge of the touch pad to connect a mouse before disabling the touch pad. n 33 N Using Your VAIO Computer Action Point Click Double-click Right-click Drag Scroll Description Slide your finger along the bottom edge to scroll horizontally (the scroll function is... finger on the touch pad while pressing the left button. Press the left button (3) once. To change the touch pad settings, click Start, All Programs, VAIO Control Center, Keyboard and Mouse and Pointing Device. ! Be sure to scroll vertically.
User Guide
Page 34
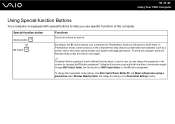
...can change the settings in the window for the S1 button assignment. Special-function button Muting button S1 button Functions Turns the volume on VAIO Control Center for changing the S1 button assignment. By default, the S1 button places your computer into Normal mode, press this window, ...press and hold the button or launch and navigate through VAIO Control Center. n 34 N Using Your VAIO Computer Using Special-function Buttons Your computer is equipped with special buttons to help file on and off.
...can change the settings in the window for the S1 button assignment. Special-function button Muting button S1 button Functions Turns the volume on VAIO Control Center for changing the S1 button assignment. By default, the S1 button places your computer into Normal mode, press this window, ...press and hold the button or launch and navigate through VAIO Control Center. n 34 N Using Your VAIO Computer Using Special-function Buttons Your computer is equipped with special buttons to help file on and off.

User Guide
Page 35
... another software application is normal and does not indicate a malfunction. This is using the camera, exit the application before using such software. n 35 N Using Your VAIO Computer Using the Built-in MOTION EYE Camera Your computer may show some noise, for a video conference using the built-in MOTION EYE camera. The...
... another software application is normal and does not indicate a malfunction. This is using the camera, exit the application before using such software. n 35 N Using Your VAIO Computer Using the Built-in MOTION EYE Camera Your computer may show some noise, for a video conference using the built-in MOTION EYE camera. The...
User Guide
Page 36
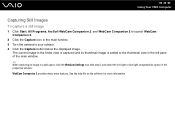
... Capture icon in the properties window. See the help file on the software for more features. WebCam Companion 2 provides many more information. n 36 N Using Your VAIO Computer Capturing Still Images To capture a still image 1 Click Start, All Programs, ArcSoft WebCam Companion 2, and WebCam Companion 2 to your subject. 4 Click the Capture button...
... Capture icon in the properties window. See the help file on the software for more features. WebCam Companion 2 provides many more information. n 36 N Using Your VAIO Computer Capturing Still Images To capture a still image 1 Click Start, All Programs, ArcSoft WebCam Companion 2, and WebCam Companion 2 to your subject. 4 Click the Capture button...
User Guide
Page 37
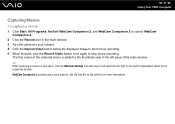
... left pane of the captured movie is added to stop movie recording. See the help file on the software for more features. n 37 N Using Your VAIO Computer Capturing Movies To capture a movie 1 Click Start, All Programs, ArcSoft WebCam Companion 2, and WebCam Companion 2 to launch WebCam Companion 2. 2 Click the Record icon in...
... left pane of the captured movie is added to stop movie recording. See the help file on the software for more features. n 37 N Using Your VAIO Computer Capturing Movies To capture a movie 1 Click Start, All Programs, ArcSoft WebCam Companion 2, and WebCam Companion 2 to launch WebCam Companion 2. 2 Click the Record icon in...
User Guide
Page 38
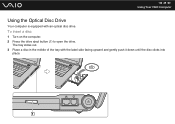
n 38 N Using Your VAIO Computer Using the Optical Disc Drive Your computer is equipped with the label side facing upward and gently push it down until the disc clicks into place. To insert a disc 1 Turn on the computer. 2 Press the drive eject button (1) to open the drive. The tray slides out. 3 Place a disc in the middle of the tray with an optical disc drive.
n 38 N Using Your VAIO Computer Using the Optical Disc Drive Your computer is equipped with the label side facing upward and gently push it down until the disc clicks into place. To insert a disc 1 Turn on the computer. 2 Press the drive eject button (1) to open the drive. The tray slides out. 3 Place a disc in the middle of the tray with an optical disc drive.
User Guide
Page 39
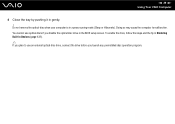
To enable the drive, follow the steps and the tip in Disabling Built-in the BIOS setup screen. You cannot use an external optical disc drive, connect the drive before you disable the optical disc drive in Devices (page 137). ✍ If you plan to malfunction. n 39 N Using Your VAIO Computer 4 Close the tray by pushing it in a power saving mode (Sleep or Hibernate). Do not remove the optical disc when your computer is in gently. ! Doing so may cause the computer to use optical discs if you launch any preinstalled disc operation program.
To enable the drive, follow the steps and the tip in Disabling Built-in the BIOS setup screen. You cannot use an external optical disc drive, connect the drive before you disable the optical disc drive in Devices (page 137). ✍ If you plan to malfunction. n 39 N Using Your VAIO Computer 4 Close the tray by pushing it in a power saving mode (Sleep or Hibernate). Do not remove the optical disc when your computer is in gently. ! Doing so may cause the computer to use optical discs if you launch any preinstalled disc operation program.
User Guide
Page 40
Use the table below to see which types of optical disc drive installed on the model you purchased. Check your specifications for the type of media your optical disc drive supports. n 40 N Using Your VAIO Computer Reading and Writing Optical Discs Your computer plays and records CDs, DVDs, and Blu-ray Disc™ media, depending on your model.
Use the table below to see which types of optical disc drive installed on the model you purchased. Check your specifications for the type of media your optical disc drive supports. n 40 N Using Your VAIO Computer Reading and Writing Optical Discs Your computer plays and records CDs, DVDs, and Blu-ray Disc™ media, depending on your model.

