User Guide
Page 3
...Docking Station...71 Connecting External Speakers ...81 Connecting an External Display ...82 Selecting Display Modes...89 Using the Multiple Monitors Function ...90 Connecting an External Microphone ...92 Connecting a Universal Serial Bus (USB) Device...93 Connecting a Printer ...96 Connecting an i.LINK Device ...97 Connecting to a Network (LAN) ...99 Customizing Your VAIO... Computer ...101 Setting the Password ...102 Setting Up Your Computer with VAIO Central ...105 Using the Power Saving Modes ...106 Managing Power with...
...Docking Station...71 Connecting External Speakers ...81 Connecting an External Display ...82 Selecting Display Modes...89 Using the Multiple Monitors Function ...90 Connecting an External Microphone ...92 Connecting a Universal Serial Bus (USB) Device...93 Connecting a Printer ...96 Connecting an i.LINK Device ...97 Connecting to a Network (LAN) ...99 Customizing Your VAIO... Computer ...101 Setting the Password ...102 Setting Up Your Computer with VAIO Central ...105 Using the Power Saving Modes ...106 Managing Power with...

User Guide
Page 5
n5 N Touch Pad...165 Keyboard...166 Floppy Disks ...167 Audio/Video...168 Memory Stick Media ...169 Peripherals ...170 Docking Station ...171 Support Options ...172 Sony Support Information ...172 Program Support Information...176
n5 N Touch Pad...165 Keyboard...166 Floppy Disks ...167 Audio/Video...168 Memory Stick Media ...169 Peripherals ...170 Docking Station ...171 Support Options ...172 Sony Support Information ...172 Program Support Information...176
User Guide
Page 16
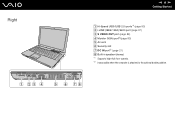
speeds. *2 Inaccessible when the computer is attached to the optional docking station. Right n 16 N Getting Started A Hi-Speed USB (USB 2.0) ports*1 (page 93) B i.LINK (IEEE 1394) S400 port (page 97) C S VIDEO OUT port (page 86) D Monitor (VGA) port*2(page 83) E Air vent F Security slot G DC IN port*2 (page 21) H Built-in speaker (stereo) *1 Supports high-/full-/low-
speeds. *2 Inaccessible when the computer is attached to the optional docking station. Right n 16 N Getting Started A Hi-Speed USB (USB 2.0) ports*1 (page 93) B i.LINK (IEEE 1394) S400 port (page 97) C S VIDEO OUT port (page 86) D Monitor (VGA) port*2(page 83) E Air vent F Security slot G DC IN port*2 (page 21) H Built-in speaker (stereo) *1 Supports high-/full-/low-
User Guide
Page 17
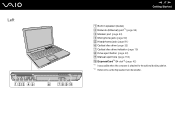
Left n 17 N Getting Started A Built-in speaker (stereo) B Network (Ethernet) port*1 (page 99) C Modem port (page 54) D Microphone jack (page 92) E Headphones jack (page 81) F Optical disc drive (page 32) G Optical disc drive indicator (page 19) H Drive eject button (page 32) I Manual eject hole (page 153) J ExpressCard™/34 slot*2 (page 42) *1 Inaccessible when the computer is attached to the optional docking station. *2 Referred to as the ExpressCard slot hereinafter.
Left n 17 N Getting Started A Built-in speaker (stereo) B Network (Ethernet) port*1 (page 99) C Modem port (page 54) D Microphone jack (page 92) E Headphones jack (page 81) F Optical disc drive (page 32) G Optical disc drive indicator (page 19) H Drive eject button (page 32) I Manual eject hole (page 153) J ExpressCard™/34 slot*2 (page 42) *1 Inaccessible when the computer is attached to the optional docking station. *2 Referred to as the ExpressCard slot hereinafter.
User Guide
Page 18
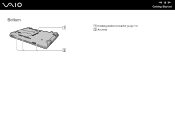
Bottom n 18 N Getting Started A Docking station connector (page 74) B Air vents
Bottom n 18 N Getting Started A Docking station connector (page 74) B Air vents

User Guide
Page 21
... AC outlet (2). 3 Plug the cable attached to the AC adapter (3) into Hibernate mode. The shape of the DC In plug varies depending on the optional docking station. ! See Using Hibernate Mode (page 109). To use the AC adapter 1 Plug one end of the power cord (1) into the AC adapter (3). 2 Plug the other...
... AC outlet (2). 3 Plug the cable attached to the AC adapter (3) into Hibernate mode. The shape of the DC In plug varies depending on the optional docking station. ! See Using Hibernate Mode (page 109). To use the AC adapter 1 Plug one end of the power cord (1) into the AC adapter (3). 2 Plug the other...

User Guide
Page 70
Using Peripheral Devices You can add functionality to your VAIO computer by using the various ports on the computer. ❑ Connecting a Docking Station (page 71) ❑ Connecting External Speakers (page 81) ❑ Connecting an External Display (page 82) ❑ Selecting Display Modes (page 89) ❑ Using the Multiple ...
Using Peripheral Devices You can add functionality to your VAIO computer by using the various ports on the computer. ❑ Connecting a Docking Station (page 71) ❑ Connecting External Speakers (page 81) ❑ Connecting an External Display (page 82) ❑ Selecting Display Modes (page 89) ❑ Using the Multiple ...
User Guide
Page 71
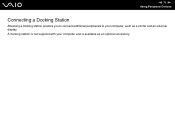
n 71 N Using Peripheral Devices Connecting a Docking Station Attaching a docking station enables you to connect additional peripherals to your computer and is available as a printer and an external display. A docking station is not supplied with your computer, such as an optional accessory.
n 71 N Using Peripheral Devices Connecting a Docking Station Attaching a docking station enables you to connect additional peripherals to your computer and is available as a printer and an external display. A docking station is not supplied with your computer, such as an optional accessory.

User Guide
Page 72
Locating Ports on the Docking Station Top n 72 N Using Peripheral Devices A DC IN indicator Illuminates when the docking station is powered. B Corner guide symbols (page 74) C IN USE indicator (page 77) D UNDOCK button (page 77)
Locating Ports on the Docking Station Top n 72 N Using Peripheral Devices A DC IN indicator Illuminates when the docking station is powered. B Corner guide symbols (page 74) C IN USE indicator (page 77) D UNDOCK button (page 77)
User Guide
Page 73
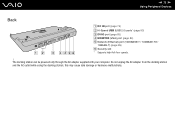
n 73 N Using Peripheral Devices Back A DC IN port (page 74) B Hi-Speed USB (USB 2.0) ports* (page 93) C DVI-D port (page 83) D MONITOR (VGA) port (page 83) E Network (Ethernet) port (1000BASE-T / 100BASE-TX / 10BASE-T) (page 99) F Security slot * Supports high-/full-/low- Do not unplug the AC adapter from the docking station and the AC outlet while using the docking station; speeds. ! this may cause data damage or hardware malfunctions. The docking station can be powered only through the AC adapter supplied with your computer.
n 73 N Using Peripheral Devices Back A DC IN port (page 74) B Hi-Speed USB (USB 2.0) ports* (page 93) C DVI-D port (page 83) D MONITOR (VGA) port (page 83) E Network (Ethernet) port (1000BASE-T / 100BASE-TX / 10BASE-T) (page 99) F Security slot * Supports high-/full-/low- Do not unplug the AC adapter from the docking station and the AC outlet while using the docking station; speeds. ! this may cause data damage or hardware malfunctions. The docking station can be powered only through the AC adapter supplied with your computer.

User Guide
Page 74
When your computer to the docking station. To attach your computer has no battery pack installed, do not attach the computer to the docking station ! To prevent loss of unsaved data, be sure to turn off your computer before attaching it to the docking station. 1 Disconnect all peripherals from the computer. 2 Plug one end of the power cord (1) into the AC adapter (2) and the other end into an AC outlet. 3 Plug the cable attached to the Docking Station ! n 74 N Using Peripheral Devices Attaching Your Computer to the AC adapter (2) into the DC IN port (3) on the docking station (4).
When your computer to the docking station. To attach your computer has no battery pack installed, do not attach the computer to the docking station ! To prevent loss of unsaved data, be sure to turn off your computer before attaching it to the docking station. 1 Disconnect all peripherals from the computer. 2 Plug one end of the power cord (1) into the AC adapter (2) and the other end into an AC outlet. 3 Plug the cable attached to the Docking Station ! n 74 N Using Peripheral Devices Attaching Your Computer to the AC adapter (2) into the DC IN port (3) on the docking station (4).
User Guide
Page 75
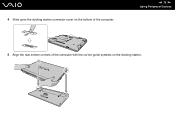
4 Slide open the docking station connector cover on the bottom of the computer with the corner guide symbols on the docking station. n 75 N Using Peripheral Devices 5 Align the rear bottom corners of the computer.
4 Slide open the docking station connector cover on the bottom of the computer with the corner guide symbols on the docking station. n 75 N Using Peripheral Devices 5 Align the rear bottom corners of the computer.

User Guide
Page 76
Use the AC adapter supplied with your computer while attached to the docking station; n 76 N Using Peripheral Devices 7 Lift open the LCD screen lid and turn on the computer. ! this may detach the docking station and cause damage to fix it into place. Do not move your computer. 6 Gently push down the computer to both units.
Use the AC adapter supplied with your computer while attached to the docking station; n 76 N Using Peripheral Devices 7 Lift open the LCD screen lid and turn on the computer. ! this may detach the docking station and cause damage to fix it into place. Do not move your computer. 6 Gently push down the computer to both units.
User Guide
Page 77
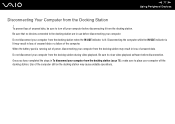
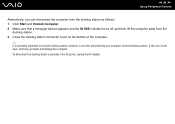
... result in loss of unsaved data, be sure to turn off the docking station. Be sure to place your computer off your computer from the Docking Station ! Do not disconnect your computer from the docking station. Once you have completed the steps in use before disconnecting your computer.... To prevent loss of unsaved data. When the battery pack is lit. Use of the computer still on the docking station may result in loss of unsaved data or a failure of power, disconnecting your computer before disconnection. n 77 N Using Peripheral Devices...
... result in loss of unsaved data, be sure to turn off the docking station. Be sure to place your computer off your computer from the Docking Station ! Do not disconnect your computer from the docking station. Once you have completed the steps in use before disconnecting your computer.... To prevent loss of unsaved data. When the battery pack is lit. Use of the computer still on the docking station may result in loss of unsaved data or a failure of power, disconnecting your computer before disconnection. n 77 N Using Peripheral Devices...
User Guide
Page 78
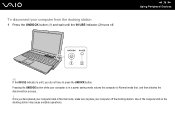
... not have placed your computer back in a power saving mode returns the computer to press the UNDOCK button. Use of the computer still on the docking station may cause unstable operations. To disconnect your computer from the docking station 1 Press the UNDOCK button (1) and wait until the IN USE indicator (2) turns off the...
... not have placed your computer back in a power saving mode returns the computer to press the UNDOCK button. Use of the computer still on the docking station may cause unstable operations. To disconnect your computer from the docking station 1 Press the UNDOCK button (1) and wait until the IN USE indicator (2) turns off the...
User Guide
Page 79
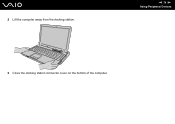
n 79 N Using Peripheral Devices 3 Close the docking station connector cover on the bottom of the computer. 2 Lift the computer away from the docking station.
n 79 N Using Peripheral Devices 3 Close the docking station connector cover on the bottom of the computer. 2 Lift the computer away from the docking station.
User Guide
Page 80
... Computer. 2 Make sure that a message balloon appears and the IN USE indicator turns off; and then lift the computer away from the docking station. n 80 N Using Peripheral Devices Alternatively, you can disconnect the computer from AC power, unplug the AC adapter. If the cover is ...extremely important to close the docking station connector cover after disconnecting your computer from the docking station. 3 Close the docking station connector cover on the bottom of the computer. ✍ It is left open, dust may get ...
... Computer. 2 Make sure that a message balloon appears and the IN USE indicator turns off; and then lift the computer away from the docking station. n 80 N Using Peripheral Devices Alternatively, you can disconnect the computer from AC power, unplug the AC adapter. If the cover is ...extremely important to close the docking station connector cover after disconnecting your computer from the docking station. 3 Close the docking station connector cover on the bottom of the computer. ✍ It is left open, dust may get ...

User Guide
Page 82
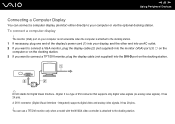
Connected external displays are used as secondary screens. When the computer is attached to the optional docking station, you can also use the VGA port on the docking station. n 82 N Using Peripheral Devices Connecting an External Display You can use the computer with a computer display or a projector. ✍ Connect the power cord after connecting all other cables. On Windows systems only, you can connect an external display (not supplied) to set up multiple monitors. ! For example, you can only use an external display to your computer.
Connected external displays are used as secondary screens. When the computer is attached to the optional docking station, you can also use the VGA port on the docking station. n 82 N Using Peripheral Devices Connecting an External Display You can use the computer with a computer display or a projector. ✍ Connect the power cord after connecting all other cables. On Windows systems only, you can connect an external display (not supplied) to set up multiple monitors. ! For example, you can only use an external display to your computer.
User Guide
Page 83
...2 If you want to connect a VGA monitor, plug the display cable (2) (not supplied) into the monitor (VGA) port (3) a on the computer or on the docking station. ✍ DVI-D stands for Digital Visual Interface - The monitor (VGA) port on your computer is not accessible when the computer is attached to the... docking station. 1 If necessary, plug one end of DVI connector that supports only digital video signals (no analog video signals). It is a type of the ...
...2 If you want to connect a VGA monitor, plug the display cable (2) (not supplied) into the monitor (VGA) port (3) a on the computer or on the docking station. ✍ DVI-D stands for Digital Visual Interface - The monitor (VGA) port on your computer is not accessible when the computer is attached to the... docking station. 1 If necessary, plug one end of DVI connector that supports only digital video signals (no analog video signals). It is a type of the ...
User Guide
Page 84
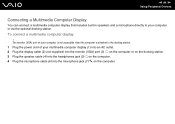
... your multimedia computer display (1) into an AC outlet. 2 Plug the display cable (2) (not supplied) into the monitor (VGA) port (3) a on the computer or on the docking station. 3 Plug the speaker cable (4) into the headphones jack (5) i on the computer. 4 Plug the microphone cable (6) into the microphone jack (7) m on the computer. To ... 84 N Using Peripheral Devices Connecting a Multimedia Computer Display You can connect a multimedia computer display that includes built-in speakers and a microphone directly to the docking station. 1 Plug the power cord of your computer or via the optional...
... your multimedia computer display (1) into an AC outlet. 2 Plug the display cable (2) (not supplied) into the monitor (VGA) port (3) a on the computer or on the docking station. 3 Plug the speaker cable (4) into the headphones jack (5) i on the computer. 4 Plug the microphone cable (6) into the microphone jack (7) m on the computer. To ... 84 N Using Peripheral Devices Connecting a Multimedia Computer Display You can connect a multimedia computer display that includes built-in speakers and a microphone directly to the docking station. 1 Plug the power cord of your computer or via the optional...
