
User Guide
Page 10
Getting Started This section describes how to get started with using your VAIO computer. ❑ Locating Controls and Ports (page 11) ❑ About the Indicator Lights (page 18) ❑ Connecting a Power Source (page 19) ❑ Using the Battery Pack (page 20) ❑ Shutting Down Your Computer Safely (page 25) n 10 N Getting Started
Getting Started This section describes how to get started with using your VAIO computer. ❑ Locating Controls and Ports (page 11) ❑ About the Indicator Lights (page 18) ❑ Connecting a Power Source (page 19) ❑ Using the Battery Pack (page 20) ❑ Shutting Down Your Computer Safely (page 25) n 10 N Getting Started
User Guide
Page 11
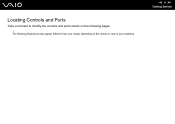
The following illustrations may appear different from your model, depending on the following pages. ! n 11 N Getting Started Locating Controls and Ports Take a moment to identify the controls and ports shown on the country or area of your residency.
The following illustrations may appear different from your model, depending on the following pages. ! n 11 N Getting Started Locating Controls and Ports Take a moment to identify the controls and ports shown on the country or area of your residency.

User Guide
Page 12
Front n 12 N Getting Started A Built-in MOTION EYE camera (page 31) B Built-in MOTION EYE camera indicator (page 18) C Internal microphone (monaural) D LCD screen (page 101) E Keyboard (page 27) F Touch pad (page 29) G WLAN (Wireless LAN) switch (page 47) H WLAN (Wireless LAN) indicator (page 18) I Power indicator (page 18) J Battery indicator (page 18) K Hard disk drive indicator (page 18) L Memory Stick media indicator (page 18) M Memory Stick media slot* (page 42) * Your computer supports Memory Stick Duo media and Memory Stick Pro high speed and high capacity capabilities.
Front n 12 N Getting Started A Built-in MOTION EYE camera (page 31) B Built-in MOTION EYE camera indicator (page 18) C Internal microphone (monaural) D LCD screen (page 101) E Keyboard (page 27) F Touch pad (page 29) G WLAN (Wireless LAN) switch (page 47) H WLAN (Wireless LAN) indicator (page 18) I Power indicator (page 18) J Battery indicator (page 18) K Hard disk drive indicator (page 18) L Memory Stick media indicator (page 18) M Memory Stick media slot* (page 42) * Your computer supports Memory Stick Duo media and Memory Stick Pro high speed and high capacity capabilities.

User Guide
Page 13
A Speakers B Num lock indicator (page 18) C Caps lock indicator (page 18) D Scroll lock indicator (page 18) E S1/S2 buttons (page 30) F Power button n 13 N Getting Started
A Speakers B Num lock indicator (page 18) C Caps lock indicator (page 18) D Scroll lock indicator (page 18) E S1/S2 buttons (page 30) F Power button n 13 N Getting Started
User Guide
Page 14
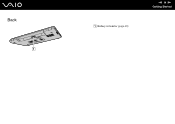
Back A Battery connector (page 20) n 14 N Getting Started
Back A Battery connector (page 20) n 14 N Getting Started

User Guide
Page 15
speeds. Right n 15 N Getting Started A Headphones jack (page 61) B Microphone jack (page 71) C AV Out jack (page 65) D Hi-Speed USB (USB 2.0) ports* (page 72) E Optical disc drive indicator (page 18) F Drive eject button (page 32) G Manual eject hole (page 134) H Security slot I DC In port (page 19) * Supports high-/full-/low-
speeds. Right n 15 N Getting Started A Headphones jack (page 61) B Microphone jack (page 71) C AV Out jack (page 65) D Hi-Speed USB (USB 2.0) ports* (page 72) E Optical disc drive indicator (page 18) F Drive eject button (page 32) G Manual eject hole (page 134) H Security slot I DC In port (page 19) * Supports high-/full-/low-

User Guide
Page 16
Left n 16 N Getting Started A Network (Ethernet) port *1 (page 79) B Modem port (page 46) C i.LINK® (IEEE1394) S400 port (page 77) D Air vent E Monitor (VGA) port *1(page 63) F Hi-Speed USB (USB 2.0) port*2 (page 72) G PC Card slot (page 39) H PC Card eject button (page 41) *1 Disabled when the computer is attached to the optional port replicator. *2 Supports high-/full-/low- speeds. Obstructed and unavailable when the computer is attached to the optional port replicator.
Left n 16 N Getting Started A Network (Ethernet) port *1 (page 79) B Modem port (page 46) C i.LINK® (IEEE1394) S400 port (page 77) D Air vent E Monitor (VGA) port *1(page 63) F Hi-Speed USB (USB 2.0) port*2 (page 72) G PC Card slot (page 39) H PC Card eject button (page 41) *1 Disabled when the computer is attached to the optional port replicator. *2 Supports high-/full-/low- speeds. Obstructed and unavailable when the computer is attached to the optional port replicator.

User Guide
Page 17
Bottom n 17 N Getting Started A Port replicator connector (page 57) B Air vents
Bottom n 17 N Getting Started A Port replicator connector (page 57) B Air vents

User Guide
Page 19
... one end of the power cord (1) into the AC adapter (3). 2 Plug the other end of shutting down in the normal way. See Using Hibernate Mode (page 89). This power saving mode saves you do not use either an AC adapter or a rechargeable battery pack as a power source for a long period of...
... one end of the power cord (1) into the AC adapter (3). 2 Plug the other end of shutting down in the normal way. See Using Hibernate Mode (page 89). This power saving mode saves you do not use either an AC adapter or a rechargeable battery pack as a power source for a long period of...

User Guide
Page 26
Using Your VAIO Computer This section describes how to get the most out of using your computer. ❑ Using the Keyboard (page 27) ❑ Using the Touch Pad (page 29) ❑ Using Special-function Buttons (page 30) ❑ Using the Built-in MOTION EYE Camera (page 31) ❑ Using the Optical Disc Drive (page 32) ❑ Using PC Cards (page 39) ❑ Using the Memory Stick Media (page 42) ❑ Using the Internet (page 46) ❑ Using Wireless LAN (WLAN) (page 47) n 26 N Using Your VAIO Computer
Using Your VAIO Computer This section describes how to get the most out of using your computer. ❑ Using the Keyboard (page 27) ❑ Using the Touch Pad (page 29) ❑ Using Special-function Buttons (page 30) ❑ Using the Built-in MOTION EYE Camera (page 31) ❑ Using the Optical Disc Drive (page 32) ❑ Using PC Cards (page 39) ❑ Using the Memory Stick Media (page 42) ❑ Using the Internet (page 46) ❑ Using Wireless LAN (WLAN) (page 47) n 26 N Using Your VAIO Computer

User Guide
Page 28
... system to its original state, use the power switch to turn on power management, see Using the Power Saving Modes (page 86). Fn + (F10): zoom Fn + (F12): Hibernate n 28 N Using Your VAIO Computer Changes the screen resolution to magnify/restore the screen view. ✍ The magnified view is not as clear as...
... system to its original state, use the power switch to turn on power management, see Using the Power Saving Modes (page 86). Fn + (F10): zoom Fn + (F12): Hibernate n 28 N Using Your VAIO Computer Changes the screen resolution to magnify/restore the screen view. ✍ The magnified view is not as clear as...

User Guide
Page 37
... the computer while writing data onto a disc. 1 Insert a blank CD-R or CD-RW disc into the optical disc drive. n 37 N Using Your VAIO Computer Copying Files to CDs To determine which type of CD your system's hardware configuration. To copy files to CD. 8 Follow the instructions in the... Files Stored on your computer supports, see Reading and Writing CDs and DVDs (page 33). A new window appears with the file(s) or folder(s) you want to copy listed under Devices with Removable Storage. If the CD Drive window ...
... the computer while writing data onto a disc. 1 Insert a blank CD-R or CD-RW disc into the optical disc drive. n 37 N Using Your VAIO Computer Copying Files to CDs To determine which type of CD your system's hardware configuration. To copy files to CD. 8 Follow the instructions in the... Files Stored on your computer supports, see Reading and Writing CDs and DVDs (page 33). A new window appears with the file(s) or folder(s) you want to copy listed under Devices with Removable Storage. If the CD Drive window ...

User Guide
Page 56
.... ❑ Connecting a Port Replicator (page 57) ❑ Connecting External Speakers (page 61) ❑ Connecting an External Display (page 62) ❑ Selecting Display Modes (page 68) ❑ Using the Multiple Monitors Function (page 69) ❑ Connecting an External Microphone (page 71) ❑ Connecting a Universal Serial Bus (USB) Device (page 72) ❑ Connecting a Printer (page 75) ❑ Connecting an i.LINK...
.... ❑ Connecting a Port Replicator (page 57) ❑ Connecting External Speakers (page 61) ❑ Connecting an External Display (page 62) ❑ Selecting Display Modes (page 68) ❑ Using the Multiple Monitors Function (page 69) ❑ Connecting an External Microphone (page 71) ❑ Connecting a Universal Serial Bus (USB) Device (page 72) ❑ Connecting a Printer (page 75) ❑ Connecting an i.LINK...

User Guide
Page 57
... AC adapter supplied with your computer, depending on the Port Replicator A DC In port (page 19) B Network (Ethernet) port (100BASE-TX / 10BASE-T) (page 79) C Hi-Speed USB (USB 2.0) ports* (page 72) D DVI-D port (page 63) E Monitor (VGA) port (page 63) F Printer port (page 76) G Security slot * Supports high-/full-/low- A port replicator may cause data damage...
... AC adapter supplied with your computer, depending on the Port Replicator A DC In port (page 19) B Network (Ethernet) port (100BASE-TX / 10BASE-T) (page 79) C Hi-Speed USB (USB 2.0) ports* (page 72) D DVI-D port (page 63) E Monitor (VGA) port (page 63) F Printer port (page 76) G Security slot * Supports high-/full-/low- A port replicator may cause data damage...
User Guide
Page 62
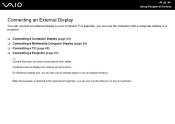
... Connecting an External Display You can use the computer with a computer display or a projector. ❑ Connecting a Computer Display (page 63) ❑ Connecting a Multimedia Computer Display (page 64) ❑ Connecting a TV (page 65) ❑ Connecting a Projector (page 67) ✍ Connect the power cord after connecting all other cables. Connected external displays are used as second...
... Connecting an External Display You can use the computer with a computer display or a projector. ❑ Connecting a Computer Display (page 63) ❑ Connecting a Multimedia Computer Display (page 64) ❑ Connecting a TV (page 65) ❑ Connecting a Projector (page 67) ✍ Connect the power cord after connecting all other cables. Connected external displays are used as second...
User Guide
Page 68
... to be able to display on the computer's LCD and the external display or projector at the same time, see Using the Multiple Monitors Function (page 69) for more information.
... to be able to display on the computer's LCD and the external display or projector at the same time, see Using the Multiple Monitors Function (page 69) for more information.
User Guide
Page 70
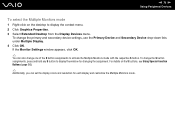
... customize the Multiple Monitors mode. n 70 N Using Peripheral Devices To select the Multiple Monitors mode 1 Right-click on the S buttons, see Using Special-function Buttons (page 30). ✍ Additionally, you can also change one of the S button assignments to activate the Multiple Monitors mode with the respective S button. If the Monitor...
... customize the Multiple Monitors mode. n 70 N Using Peripheral Devices To select the Multiple Monitors mode 1 Right-click on the S buttons, see Using Special-function Buttons (page 30). ✍ Additionally, you can also change one of the S button assignments to activate the Multiple Monitors mode with the respective S button. If the Monitor...
User Guide
Page 81
Customizing Your VAIO Computer This section briefly describes how to change the main settings of your computer. ❑ Setting the Password (page 82) ❑ Setting Up Your Computer with VAIO Central (page 85) ❑ Using the Power Saving Modes (page 86) ❑ Managing Power with VAIO Power Management (page 91) n 81 N Customizing Your VAIO Computer
Customizing Your VAIO Computer This section briefly describes how to change the main settings of your computer. ❑ Setting the Password (page 82) ❑ Setting Up Your Computer with VAIO Central (page 85) ❑ Using the Power Saving Modes (page 86) ❑ Managing Power with VAIO Power Management (page 91) n 81 N Customizing Your VAIO Computer
User Guide
Page 87
... battery runs down when the computer enters Standby mode, you will be lost if you cannot insert a disc. To avoid this mode. You can use VAIO Central to configure the computer to return to the previous work state is in this , you open the LCD screen lid. Going back to Normal... for 25 minutes, it will lose any key. ! If you should save your data frequently. To return to a low power consumption mode. n 87 N Customizing Your VAIO Computer Using Standby Mode Standby mode turns off automatically. See Setting Up Your Computer with...
... battery runs down when the computer enters Standby mode, you will be lost if you cannot insert a disc. To avoid this mode. You can use VAIO Central to configure the computer to return to the previous work state is in this , you open the LCD screen lid. Going back to Normal... for 25 minutes, it will lose any key. ! If you should save your data frequently. To return to a low power consumption mode. n 87 N Customizing Your VAIO Computer Using Standby Mode Standby mode turns off automatically. See Setting Up Your Computer with...

User Guide
Page 90
... computer for a long period of shutting down in Hibernate mode, you cannot insert a disc. n 90 N Customizing Your VAIO Computer ✍ If you do not use VAIO Central to configure the computer to return to Normal mode from Hibernate mode than from Standby mode. This power resuming setting will... be activated. See Setting Up Your Computer with VAIO Central (page 85). ! It takes more time than Standby mode. Hibernate mode requires more time to return to Normal mode when you remove both...
... computer for a long period of shutting down in Hibernate mode, you cannot insert a disc. n 90 N Customizing Your VAIO Computer ✍ If you do not use VAIO Central to configure the computer to return to Normal mode from Hibernate mode than from Standby mode. This power resuming setting will... be activated. See Setting Up Your Computer with VAIO Central (page 85). ! It takes more time than Standby mode. Hibernate mode requires more time to return to Normal mode when you remove both...