
User Guide
Page 3
...66 Connecting External Speakers ...67 Connecting an External Display ...68 Selecting Display Modes...74 Using the Multiple Monitors Function ...76 Connecting an External Microphone ...79 Connecting a Universal Serial Bus (USB) Device...80 Connecting a Printer ...83 Connecting an i.LINK Device ...84 Connecting to a Network (LAN) ...86 Customizing Your VAIO Computer ...87 Setting the Password ...88 Setting Up Your Computer with VAIO Control Center 93 Using the Power Saving Modes ...94 Managing Power with VAIO Power Management ...99 Upgrading Your VAIO Computer...101 Adding and Removing Memory...
...66 Connecting External Speakers ...67 Connecting an External Display ...68 Selecting Display Modes...74 Using the Multiple Monitors Function ...76 Connecting an External Microphone ...79 Connecting a Universal Serial Bus (USB) Device...80 Connecting a Printer ...83 Connecting an i.LINK Device ...84 Connecting to a Network (LAN) ...86 Customizing Your VAIO Computer ...87 Setting the Password ...88 Setting Up Your Computer with VAIO Control Center 93 Using the Power Saving Modes ...94 Managing Power with VAIO Power Management ...99 Upgrading Your VAIO Computer...101 Adding and Removing Memory...

User Guide
Page 8
... -screen guide: 1 Click Start and Help and Support. 2 Click Use my VAIO. 3 Click VAIO Recovery Center User Guide. ❑ SmartWi™ Connection Utility Help - See the online specifications to find out whether your entire hard disk drive to the original factory settings. To access this on selected models only. Provides information about restoring individual software programs, hardware drivers, and drive partition(s) or your model supports the function. Provides information about setting up Bluetooth* and wireless LAN functions. n8 N Before Use ❑ VAIO Recovery Center...
... -screen guide: 1 Click Start and Help and Support. 2 Click Use my VAIO. 3 Click VAIO Recovery Center User Guide. ❑ SmartWi™ Connection Utility Help - See the online specifications to find out whether your entire hard disk drive to the original factory settings. To access this on selected models only. Provides information about restoring individual software programs, hardware drivers, and drive partition(s) or your model supports the function. Provides information about setting up Bluetooth* and wireless LAN functions. n8 N Before Use ❑ VAIO Recovery Center...

User Guide
Page 30
... used only after the operating system is very similar to a desktop computer keyboard, but has additional keys that perform model-specific tasks. Combinations/Feature Fn + % (F2): speaker switch Fn + 8 (F5/F6): brightness control Fn + /T (F7): display output Fn + / (F9/F10): zoom Fn + (F12): hibernate Functions Turns on and off the built-in speakers and the headphones. Changes the LCD brightness of your computer screen. To decrease lighting...
... used only after the operating system is very similar to a desktop computer keyboard, but has additional keys that perform model-specific tasks. Combinations/Feature Fn + % (F2): speaker switch Fn + 8 (F5/F6): brightness control Fn + /T (F7): display output Fn + / (F9/F10): zoom Fn + (F12): hibernate Functions Turns on and off the built-in speakers and the headphones. Changes the LCD brightness of your computer screen. To decrease lighting...

User Guide
Page 32
... the VAIO Control Center to display the setup window. See the help you use specific functions of a CD, DVD, or Blu-ray Disc * media or a music/video file stored on the hard disk drive. AV MODE button Launches the VAIO Launcher for the S1 button assignment. Decrease (-) and increase (+) the volume. You can change the S1 button assignment, press and hold the AV MODE button to help file included with a Blu-ray Disc drive only. Stop button...
... the VAIO Control Center to display the setup window. See the help you use specific functions of a CD, DVD, or Blu-ray Disc * media or a music/video file stored on the hard disk drive. AV MODE button Launches the VAIO Launcher for the S1 button assignment. Decrease (-) and increase (+) the volume. You can change the S1 button assignment, press and hold the AV MODE button to help file included with a Blu-ray Disc drive only. Stop button...

User Guide
Page 38
Use the table below to see which types of optical disc drive installed on the model you purchased. Check your specifications for the type of media your model. n 38 N Using Your VAIO Computer Reading and Writing Optical Discs Your computer plays and records CDs, DVDs, and Blu-ray Disc media, depending on your optical disc drive supports.
Use the table below to see which types of optical disc drive installed on the model you purchased. Check your specifications for the type of media your model. n 38 N Using Your VAIO Computer Reading and Writing Optical Discs Your computer plays and records CDs, DVDs, and Blu-ray Disc media, depending on your optical disc drive supports.

User Guide
Page 44
... to the disc. For instructions on selected models only. See the online specifications to find out about the supported disc media. The Blu-ray Disc writing function is available on how to use the software, see the help file included with your Blu-ray Disc burning software. n 44 N Using Your VAIO Computer Playing Blu-ray Disc Media ! Copying Files to find out the type of your optical disc drive, and...
... to the disc. For instructions on selected models only. See the online specifications to find out about the supported disc media. The Blu-ray Disc writing function is available on how to use the software, see the help file included with your Blu-ray Disc burning software. n 44 N Using Your VAIO Computer Playing Blu-ray Disc Media ! Copying Files to find out the type of your optical disc drive, and...

User Guide
Page 47
... computer is off, skip steps 1 to 4. 1 Double-click the Safely Remove Hardware icon on the taskbar. 2 Select the hardware you want to unplug. 3 Click Stop. 4 Follow the on . If it out of the slot. To remove an ExpressCard module ✍ To remove an ExpressCard module when your computer is on -screen instructions to remove the ExpressCard module while your system may not work properly.
... computer is off, skip steps 1 to 4. 1 Double-click the Safely Remove Hardware icon on the taskbar. 2 Select the hardware you want to unplug. 3 Click Stop. 4 Follow the on . If it out of the slot. To remove an ExpressCard module ✍ To remove an ExpressCard module when your computer is on -screen instructions to remove the ExpressCard module while your system may not work properly.

User Guide
Page 61
... to turn on -screen guide: 1 Click Start, All Programs, and SmartWi Connection Utility. 2 Click SmartWi Connection Utility Help. ! You can transfer data between your model supports the Bluetooth function. To use the Bluetooth function You need to set up to find out whether your computer and other Bluetooth devices such as another computer or a mobile phone. To access this on the WIRELESS switch before starting the SmartWi Connection Utility. n 61 N Using Your VAIO Computer Using the Bluetooth Function The Bluetooth function is...
... to turn on -screen guide: 1 Click Start, All Programs, and SmartWi Connection Utility. 2 Click SmartWi Connection Utility Help. ! You can transfer data between your model supports the Bluetooth function. To use the Bluetooth function You need to set up to find out whether your computer and other Bluetooth devices such as another computer or a mobile phone. To access this on the WIRELESS switch before starting the SmartWi Connection Utility. n 61 N Using Your VAIO Computer Using the Bluetooth Function The Bluetooth function is...

User Guide
Page 66
... functionality to your VAIO computer by using the various ports on the computer. ❑ Connecting External Speakers (page 67) ❑ Connecting an External Display (page 68) ❑ Selecting Display Modes (page 74) ❑ Using the Multiple Monitors Function (page 76) ❑ Connecting an External Microphone (page 79) ❑ Connecting a Universal Serial Bus (USB) Device (page 80) ❑ Connecting a Printer (page 83) ❑ Connecting an i.LINK Device (page 84) ❑ Connecting to a Network (LAN) (page 86) n 66 N Using Peripheral Devices
... functionality to your VAIO computer by using the various ports on the computer. ❑ Connecting External Speakers (page 67) ❑ Connecting an External Display (page 68) ❑ Selecting Display Modes (page 74) ❑ Using the Multiple Monitors Function (page 76) ❑ Connecting an External Microphone (page 79) ❑ Connecting a Universal Serial Bus (USB) Device (page 80) ❑ Connecting a Printer (page 83) ❑ Connecting an i.LINK Device (page 84) ❑ Connecting to a Network (LAN) (page 86) n 66 N Using Peripheral Devices

User Guide
Page 71
... other end to the TV. 3 Switch the input channel of your computer. For the detailed instructions, see How do I change the device for updates. Always use the device driver provided by Sony is used, the image will not be displayed and the audio will not be heard. n 71 N Using Peripheral Devices Connecting a TV You can connect a TV with an HDMI input port to external input. 4 Set up the TV configuration system. !
... other end to the TV. 3 Switch the input channel of your computer. For the detailed instructions, see How do I change the device for updates. Always use the device driver provided by Sony is used, the image will not be displayed and the audio will not be heard. n 71 N Using Peripheral Devices Connecting a TV You can connect a TV with an HDMI input port to external input. 4 Set up the TV configuration system. !

User Guide
Page 77
... Display Settings. 3 Follow the on the S1 button, see the online specifications. At the confirmation prompt, click Yes. n 77 N Using Peripheral Devices To use the Multiple Monitors function ! For details on -screen instructions to change the settings. ✍ You can set the display colors and resolution for changing the assignment. Models with the S1 button. To change the S1 button assignment to display the window for each display and customize the Multiple Monitors function. Additionally...
... Display Settings. 3 Follow the on the S1 button, see the online specifications. At the confirmation prompt, click Yes. n 77 N Using Peripheral Devices To use the Multiple Monitors function ! For details on -screen instructions to change the settings. ✍ You can set the display colors and resolution for changing the assignment. Models with the S1 button. To change the S1 button assignment to display the window for each display and customize the Multiple Monitors function. Additionally...
User Guide
Page 88
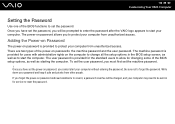
... password. Once you have set the power-on the computer to change all the setup options in for users with administrative rights on password, you will be charged, and your computer may need to be prompted to enter the password after the VAIO logo appears to start your computer from other people. Write down your password and keep it , a password reset fee will be sent in the BIOS setup screen...
... password. Once you have set the power-on the computer to change all the setup options in for users with administrative rights on password, you will be charged, and your computer may need to be prompted to enter the password after the VAIO logo appears to start your computer from other people. Write down your password and keep it , a password reset fee will be sent in the BIOS setup screen...

User Guide
Page 126
n 126 N Troubleshooting Why doesn't my computer enter Sleep or Hibernate mode? To restore your computer to normal mode 1 Close all open programs. 2 Click Start, the arrow next to the Lock button, and Restart. 3 If your computer does not restart, press the Ctrl+Alt+Delete keys and click the arrow next to the battery pack not being installed properly. Turning off your computer and remove the battery pack...
n 126 N Troubleshooting Why doesn't my computer enter Sleep or Hibernate mode? To restore your computer to normal mode 1 Close all open programs. 2 Click Start, the arrow next to the Lock button, and Restart. 3 If your computer does not restart, press the Ctrl+Alt+Delete keys and click the arrow next to the battery pack not being installed properly. Turning off your computer and remove the battery pack...
User Guide
Page 136
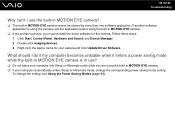
To change the corresponding power saving mode setting. Follow these steps: 1 Click Start, Control Panel, Hardware and Sound, and Device Manager. 2 Double-click Imaging devices. 3 Right-click the device name for the camera. If another software application is in use the built-in MOTION EYE camera? ❑ The built-in MOTION EYE camera. ❑ If the problem persists, you must reinstall the driver software for your camera and click Update Driver Software. n 136 N Troubleshooting Why can't I do...
To change the corresponding power saving mode setting. Follow these steps: 1 Click Start, Control Panel, Hardware and Sound, and Device Manager. 2 Double-click Imaging devices. 3 Right-click the device name for the camera. If another software application is in use the built-in MOTION EYE camera? ❑ The built-in MOTION EYE camera. ❑ If the problem persists, you must reinstall the driver software for your camera and click Update Driver Software. n 136 N Troubleshooting Why can't I do...
User Guide
Page 150
... not work. You may not be able to DVD media? ❑ Make sure you are using a CD-R/RW disc with an adhesive label affixed, replace it must be connected to selected models only. For information on the computer, it with one with no affixed adhesive label. What should I cannot play such contents, download and install the latest updates for WinDVD BD using the keyboard...
... not work. You may not be able to DVD media? ❑ Make sure you are using a CD-R/RW disc with an adhesive label affixed, replace it must be connected to selected models only. For information on the computer, it with one with no affixed adhesive label. What should I cannot play such contents, download and install the latest updates for WinDVD BD using the keyboard...

User Guide
Page 151
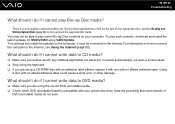
You cannot add or erase data to selected models only. The DVD±RW/±R DL/RAM drive does not support it. ❑ BD-R Disc media are not rewritable. This Q & A entry applies to or from the BD-R Disc media. See the online specifications to find out about the supported disc media. ❑ Make sure your optical disc drive, and then Reading and Writing Optical Discs (page 38) to Blu-ray Disc media? ! n 151 N Troubleshooting Why can't I write data to find out the type of your optical disc drive supports the Blu-ray Disc writing function.
You cannot add or erase data to selected models only. The DVD±RW/±R DL/RAM drive does not support it. ❑ BD-R Disc media are not rewritable. This Q & A entry applies to or from the BD-R Disc media. See the online specifications to find out about the supported disc media. ❑ Make sure your optical disc drive, and then Reading and Writing Optical Discs (page 38) to Blu-ray Disc media? ! n 151 N Troubleshooting Why can't I write data to find out the type of your optical disc drive supports the Blu-ray Disc writing function.

User Guide
Page 157
... functions are provided with the Windows operating system installed on your computer may need to cancel the Enable bidirectional support check box. 6 Click OK. This disables the bidirectional communication functions of the printer, such as data transfer, status monitoring, and remote panel. Follow these steps: 1 Click Start and Control Panel. 2 Click Printer under Hardware and Sound. 3 Right-click the printer icon and select Properties. 4 Click the Ports...
... functions are provided with the Windows operating system installed on your computer may need to cancel the Enable bidirectional support check box. 6 Click OK. This disables the bidirectional communication functions of the printer, such as data transfer, status monitoring, and remote panel. Follow these steps: 1 Click Start and Control Panel. 2 Click Printer under Hardware and Sound. 3 Right-click the printer icon and select Properties. 4 Click the Ports...

User Guide
Page 161
n 161 N Troubleshooting Touch Pad What should I do not work , press and hold the power button until the computer turns off. ! See Using the Touch Pad (page 31). ❑ Make sure that a mouse is not connected to your computer. Turning off your computer with the M or m key, and press the Enter key to your computer. ❑ If the pointer does not move while a software application is running, press the Alt...
n 161 N Troubleshooting Touch Pad What should I do not work , press and hold the power button until the computer turns off. ! See Using the Touch Pad (page 31). ❑ Make sure that a mouse is not connected to your computer. Turning off your computer with the M or m key, and press the Enter key to your computer. ❑ If the pointer does not move while a software application is running, press the Alt...

User Guide
Page 170
... hard disk drive as on-screen help guides. You can visit the Sony online support web site at : http://support.microsoft.com/directory/. 4 Sony Computing Support This service provides instant access to information on commonly encountered problems. Type a description of the problem and the Knowledge Database searches for the corresponding solutions online. Click the VAIO Update notice to open the VAIO Support web site and view the information. For operating system support...
... hard disk drive as on-screen help guides. You can visit the Sony online support web site at : http://support.microsoft.com/directory/. 4 Sony Computing Support This service provides instant access to information on commonly encountered problems. Type a description of the problem and the Knowledge Database searches for the corresponding solutions online. Click the VAIO Update notice to open the VAIO Support web site and view the information. For operating system support...

User Guide
Page 177
... time you first use the software. Product activation procedures will operate under reduced-functionality mode, limiting end-user options and operations. Microsoft Corp. ❑ For customers in USA and Canada Web site http://support.microsoft.com The software has been installed and you must buy a subscription. activation requires Internet access. n 177 N Support Options 60-Day Trial Version of first use it. You can subscribe online by Internet: Internet service charges may apply.
... time you first use the software. Product activation procedures will operate under reduced-functionality mode, limiting end-user options and operations. Microsoft Corp. ❑ For customers in USA and Canada Web site http://support.microsoft.com The software has been installed and you must buy a subscription. activation requires Internet access. n 177 N Support Options 60-Day Trial Version of first use it. You can subscribe online by Internet: Internet service charges may apply.


