
User Guide
Page 2
... ...6 Documentation ...6 Ergonomic Considerations ...9 Getting Started ...11 Locating Controls and Ports...12 About the Indicator Lights ...18 Connecting a Power Source ...19 Using the Battery Pack ...20 Shutting Down Your Computer Safely ...26 Using Your VAIO Computer ...27 Using the Keyboard ...28 Using the Touch Pad ...30 Using Special-function Buttons ...31 Using the...
... ...6 Documentation ...6 Ergonomic Considerations ...9 Getting Started ...11 Locating Controls and Ports...12 About the Indicator Lights ...18 Connecting a Power Source ...19 Using the Battery Pack ...20 Shutting Down Your Computer Safely ...26 Using Your VAIO Computer ...27 Using the Keyboard ...28 Using the Touch Pad ...30 Using Special-function Buttons ...31 Using the...

User Guide
Page 3
... Bus (USB) Device...82 Connecting a Printer ...85 Connecting an i.LINK Device ...86 Connecting to a Network (LAN) ...88 Customizing Your VAIO Computer ...89 Setting the Password ...90 Setting Up Your Computer with VAIO Central ...93 Using the Power Saving Modes ...94 Managing Power with VAIO Power Management ...98 Upgrading Your VAIO Computer...100 Adding and Removing Memory...101
... Bus (USB) Device...82 Connecting a Printer ...85 Connecting an i.LINK Device ...86 Connecting to a Network (LAN) ...88 Customizing Your VAIO Computer ...89 Setting the Password ...90 Setting Up Your Computer with VAIO Central ...93 Using the Power Saving Modes ...94 Managing Power with VAIO Power Management ...98 Upgrading Your VAIO Computer...100 Adding and Removing Memory...101
User Guide
Page 4
n4 N Precautions ...107 On Handling the LCD Screen ...108 On Using the Power Source ...109 On Handling Your Computer...110 On Using the Built-in MOTION EYE Camera...112 On Handling Floppy Disks ...113 On Handling Discs ...114 ...
n4 N Precautions ...107 On Handling the LCD Screen ...108 On Using the Power Source ...109 On Handling Your Computer...110 On Using the Built-in MOTION EYE Camera...112 On Handling Floppy Disks ...113 On Handling Discs ...114 ...

User Guide
Page 11
..., and so on) at a time, following the manufacturers' instructions. ❑ Locating Controls and Ports (page 12) ❑ About the Indicator Lights (page 18) ❑ Connecting a Power Source (page 19) ❑ Using the Battery Pack (page 20) ❑ Shutting Down Your Computer Safely (page 26) n 11 N Getting Started Getting Started This section... time, do not connect any other hardware that did not originally come with only the supplied accessories connected and set up your computer with your VAIO computer. ! Make sure to get started using your computer.
..., and so on) at a time, following the manufacturers' instructions. ❑ Locating Controls and Ports (page 12) ❑ About the Indicator Lights (page 18) ❑ Connecting a Power Source (page 19) ❑ Using the Battery Pack (page 20) ❑ Shutting Down Your Computer Safely (page 26) n 11 N Getting Started Getting Started This section... time, do not connect any other hardware that did not originally come with only the supplied accessories connected and set up your computer with your VAIO computer. ! Make sure to get started using your computer.

User Guide
Page 13
...page 31) D VOL-/VOL+ buttons (page 31) E Play/Pause button (page 31) F Next track button (page 31) G Stop button (page 31) H Power button I Power indicator (page 18) J Battery indicator (page 18) K Hard disk drive indicator (page 18) L Bluetooth indicator*1 (page 18) M WLAN (Wireless LAN) indicator ...(page 18) N WIRELESS switch (page 56) O Memory Stick PRO/Duo media slot*2 (page 47) P SD memory card slot (page 52) Q Media Access ...
...page 31) D VOL-/VOL+ buttons (page 31) E Play/Pause button (page 31) F Next track button (page 31) G Stop button (page 31) H Power button I Power indicator (page 18) J Battery indicator (page 18) K Hard disk drive indicator (page 18) L Bluetooth indicator*1 (page 18) M WLAN (Wireless LAN) indicator ...(page 18) N WIRELESS switch (page 56) O Memory Stick PRO/Duo media slot*2 (page 47) P SD memory card slot (page 52) Q Media Access ...
User Guide
Page 18
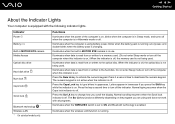
...Caps Lock key to activate the numeric keypad. Illuminates when data is running out of the computer is on the program you are using battery power, blinks when the battery pack is running . Normal scrolling resumes when the Scroll lock indicator is off . Illuminates when the wireless LAN ...Press it a second time to a memory card. (Do not enter Sleep mode or turn off , the optical disc is off the indicator. Indicator Power 1 Battery e Built-in lowercase if you scroll the display. The numeric keypad is not active when the indicator is off the computer when this indicator...
...Caps Lock key to activate the numeric keypad. Illuminates when data is running out of the computer is on the program you are using battery power, blinks when the battery pack is running . Normal scrolling resumes when the Scroll lock indicator is off . Illuminates when the wireless LAN ...Press it a second time to a memory card. (Do not enter Sleep mode or turn off , the optical disc is off the indicator. Indicator Power 1 Battery e Built-in lowercase if you scroll the display. The numeric keypad is not active when the indicator is off the computer when this indicator...
User Guide
Page 19
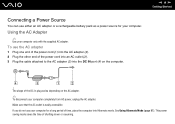
...on the computer. ! Using the AC Adapter ✍ Use your computer for your computer completely from AC power, unplug the AC adapter. To use the AC adapter 1 Plug one end of the power cord (1) into the AC adapter (3). 2 Plug the other end of time, place the computer into the... (page 97). The shape of shutting down or resuming. n 19 N Getting Started Connecting a Power Source You can use either an AC adapter or a rechargeable battery pack as a power source for a long period of the power cord into an AC outlet (2). 3 Plug the cable attached to the AC adapter (3) into Hibernate...
...on the computer. ! Using the AC Adapter ✍ Use your computer for your computer completely from AC power, unplug the AC adapter. To use the AC adapter 1 Plug one end of the power cord (1) into the AC adapter (3). 2 Plug the other end of time, place the computer into the... (page 97). The shape of shutting down or resuming. n 19 N Getting Started Connecting a Power Source You can use either an AC adapter or a rechargeable battery pack as a power source for a long period of the power cord into an AC outlet (2). 3 Plug the cable attached to the AC adapter (3) into Hibernate...
User Guide
Page 22
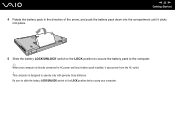
n 22 N Getting Started 4 Rotate the battery pack in the direction of the arrow, and push the battery pack down into place. 5 Slide the battery LOCK/UNLOCK switch to the LOCK position to secure the battery pack to the computer. ✍ When your computer. This computer is directly connected to the LOCK position before using your computer is designed to operate only with genuine Sony batteries. Be sure to slide the battery LOCK/UNLOCK switch to AC power and has a battery pack installed, it clicks into the compartment until it uses power from the AC outlet. !
n 22 N Getting Started 4 Rotate the battery pack in the direction of the arrow, and push the battery pack down into place. 5 Slide the battery LOCK/UNLOCK switch to the LOCK position to secure the battery pack to the computer. ✍ When your computer. This computer is directly connected to the LOCK position before using your computer is designed to operate only with genuine Sony batteries. Be sure to slide the battery LOCK/UNLOCK switch to AC power and has a battery pack installed, it clicks into the compartment until it uses power from the AC outlet. !
User Guide
Page 23
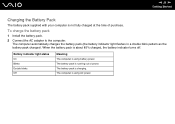
... computer is charging. The battery pack is using AC power. Battery indicator light status On Blinks Double blinks Off Meaning The computer is running out of purchase. The computer automatically charges the battery pack (the ...battery indicator light flashes in a double blink pattern as the battery pack charges). When the battery pack is not fully charged at the time of power. n 23 N Getting Started Charging the Battery Pack The battery pack supplied with your computer is about 85% charged, the battery indicator turns off. To charge...
... computer is charging. The battery pack is using AC power. Battery indicator light status On Blinks Double blinks Off Meaning The computer is running out of purchase. The computer automatically charges the battery pack (the ...battery indicator light flashes in a double blink pattern as the battery pack charges). When the battery pack is not fully charged at the time of power. n 23 N Getting Started Charging the Battery Pack The battery pack supplied with your computer is about 85% charged, the battery indicator turns off. To charge...
User Guide
Page 24
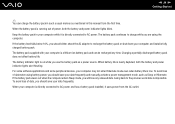
... a battery pack installed, it is directly connected to the previous work state is low. Going back to AC power. When your data frequently and manually activate a power management mode, such as Sleep or Hibernate. For some software applications and some peripheral devices, your data frequently. To... when the computer enters Sleep mode, you use the battery pack as mentioned in your computer is running out of data when using battery power, you are using the computer. n 24 N Getting Started ✍ You can be recharged any unsaved data. Charging a partially discharged ...
... a battery pack installed, it is directly connected to the previous work state is low. Going back to AC power. When your data frequently and manually activate a power management mode, such as Sleep or Hibernate. For some software applications and some peripheral devices, your data frequently. To... when the computer enters Sleep mode, you use the battery pack as mentioned in your computer is running out of data when using battery power, you are using the computer. n 24 N Getting Started ✍ You can be recharged any unsaved data. Charging a partially discharged ...
User Guide
Page 26
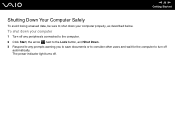
To shut down your computer 1 Turn off any peripherals connected to the computer. 2 Click Start, the arrow next to the Lock button, and Shut Down. 3 Respond to any prompts warning you to save documents or to consider other users and wait for the computer to shut down your computer properly, as described below. The power indicator light turns off. n 26 N Getting Started Shutting Down Your Computer Safely To avoid losing unsaved data, be sure to turn off automatically.
To shut down your computer 1 Turn off any peripherals connected to the computer. 2 Click Start, the arrow next to the Lock button, and Shut Down. 3 Respond to any prompts warning you to save documents or to consider other users and wait for the computer to shut down your computer properly, as described below. The power indicator light turns off. n 26 N Getting Started Shutting Down Your Computer Safely To avoid losing unsaved data, be sure to turn off automatically.

User Guide
Page 29
To return the system to its original state, use the power button to the hard disk and the system power is turned off. Combinations/Feature Fn + (F12): Hibernate n 29 N Using Your VAIO Computer Functions Provides for the lowest level of the system and the peripheral devices are written to turn on power management, see Using the Power Saving Modes (page 94). For details on the power. When you execute this command, the states of power consumption.
To return the system to its original state, use the power button to the hard disk and the system power is turned off. Combinations/Feature Fn + (F12): Hibernate n 29 N Using Your VAIO Computer Functions Provides for the lowest level of the system and the peripheral devices are written to turn on power management, see Using the Power Saving Modes (page 94). For details on the power. When you execute this command, the states of power consumption.
User Guide
Page 35
Do not remove the optical disc when your computer is in gently. ! n 35 N Using Your VAIO Computer 4 Close the tray by pushing it in a power saving mode (Sleep or Hibernate). Doing so may cause the computer to malfunction. ✍ If you plan to use an external optical disc drive, connect the drive before you launch any preinstalled disc operation program.
Do not remove the optical disc when your computer is in gently. ! n 35 N Using Your VAIO Computer 4 Close the tray by pushing it in a power saving mode (Sleep or Hibernate). Doing so may cause the computer to malfunction. ✍ If you plan to use an external optical disc drive, connect the drive before you launch any preinstalled disc operation program.

User Guide
Page 39
..., use memory-resident utility software while writing data to a disc. Do not use discs in any other applications. ❑ Do not switch to power saving modes while using your software application to burn discs, make data on a disc readable on your software. ❑ Only use the same disc... burning software to add data to a used disc. n 39 N Using Your VAIO Computer Notes on writing data to a disc ❑ Use only Sony recommended software, which is at least 50 percent charged. ❑ Make sure you use circular discs. This may result. &#...
..., use memory-resident utility software while writing data to a disc. Do not use discs in any other applications. ❑ Do not switch to power saving modes while using your software application to burn discs, make data on a disc readable on your software. ❑ Only use the same disc... burning software to add data to a used disc. n 39 N Using Your VAIO Computer Notes on writing data to a disc ❑ Use only Sony recommended software, which is at least 50 percent charged. ❑ Make sure you use circular discs. This may result. &#...

User Guide
Page 40
This may cause your computer to malfunction. ❑ Do not switch to power saving modes while your computer is playing a disc. ❑ Region code indicators are labeled on the DVDs to indicate in most regions of your residence ... media. ❑ Some DVD players and computer's optical disc drives may not be able to speed up disc access when playing a disc. n 40 N Using Your VAIO Computer Notes on what type of player you can play this means that you cannot play the disc on your computer. R DL, DVD+R, DVD+RW...
This may cause your computer to malfunction. ❑ Do not switch to power saving modes while your computer is playing a disc. ❑ Region code indicators are labeled on the DVDs to indicate in most regions of your residence ... media. ❑ Some DVD players and computer's optical disc drives may not be able to speed up disc access when playing a disc. n 40 N Using Your VAIO Computer Notes on what type of player you can play this means that you cannot play the disc on your computer. R DL, DVD+R, DVD+RW...
User Guide
Page 67
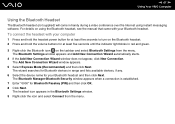
n 67 N Using Your VAIO Computer Using the Bluetooth Headset The Bluetooth headset (not supplied) will come in red and green. 3 Right-click the Bluetooth icon on the taskbar and ... menu. The headset icon appears in range and lists available devices, if any. 6 Select the device name for your computer 1 Press and hold the headset power button for at least five seconds to turn on using instant messaging software. To connect the headset with your Bluetooth headset. The Bluetooth Settings window...
n 67 N Using Your VAIO Computer Using the Bluetooth Headset The Bluetooth headset (not supplied) will come in red and green. 3 Right-click the Bluetooth icon on the taskbar and ... menu. The headset icon appears in range and lists available devices, if any. 6 Select the device name for your computer 1 Press and hold the headset power button for at least five seconds to turn on using instant messaging software. To connect the headset with your Bluetooth headset. The Bluetooth Settings window...
User Guide
Page 71
For example, you can also use the computer with a computer display or a projector. ✍ Connect the power cord after connecting all other cables. On the Windows operating system, you can use an external display to your computer. Connected external displays are used as secondary screens. n 71 N Using Peripheral Devices Connecting an External Display You can connect an external display (not supplied) to set up multiple monitors.
For example, you can also use the computer with a computer display or a projector. ✍ Connect the power cord after connecting all other cables. On the Windows operating system, you can use an external display to your computer. Connected external displays are used as secondary screens. n 71 N Using Peripheral Devices Connecting an External Display You can connect an external display (not supplied) to set up multiple monitors.
User Guide
Page 72
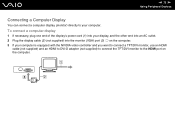
... TFT/DVI monitor to the HDMI port on the computer. 3 If your computer. To connect a computer display 1 If necessary, plug one end of the display's power cord (1) into your display, and the other end into an AC outlet. 2 Plug the display cable (2) (not supplied) into the monitor (VGA) port (3) a on the...
... TFT/DVI monitor to the HDMI port on the computer. 3 If your computer. To connect a computer display 1 If necessary, plug one end of the display's power cord (1) into your display, and the other end into an AC outlet. 2 Plug the display cable (2) (not supplied) into the monitor (VGA) port (3) a on the...
User Guide
Page 73
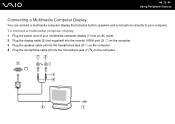
To connect a multimedia computer display 1 Plug the power cord of your computer. n 73 N Using Peripheral Devices Connecting a Multimedia Computer Display You can connect a multimedia computer display that includes built-in speakers and a microphone directly to your multimedia computer display (1) into an AC outlet. 2 Plug the display cable (2) (not supplied) into the monitor (VGA) port (3) a on the computer. 3 Plug the speaker cable (4) into the headphones jack (5) i on the computer. 4 Plug the microphone cable (6) into the microphone jack (7) m on the computer.
To connect a multimedia computer display 1 Plug the power cord of your computer. n 73 N Using Peripheral Devices Connecting a Multimedia Computer Display You can connect a multimedia computer display that includes built-in speakers and a microphone directly to your multimedia computer display (1) into an AC outlet. 2 Plug the display cable (2) (not supplied) into the monitor (VGA) port (3) a on the computer. 3 Plug the speaker cable (4) into the headphones jack (5) i on the computer. 4 Plug the microphone cable (6) into the microphone jack (7) m on the computer.
User Guide
Page 74
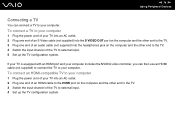
To connect an HDMI-compatible TV to your computer 1 Plug the power cord of your TV into an AC outlet. 2 Plug one end of an audio cable (not supplied) into the S VIDEO OUT port on the computer ... a TV You can then use an HDMI cable (not supplied) to connect the TV to your computer. To connect a TV to your computer 1 Plug the power cord of your computer. If your TV is equipped with an HDMI port and your computer includes the NVIDIA video controller, you can connect a TV...
To connect an HDMI-compatible TV to your computer 1 Plug the power cord of your TV into an AC outlet. 2 Plug one end of an audio cable (not supplied) into the S VIDEO OUT port on the computer ... a TV You can then use an HDMI cable (not supplied) to connect the TV to your computer. To connect a TV to your computer 1 Plug the power cord of your computer. If your TV is equipped with an HDMI port and your computer includes the NVIDIA video controller, you can connect a TV...


