User Guide
Page 27
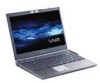
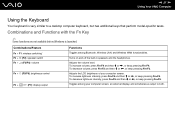
n 27 N Using Your VAIO Computer Using the Keyboard Your keyboard is launched. Combinations/Feature Fn + F1: wireless switching* Fn + % (F2): speaker switch Fn + 2 (F3/F4): volume Fn + 8 (F5/F6): ..., press Fn+F4 and then M or ,, or keep pressing Fn+F4. Combinations and Functions with the Fn Key ✍ Some functions are not available before Windows is very similar to a desktop computer keyboard, but has additional keys that perform model-specific tasks.
n 27 N Using Your VAIO Computer Using the Keyboard Your keyboard is launched. Combinations/Feature Fn + F1: wireless switching* Fn + % (F2): speaker switch Fn + 2 (F3/F4): volume Fn + 8 (F5/F6): ..., press Fn+F4 and then M or ,, or keep pressing Fn+F4. Combinations and Functions with the Fn Key ✍ Some functions are not available before Windows is very similar to a desktop computer keyboard, but has additional keys that perform model-specific tasks.
User Guide
Page 28
...applying a lower resolution to turn on power management, see Using the Power Saving Modes (page 138). Provides for the lowest level of software windows may not work with a higher resolution. When your computer's screen view. ✍ The magnified view is not as clear as the standard... view is turned off. Combinations/Feature Fn + (F10): zoom Fn + (F12): Hibernate * On selected models only. n 28 N Using Your VAIO Computer Functions Changes the screen resolution to the external display disables the function and restores the standard view. The location and size of power consumption...
...applying a lower resolution to turn on power management, see Using the Power Saving Modes (page 138). Provides for the lowest level of software windows may not work with a higher resolution. When your computer's screen view. ✍ The magnified view is not as clear as the standard... view is turned off. Combinations/Feature Fn + (F10): zoom Fn + (F12): Hibernate * On selected models only. n 28 N Using Your VAIO Computer Functions Changes the screen resolution to the external display disables the function and restores the standard view. The location and size of power consumption...
User Guide
Page 30
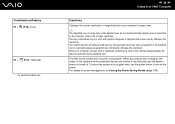
Special-function button S1/S2 buttons Functions By default, the S1 button turns the volume on the window for changing the S button assignments. To display this window, press and hold either button or launch and navigate through VAIO Central. n 30 N Using Your VAIO Computer Using Special-function Buttons Your computer is equipped with special buttons to reduce the fan noise. You can change these button assignments on and off and the S2 button lowers the CPU speed to help you use specific functions of the computer.
Special-function button S1/S2 buttons Functions By default, the S1 button turns the volume on the window for changing the S button assignments. To display this window, press and hold either button or launch and navigate through VAIO Central. n 30 N Using Your VAIO Computer Using Special-function Buttons Your computer is equipped with special buttons to reduce the fan noise. You can change these button assignments on and off and the S2 button lowers the CPU speed to help you use specific functions of the computer.
User Guide
Page 31
...-in MOTION EYE camera. This is using the camera, exit the application before using the built-in MOTION EYE camera. ! The viewer window may be shared by more than one software application. The built-in MOTION EYE camera adds video functionality to find whether your instant messaging... the built-in MOTION EYE camera, respectively. If another software application is normal and does not indicate a malfunction. n 31 N Using Your VAIO Computer Using the Built-in MOTION EYE Camera Your computer may show some noises, for example horizontal streaks, if you view a rapid-moving object...
...-in MOTION EYE camera. This is using the camera, exit the application before using the built-in MOTION EYE camera. ! The viewer window may be shared by more than one software application. The built-in MOTION EYE camera adds video functionality to find whether your instant messaging... the built-in MOTION EYE camera, respectively. If another software application is normal and does not indicate a malfunction. n 31 N Using Your VAIO Computer Using the Built-in MOTION EYE Camera Your computer may show some noises, for example horizontal streaks, if you view a rapid-moving object...
User Guide
Page 40
If the Audio CD window appears, click to start the desired CD software, such as the SonicStage software. n 40 N Using Your VAIO Computer Playing CDs To play an audio CD 1 Insert a disc into the optical disc drive. 2 If nothing appears on the desktop, then click Start, point to All Programs, and click to select an option.
If the Audio CD window appears, click to start the desired CD software, such as the SonicStage software. n 40 N Using Your VAIO Computer Playing CDs To play an audio CD 1 Insert a disc into the optical disc drive. 2 If nothing appears on the desktop, then click Start, point to All Programs, and click to select an option.
User Guide
Page 41
n 41 N Using Your VAIO Computer Copying Files to CDs To copy files to a disc. 1 Insert a blank disc into the optical disc drive. If the CD Drive window appears, click Take no action and then click OK. 2 Right-click Start and then click Explore. 3 In the Folders panel on the left, locate the ... folder(s) you want to copy, right-click the file(s) or folder(s), point to Send To, and then click the optical disc drive* name. 4 Close the window. 5 Click Start and then My Computer. 6 Click the optical disc drive icon under Devices with the file(s) or folder(s) you want to copy listed under...
n 41 N Using Your VAIO Computer Copying Files to CDs To copy files to a disc. 1 Insert a blank disc into the optical disc drive. If the CD Drive window appears, click Take no action and then click OK. 2 Right-click Start and then click Explore. 3 In the Folders panel on the left, locate the ... folder(s) you want to copy, right-click the file(s) or folder(s), point to Send To, and then click the optical disc drive* name. 4 Close the window. 5 Click Start and then My Computer. 6 Click the optical disc drive icon under Devices with the file(s) or folder(s) you want to copy listed under...
User Guide
Page 44
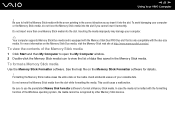
... is inserted, your computer may not function properly if you are inserting the PC Card in the System Properties window, remove the software driver and then reinstall it. If an "!" n 44 N Using Your VAIO Computer ! Make sure you remove the card before the computer enters Hibernate mode. Before moving your system to...
... is inserted, your computer may not function properly if you are inserting the PC Card in the System Properties window, remove the software driver and then reinstall it. If an "!" n 44 N Using Your VAIO Computer ! Make sure you remove the card before the computer enters Hibernate mode. Before moving your system to...
User Guide
Page 45
... off, skip steps 1 to remove the PC Card while your system may not work properly. A window appears, explaining that it is safe to unplug. 3 Click Stop. If it back in. The Safely Remove Hardware window appears. 2 Select the hardware you want to remove the device. 6 Click Close. 7 Push the... PC Card release button so that the release button pops out. 8 Push the PC Card release button a second time so that the device can be safely removed from the system. 5 Click OK. n 45 N Using Your VAIO...
... off, skip steps 1 to remove the PC Card while your system may not work properly. A window appears, explaining that it is safe to unplug. 3 Click Stop. If it back in. The Safely Remove Hardware window appears. 2 Select the hardware you want to remove the device. 6 Click Close. 7 Push the... PC Card release button so that the release button pops out. 8 Push the PC Card release button a second time so that the device can be safely removed from the system. 5 Click OK. n 45 N Using Your VAIO...
User Guide
Page 49
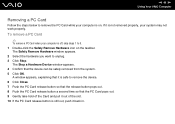
... when your computer is on the taskbar. n 49 N Using Your VAIO Computer Removing an ExpressCard Module Follow the steps below to remove the ExpressCard module while your computer is off, skip steps 1 to 6. 1 Double-click the Safely Remove Hardware icon on . A window appears, explaining that the device can be safely removed from...
... when your computer is on the taskbar. n 49 N Using Your VAIO Computer Removing an ExpressCard Module Follow the steps below to remove the ExpressCard module while your computer is off, skip steps 1 to 6. 1 Double-click the Safely Remove Hardware icon on . A window appears, explaining that the device can be safely removed from...
User Guide
Page 52
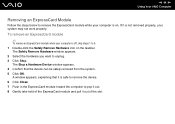
... To insert a standard-size Memory Stick media, use the ExpressCard slot. To do this, you can insert a Memory Stick media into place. n 52 N Using Your VAIO Computer Inserting a Memory Stick Media There are two ways you need the supplied memory card adapter. To insert a Memory Stick media using the Memory Stick... toward the Memory Stick Duo/PRO Duo media slot. 2 Carefully slide the Memory Stick media into the slot until it clicks into your My Computer window as a local drive, under the appropriate letter (depending on the configuration of the computer).
... To insert a standard-size Memory Stick media, use the ExpressCard slot. To do this, you can insert a Memory Stick media into place. n 52 N Using Your VAIO Computer Inserting a Memory Stick Media There are two ways you need the supplied memory card adapter. To insert a Memory Stick media using the Memory Stick... toward the Memory Stick Duo/PRO Duo media slot. 2 Carefully slide the Memory Stick media into the slot until it clicks into your My Computer window as a local drive, under the appropriate letter (depending on the configuration of the computer).
User Guide
Page 53
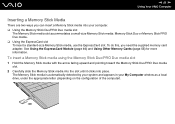
...Memory Stick media into the slot if you insert it smoothly. For more than one Memory Stick media into the slot. n 53 N Using Your VAIO Computer ! Formatting the Memory Stick media erases the entire data on the media. In case the media is formatted with the formatting function of your...the Memory Stick Duo/PRO Duo slot that is only compatible with the arrow pointing in the Memory Stick media. Avoid accidental erasure of the Windows operating system, the media cannot be recognized by other Memory Stick devices. Do not insert more information on the Memory Stick Formatter software for...
...Memory Stick media into the slot if you insert it smoothly. For more than one Memory Stick media into the slot. n 53 N Using Your VAIO Computer ! Formatting the Memory Stick media erases the entire data on the media. In case the media is formatted with the formatting function of your...the Memory Stick Duo/PRO Duo slot that is only compatible with the arrow pointing in the Memory Stick media. Avoid accidental erasure of the Windows operating system, the media cannot be recognized by other Memory Stick devices. Do not insert more information on the Memory Stick Formatter software for...
User Guide
Page 58
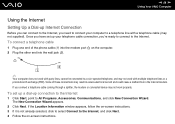
...these connections may not work with a telephone cable (may not supplied). The New Connection Wizard appears. 2 Click Next. If the Location Information window appears, follow the on-screen instructions. 3 If it is not already selected, click to select Connect to the Internet, and click Next....connection to the Internet 1 Click Start, point to All Programs, Accessories, Communications, and click New Connection Wizard. n 58 N Using Your VAIO Computer Using the Internet Setting Up a Dial-up Internet Connection Before you can connect to the Internet, you need to connect your telephone cable...
...these connections may not work with a telephone cable (may not supplied). The New Connection Wizard appears. 2 Click Next. If the Location Information window appears, follow the on-screen instructions. 3 If it is not already selected, click to select Connect to the Internet, and click Next....connection to the Internet 1 Click Start, point to All Programs, Accessories, Communications, and click New Connection Wizard. n 58 N Using Your VAIO Computer Using the Internet Setting Up a Dial-up Internet Connection Before you can connect to the Internet, you need to connect your telephone cable...

User Guide
Page 63
... select the 5 GHz bandwidth, which is provided for the IEEE 802.11a standard, on ad-hoc networks. The Network Connections window appears. 5 Right-click Wireless Network Connection, then click Properties. On models that support the Bluetooth functionality*1 and/or the IEEE.... n 63 N Using Your VAIO Computer To communicate without an access point (ad-hoc) 1 Turn on the taskbar to display the Wireless Device Switch window. The Wireless network properties window appears. 8 Enter a network name (SSID)*2. The Wireless Network Connection Properties window appears. 6 Select the Wireless ...
... select the 5 GHz bandwidth, which is provided for the IEEE 802.11a standard, on ad-hoc networks. The Network Connections window appears. 5 Right-click Wireless Network Connection, then click Properties. On models that support the Bluetooth functionality*1 and/or the IEEE.... n 63 N Using Your VAIO Computer To communicate without an access point (ad-hoc) 1 Turn on the taskbar to display the Wireless Device Switch window. The Wireless network properties window appears. 8 Enter a network name (SSID)*2. The Wireless Network Connection Properties window appears. 6 Select the Wireless ...
User Guide
Page 64
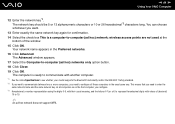
n 64 N Using Your VAIO Computer 12 Enter the network key*2. You can choose whichever you want to communicate ...✍ An ad-hoc network does not support WPA. Your network name appears in the exact same way. The Advanced window appears. 17 Select the Computer-to -computer (ad hoc) network; The network key should be 5 or 13 alphanumeric characters... or 10 or 26 hexadecimal*3 characters long. The computer is ready to communicate with values of the window. 15 Click OK. wireless access points are not used at the bottom of (decimal) 10 to represent hexadecimal digits...
n 64 N Using Your VAIO Computer 12 Enter the network key*2. You can choose whichever you want to communicate ...✍ An ad-hoc network does not support WPA. Your network name appears in the exact same way. The Advanced window appears. 17 Select the Computer-to -computer (ad hoc) network; The network key should be 5 or 13 alphanumeric characters... or 10 or 26 hexadecimal*3 characters long. The computer is ready to communicate with values of the window. 15 Click OK. wireless access points are not used at the bottom of (decimal) 10 to represent hexadecimal digits...
User Guide
Page 65
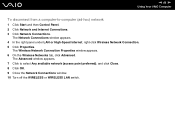
... right panel under LAN or High-Speed Internet, right-click Wireless Network Connection. 5 Click Properties. The Wireless Network Connection Properties window appears. 6 On the Wireless Networks tab, click Advanced. n 65 N Using Your VAIO Computer To disconnect from a computer-to select Any available network (access point preferred), and click Close. 8 Click OK. 9 Close...
... right panel under LAN or High-Speed Internet, right-click Wireless Network Connection. 5 Click Properties. The Wireless Network Connection Properties window appears. 6 On the Wireless Networks tab, click Advanced. n 65 N Using Your VAIO Computer To disconnect from a computer-to select Any available network (access point preferred), and click Close. 8 Click OK. 9 Close...
User Guide
Page 67
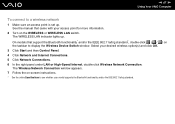
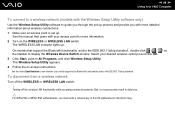
... for more information. 2 Turn on the WIRELESS or WIRELESS LAN switch. The Wireless Network Connection window appears. 7 Follow the on the taskbar to display the Wireless Device Switch window. Select your desired wireless option(s) and click OK. 3 Click Start and then Control Panel. ... -screen instructions. * See the online Specifications to a wireless network 1 Make sure an access point is set up . n 67 N Using Your VAIO Computer To connect to see whether your model supports the Bluetooth functionality and/or the IEEE 802.11a/b/g standard. The WIRELESS LAN indicator lights up .
... for more information. 2 Turn on the WIRELESS or WIRELESS LAN switch. The Wireless Network Connection window appears. 7 Follow the on the taskbar to display the Wireless Device Switch window. Select your desired wireless option(s) and click OK. 3 Click Start and then Control Panel. ... -screen instructions. * See the online Specifications to a wireless network 1 Make sure an access point is set up . n 67 N Using Your VAIO Computer To connect to see whether your model supports the Bluetooth functionality and/or the IEEE 802.11a/b/g standard. The WIRELESS LAN indicator lights up .
User Guide
Page 68
n 68 N Using Your VAIO Computer To connect to a wireless network (models with the Wireless Setup Utility software only) Use the Wireless Setup Utility software to All Programs, and click ... point is set up . The WIRELESS LAN indicator lights up process and provide you must enter a network key of 8 to display the Wireless Device Switch window. The Wireless Setup Utility appears. 4 Follow the on the WIRELESS or WIRELESS LAN switch. See the manual that support the Bluetooth functionality* and/or the...
n 68 N Using Your VAIO Computer To connect to a wireless network (models with the Wireless Setup Utility software only) Use the Wireless Setup Utility software to All Programs, and click ... point is set up . The WIRELESS LAN indicator lights up process and provide you must enter a network key of 8 to display the Wireless Device Switch window. The Wireless Setup Utility appears. 4 Follow the on the WIRELESS or WIRELESS LAN switch. See the manual that support the Bluetooth functionality* and/or the...

User Guide
Page 69
... up Bluetooth functionality. You can establish wireless communication between these devices without cables and up to display the Wireless Device Switch window. 3 Select the Enable Bluetooth Device option. 4 Click OK. You can transfer data between your model supports the Bluetooth functionality. n 69... N Using Your VAIO Computer Using the Bluetooth Functionality The Bluetooth functionality is available on the taskbar to 33 feet (10 meters) range in open space....
... up Bluetooth functionality. You can establish wireless communication between these devices without cables and up to display the Wireless Device Switch window. 3 Select the Enable Bluetooth Device option. 4 Click OK. You can transfer data between your model supports the Bluetooth functionality. n 69... N Using Your VAIO Computer Using the Bluetooth Functionality The Bluetooth functionality is available on the taskbar to 33 feet (10 meters) range in open space....
User Guide
Page 74
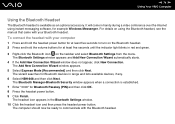
... headset. The wizard searches for Bluetooth devices in red and green. 3 Right-click the Bluetooth icon on using instant messaging software, for example Windows Messenger. n 74 N Using Your VAIO Computer Using the Bluetooth Headset The Bluetooth headset is established. 7 Enter "0000" for Bluetooth Passkey (PIN) and then click OK. 8 Press the headset...
... headset. The wizard searches for Bluetooth devices in red and green. 3 Right-click the Bluetooth icon on using instant messaging software, for example Windows Messenger. n 74 N Using Your VAIO Computer Using the Bluetooth Headset The Bluetooth headset is established. 7 Enter "0000" for Bluetooth Passkey (PIN) and then click OK. 8 Press the headset...
User Guide
Page 75
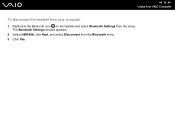
n 75 N Using Your VAIO Computer To disconnect the headset from your computer 1 Right-click the Bluetooth icon on the taskbar and select Bluetooth Settings from the Bluetooth menu. 3 Click Yes. The Bluetooth Settings window appears. 2 Select HBH-608, click Next, and select Disconnect from the menu.
n 75 N Using Your VAIO Computer To disconnect the headset from your computer 1 Right-click the Bluetooth icon on the taskbar and select Bluetooth Settings from the Bluetooth menu. 3 Click Yes. The Bluetooth Settings window appears. 2 Select HBH-608, click Next, and select Disconnect from the menu.


