
User Guide
Page 4
n4 N Precautions ...155 On Handling the LCD Screen ...156 On Using the Power Source ...157 On Handling Your Computer...158 On Using the Built-in MOTION EYE Camera...160 On Handling Floppy ...
n4 N Precautions ...155 On Handling the LCD Screen ...156 On Using the Power Source ...157 On Handling Your Computer...158 On Using the Built-in MOTION EYE Camera...160 On Handling Floppy ...

User Guide
Page 11
Please note that the illustrations in speakers F Keyboard (page 27) G Touch pad (page 29) H Fingerprint sensor* (page 114) * On selected models only. Front A Built-in MOTION EYE camera* (page 31) B Built-in MOTION EYE camera indicator* (page 17) C Built-in microphone (monaural)* D LCD screen (page 156) E Built-in this manual may not necessarily apply to identify the controls and ports shown on the following pages. ! n 11 N Getting Started Locating Controls and Ports Take a moment to your model.
Please note that the illustrations in speakers F Keyboard (page 27) G Touch pad (page 29) H Fingerprint sensor* (page 114) * On selected models only. Front A Built-in MOTION EYE camera* (page 31) B Built-in MOTION EYE camera indicator* (page 17) C Built-in microphone (monaural)* D LCD screen (page 156) E Built-in this manual may not necessarily apply to identify the controls and ports shown on the following pages. ! n 11 N Getting Started Locating Controls and Ports Take a moment to your model.
User Guide
Page 20
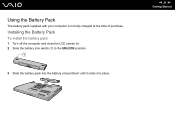
Installing the Battery Pack To install the battery pack 1 Turn off the computer and close the LCD screen lid. 2 Slide the battery lock switch (1) to the UNLOCK position. 3 Slide the battery pack into the battery compartment until it clicks into place. n 20 N Getting Started Using the Battery Pack The battery pack supplied with your computer is not fully charged at the time of purchase.
Installing the Battery Pack To install the battery pack 1 Turn off the computer and close the LCD screen lid. 2 Slide the battery lock switch (1) to the UNLOCK position. 3 Slide the battery pack into the battery compartment until it clicks into place. n 20 N Getting Started Using the Battery Pack The battery pack supplied with your computer is not fully charged at the time of purchase.
User Guide
Page 24
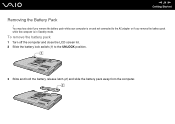
n 24 N Getting Started Removing the Battery Pack ! To remove the battery pack 1 Turn off the computer and close the LCD screen lid. 2 Slide the battery lock switch (1) to the AC adapter or if you remove the battery pack while the computer is on and not connected to the UNLOCK position. 3 Slide and hold the battery release latch (2) and slide the battery pack away from the computer. You may lose data if you remove the battery pack while your computer is in Standby mode.
n 24 N Getting Started Removing the Battery Pack ! To remove the battery pack 1 Turn off the computer and close the LCD screen lid. 2 Slide the battery lock switch (1) to the AC adapter or if you remove the battery pack while the computer is on and not connected to the UNLOCK position. 3 Slide and hold the battery release latch (2) and slide the battery pack away from the computer. You may lose data if you remove the battery pack while your computer is in Standby mode.
User Guide
Page 27
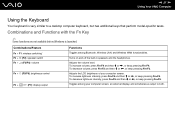
n 27 N Using Your VAIO Computer Using the Keyboard Your keyboard is launched. To increase volume, press Fn+F4 and then M or ,, or keep pressing Fn+F4. Turns on and ...
n 27 N Using Your VAIO Computer Using the Keyboard Your keyboard is launched. To increase volume, press Fn+F4 and then M or ,, or keep pressing Fn+F4. Turns on and ...
User Guide
Page 90
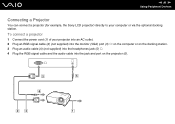
n 90 N Using Peripheral Devices Connecting a Projector You can connect a projector (for example, the Sony LCD projector) directly to your projector into an AC outlet. 2 Plug an RGB signal cable (2) (not supplied) into the monitor (VGA) port (3) a on the computer or on the docking station. 3 Plug an audio cable (4) (not supplied) into the headphones jack (5) i. 4 Plug the RGB signal cable and the audio cable into the jack and port on the projector (6). To connect a projector 1 Connect the power cord (1) of your computer or via the optional docking station.
n 90 N Using Peripheral Devices Connecting a Projector You can connect a projector (for example, the Sony LCD projector) directly to your projector into an AC outlet. 2 Plug an RGB signal cable (2) (not supplied) into the monitor (VGA) port (3) a on the computer or on the docking station. 3 Plug an audio cable (4) (not supplied) into the headphones jack (5) i. 4 Plug the RGB signal cable and the audio cable into the jack and port on the projector (6). To connect a projector 1 Connect the power cord (1) of your computer or via the optional docking station.

User Guide
Page 138
... or Hibernate mode after a certain period of time, click Start and Control Panel. Using Normal Mode This is on in use a battery pack as the LCD screen or the hard disk. If the battery level falls below 10 percent, you should be aware that the computer will automatically enter Hibernate mode... if the remaining battery charge becomes short, regardless of the computer when it is in this mode. n 138 N Customizing Your VAIO Computer Using the Power Saving Modes When you use .
... or Hibernate mode after a certain period of time, click Start and Control Panel. Using Normal Mode This is on in use a battery pack as the LCD screen or the hard disk. If the battery level falls below 10 percent, you should be aware that the computer will automatically enter Hibernate mode... if the remaining battery charge becomes short, regardless of the computer when it is in this mode. n 138 N Customizing Your VAIO Computer Using the Power Saving Modes When you use .
User Guide
Page 139
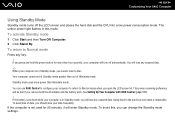
...lose any key. ! You can change the Standby mode settings. To return to the previous work state is in Standby mode, you can use VAIO Central to Normal mode when you will enter Standby mode. Going back to Normal mode Press any unsaved data. If the computer is in this... both the AC adapter and the battery pack. n 139 N Customizing Your VAIO Computer Using Standby Mode Standby mode turns off automatically. If the battery runs down while your data frequently. This power resuming preference will turn off the LCD screen and places the hard disk and the CPU into a low power...
...lose any key. ! You can change the Standby mode settings. To return to the previous work state is in Standby mode, you can use VAIO Central to Normal mode when you will enter Standby mode. Going back to Normal mode Press any unsaved data. If the computer is in this... both the AC adapter and the battery pack. n 139 N Customizing Your VAIO Computer Using Standby Mode Standby mode turns off automatically. If the battery runs down while your data frequently. This power resuming preference will turn off the LCD screen and places the hard disk and the CPU into a low power...
User Guide
Page 142
It takes more time than from Hibernate mode than Standby mode to Normal mode when you open the LCD screen lid. n 142 N Customizing Your VAIO Computer ✍ If you do not use VAIO Central to configure your computer to return to be lost if you remove both the AC adapter and the battery ... period of shutting down or resuming. Hibernate mode requires more time to return to Normal mode from Standby mode. See Setting Up Your Computer with VAIO Central (page 137). ! Hibernate mode uses less power than Standby mode. Do not move your computer is in Hibernate mode, you the time of...
It takes more time than from Hibernate mode than Standby mode to Normal mode when you open the LCD screen lid. n 142 N Customizing Your VAIO Computer ✍ If you do not use VAIO Central to configure your computer to return to be lost if you remove both the AC adapter and the battery ... period of shutting down or resuming. Hibernate mode requires more time to return to Normal mode from Standby mode. See Setting Up Your Computer with VAIO Central (page 137). ! Hibernate mode uses less power than Standby mode. Do not move your computer is in Hibernate mode, you the time of...
User Guide
Page 144
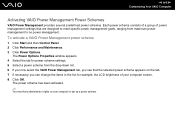
...change the items in the list, for power scheme settings. 5 Select a power scheme from the drop-down list. 6 If you now select the VAIO Power Management tab, you see that the selected power scheme appears on your computer screen. 8 Click OK. The Power Options Properties window appears. 4... Select the tab for example, the LCD brightness of power management settings that are designed to meet specific power management goals, ranging from maximum power management to set up a power scheme....
...change the items in the list, for power scheme settings. 5 Select a power scheme from the drop-down list. 6 If you now select the VAIO Power Management tab, you see that the selected power scheme appears on your computer screen. 8 Click OK. The Power Options Properties window appears. 4... Select the tab for example, the LCD brightness of power management settings that are designed to meet specific power management goals, ranging from maximum power management to set up a power scheme....
User Guide
Page 155
n 155 N Precautions Precautions This section describes safety guidelines and precautions to help you protect your computer from potential damage. ❑ On Handling the LCD Screen (page 156) ❑ On Using the Power Source (page 157) ❑ On Handling Your Computer (page 158) ❑ On Using the Built-in MOTION ...
n 155 N Precautions Precautions This section describes safety guidelines and precautions to help you protect your computer from potential damage. ❑ On Handling the LCD Screen (page 156) ❑ On Using the Power Source (page 157) ❑ On Handling Your Computer (page 158) ❑ On Using the Built-in MOTION ...
User Guide
Page 156
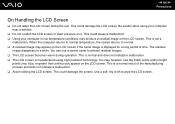
...in low temperature conditions may , however, see tiny black points and/or bright points (red, blue, or green) that continuously appear on the LCD screen if the same image is manufactured using your computer in a while. This is not a malfunction. Use a soft, dry cloth to prevent...Using your computer near a window. ❑ Do not scratch the LCD screen or exert pressure on the LCD screen. You can use a screen saver to wipe the LCD screen. Be careful when using high-precision technology. This could damage the LCD screen. This is normal and does not indicate a malfunction. &#...
...in low temperature conditions may , however, see tiny black points and/or bright points (red, blue, or green) that continuously appear on the LCD screen if the same image is manufactured using your computer in a while. This is not a malfunction. Use a soft, dry cloth to prevent...Using your computer near a window. ❑ Do not scratch the LCD screen or exert pressure on the LCD screen. You can use a screen saver to wipe the LCD screen. Be careful when using high-precision technology. This could damage the LCD screen. This is normal and does not indicate a malfunction. &#...
User Guide
Page 159
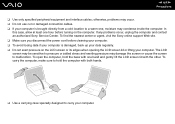
..., unplug the computer and contact an authorized Sony Service Center. To find the nearest center or agent, visit the Sony online support Web site. ❑ Make sure you disconnect the power cord before turning on the LCD screen or its edges when opening the LCD screen lid or lifting your computer. To ..., moisture may condense inside the computer. otherwise, problems may damage the screen or cause the screen to a warm one hand and gently lift the LCD screen lid with the other. In this case, allow at least one hour before cleaning your computer. ❑ To avoid losing data if your ...
..., unplug the computer and contact an authorized Sony Service Center. To find the nearest center or agent, visit the Sony online support Web site. ❑ Make sure you disconnect the power cord before turning on the LCD screen or its edges when opening the LCD screen lid or lifting your computer. To ..., moisture may condense inside the computer. otherwise, problems may damage the screen or cause the screen to a warm one hand and gently lift the LCD screen lid with the other. In this case, allow at least one hour before cleaning your computer. ❑ To avoid losing data if your ...

User Guide
Page 181
... images from the built-in MOTION EYE camera. Why are not currently using the built-in MOTION EYE camera. ❑ The video memory of the LCD screen might help file on your computer can handle. Exit the applications that you are captured images poor in quality? ❑ The images captured under...
... images from the built-in MOTION EYE camera. Why are not currently using the built-in MOTION EYE camera. ❑ The video memory of the LCD screen might help file on your computer can handle. Exit the applications that you are captured images poor in quality? ❑ The images captured under...
User Guide
Page 198
If the computer is in LCD (Video) Standby mode, press any key to brighten your computer screen. Make sure the power indicator shows the power is securely plugged into a power source ...
If the computer is in LCD (Video) Standby mode, press any key to brighten your computer screen. Make sure the power indicator shows the power is securely plugged into a power source ...
User Guide
Page 199
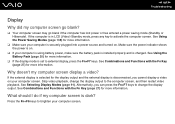
...then cancel the check box for enabling the automatic function to change the settings for LCD Brightness. 7 Click OK. To save this adjustment is overridden by the setting on the VAIO Power Management tab when another power scheme is temporary and this preference for the output...., follow these steps: ✍ To do the following procedure, you need to change the display output. The LCD brightness setting, adjusted with VAIO Central. n 199 N Troubleshooting What should I do if the LCD brightness of operating conditions. What should I do if the external display stays blank?
...then cancel the check box for enabling the automatic function to change the settings for LCD Brightness. 7 Click OK. To save this adjustment is overridden by the setting on the VAIO Power Management tab when another power scheme is temporary and this preference for the output...., follow these steps: ✍ To do the following procedure, you need to change the display output. The LCD brightness setting, adjusted with VAIO Central. n 199 N Troubleshooting What should I do if the LCD brightness of operating conditions. What should I do if the external display stays blank?


