
User Manual
Page 18
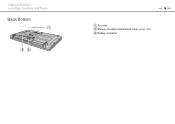
Getting Started > Locating Controls and Ports Back/Bottom n 18 N A Air vents B Memory module compartment cover (page 105) C Battery connector
Getting Started > Locating Controls and Ports Back/Bottom n 18 N A Air vents B Memory module compartment cover (page 105) C Battery connector

User Manual
Page 104
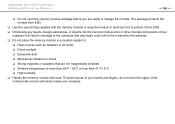
... the model you are not familiar with upgrading memory on your computer. To find out about Your VAIO Computer (page 5). For assistance, contact an authorized Sony service/support center. See the specifications to install a new memory module. ❑ You should not touch the connectors or open the memory module compartment...
... the model you are not familiar with upgrading memory on your computer. To find out about Your VAIO Computer (page 5). For assistance, contact an authorized Sony service/support center. See the specifications to install a new memory module. ❑ You should not touch the connectors or open the memory module compartment...

User Manual
Page 105
... (ESD) can damage memory modules and other components. Install the memory module only at an ESD workstation. Notes on a flat surface before you remove any cover or panel from the computer. Before you upgrade your computer's memory, read the notes and procedures in the following : ❑ The procedures described in this...
... (ESD) can damage memory modules and other components. Install the memory module only at an ESD workstation. Notes on a flat surface before you remove any cover or panel from the computer. Before you upgrade your computer's memory, read the notes and procedures in the following : ❑ The procedures described in this...
User Manual
Page 106
... the memory module slots or other internal components of your computer will result in damage to the computer and any repair costs will not be covered by the warranty. ❑ Do not place the memory module in a location subject to: ❑ Heat sources such as radiators or air ducts ❑ Direct...
... the memory module slots or other internal components of your computer will result in damage to the computer and any repair costs will not be covered by the warranty. ❑ Do not place the memory module in a location subject to: ❑ Heat sources such as radiators or air ducts ❑ Direct...

User Manual
Page 107
Upgrading Your VAIO Computer > Adding and Removing Memory n 107 N Removing and Installing a Memory Module To change or add a memory module 1 Shut down the computer and disconnect all peripheral devices. 2 Unplug the computer and remove the battery pack. 3 Wait about an hour until the computer cools down. 4 Unscrew the screw (indicated by the arrow below) on the bottom of the computer and remove the memory module compartment cover. 5 Touch a metal object to discharge static electricity.
Upgrading Your VAIO Computer > Adding and Removing Memory n 107 N Removing and Installing a Memory Module To change or add a memory module 1 Shut down the computer and disconnect all peripheral devices. 2 Unplug the computer and remove the battery pack. 3 Wait about an hour until the computer cools down. 4 Unscrew the screw (indicated by the arrow below) on the bottom of the computer and remove the memory module compartment cover. 5 Touch a metal object to discharge static electricity.

User Manual
Page 109
... the open slot. If you want to install only one memory module, be sure to the slot and the module. 9 Replace the memory module compartment cover. 10 Tighten the screw on the bottom of the memory module into place. Do not touch any components on the motherboard other than the memory...
... the open slot. If you want to install only one memory module, be sure to the slot and the module. 9 Replace the memory module compartment cover. 10 Tighten the screw on the bottom of the memory module into place. Do not touch any components on the motherboard other than the memory...

User Manual
Page 115
... computer. ❑ Make sure you unplug the AC adapter and remove the battery pack before cleaning your computer. Built-in Camera Clean the lens protection cover of the built-in camera with a dry soft cloth. Wipe off with a soft dry cloth. Do not use an abrasive pad, scouring powder, or ...solvent such as alcohol or benzine, as it is extremely dirty, wipe it to wipe the surface of the LCD screen. If the cover is sensitive to its edges and use a soft cloth to wipe the surface from the center out. Precautions > Care and Maintenance Information n 115 N Care and...
... computer. ❑ Make sure you unplug the AC adapter and remove the battery pack before cleaning your computer. Built-in Camera Clean the lens protection cover of the built-in camera with a dry soft cloth. Wipe off with a soft dry cloth. Do not use an abrasive pad, scouring powder, or ...solvent such as alcohol or benzine, as it is extremely dirty, wipe it to wipe the surface of the LCD screen. If the cover is sensitive to its edges and use a soft cloth to wipe the surface from the center out. Precautions > Care and Maintenance Information n 115 N Care and...

User Manual
Page 120
Precautions > Handling the Built-in Camera n 120 N Handling the Built-in Camera ❑ Do not touch the lens protection cover of the built-in camera, as it may cause scratches on the cover and such scratches will appear on the captured images. ❑ Do not let the direct sunlight get into the lens of the built-in camera regardless of your computer's power state, as it may cause the camera to malfunction.
Precautions > Handling the Built-in Camera n 120 N Handling the Built-in Camera ❑ Do not touch the lens protection cover of the built-in camera, as it may cause scratches on the cover and such scratches will appear on the captured images. ❑ Do not let the direct sunlight get into the lens of the built-in camera regardless of your computer's power state, as it may cause the camera to malfunction.

User Manual
Page 138
Clean the cover. See the help file included with your software application for example horizontal streaks, when you cannot take a clear shot. Troubleshooting > Built-in Camera n 138 N Built-.... This is normal and does not indicate a malfunction. ❑ If the problem persists, restart your computer may appear as a noise. ❑ If the lens protection cover is dirty, you are not currently using. ❑ The power management function of light. ❑ A dark portion in Camera (page 115). See Built-in captured...
Clean the cover. See the help file included with your software application for example horizontal streaks, when you cannot take a clear shot. Troubleshooting > Built-in Camera n 138 N Built-.... This is normal and does not indicate a malfunction. ❑ If the problem persists, restart your computer may appear as a noise. ❑ If the lens protection cover is dirty, you are not currently using. ❑ The power management function of light. ❑ A dark portion in Camera (page 115). See Built-in captured...
