
User Manual
Page 2
... Started 9 Locating Controls and Ports 10 About the Indicator Lights 15 Connecting a Power Source 16 Using the Battery Pack 18 Shutting Down Your Computer Safely 25 Using the Power Saving Modes 26 Updating Your Computer 29 Using Your VAIO Computer 30 Using the Keyboard 31 Using the Touch Pad 33 Using Special-function Buttons 34 Using the Built-in Camera 35 Using the Optical Disc Drive 36 Using "Memory Stick 43 Using Other Modules / Memory Cards 49 Using the Internet 55 Using the Network (LAN 56 Using the Wireless LAN 57 Using the Bluetooth Function 62 Using Peripheral...
... Started 9 Locating Controls and Ports 10 About the Indicator Lights 15 Connecting a Power Source 16 Using the Battery Pack 18 Shutting Down Your Computer Safely 25 Using the Power Saving Modes 26 Updating Your Computer 29 Using Your VAIO Computer 30 Using the Keyboard 31 Using the Touch Pad 33 Using Special-function Buttons 34 Using the Built-in Camera 35 Using the Optical Disc Drive 36 Using "Memory Stick 43 Using Other Modules / Memory Cards 49 Using the Internet 55 Using the Network (LAN 56 Using the Wireless LAN 57 Using the Bluetooth Function 62 Using Peripheral...
User Manual
Page 13
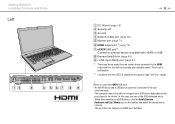
... vent D Network (LAN) port (page 56) E Monitor port (page 71) F HDMI output port*1 (page 73) G eSATA/USB port*2 Connect an external device compatible with the USB 2.0 standard and supports high-/full-/low- An eSATA device and a USB device cannot be no sound from an output device connected to recognize your USB device depending on the plug shape of the USB dedicated ports. - When disconnecting an eSATA device, click the Safely Remove Hardware and Eject Media icon on using the eSATA/USB port: -
... vent D Network (LAN) port (page 56) E Monitor port (page 71) F HDMI output port*1 (page 73) G eSATA/USB port*2 Connect an external device compatible with the USB 2.0 standard and supports high-/full-/low- An eSATA device and a USB device cannot be no sound from an output device connected to recognize your USB device depending on the plug shape of the USB dedicated ports. - When disconnecting an eSATA device, click the Safely Remove Hardware and Eject Media icon on using the eSATA/USB port: -
User Manual
Page 15
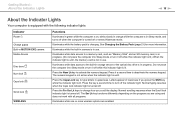
... is unlit. See Charging the Battery Pack (page 21) for more wireless options are using and does not work with the following indicator lights: Indicator Power 1 Charge Built-in MOTION EYE camera Media Access Disc drive Num lock Caps lock Scroll lock WIRELESS Functions Illuminates in green while the computer is on the program you press the Shift key while the indicator light is lit. Illuminates while data access to change how you scroll the display. Press the Num...
... is unlit. See Charging the Battery Pack (page 21) for more wireless options are using and does not work with the following indicator lights: Indicator Power 1 Charge Built-in MOTION EYE camera Media Access Disc drive Num lock Caps lock Scroll lock WIRELESS Functions Illuminates in green while the computer is on the program you press the Shift key while the indicator light is lit. Illuminates while data access to change how you scroll the display. Press the Num...
User Manual
Page 33
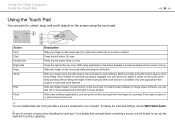
... viewer software, you can disable/enable the touch pad while a mouse is available only with two fingers for pointer operations. To change the touch pad settings, use only the keyboard for zooming. With some software applications, you will be able to place the pointer (2) on an item or object. Slide your computer. If you disable the touch pad before disabling the touch pad. Slide your finger on the touch pad (1) to use the VAIO Control...
... viewer software, you can disable/enable the touch pad while a mouse is available only with two fingers for pointer operations. To change the touch pad settings, use only the keyboard for zooming. With some software applications, you will be able to place the pointer (2) on an item or object. Slide your computer. If you disable the touch pad before disabling the touch pad. Slide your finger on the touch pad (1) to use the VAIO Control...
User Manual
Page 34
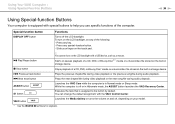
... use specific functions of the following: - Press any key. - Slide your model. * Use the WinDVD BD software for playback. x Stop button Stops playback of a CD, DVD, or Blu-ray Disc* media or a music/video file stored on the touch pad. ! VAIO button Launches the Media Gallery or turns the volume on and off, depending on your finger on the built-in storage device. u Play/Pause button Starts or pauses playback of a CD, DVD...
... use specific functions of the following: - Press any key. - Slide your model. * Use the WinDVD BD software for playback. x Stop button Stops playback of a CD, DVD, or Blu-ray Disc* media or a music/video file stored on the touch pad. ! VAIO button Launches the Media Gallery or turns the volume on and off, depending on your finger on the built-in storage device. u Play/Pause button Starts or pauses playback of a CD, DVD...

User Manual
Page 41
... your computer. ! Using Your VAIO Computer > Using the Optical Disc Drive n 41 N Notes on region codes ❑ Region code indicators are not covered by changing the region code settings of the drive are labeled on the discs or packages to change the region code while the WinDVD or WinDVD BD software is running, restart the software or eject the disc and re-insert it to make the new setting effective. ❑ Do...
... your computer. ! Using Your VAIO Computer > Using the Optical Disc Drive n 41 N Notes on region codes ❑ Region code indicators are not covered by changing the region code settings of the drive are labeled on the discs or packages to change the region code while the WinDVD or WinDVD BD software is running, restart the software or eject the disc and re-insert it to make the new setting effective. ❑ Do...

User Manual
Page 50
... can skip steps 1 to unplug. 4 Follow the on the taskbar. - the Safely Remove Hardware icon is off. - the hardware you want to unplug is not displayed in the Safely Remove Hardware window. 1 Locate the ExpressCard slot. 2 Click the Safely Remove Hardware and Eject Media icon on the taskbar. 3 Select the hardware you use the most recent driver software provided by the ExpressCard module manufacturer. Make sure you want to 4 when: - n 50 N
... can skip steps 1 to unplug. 4 Follow the on the taskbar. - the Safely Remove Hardware icon is off. - the hardware you want to unplug is not displayed in the Safely Remove Hardware window. 1 Locate the ExpressCard slot. 2 Click the Safely Remove Hardware and Eject Media icon on the taskbar. 3 Select the hardware you use the most recent driver software provided by the ExpressCard module manufacturer. Make sure you want to 4 when: - n 50 N

User Manual
Page 55
... for Internet access and how to connect your computer to the Internet, ask your ISP. ✍ To connect your computer to connect to set up the wireless LAN network. The following types of Internet connection services may need to connect an external modem device, for example a USB telephone modem, a DSL modem, or a cable modem, to your computer to the Internet using the Internet, you need to the Internet. For detailed instructions on connection setups and modem configuration, see the manual...
... for Internet access and how to connect your computer to the Internet, ask your ISP. ✍ To connect your computer to connect to set up the wireless LAN network. The following types of Internet connection services may need to connect an external modem device, for example a USB telephone modem, a DSL modem, or a cable modem, to your computer to the Internet using the Internet, you need to the Internet. For detailed instructions on connection setups and modem configuration, see the manual...
User Manual
Page 74
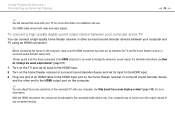
To hear sound from the device connected to the HDMI output port, you need to change the sound output device? (page 157). 1 Turn on the TV and set its input to the HDMI output port on the computer. ✍ You can be adjusted by the connected audio device only. For detailed instructions, see How do I change the device for sound output. With the HDMI connection, the volume can adjust the screen resolution of the connected TV with your...
To hear sound from the device connected to the HDMI output port, you need to change the sound output device? (page 157). 1 Turn on the TV and set its input to the HDMI output port on the computer. ✍ You can be adjusted by the connected audio device only. For detailed instructions, see How do I change the device for sound output. With the HDMI connection, the volume can adjust the screen resolution of the connected TV with your...

User Manual
Page 84
... the machine password, the password needs to change all the setup options in a secure place. User password: Allows the standard users to be reset and a fee will be charged. Do not to Normal mode from Sleep mode or Hibernate mode. ! Machine password: Allows users with its own password. ✍ Entry of the power-on password Windows password Description You can reset the user password at the BIOS setup screen by making the user enter the password when the computer is turned on or...
... the machine password, the password needs to change all the setup options in a secure place. User password: Allows the standard users to be reset and a fee will be charged. Do not to Normal mode from Sleep mode or Hibernate mode. ! Machine password: Allows users with its own password. ✍ Entry of the power-on password Windows password Description You can reset the user password at the BIOS setup screen by making the user enter the password when the computer is turned on or...
User Manual
Page 93
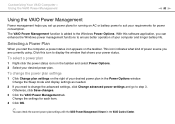
... current power plan settings with the VAIO Power Management Viewer in the Power Options window. To change the advanced settings, click Change advanced power settings and go to step 3. Change the Sleep mode and display settings as needed. 2 If you set up power plans for running on AC or battery power to suit your requirements for each item. 4 Click OK. ✍ You can enhance the Windows power management functions to ensure better operation of power source you start the computer, a power...
... current power plan settings with the VAIO Power Management Viewer in the Power Options window. To change the advanced settings, click Change advanced power settings and go to step 3. Change the Sleep mode and display settings as needed. 2 If you set up power plans for running on AC or battery power to suit your requirements for each item. 4 Click OK. ✍ You can enhance the Windows power management functions to ensure better operation of power source you start the computer, a power...

User Manual
Page 95
... cover. Upgrading Your VAIO Computer > n 95 N Upgrading Your VAIO Computer Your VAIO computer and memory modules use high precision components and electronic connectors technology. To avoid invalidation of your computer. See the specifications to install a new memory module. ❑ You should not install it yourself, if you are not familiar with upgrading memory on a computer. ❑ You should contact your computer may differ depending on the model you need...
... cover. Upgrading Your VAIO Computer > n 95 N Upgrading Your VAIO Computer Your VAIO computer and memory modules use high precision components and electronic connectors technology. To avoid invalidation of your computer. See the specifications to install a new memory module. ❑ You should not install it yourself, if you are not familiar with upgrading memory on a computer. ❑ You should contact your computer may differ depending on the model you need...

User Manual
Page 123
... on battery power, the CPU clock frequency is reduced for power conserving purposes, which you need to change the boot device order. While your computer from the USB floppy disk drive connected to run slowly. You can I cannot boot my computer from the USB floppy disk drive, you want to assign the priority and press the Enter key. 6 Press the < or , key to change the boot device. At the confirmation prompt, press the Enter key...
... on battery power, the CPU clock frequency is reduced for power conserving purposes, which you need to change the boot device order. While your computer from the USB floppy disk drive connected to run slowly. You can I cannot boot my computer from the USB floppy disk drive, you want to assign the priority and press the Enter key. 6 Press the < or , key to change the boot device. At the confirmation prompt, press the Enter key...
User Manual
Page 126
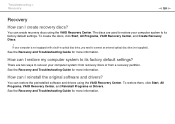
... disc drive, you need to its factory default settings. How can create recovery discs using the VAIO Recovery Center. To restore them, click Start, All Programs, VAIO Recovery Center, and Reinstall Programs or Drivers. You can I reinstall the original software and drivers? The discs are two ways to its factory default settings? Troubleshooting > Recovery n 126 N Recovery How can restore the preinstalled software and drivers using the VAIO Recovery Center. You can I restore my computer system to connect an external optical disc drive (not supplied). See the Recovery...
... disc drive, you need to its factory default settings. How can create recovery discs using the VAIO Recovery Center. To restore them, click Start, All Programs, VAIO Recovery Center, and Reinstall Programs or Drivers. You can I reinstall the original software and drivers? The discs are two ways to its factory default settings? Troubleshooting > Recovery n 126 N Recovery How can restore the preinstalled software and drivers using the VAIO Recovery Center. You can I restore my computer system to connect an external optical disc drive (not supplied). See the Recovery...
User Manual
Page 132
... if my computer becomes unstable when it enters a power saving mode while the built-in camera is the video input from the built-in use the camera under fluorescent lights due to one of camera images. This is running on battery power? The battery pack is normal and does not indicate a malfunction. Connect your computer automatically enters Sleep or Hibernate mode, change the setting, see Using the Power Saving Modes (page 26).
... if my computer becomes unstable when it enters a power saving mode while the built-in camera is the video input from the built-in use the camera under fluorescent lights due to one of camera images. This is running on battery power? The battery pack is normal and does not indicate a malfunction. Connect your computer automatically enters Sleep or Hibernate mode, change the setting, see Using the Power Saving Modes (page 26).
User Manual
Page 133
... by default. ❑ Follow these steps to check the settings: 1 Click Start and Control Panel. 2 Click View network status and tasks under Network and Internet. 3 Click Connect to a network to confirm that your computer to a wireless LAN access point using only the 5 GHz band, available on selected models only, is disabled by distance and obstructions. Wireless LAN communication (IEEE 802.11a standard) using the 5 GHz band, make sure the option to use...
... by default. ❑ Follow these steps to check the settings: 1 Click Start and Control Panel. 2 Click View network status and tasks under Network and Internet. 3 Click Connect to a network to confirm that your computer to a wireless LAN access point using only the 5 GHz band, available on selected models only, is disabled by distance and obstructions. Wireless LAN communication (IEEE 802.11a standard) using the 5 GHz band, make sure the option to use...

User Manual
Page 143
... is installed. Troubleshooting > Optical Discs n 143 N ❑ Make sure the correct driver software is not affixed to malfunction. ❑ Make sure your computer, do not use the computer for at least one hour. Check the package to open a list of the optical disc drives of your desired drive. The Device Manager window appears with a listing of your computer. 6 Double-click your computer's hardware devices. Follow these steps: 1 Click Start and Control Panel...
... is installed. Troubleshooting > Optical Discs n 143 N ❑ Make sure the correct driver software is not affixed to malfunction. ❑ Make sure your computer, do not use the computer for at least one hour. Check the package to open a list of the optical disc drives of your desired drive. The Device Manager window appears with a listing of your computer. 6 Double-click your computer's hardware devices. Follow these steps: 1 Click Start and Control Panel...

User Manual
Page 150
... need to install the printer driver software before you use your computer may enable printing. Troubleshooting > Printing n 150 N Printing What should I do if I cannot print a document? ❑ Make sure your printer is on, and the printer cable is securely connected to the ports on the printer and your computer. ❑ Make sure your printer is not functioning after your computer resumes from a power saving mode (Sleep...
... need to install the printer driver software before you use your computer may enable printing. Troubleshooting > Printing n 150 N Printing What should I do if I cannot print a document? ❑ Make sure your printer is on, and the printer cable is securely connected to the ports on the printer and your computer. ❑ Make sure your printer is not functioning after your computer resumes from a power saving mode (Sleep...
User Manual
Page 154
Turning off . ! Troubleshooting > Touch Pad n 154 N Touch Pad What should I do not work , press and hold the power button until the computer turns off your computer. See Using the Touch Pad (page 33). ❑ Make sure that a mouse is not connected to your computer. ❑ If the pointer does not move while a software application is running, press the Alt+F4 keys to close the application window. ❑ If the Alt...
Turning off . ! Troubleshooting > Touch Pad n 154 N Touch Pad What should I do not work , press and hold the power button until the computer turns off your computer. See Using the Touch Pad (page 33). ❑ Make sure that a mouse is not connected to your computer. ❑ If the pointer does not move while a software application is running, press the Alt+F4 keys to close the application window. ❑ If the Alt...

User Manual
Page 157
... need to change the sound output device? If a message appears stating that the i.LINK device is disconnected or turned off the Windows startup sound, follow these steps: 1 Click Start and Control Panel. 2 Click Hardware and Sound. 3 Click Manage audio devices under Sound. 5 On the Playback tab, select your computer or camcorder. Troubleshooting > Audio/Video n 157 N Audio/Video What should I do not hear sound from the device connected to a port, such as the USB port, HDMI output port, optical output port, or headphones jack...
... need to change the sound output device? If a message appears stating that the i.LINK device is disconnected or turned off the Windows startup sound, follow these steps: 1 Click Start and Control Panel. 2 Click Hardware and Sound. 3 Click Manage audio devices under Sound. 5 On the Playback tab, select your computer or camcorder. Troubleshooting > Audio/Video n 157 N Audio/Video What should I do not hear sound from the device connected to a port, such as the USB port, HDMI output port, optical output port, or headphones jack...


