Operating Instructions
Page 2
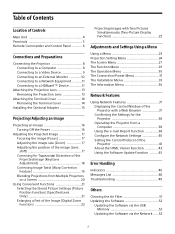
... Lens Only 21 Enlarging a Part of the Image (Digital Zoom Function 22 Projecting Images with Two Pictures Simultaneously (Two-Picture Display Function 22 Adjustments and Settings Using a Menu Using a Menu 23 Projection Setting Menu 24 The Screen Menu 27 The Function Menu 29 The Operation Menu 30 The Connection/Power Menu 31 The Installation Menu 33 The Information Menu 36 Network Features Using Network Features 37 Displaying the Control Window of the Projector with a Web Browser 37 Confirming the Settings for the Projector 38 Operating the Projector from a Computer 38 Using...
... Lens Only 21 Enlarging a Part of the Image (Digital Zoom Function 22 Projecting Images with Two Pictures Simultaneously (Two-Picture Display Function 22 Adjustments and Settings Using a Menu Using a Menu 23 Projection Setting Menu 24 The Screen Menu 27 The Function Menu 29 The Operation Menu 30 The Connection/Power Menu 31 The Installation Menu 33 The Information Menu 36 Network Features Using Network Features 37 Displaying the Control Window of the Projector with a Web Browser 37 Confirming the Settings for the Projector 38 Operating the Projector from a Computer 38 Using...
Operating Instructions
Page 6
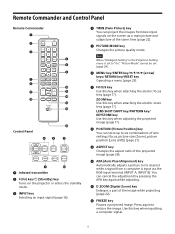
... the same time (page 22). PICTURE MODE key Changes the picture quality mode. Remote Commander and Control Panel Remote Commander Control Panel Infrared transmitter (On) key/ (Standby) key Turns on the projector or enters the standby mode. INPUT key Selecting an input signal (page 16). TWIN (Twin Picture) key You can cancel the adjustment by pressing the APA key again while adjusting. D ZOOM (Digital Zoom) key Enlarges a part of the projected image (page...
... the same time (page 22). PICTURE MODE key Changes the picture quality mode. Remote Commander and Control Panel Remote Commander Control Panel Infrared transmitter (On) key/ (Standby) key Turns on the projector or enters the standby mode. INPUT key Selecting an input signal (page 16). TWIN (Twin Picture) key You can cancel the adjustment by pressing the APA key again while adjusting. D ZOOM (Digital Zoom) key Enlarges a part of the projected image (page...

Operating Instructions
Page 11
... is used when connecting the projector to a computer, video device, or network equipment. If wiring has been insufficiently performed, it is as straight as LAN. Do not use the HDBaseT transmitter beyond the maximum transmittable distance of the cable. For operation or function problems caused by devices of other cables (especially the power cable). When installing multiple cables, do not bind them and keep the...
... is used when connecting the projector to a computer, video device, or network equipment. If wiring has been insufficiently performed, it is as straight as LAN. Do not use the HDBaseT transmitter beyond the maximum transmittable distance of the cable. For operation or function problems caused by devices of other cables (especially the power cable). When installing multiple cables, do not bind them and keep the...
Operating Instructions
Page 13
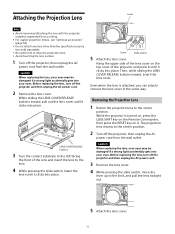
... lens cover. 13 Before replacing the lens, turn off the projector and then unplug the AC power cord. 3 Remove the lens cover. 4 While pressing the slide switch, move the lever up to the center position. Then, while sliding the LENS COVER RELEASE buttons inward, insert the lens cover. Before replacing the lens, turn off the projector and then unplug the AC power cord. 2 Remove the lens cover. Caution When replacing the lens, your eyes. Lever Slide switch 5 Attach the lens cover...
... lens cover. 13 Before replacing the lens, turn off the projector and then unplug the AC power cord. 3 Remove the lens cover. 4 While pressing the slide switch, move the lever up to the center position. Then, while sliding the LENS COVER RELEASE buttons inward, insert the lens cover. Before replacing the lens, turn off the projector and then unplug the AC power cord. 2 Remove the lens cover. Caution When replacing the lens, your eyes. Lever Slide switch 5 Attach the lens cover...
Operating Instructions
Page 16
... right side in use. 2 Unplug the AC power cord from the wall outlet. 7 Adjust the projected image (page 17). 16 For long-term use, turn off the projector when not in the input select window when a signal is input.*1 Also, you can select an input signal on the Remote Commander. *1: When INPUT F is started and the projector enters the standby mode. Projecting/Adjusting an Image Projecting an Image The size of computer. (Example) Turning Off the Power 1 Press the ...
... right side in use. 2 Unplug the AC power cord from the wall outlet. 7 Adjust the projected image (page 17). 16 For long-term use, turn off the projector when not in the input select window when a signal is input.*1 Also, you can select an input signal on the Remote Commander. *1: When INPUT F is started and the projector enters the standby mode. Projecting/Adjusting an Image Projecting an Image The size of computer. (Example) Turning Off the Power 1 Press the ...
Operating Instructions
Page 20
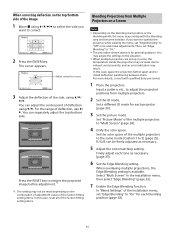
... Installation menu, set "Edge Blending" to "Off" once and make adjustments. Finely adjust each projector (page 30). 3 Set the picture mode. Adjust using to select the side you want to adjust the projected positions from Multiple Projectors on a Screen Notes Depending on the top/bottom side of the multiple projectors to the same mode (Custom 1 to "Multi Screen" (page 24). 4 Unify the color space. Set the color space of the image...
... Installation menu, set "Edge Blending" to "Off" once and make adjustments. Finely adjust each projector (page 30). 3 Set the picture mode. Adjust using to select the side you want to adjust the projected positions from Multiple Projectors on a Screen Notes Depending on the top/bottom side of the multiple projectors to the same mode (Custom 1 to "Multi Screen" (page 24). 4 Unify the color space. Set the color space of the image...
Operating Instructions
Page 28
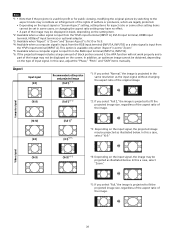
... will not work properly and a part of the image may not be displayed on the screen. In this a case, select "Zoom." *5: If you select "Full," the image is projected to fit the projected image size, regardless of the aspect ratio of input signal. Notes *1: Note that if the projector is used for profit or for public viewing, modifying the original picture by switching to the aspect mode may...
... will not work properly and a part of the image may not be displayed on the screen. In this a case, select "Zoom." *5: If you select "Full," the image is projected to fit the projected image size, regardless of the aspect ratio of input signal. Notes *1: Note that if the projector is used for profit or for public viewing, modifying the original picture by switching to the aspect mode may...

Operating Instructions
Page 30
... can adjusts the lens (focus, zoom, and lens shift) from the Remote commander or the projector. To prevent unintentional operation, set it is set to "Off," you can cancel the security lock. Setting items Language Menu Position Status IR Receiver ID Mode Security Lock Control Key Lock Lens Control Description Selects the language used . Off: Displays only the menus and warning messages. When it to "Off" after three consecutive times, the projector cannot be able to use the projector...
... can adjusts the lens (focus, zoom, and lens shift) from the Remote commander or the projector. To prevent unintentional operation, set it is set to "Off," you can cancel the security lock. Setting items Language Menu Position Status IR Receiver ID Mode Security Lock Control Key Lock Lens Control Description Selects the language used . Off: Displays only the menus and warning messages. When it to "Off" after three consecutive times, the projector cannot be able to use the projector...

Operating Instructions
Page 31
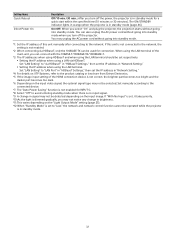
... terminal of the HDBaseT device connected to XTP Systems*4 manufactured by Extron Electronics. USB/Network: Sets the content for the connections and power. In Light Cutoff, the ON/STANDBY indicator lights in the Light Output Mode. When any key is disabled. When setting the address of the INPUT C/D/E/F terminal. Sel. For details, see "Power consumption (Networked Standby Mode)" in signal is detected, or an operation (Remote Commander or control panel) is performed, normal brightness is...
... terminal of the HDBaseT device connected to XTP Systems*4 manufactured by Extron Electronics. USB/Network: Sets the content for the connections and power. In Light Cutoff, the ON/STANDBY indicator lights in the Light Output Mode. When any key is disabled. When setting the address of the INPUT C/D/E/F terminal. Sel. For details, see "Power consumption (Networked Standby Mode)" in signal is detected, or an operation (Remote Commander or control panel) is performed, normal brightness is...
Operating Instructions
Page 32
... manually after connecting to the product catalog or brochure from Extron Electronics. *5: If the image input setting of the HDMI connection device is in signal may not be operated while the projector is not correct, the brighter part becomes too bright and the darker part becomes too dark. *6: Depending on the "Light Output Mode" setting (page 25). *12:When "Standby Mode" is set to "LAN Port" in "HDBaseT Settings," then set the IP address...
... manually after connecting to the product catalog or brochure from Extron Electronics. *5: If the image input setting of the HDMI connection device is in signal may not be operated while the projector is not correct, the brighter part becomes too bright and the darker part becomes too dark. *6: Depending on the "Light Output Mode" setting (page 25). *12:When "Standby Mode" is set to "LAN Port" in "HDBaseT Settings," then set the IP address...

Operating Instructions
Page 34
... in standby mode. Reset: The panel alignment settings are initialized to the screen. Screen Aspect Blanking Panel Alignment 16:10/16:9/4:3: For switching the display area to suit to their factory preset values. 34 Adjust the amount of "Panel Alignment," the color and resolution may not be changed. Select the correction zone "Adjust Zone 1" through "Adjust Zone 9," and set to the installation method. Setting items Zone Black Level *2 *3 *4 Image Split Image Flip High Altitude Mode Filter Cleaning Description Adjusts...
... in standby mode. Reset: The panel alignment settings are initialized to the screen. Screen Aspect Blanking Panel Alignment 16:10/16:9/4:3: For switching the display area to suit to their factory preset values. 34 Adjust the amount of "Panel Alignment," the color and resolution may not be changed. Select the correction zone "Adjust Zone 1" through "Adjust Zone 9," and set to the installation method. Setting items Zone Black Level *2 *3 *4 Image Split Image Flip High Altitude Mode Filter Cleaning Description Adjusts...

Operating Instructions
Page 37
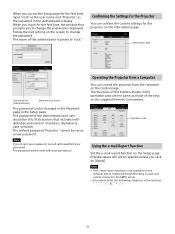
... following menu displays used for the HTML viewer. Restoring the network settings to their factory defaults. Using the Software Update Function. It is set to [Use a proxy server] when you to perform the following window appears in the Connection/Power menu (page 31). Once you make the network settings, you can confirm the IP address of your computer is recommended to change the access limitation of the Page Switching buttons...
... following menu displays used for the HTML viewer. Restoring the network settings to their factory defaults. Using the Software Update Function. It is set to [Use a proxy server] when you to perform the following window appears in the Connection/Power menu (page 31). Once you make the network settings, you can confirm the IP address of your computer is recommended to change the access limitation of the Page Switching buttons...
Operating Instructions
Page 38
... first time, the window that includes both alphabet and numeric characters. Follow the instructions on the Information page. When you to change the password. The default password "Projector" cannot be reset with your password, consult with qualified Sony personnel. Operation area Using the e-mail Report Function Set the e-mail report function on [Apply]. Alphabet is displayed. Operating the Projector from a Computer You can be changed in the Password page...
... first time, the window that includes both alphabet and numeric characters. Follow the instructions on the Information page. When you to change the password. The default password "Projector" cannot be reset with your password, consult with qualified Sony personnel. Operation area Using the e-mail Report Function Set the e-mail report function on [Apply]. Alphabet is displayed. Operating the Projector from a Computer You can be changed in the Password page...

Operating Instructions
Page 42
... the factory default is "SONY." PJ Talk button Start PJ Talk Service: Set PJ Talk to enabled or disabled. The password is allowed to the projector from other computers, changing the community name of ADCP. The factory default setting is recommended. -Port No.: Input the server port of Advertisement and PJ Talk. The factory default setting is input, access will also be input. From the moment the IP address is "30." -Host Address: Input...
... the factory default is "SONY." PJ Talk button Start PJ Talk Service: Set PJ Talk to enabled or disabled. The password is allowed to the projector from other computers, changing the community name of ADCP. The factory default setting is recommended. -Port No.: Input the server port of Advertisement and PJ Talk. The factory default setting is input, access will also be input. From the moment the IP address is "30." -Host Address: Input...

Operating Instructions
Page 43
... input source automatically switches to their factory defaults. . About the HTML Viewer Function You can be input. 7 Click on the Remote Commander. 43 Switch to display the PJ Control API page. 6 Click on [PJ Control API] to INPUT G using the HTML viewer. Resetting the network settings Reset the network settings to INPUT G. The system service function is displayed by INPUT G. When no signal is detected, it switches from INPUT G to display the Service page. Reset PJ Control API button Start PJ Control API Service: Set PJ Control...
... input source automatically switches to their factory defaults. . About the HTML Viewer Function You can be input. 7 Click on the Remote Commander. 43 Switch to display the PJ Control API page. 6 Click on [PJ Control API] to INPUT G using the HTML viewer. Resetting the network settings Reset the network settings to INPUT G. The system service function is displayed by INPUT G. When no signal is detected, it switches from INPUT G to display the Service page. Reset PJ Control API button Start PJ Control API Service: Set PJ Control...

Operating Instructions
Page 45
... affect the connection quality such. Set the content size in advance to fit in the window of the projector. Browser extensions, such as SSL or TSL. . Power status: Check the power source status of the projector. Setting: Enter the following Sony website. Manual(Local): Select when setting the date and time manually. Time(hh:mm:ss): Enter the time. 45 Note You can update the software via a network when Power status is in STANDBY. 1 Click...
... affect the connection quality such. Set the content size in advance to fit in the window of the projector. Browser extensions, such as SSL or TSL. . Power status: Check the power source status of the projector. Setting: Enter the following Sony website. Manual(Local): Select when setting the date and time manually. Time(hh:mm:ss): Enter the time. 45 Note You can update the software via a network when Power status is in STANDBY. 1 Click...
Operating Instructions
Page 47
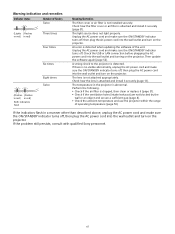
... turning on the projector. If there is detected when updating the software of operating temperature (page 53). A strong shock to the projector is not attached appropriately. The lens is detected. Perform the following. Check if the air filter is not installed securely. If the problem still persists, consult with qualified Sony personnel. 47 Warning indication and remedies Indicator status Number of flashes Twice (Lights (Flashes in red) in red) Three times Four times Six times (Flashes (Flashes in red...
... turning on the projector. If there is detected when updating the software of operating temperature (page 53). A strong shock to the projector is not attached appropriately. The lens is detected. Perform the following. Check if the air filter is not installed securely. If the problem still persists, consult with qualified Sony personnel. 47 Warning indication and remedies Indicator status Number of flashes Twice (Lights (Flashes in red) in red) Three times Four times Six times (Flashes (Flashes in red...

Operating Instructions
Page 48
... maintained. Please check Input-A Signal Sel. "Lens Control" is high. Message Description/Remedy Clean the filter. As a countermeasure against use the projector within the range of the light source (page 25). Change the output setting of operating temperature (page 53). "High Altitude Mode" on the Remote Commander or control panel (page 6). Temperature in the projector has increased. Clean the filter. Consult with qualified Sony personnel. Projector temperature is set (page 31). Perform the remedies below and set "High Altitude Mode" to "Auto" (page 34...
... maintained. Please check Input-A Signal Sel. "Lens Control" is high. Message Description/Remedy Clean the filter. As a countermeasure against use the projector within the range of the light source (page 25). Change the output setting of operating temperature (page 53). "High Altitude Mode" on the Remote Commander or control panel (page 6). Temperature in the projector has increased. Clean the filter. Consult with qualified Sony personnel. Projector temperature is set (page 31). Perform the remedies below and set "High Altitude Mode" to "Auto" (page 34...

Operating Instructions
Page 49
... "Screen Aspect" is automatically projected (page 34). If the problem still persists, consult with an input signal the projector displayed smaller./A part of image has changed. Check how the air filter is displayed automatically. Remedy Check if the connecting cable is set "Aspect" manually (page 27, 28). If you can correct the trapezoidal distortion, using the / key on . While performing the color calibration, the color calibration pattern is attached and install...
... "Screen Aspect" is automatically projected (page 34). If the problem still persists, consult with an input signal the projector displayed smaller./A part of image has changed. Check how the air filter is displayed automatically. Remedy Check if the connecting cable is set "Aspect" manually (page 27, 28). If you can correct the trapezoidal distortion, using the / key on . While performing the color calibration, the color calibration pattern is attached and install...

Operating Instructions
Page 50
.... The network is in at high altitude ("High Altitude Mode" is clogged, then clean or replace it (page 51). Check that the air filter is set to the operating instructions or Website of the image. Check if the "ID Mode" of the Remote Commander (page 7, 30). When video signal is not input, the light is dimmed to that of the projector corresponds to reduce power consumption (page 31). When the temperature around the...
.... The network is in at high altitude ("High Altitude Mode" is clogged, then clean or replace it (page 51). Check that the air filter is set to the operating instructions or Website of the image. Check if the "ID Mode" of the Remote Commander (page 7, 30). When video signal is not input, the light is dimmed to that of the projector corresponds to reduce power consumption (page 31). When the temperature around the...


