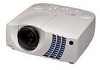
Operating Instructions
Page 5
... Side 9 (GB) Rear/Right Side/Bottom 9 (GB) Control panel 11 (GB) Connector panel 12 (GB) Remote Commander 13 (GB) Setting up and projecting Installing the Projector 14 (GB) Connecting 15 (GB) Connecting with a Computer 15 (GB) GB Connecting with a VCR/15k RGB/Component Equipment 17 (GB) Selecting the Menu Language 18...
... Side 9 (GB) Rear/Right Side/Bottom 9 (GB) Control panel 11 (GB) Connector panel 12 (GB) Remote Commander 13 (GB) Setting up and projecting Installing the Projector 14 (GB) Connecting 15 (GB) Connecting with a Computer 15 (GB) GB Connecting with a VCR/15k RGB/Component Equipment 17 (GB) Selecting the Menu Language 18...
Operating Instructions
Page 7
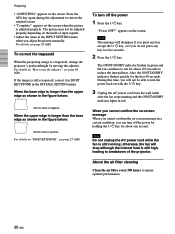
...several days. • To disconnect the cord, pull it is recommended that the carpet and wall paper be near the ventilation holes - Caution The projector is on the lens, use a damp cloth, detergent solution, or thinner. • Clean the filter at regular intervals every 300 hours. For ...maximum protection, repack your unit as thinner, benzene, or abrasive cleansers, since these holes, or internal heat build-up the projector. Do not use a soft dry cloth. On repacking • Save the original shipping carton and packing material; If the floor and walls are...
...several days. • To disconnect the cord, pull it is recommended that the carpet and wall paper be near the ventilation holes - Caution The projector is on the lens, use a damp cloth, detergent solution, or thinner. • Clean the filter at regular intervals every 300 hours. For ...maximum protection, repack your unit as thinner, benzene, or abrasive cleansers, since these holes, or internal heat build-up the projector. Do not use a soft dry cloth. On repacking • Save the original shipping carton and packing material; If the floor and walls are...

Operating Instructions
Page 8
...allows you to connect the projector to a convenient carrying, and you can carry it everywhere you want. • Sony original high performance APA ... SVGA, XGA and SXGA are the Display Data Channel (DDCTM)4) standard in the VESA standard.) When connecting a DDC1 host system, the projector synchronizes with V.CLK ...projector allows you to a computer from your system. Features Features High brightness, high picture quality • High brightness The LCD panel with microlens and the 200 W UHP lamp allow high brightness (light output 1400 ANSI lumen for VPL-PX20, and 2400 ANSI lumen for VPL...
...allows you to connect the projector to a convenient carrying, and you can carry it everywhere you want. • Sony original high performance APA ... SVGA, XGA and SXGA are the Display Data Channel (DDCTM)4) standard in the VESA standard.) When connecting a DDC1 host system, the projector synchronizes with V.CLK ...projector allows you to a computer from your system. Features Features High brightness, high picture quality • High brightness The LCD panel with microlens and the 200 W UHP lamp allow high brightness (light output 1400 ANSI lumen for VPL-PX20, and 2400 ANSI lumen for VPL...
Operating Instructions
Page 9
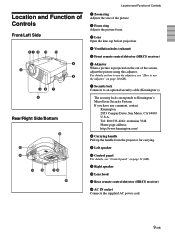
Tel: 800-535-4242: extension 3348 Home page address: http://www.kensington.com/ 8 Carrying handle Pull up the handle from the projector for carrying. 9 Left speaker 0 Control panel For details, see "How to use the adjusters, see "Control panel" on page 10 (GB). 7 Security lock Connects to ...
Tel: 800-535-4242: extension 3348 Home page address: http://www.kensington.com/ 8 Carrying handle Pull up the handle from the projector for carrying. 9 Left speaker 0 Control panel For details, see "How to use the adjusters, see "Control panel" on page 10 (GB). 7 Security lock Connects to ...
Operating Instructions
Page 10
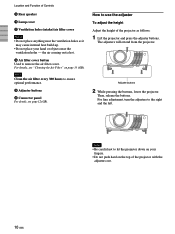
...Notes • Do not place anything near the ventilation holes - How to the right and the left. Adjuster buttons 2 While pressing the buttons, lower the projector. qk Air filter cover button Used to ensure optimal performance. Then, release the buttons. ql Adjuster buttons w; Location and Function of the... to remove the air filter cover. For fine adjustment, turn the adjusters to use the adjuster To adjust the height Adjust the height of the projector as it may cause internal heat build-up. • Do not place your fingers. • Do not push hard on your hand or objects ...
...Notes • Do not place anything near the ventilation holes - How to the right and the left. Adjuster buttons 2 While pressing the buttons, lower the projector. qk Air filter cover button Used to ensure optimal performance. Then, release the buttons. ql Adjuster buttons w; Location and Function of the... to remove the air filter cover. For fine adjustment, turn the adjusters to use the adjuster To adjust the height Adjust the height of the projector as it may cause internal heat build-up. • Do not place your fingers. • Do not push hard on your hand or objects ...

Operating Instructions
Page 11
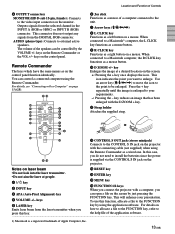
keys Adjust the volume of the built-in speakers and output level of the AUDIO jack. + : Increases the volume. - : Decreases the volume. 2 Arrow keys (M/m/ Control panel 1 2 34 LAMP/ COVER TEMP/ POWER ON/ FAN SAVING STANDBY 5 6 VOL + VOL - MENU HELP ENTER RESET INPUT APA LIGHT 7 qa 0 9 8 1 VOL +/-
keys Adjust the volume of the built-in speakers and output level of the AUDIO jack. + : Increases the volume. - : Decreases the volume. 2 Arrow keys (M/m/ Control panel 1 2 34 LAMP/ COVER TEMP/ POWER ON/ FAN SAVING STANDBY 5 6 VOL + VOL - MENU HELP ENTER RESET INPUT APA LIGHT 7 qa 0 9 8 1 VOL +/-
Operating Instructions
Page 12
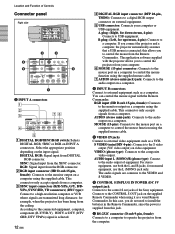
...common to the VIDEO and S VIDEO. 4 CONTROL S IN/PLUG IN POWER (DC 5V output) jack Connects to the control S out jacks of the Sony equipment. for downstream, 4-pin): Connects to the monitor output on INPUT A connectors. this jack. 5 RS-232C connector (D-sub 9-pin, female) Connects ... upstream, 4-pin): Connects to install the batteries in the Remote Commander, since the power is supplied from this allows you connect the projector and a computer, the projector automatically assumes that a USB mouse is selected. 12 (GB) 4DIGITAL RGB input connector (DFP 20-pin, TMDS): Connects to a ...
...common to the VIDEO and S VIDEO. 4 CONTROL S IN/PLUG IN POWER (DC 5V output) jack Connects to the control S out jacks of the Sony equipment. for downstream, 4-pin): Connects to the monitor output on INPUT A connectors. this jack. 5 RS-232C connector (D-sub 9-pin, female) Connects ... upstream, 4-pin): Connects to install the batteries in the Remote Commander, since the power is supplied from this allows you connect the projector and a computer, the projector automatically assumes that a USB mouse is selected. 12 (GB) 4DIGITAL RGB input connector (DFP 20-pin, TMDS): Connects to a ...
Operating Instructions
Page 13
This connector does not output any signals from the selected channel in the INPUT A (RGB or 5BNC) or INPUT B (RGB) connector. AUDIO (phono type): Connects to the unit. 7 Arrow keys (M/m/ keys on the control panel. keys on the Remote Commander or the VOL +/- You can be controlled by the VOLUME +/- For details, see "Connecting with a Computer" on the monitor. Location and Function of Controls 6 OUTPUT connectors MONITOR (HD D-sub 15-pin, female): Connects to the video input connector on page 15 (GB). LASER ENTER R CLICK RESET D ZOOM + - 1 2 3 4 5 6 7 8 9 0 qa,qs 6 Joy stick...
This connector does not output any signals from the selected channel in the INPUT A (RGB or 5BNC) or INPUT B (RGB) connector. AUDIO (phono type): Connects to the unit. 7 Arrow keys (M/m/ keys on the control panel. keys on the Remote Commander or the VOL +/- You can be controlled by the VOLUME +/- For details, see "Connecting with a Computer" on the monitor. Location and Function of Controls 6 OUTPUT connectors MONITOR (HD D-sub 15-pin, female): Connects to the video input connector on page 15 (GB). LASER ENTER R CLICK RESET D ZOOM + - 1 2 3 4 5 6 7 8 9 0 qa,qs 6 Joy stick...

Operating Instructions
Page 14
... is correct when inserting batteries. • Do not mix an old battery with a new one, or different types of Controls / Installing the Projector qj MUTING keys Cut off the picture. Press again or press the VOLUME + key to restore the picture. ql COMMAND ON/OFF switch When...table as a guide. PIC: Cuts off the picture and sound. Transmission indicator Lights up when you use the Remote Commander for installing the projector. This indicator does not light up when you need help messages. wa Infrared transmitter ws Laser transmitter Battery installation 1 Push and slide to ...
... is correct when inserting batteries. • Do not mix an old battery with a new one, or different types of Controls / Installing the Projector qj MUTING keys Cut off the picture. Press again or press the VOLUME + key to restore the picture. ql COMMAND ON/OFF switch When...table as a guide. PIC: Cuts off the picture and sound. Transmission indicator Lights up when you use the Remote Commander for installing the projector. This indicator does not light up when you need help messages. wa Infrared transmitter ws Laser transmitter Battery installation 1 Push and slide to ...
Operating Instructions
Page 15
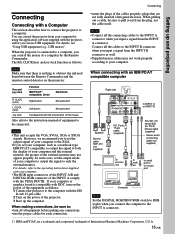
...the XGA. • If you connect the computer to only the external monitor. Notes • This unit accepts the VGA, SVGA, XGA or SXGA Speaker HD D-sub 15-pin cable (supplied) serial)/S22 (for each connection. ... 1) IBM and PC/AT are not fully inserted often generate... the output mode of International Business Machines Corporation, U.S.A. 15 (GB) The R/L CLICK keys and joy stick function as follows: Computer 1 Connect the projector to a computer. Connecting Setting up the computer. In such cases, set your computer. • The RGB input connectors of the INPUT A/B and ...
...the XGA. • If you connect the computer to only the external monitor. Notes • This unit accepts the VGA, SVGA, XGA or SXGA Speaker HD D-sub 15-pin cable (supplied) serial)/S22 (for each connection. ... 1) IBM and PC/AT are not fully inserted often generate... the output mode of International Business Machines Corporation, U.S.A. 15 (GB) The R/L CLICK keys and joy stick function as follows: Computer 1 Connect the projector to a computer. Connecting Setting up the computer. In such cases, set your computer. • The RGB input connectors of the INPUT A/B and ...

Operating Instructions
Page 17
...RGB/ component equipment. Notes • Your computer may not start correctly when it out from the plug, not the cable itself. The projector automatically assumes that are recognized by your computer via the USB connector, do not connect another mouse to the MOUSE port. When making any... connections. • use the proper cables for projector control function) Any other devices connected to the downstream connector of the cables properly; Using USB equipment (e.g., USB mouse) Connect the USB ...
...RGB/ component equipment. Notes • Your computer may not start correctly when it out from the plug, not the cable itself. The projector automatically assumes that are recognized by your computer via the USB connector, do not connect another mouse to the MOUSE port. When making any... connections. • use the proper cables for projector control function) Any other devices connected to the downstream connector of the cables properly; Using USB equipment (e.g., USB mouse) Connect the USB ...

Operating Instructions
Page 19
... the size of the picture. 5 Turn the focus ring to get the suitable picture when a signal from the computer is automatically adjusted to the projector. The ON/STANDBY indicator lights in green. 3 Turn on the Remote Commander. VIDEO: Selects audio and video signals input from the INPUT A connector...connected to be projected clearest. Press the INPUT key to your eyes. The picture is input. The ON/STANDBY indicator lights in red and the projector goes into the wall outlet. Projecting VOL + VOL - 1 ON/STANDBY indicator LAMP/ TEMP/ POWER ON/ COVER FAN SAVING STANDBY MENU HELP ...
... the size of the picture. 5 Turn the focus ring to get the suitable picture when a signal from the computer is automatically adjusted to the projector. The ON/STANDBY indicator lights in green. 3 Turn on the Remote Commander. VIDEO: Selects audio and video signals input from the INPUT A connector...connected to be projected clearest. Press the INPUT key to your eyes. The picture is input. The ON/STANDBY indicator lights in red and the projector goes into the wall outlet. Projecting VOL + VOL - 1 ON/STANDBY indicator LAMP/ TEMP/ POWER ON/ COVER FAN SAVING STANDBY MENU HELP ...
Operating Instructions
Page 20
... with the I / 1 key for five seconds. 2 Press the I / 1 key. Note The message will stop although the internal heat is a trapezoid, change the projector's position/height by holding the I / 1 key. 3 Unplug the AC power cord from the wall outlet after the fan stops running ; "Power OFF?" When you cannot...screen message When you do not press any key except the I / 1 key, or if you cannot confirm the on the kinds of the projector. To correct the trapezoid When the projecting image is still high, leading to use the adjuster", see page 10 (GB). For details, see page...
... with the I / 1 key for five seconds. 2 Press the I / 1 key. Note The message will stop although the internal heat is a trapezoid, change the projector's position/height by holding the I / 1 key. 3 Unplug the AC power cord from the wall outlet after the fan stops running ; "Power OFF?" When you cannot...screen message When you do not press any key except the I / 1 key, or if you cannot confirm the on the kinds of the projector. To correct the trapezoid When the projecting image is still high, leading to use the adjuster", see page 10 (GB). For details, see page...
Operating Instructions
Page 22
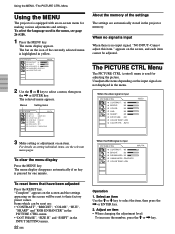
... disappears automatically if no input signal, "NO INPUT-Cannot adjust this item." Using the MENU / The PICTURE CTRL Menu Using the MENU The projector is equipped with an on the input signal are not displayed in the menu. PICTURE CTRL CONTRAST: 80 BRIGHT: 50 RGB ENHANCER: 30 GAMMA...on -screen menu for making various adjustments and settings. For details on an item. "Complete!" Items which can be reset are automatically stored in the projector memory. Adjust an item • When changing the adjustment level: To increase the number, press the M or , key. To clear the menu display...
... disappears automatically if no input signal, "NO INPUT-Cannot adjust this item." Using the MENU / The PICTURE CTRL Menu Using the MENU The projector is equipped with an on the input signal are not displayed in the menu. PICTURE CTRL CONTRAST: 80 BRIGHT: 50 RGB ENHANCER: 30 GAMMA...on -screen menu for making various adjustments and settings. For details on an item. "Complete!" Items which can be reset are automatically stored in the projector memory. Adjust an item • When changing the adjustment level: To increase the number, press the M or , key. To clear the menu display...

Operating Instructions
Page 25
... 43.436 H-pos V-pos 1696 35 SGI-5 53.316 50.062 S on G 1680 36 SXGA VESA 60 Hz 63.974 60.013 H-pos V-pos 1696 37 SXGA VESA 75 Hz 79.976 75.025 H-pos V-pos 1688 38 SXGA VESA 85 Hz 91.146 85.024 H-pos V-pos 1728 43 PC Component 480... adjustable/setting items Item Input signal Video or 15k RGB/ HDTV S video (Y/C) Component DOT - - You can not be set About the preset memory No. This projector automatically detects the signal type. When the signal is registered to the signal type. Preset signals Memory Preset signal No. If the input signal is...
... 43.436 H-pos V-pos 1696 35 SGI-5 53.316 50.062 S on G 1680 36 SXGA VESA 60 Hz 63.974 60.013 H-pos V-pos 1696 37 SXGA VESA 75 Hz 79.976 75.025 H-pos V-pos 1688 38 SXGA VESA 85 Hz 91.146 85.024 H-pos V-pos 1728 43 PC Component 480... adjustable/setting items Item Input signal Video or 15k RGB/ HDTV S video (Y/C) Component DOT - - You can not be set About the preset memory No. This projector automatically detects the signal type. When the signal is registered to the signal type. Preset signals Memory Preset signal No. If the input signal is...

Operating Instructions
Page 26
...Since the data is recalled from the 5BNC connector. Make fine adjustment by adjusting SIZE H. Signal Super Mac-2 SGI-1 Macintosh 19" Macintosh 21" Sony News PC-9821 1280 × 1024 WS Sunmicro Memory No. 23 23 25 28 36 36 37 SIZE H 1312 1320 1328 1456 1708 ...INPUT-A: COMPUTER AUTO INPUT SEL: OFF LANGUAGE: ENGLISH SPEAKER: ON POWER SAVING: OFF SIRCS RECEIVER: FRONT&REAR AUTO INPUT SEL When set to ON, the projector detects input signals in the following signals, you turn on -screen display. Available languages are: English, French, German, Italian, Spanish, Japanese and Chinese....
...Since the data is recalled from the 5BNC connector. Make fine adjustment by adjusting SIZE H. Signal Super Mac-2 SGI-1 Macintosh 19" Macintosh 21" Sony News PC-9821 1280 × 1024 WS Sunmicro Memory No. 23 23 25 28 36 36 37 SIZE H 1312 1320 1328 1456 1708 ...INPUT-A: COMPUTER AUTO INPUT SEL: OFF LANGUAGE: ENGLISH SPEAKER: ON POWER SAVING: OFF SIRCS RECEIVER: FRONT&REAR AUTO INPUT SEL When set to ON, the projector detects input signals in the following signals, you turn on -screen display. Available languages are: English, French, German, Italian, Spanish, Japanese and Chinese....
Operating Instructions
Page 27
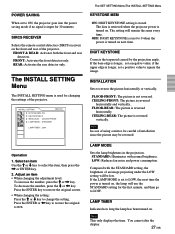
... MEM ON: DIGIT KEYSTONE setting is turned on. The data is retrieved when the projector power is stored. If the base edge is longer, set a positive value to ON, the projector goes into the power saving mode if no signal is input for changing the settings ... The picture is reversed vertically. To decrease the number, press the m or < key. STANDARD: Illuminates with the STANDARD setting, the brightness of the projector. Adjust an item • When changing the adjustment level: To increase the number, press the M or , key. Compared with normal brightness. If the...
... MEM ON: DIGIT KEYSTONE setting is turned on. The data is retrieved when the projector power is stored. If the base edge is longer, set a positive value to ON, the projector goes into the power saving mode if no signal is input for changing the settings ... The picture is reversed vertically. To decrease the number, press the m or < key. STANDARD: Illuminates with the STANDARD setting, the brightness of the projector. Adjust an item • When changing the adjustment level: To increase the number, press the M or , key. Compared with normal brightness. If the...
Operating Instructions
Page 28
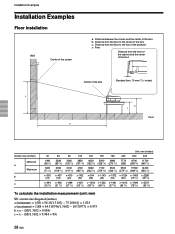
... lens b: Distance from the floor to the center of the lens Wall Center of the screen c: Distance from the floor to the foot of the projector x: Free Distance from the front of the cabinet and the center of the lens Center of the lens Standard lens: 10 mm (13/32 inches...
... lens b: Distance from the floor to the center of the lens Wall Center of the screen c: Distance from the floor to the foot of the projector x: Free Distance from the front of the cabinet and the center of the lens Center of the lens Standard lens: 10 mm (13/32 inches...

Operating Instructions
Page 29
For ceiling installation, consult with qualified Sony personnel. Installation Installation Examples Ceiling Installation When installing the projector on the ceiling, use the PSS-610 Projector Suspension Support. a: Distance between the screen and the center of the lens b: Distance between the ceiling and the ...center of the lens x: Distance between the ceiling and the center of the screen PSS-610 Projector Suspension Support (not supplied) ,,,,,,,,, x Wall a Center of the screen Ceiling b Center of the lens Distance from the front of ...
For ceiling installation, consult with qualified Sony personnel. Installation Installation Examples Ceiling Installation When installing the projector on the ceiling, use the PSS-610 Projector Suspension Support. a: Distance between the screen and the center of the lens b: Distance between the ceiling and the ...center of the lens x: Distance between the ceiling and the center of the screen PSS-610 Projector Suspension Support (not supplied) ,,,,,,,,, x Wall a Center of the screen Ceiling b Center of the lens Distance from the front of ...
Operating Instructions
Page 30
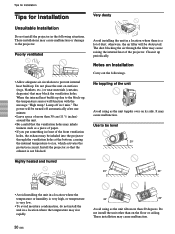
...prevent internal heat build-up periodically. Clean it up . Do not place the unit on Installation Carry out the followings. Install the projector so that may inhale tininess such as the unit topples over on the floor or ceiling. Poorly ventilated • Allow adequate air...than on its side. UVWTips for Installation Tips for Installation Very dusty Unsuitable Installation Do not install the projector in a location where there is a lot of the projector. These installations may cause raising the internal heat of dust; Avoid installing the unit in the following ...
...prevent internal heat build-up periodically. Clean it up . Do not place the unit on Installation Carry out the followings. Install the projector so that may inhale tininess such as the unit topples over on the floor or ceiling. Poorly ventilated • Allow adequate air...than on its side. UVWTips for Installation Tips for Installation Very dusty Unsuitable Installation Do not install the projector in a location where there is a lot of the projector. These installations may cause raising the internal heat of dust; Avoid installing the unit in the following ...


