
User Manual
Page 1
4-148-278-12 (1) Data Projector Operating Instructions Before operating the unit, please read this manual thoroughly and retain it for future reference. Please check with your local Sony Authorized Dealer. © 2009 Sony Corporation VPL-TX70 VPL-TX7 Not all models are available in all countries and area.
4-148-278-12 (1) Data Projector Operating Instructions Before operating the unit, please read this manual thoroughly and retain it for future reference. Please check with your local Sony Authorized Dealer. © 2009 Sony Corporation VPL-TX70 VPL-TX7 Not all models are available in all countries and area.
User Manual
Page 4
.../Front 11 Rear/Bottom 11 Control Panel 13 Connector Panel 15 Remote Commander 16 Projecting the Picture Installing the Projector 18 Connecting the Projector 19 Connecting a Computer 19 Connecting a VCR 20 Projecting 21 Turning Off the Power 23 Convenient Functions Selecting ...Computer or a Network 42 Connecting the Projector to a Computer 42 Connecting the Projector to a Local Network 43 Accessing the Projector from a Computer 43 Checking the Status of the Projector 44 Controlling the Projector from a Computer 44 Setting up the Projector 45 Setting the Network Password ....45 ...
.../Front 11 Rear/Bottom 11 Control Panel 13 Connector Panel 15 Remote Commander 16 Projecting the Picture Installing the Projector 18 Connecting the Projector 19 Connecting a Computer 19 Connecting a VCR 20 Projecting 21 Turning Off the Power 23 Convenient Functions Selecting ...Computer or a Network 42 Connecting the Projector to a Computer 42 Connecting the Projector to a Local Network 43 Accessing the Projector from a Computer 43 Checking the Status of the Projector 44 Controlling the Projector from a Computer 44 Setting up the Projector 45 Setting the Network Password ....45 ...

User Manual
Page 6
... it is desirable to a dark color. If voltage adaptation is required, consult with qualified Sony personnel. • Should any windows that face the screen with opaque draperies. • It is not to the projector. Cleaning Before cleaning Be sure to the "Cleaning the Air Filter" on the cabinet.... outlet should not be removed with a soft cloth such as they will damage the lens surface. Stubborn stains may impair the performance of the projector, take care with water. • Never use solvent such as alcohol, benzene or thinner, or acid, alkaline or abrasive detergent, or chemical...
... it is desirable to a dark color. If voltage adaptation is required, consult with qualified Sony personnel. • Should any windows that face the screen with opaque draperies. • It is not to the projector. Cleaning Before cleaning Be sure to the "Cleaning the Air Filter" on the cabinet.... outlet should not be removed with a soft cloth such as they will damage the lens surface. Stubborn stains may impair the performance of the projector, take care with water. • Never use solvent such as alcohol, benzene or thinner, or acid, alkaline or abrasive detergent, or chemical...

User Manual
Page 7
...8226; Allow adequate air circulation to the unit. When internal heat builds up . Notes on Installation and Usage Unsuitable Installation Do not install the projector in contact with a rubber or vinyl resin product for a long period of time, the finish of dust. You may cause a malfunction or... using high-precision technology. When the images are the same models. Do not place the unit on the LCD data projector. LCD data projector This LCD data projector is a normal result of the manufacturing process and does not indicate a malfunction. Notes on Installation and Usage 7
...8226; Allow adequate air circulation to the unit. When internal heat builds up . Notes on Installation and Usage Unsuitable Installation Do not install the projector in contact with a rubber or vinyl resin product for a long period of time, the finish of dust. You may cause a malfunction or... using high-precision technology. When the images are the same models. Do not place the unit on the LCD data projector. LCD data projector This LCD data projector is a normal result of the manufacturing process and does not indicate a malfunction. Notes on Installation and Usage 7
User Manual
Page 8
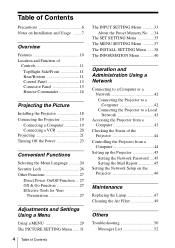
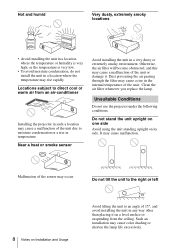
... unit upright on one side Avoid using the unit standing upright on a level surface or suspending from an air-conditioner Installing the projector in such a location may rise rapidly. It may cause color shading or shorten the lamp life excessively. Such an installation may ...cause malfunction. Unsuitable Conditions Do not use the projector under the following conditions. Hot and humid Very dusty, extremely smoky locations • Avoid installing the unit in a location where the ...
... unit upright on one side Avoid using the unit standing upright on a level surface or suspending from an air-conditioner Installing the projector in such a location may rise rapidly. It may cause color shading or shorten the lamp life excessively. Such an installation may ...cause malfunction. Unsuitable Conditions Do not use the projector under the following conditions. Hot and humid Very dusty, extremely smoky locations • Avoid installing the unit in a location where the ...
User Manual
Page 9
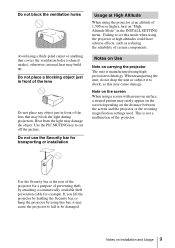
... using a thick-piled carpet or anything that may block the light during projection. Failing to shock, as reducing the reliability of the projector. otherwise, internal heat may damage the object. Do not use the Security bar for transporting or installation Usage at High Altitude When using the...theft, by using this mode when using a screen with an uneven surface, a striped pattern may rarely appear on the screen depending on carrying the projector The unit is not a malfunction of certain components. Do not place a blocking object just in front of the lens Do not place any object...
... using a thick-piled carpet or anything that may block the light during projection. Failing to shock, as reducing the reliability of the projector. otherwise, internal heat may damage the object. Do not use the Security bar for transporting or installation Usage at High Altitude When using the...theft, by using this mode when using a screen with an uneven surface, a striped pattern may rarely appear on the screen depending on carrying the projector The unit is not a malfunction of certain components. Do not place a blocking object just in front of the lens Do not place any object...
User Manual
Page 10
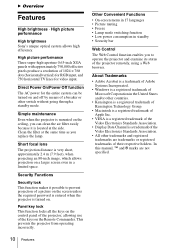
..., and 750 horizontal TV lines for the entire system can clean the air filter easily because it possible to operate the projector and examine its status of a breaker or other trademarks and registered trademarks are not specified. 10 Features Other Convenient Functions ... Association. • Display Data Channel is turned on and off by means of the projector remotely, using a Web browser. B Overview Features High brightness · High picture performance High brightness Sony's unique optical system allows high efficiency. About Trademarks • Adobe Acrobat is a trademark...
..., and 750 horizontal TV lines for the entire system can clean the air filter easily because it possible to operate the projector and examine its status of a breaker or other trademarks and registered trademarks are not specified. 10 Features Other Convenient Functions ... Association. • Display Data Channel is turned on and off by means of the projector remotely, using a Web browser. B Overview Features High brightness · High picture performance High brightness Sony's unique optical system allows high efficiency. About Trademarks • Adobe Acrobat is a trademark...
User Manual
Page 13
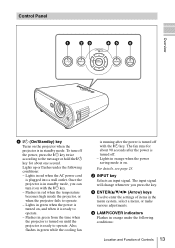
... according to enter the settings of Controls 13 d LAMP/COVER indicators Flashes in red when the temperature becomes high inside the projector, or when the projector fails to operate. Flashes in orange under the following conditions: Location and Function of items in red when the AC power...after the power is turned off with the ?/1 key. - Control Panel 1 23 45 6 Overview a ?/1 (On/Standby) key Turns on the projector when the projector is in green while the cooling fan is running after the power is turned off. - Also, flashes in standby mode. c ENTER/v/V/b/B (Arrow) keys...
... according to enter the settings of Controls 13 d LAMP/COVER indicators Flashes in red when the temperature becomes high inside the projector, or when the projector fails to operate. Flashes in orange under the following conditions: Location and Function of items in red when the AC power...after the power is turned off with the ?/1 key. - Control Panel 1 23 45 6 Overview a ?/1 (On/Standby) key Turns on the projector when the projector is in green while the cooling fan is running after the power is turned off. - Also, flashes in standby mode. c ENTER/v/V/b/B (Arrow) keys...
User Manual
Page 15
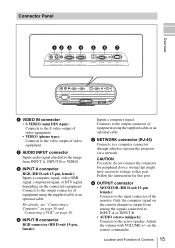
... connector Inputs audio signal attached to the image from among the signals connected to INPUT A or INPUT B. • AUDIO (stereo minijack): Connects to operate the projector via a network.
... connector Inputs audio signal attached to the image from among the signals connected to INPUT A or INPUT B. • AUDIO (stereo minijack): Connects to operate the projector via a network.
User Manual
Page 16
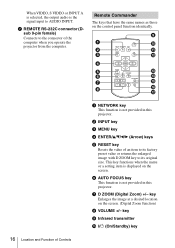
... an item to its factory preset value or returns the enlarged image with D ZOOM key to the connector of the computer when you operate the projector from the computer. b INPUT key c MENU key d ENTER/v/V/b/B (Arrow) keys e RESET key Resets the value of Controls g D ZOOM (Digital Zoom) +/- Remote .../TILT PIC MUTING D ZOOM VOLUME FREEZE AUDIO MUTING qd qf qg qh qj a NETWORK key This function is not provided in this projector. f AUTO FOCUS key This function is not provided in this projector. g REMOTE RS-232C connector (Dsub 9-pin female) Connects to its original size.
... an item to its factory preset value or returns the enlarged image with D ZOOM key to the connector of the computer when you operate the projector from the computer. b INPUT key c MENU key d ENTER/v/V/b/B (Arrow) keys e RESET key Resets the value of Controls g D ZOOM (Digital Zoom) +/- Remote .../TILT PIC MUTING D ZOOM VOLUME FREEZE AUDIO MUTING qd qf qg qh qj a NETWORK key This function is not provided in this projector. f AUTO FOCUS key This function is not provided in this projector. g REMOTE RS-232C connector (Dsub 9-pin female) Connects to its original size.
User Manual
Page 17
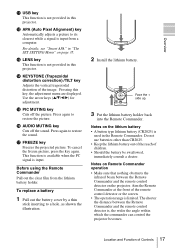
... shown the illustration. 2 Install the lithium battery. q FREEZE key Freezes the projected picture. This function is available when the PC signal is used in this projector. To replace a battery 1 Pull out the battery cover by a thin stick inserting to restore the sound. Face the + side up. 3 Put the ... the infrared beam between the Remote Commander and the remote control detector is, the wider the angle within which the commander can control the projector becomes. Do not use batteries other than CR2025. • Keep the lithium battery out of the reach of the remote control detector or...
... shown the illustration. 2 Install the lithium battery. q FREEZE key Freezes the projected picture. This function is available when the PC signal is used in this projector. To replace a battery 1 Pull out the battery cover by a thin stick inserting to restore the sound. Face the + side up. 3 Put the ... the infrared beam between the Remote Commander and the remote control detector is, the wider the angle within which the commander can control the projector becomes. Do not use batteries other than CR2025. • Keep the lithium battery out of the reach of the remote control detector or...

User Manual
Page 18
....1) (23.0) (28.9) (34.5) There may be a slight difference between the lens and the screen varies depending on page 59. 18 Installing the Projector B Projecting the Picture Installing the Projector The distance between the actual value and the design value shown in the table above. Screen Distance between the screen and the center...
....1) (23.0) (28.9) (34.5) There may be a slight difference between the lens and the screen varies depending on page 59. 18 Installing the Projector B Projecting the Picture Installing the Projector The distance between the actual value and the design value shown in the table above. Screen Distance between the screen and the center...
User Manual
Page 19
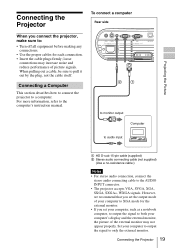
...sure to a computer. Connecting a Computer This section describes how to connect the projector to pull it out by the plug, not the cable itself. Connecting the Projector 19 Projecting the Picture Connecting the Projector To connect a computer Rear side When you set the output mode of picture...8226; Turn off all equipment before making any connections. • Use the proper cables for the external monitor. • If you connect the projector, make sure to the computer's instruction manual. to monitor output Computer to audio input 1 HD D-sub 15-pin cable (supplied) 2 Stereo audio...
...sure to a computer. Connecting a Computer This section describes how to connect the projector to pull it out by the plug, not the cable itself. Connecting the Projector 19 Projecting the Picture Connecting the Projector To connect a computer Rear side When you set the output mode of picture...8226; Turn off all equipment before making any connections. • Use the proper cables for the external monitor. • If you connect the projector, make sure to the computer's instruction manual. to monitor output Computer to audio input 1 HD D-sub 15-pin cable (supplied) 2 Stereo audio...
User Manual
Page 20
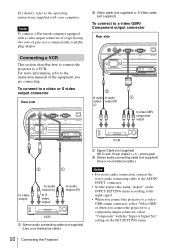
...audio output (L) to S video output to audio output (R) VCR 1 Stereo audio connecting cable (not supplied) (Use a no-resistance cable.) 20 Connecting the Projector VCR 1 Signal Cable (not supplied) HD D-sub 15-pin (male) ↔ 3 × phono jack 2 Stereo audio connecting cable (not supplied) (.... Note To connect a Macintosh computer equipped with a video output connector of a type having two rows of the equipment you connect the projector to a component output connector, select "Component" with your computer. For details, refer to the operating instructions supplied with the "Input-A ...
...audio output (L) to S video output to audio output (R) VCR 1 Stereo audio connecting cable (not supplied) (Use a no-resistance cable.) 20 Connecting the Projector VCR 1 Signal Cable (not supplied) HD D-sub 15-pin (male) ↔ 3 × phono jack 2 Stereo audio connecting cable (not supplied) (.... Note To connect a Macintosh computer equipped with a video output connector of a type having two rows of the equipment you connect the projector to a component output connector, select "Component" with your computer. For details, refer to the operating instructions supplied with the "Input-A ...
User Manual
Page 21
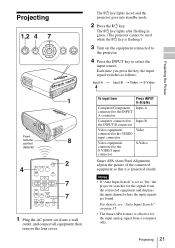
... equipment so that it is effective for the input analog signal from a computer only. Projecting 1,2 4 7 The ?/1 key lights in green. (The projector cannot be used while the ?/1 key is flashing.) 3 Turn on page 35. • The Smart APA feature is projected clearly. Each time you ... MUTING 7 7 1 Plug the AC power cord into standby mode. 2 Press the ?/1 key. The ?/1 key lights after flashing in red and the projector goes into a wall outlet, and connect all equipment, then remove the lens cover. Projecting 21 To input from the connected equipment and displays the input...
... equipment so that it is effective for the input analog signal from a computer only. Projecting 1,2 4 7 The ?/1 key lights in green. (The projector cannot be used while the ?/1 key is flashing.) 3 Turn on page 35. • The Smart APA feature is projected clearly. Each time you ... MUTING 7 7 1 Plug the AC power cord into standby mode. 2 Press the ?/1 key. The ?/1 key lights after flashing in red and the projector goes into a wall outlet, and connect all equipment, then remove the lens cover. Projecting 21 To input from the connected equipment and displays the input...
User Manual
Page 22
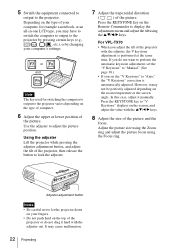
...distortion ( ) of your fingers. • Do not push hard on the room temperature or the screen angle. Use the adjuster to the projector. If you do not drag it manually. Adjust the picture size using the Zoom ring and adjust the picture focus using the v/V/b/B keys. ..., the V keystone adjustment is automatically adjusted. For VPL-TX70 • When you set the "V Keystone" to "Manual." (See page 38.) • If you adjust the tilt of the projector with the v/V/b/B keys. 8 Adjust the size of the projector or do not want to perform the automatic keystone adjustment...
...distortion ( ) of your fingers. • Do not push hard on the room temperature or the screen angle. Use the adjuster to the projector. If you do not drag it manually. Adjust the picture size using the Zoom ring and adjust the picture focus using the v/V/b/B keys. ..., the V keystone adjustment is automatically adjusted. For VPL-TX70 • When you set the "V Keystone" to "Manual." (See page 38.) • If you adjust the tilt of the projector with the v/V/b/B keys. 8 Adjust the size of the projector or do not want to perform the automatic keystone adjustment...

User Manual
Page 24
To change the menu language, proceed as follows: 1 24 Selecting the Menu Language Front remote control detector 3 INPUT NETWORK USB MENU APA 2 ENTER RESET KEYSTONE AUTO FOCUS LENS /TILT PIC MUTING D ZOOM VOLUME FREEZE AUDIO MUTING 4,5,6 1 Plug the AC power cord into a wall outlet. 2 Press the ?/1 key to turn on -screen displays. B Convenient Functions Selecting the Menu Language 2 4,5,6 3 You can select one of seventeen languages for displaying the menu and other on the projector. The factory setting is English.
To change the menu language, proceed as follows: 1 24 Selecting the Menu Language Front remote control detector 3 INPUT NETWORK USB MENU APA 2 ENTER RESET KEYSTONE AUTO FOCUS LENS /TILT PIC MUTING D ZOOM VOLUME FREEZE AUDIO MUTING 4,5,6 1 Plug the AC power cord into a wall outlet. 2 Press the ?/1 key to turn on -screen displays. B Convenient Functions Selecting the Menu Language 2 4,5,6 3 You can select one of seventeen languages for displaying the menu and other on the projector. The factory setting is English.
User Manual
Page 26
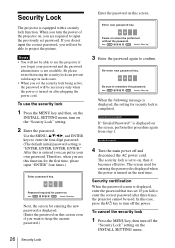
... new password is turned on this screen. The screen used . To cancel the security lock 1 Press the MENU key, then turn the power of the projector on . Use: Cancel: Other key Next, the screen for security lock is "ENTER, ENTER, ENTER, ENTER." When you forget your own password. Therefore... lock 1 Press the MENU key and then, on the INSTALL SETTING menu, turn off the "Security Lock" setting on after three times, the projector cannot be performed without the password. Enter new password key. If "Invalid Password!" Be please aware that was set to on the screen, perform ...
... new password is turned on this screen. The screen used . To cancel the security lock 1 Press the MENU key, then turn the power of the projector on . Use: Cancel: Other key Next, the screen for security lock is "ENTER, ENTER, ENTER, ENTER." When you forget your own password. Therefore... lock 1 Press the MENU key and then, on the INSTALL SETTING menu, turn off the "Security Lock" setting on after three times, the projector cannot be performed without the password. Enter new password key. If "Invalid Password!" Be please aware that was set to on the screen, perform ...
User Manual
Page 27
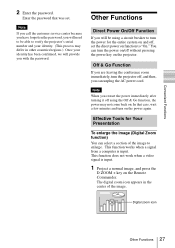
... restart the power immediately after turning it off without pressing the power key on . Enter the password that case, wait a few minutes and turn the projector off , set . Note When you can select a section of the image. Digital zoom icon Other Functions 27 This function works when a signal from a computer is... the Remote Commander. The digital zoom icon appears in other countries/regions.) Once your identity has been confirmed, we will be able to verify the projector's serial number and your identity. (This process may not come back on the...
... restart the power immediately after turning it off without pressing the power key on . Enter the password that case, wait a few minutes and turn the projector off , set . Note When you can select a section of the image. Digital zoom icon Other Functions 27 This function works when a signal from a computer is... the Remote Commander. The digital zoom icon appears in other countries/regions.) Once your identity has been confirmed, we will be able to verify the projector's serial number and your identity. (This process may not come back on the...
User Manual
Page 29
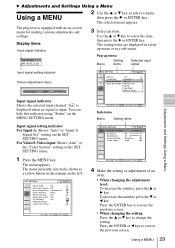
... an item. • When changing the adjustment level: To increase the number, press the v or B key. To decrease the number, press the V or b key. The projector is equipped with an on the left Start Up Image Bottom Left Center Top Right Bottom Right Adjustments and Settings Using a Menu Input signal indicator...
... an item. • When changing the adjustment level: To increase the number, press the v or B key. To decrease the number, press the V or b key. The projector is equipped with an on the left Start Up Image Bottom Left Center Top Right Bottom Right Adjustments and Settings Using a Menu Input signal indicator...


