

Users Guide
Page 2
... 20 Specifications 21 Troubleshooting guide 22 2 Best Tuning Memory (BTM 7 Memorizing only the desired stations 8 Receiving the memorized stations 8 RDS (XR-5890R/5880R only) Overview of controls 3 Getting Started Resetting the unit 4 Detaching the front panel 4 Setting the clock 5 Cassette Player Listening to traffic announcements 12 Presetting the RDS stations with the AF and TA data 12 Locating a station by programme type .......... 13 Setting the clock automatically 14 Other Functions...
... 20 Specifications 21 Troubleshooting guide 22 2 Best Tuning Memory (BTM 7 Memorizing only the desired stations 8 Receiving the memorized stations 8 RDS (XR-5890R/5880R only) Overview of controls 3 Getting Started Resetting the unit 4 Detaching the front panel 4 Setting the clock 5 Cassette Player Listening to traffic announcements 12 Presetting the RDS stations with the AF and TA data 12 Locating a station by programme type .......... 13 Setting the clock automatically 14 Other Functions...
Users Guide
Page 3
...seek/Automatic Music Sensor/manual search) control 6, 8, 11, 14 2 MODE (*) button During tape playback: Playback direction change 6 During radio reception: BAND select 7, 8 3 SOURCE (TAPE/TUNER) button 6, 7, 8, 12 4 Dial (volume/bass/treble/left-right/rearfront control) 5, 17 5 SOUND button 17 6 Display window 7 DSPL (display mode change) button 6, 9, 10 8 6 (eject) button 6 9 PTY button* RDS Programme 14 !º PRST button During radio reception: Preset stations select 8 !¡ AF/TA button* 10, 11, 12, 13 !™ RELEASE (front panel release) button 4, 20 !£ Reset button (located on...
...seek/Automatic Music Sensor/manual search) control 6, 8, 11, 14 2 MODE (*) button During tape playback: Playback direction change 6 During radio reception: BAND select 7, 8 3 SOURCE (TAPE/TUNER) button 6, 7, 8, 12 4 Dial (volume/bass/treble/left-right/rearfront control) 5, 17 5 SOUND button 17 6 Display window 7 DSPL (display mode change) button 6, 9, 10 8 6 (eject) button 6 9 PTY button* RDS Programme 14 !º PRST button During radio reception: Preset stations select 8 !¡ AF/TA button* 10, 11, 12, 13 !™ RELEASE (front panel release) button 4, 20 !£ Reset button (located on...

Users Guide
Page 4
... hard or put excessive pressure on the display window of the front panel. • Do not expose the front panel to direct sunlight or heat sources such as hot air ducts, and do not leave it in temperature. a b Reset button Note Pressing the reset button will turn the ignition key switch to...in direct sunlight or where there may be a considerable rise in a humid place. Caution alarm If you turn off towards you , use the supplied front panel case. 4 Resetting the unit Before operating the unit for a few seconds (only when the POWER SELECT switch on the dashboard of the unit is set ...
... hard or put excessive pressure on the display window of the front panel. • Do not expose the front panel to direct sunlight or heat sources such as hot air ducts, and do not leave it in temperature. a b Reset button Note Pressing the reset button will turn the ignition key switch to...in direct sunlight or where there may be a considerable rise in a humid place. Caution alarm If you turn off towards you , use the supplied front panel case. 4 Resetting the unit Before operating the unit for a few seconds (only when the POWER SELECT switch on the dashboard of the unit is set ...

Users Guide
Page 5
After the clock setting is complete, the display returns to the B position, turn the power on the bottom of the unit is set to normal playback mode. The minute indication flashes. 4 Set the minute. The hour indication flashes. 2 Set the hour. Note If the POWER SELECT switch on first, then set the clock to 10:08 1 Press (SHIFT), then press (2) (SET UP) repeatedly until "CLOCK" appears. 1 Press...
After the clock setting is complete, the display returns to the B position, turn the power on the bottom of the unit is set to normal playback mode. The minute indication flashes. 4 Set the minute. The hour indication flashes. 2 Set the hour. Note If the POWER SELECT switch on first, then set the clock to 10:08 1 Press (SHIFT), then press (2) (SET UP) repeatedly until "CLOCK" appears. 1 Press...
Users Guide
Page 6
... Motion Display mode after a few seconds. Locating a specific track - Changing the display item Each time you press (DSPL), the item changes as follows: z Tape playback z Clock Frequency*Z * While either of low volume or quiet sections. Tip The Motion Display mode can skip up or down and release for each track you select the desired item, the display will automatically change the tape's playback direction, press (MODE) (*). there is played. Playback...
... Motion Display mode after a few seconds. Locating a specific track - Changing the display item Each time you press (DSPL), the item changes as follows: z Tape playback z Clock Frequency*Z * While either of low volume or quiet sections. Tip The Motion Display mode can skip up or down and release for each track you select the desired item, the display will automatically change the tape's playback direction, press (MODE) (*). there is played. Playback...
Users Guide
Page 7
... CrO2 tape. • BL SKP (Blank Skip) skips blanks longer than eight seconds. • ATA (Automatic Tuner Activation) turns on the tuner automatically when fast-winding the tape. 1 During playback, press (SHIFT). Play mode starts. 4 Press (SHIFT). To return to normal playback mode, select "OFF" in stations while driving, use Best Tuning Memory to prevent accidents. 1 Press (SOURCE) repeatedly to complete the mode setting. Radio Memorizing stations automatically...
... CrO2 tape. • BL SKP (Blank Skip) skips blanks longer than eight seconds. • ATA (Automatic Tuner Activation) turns on the tuner automatically when fast-winding the tape. 1 During playback, press (SHIFT). Play mode starts. 4 Press (SHIFT). To return to normal playback mode, select "OFF" in stations while driving, use Best Tuning Memory to prevent accidents. 1 Press (SOURCE) repeatedly to complete the mode setting. Radio Memorizing stations automatically...

Users Guide
Page 8
.... 1 Press (SOURCE) repeatedly to select the tuner. 2 Press (MODE) repeatedly to select the band. 3 Push the SEEK/AMS control up or down and hold the desired number button ((1) to (6)) until "MEM" appears. Press (SHIFT). To return to select "LOCAL-ON." Then press (4) (n) to normal mode, select "MONOOFF" in the memory (Preset Search Function). Tip If you know the frequency of (PRST) to store another station on...
.... 1 Press (SOURCE) repeatedly to select the tuner. 2 Press (MODE) repeatedly to select the band. 3 Push the SEEK/AMS control up or down and hold the desired number button ((1) to (6)) until "MEM" appears. Press (SHIFT). To return to select "LOCAL-ON." Then press (4) (n) to normal mode, select "MONOOFF" in the memory (Preset Search Function). Tip If you know the frequency of (PRST) to store another station on...

Users Guide
Page 9
... in the display. Tip The Motion Display mode can be turned off. (See "Changing the sound and display settings" on the country or region, not all the above items are just a few: retuning the same programme automatically, listening to the Motion Display mode after a few seconds. Displaying the station name The name of the RDS function Radio Data System (RDS) is being received. 9 Select an FM station (page...
... in the display. Tip The Motion Display mode can be turned off. (See "Changing the sound and display settings" on the country or region, not all the above items are just a few: retuning the same programme automatically, listening to the Motion Display mode after a few seconds. Displaying the station name The name of the RDS function Radio Data System (RDS) is being received. 9 Select an FM station (page...
Users Guide
Page 10
In the Motion Display mode, all the above items are scrolled in the display one in a network. Tip The Motion Display mode can continuously listen to the same programme during a longdistance drive without having to retune the station manually. By using this function, you select the desired item, the display will automatically change automatically. 98.5MHz 96.0MHz Station 102.5MHz 1 Select an FM station (page 7). 2 Press (AF...
In the Motion Display mode, all the above items are scrolled in the display one in a network. Tip The Motion Display mode can continuously listen to the same programme during a longdistance drive without having to retune the station manually. By using this function, you select the desired item, the display will automatically change automatically. 98.5MHz 96.0MHz Station 102.5MHz 1 Select an FM station (page 7). 2 Press (AF...

Users Guide
Page 11
... starts searching for another frequency, "NO PI" appears, and the unit returns to the previously selected frequency. To return to regional on, select "REG-ON" in the network. • If the station name starts flashing after selecting a station with the same PI (Programme Identification) data ("PI SEEK" appears and no alternative frequency is received. 11 Note This function does not work in the United Kingdom...
... starts searching for another frequency, "NO PI" appears, and the unit returns to the previously selected frequency. To return to regional on, select "REG-ON" in the network. • If the station name starts flashing after selecting a station with the same PI (Programme Identification) data ("PI SEEK" appears and no alternative frequency is received. 11 Note This function does not work in the United Kingdom...

Users Guide
Page 12
... for a station that is over . When a traffic announcement starts, the volume will be automatically adjusted to the preset level. 1 Select the desired volume level. 2 Press (AF/TA) for all traffic announcements, turn on . The unit will then automatically switch to these announcements no matter which source you are listening to a source other than the radio, the emergency announcements will be heard if you set AF...
... for a station that is over . When a traffic announcement starts, the volume will be automatically adjusted to the preset level. 1 Select the desired volume level. 2 Press (AF/TA) for all traffic announcements, turn on . The unit will then automatically switch to these announcements no matter which source you are listening to a source other than the radio, the emergency announcements will be heard if you set AF...

Users Guide
Page 13
... want to change the preset AF and/or TA setting after you tune in the preset station, you want by turning the AF or TA function on or off. Note that selecting "AF TA-OFF" stores not only RDS stations, but also non-RDS stations. 3 Press (SHIFT), then press (3) (PLAY MODE) repeatedly until "B.T.M" appears. 4 Press (4) (n) until "MEM" appears. Presetting different settings for each preset station 1 Select an...
... want to change the preset AF and/or TA setting after you tune in the preset station, you want by turning the AF or TA function on or off. Note that selecting "AF TA-OFF" stores not only RDS stations, but also non-RDS stations. 3 Press (SHIFT), then press (3) (PLAY MODE) repeatedly until "B.T.M" appears. 4 Press (4) (n) until "MEM" appears. Presetting different settings for each preset station 1 Select an...
Users Guide
Page 14
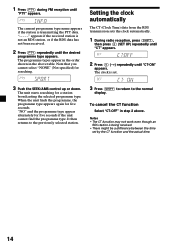
... from the RDS transmission sets the clock automatically. 1 During radio reception, press (SHIFT), then press (2) (SET UP) repeatedly until "CT" appears. 2 Press (4) (n) repeatedly until "PTY" appears. Notes • The CT function may not work even though an RDS station is being received. • There might be a difference between the time set . 3 Push the SEEK/AMS control up or down...
... from the RDS transmission sets the clock automatically. 1 During radio reception, press (SHIFT), then press (2) (SET UP) repeatedly until "CT" appears. 2 Press (4) (n) repeatedly until "PTY" appears. Notes • The CT function may not work even though an RDS station is being received. • There might be a difference between the time set . 3 Push the SEEK/AMS control up or down...
Users Guide
Page 15
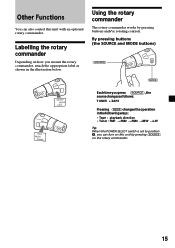
... works by pressing (SOURCE) on the rotary commander. 15 Other Functions You can turn on this unit with an optional rotary commander. By pressing buttons (the SOURCE and MODE buttons) (SOURCE) (MODE) SOUND MODE DSPL DSPL MODE SOUND Each time you press (SOURCE), the source changes as follows: TUNER ˜TAPE Pressing (MODE)changestheoperation in the following ways; • Tape : playback direction • Tuner : FM1 nFM2 nFM3 nMW nLW Tip When the POWER SELECT switch is set...
... works by pressing (SOURCE) on the rotary commander. 15 Other Functions You can turn on this unit with an optional rotary commander. By pressing buttons (the SOURCE and MODE buttons) (SOURCE) (MODE) SOUND MODE DSPL DSPL MODE SOUND Each time you press (SOURCE), the source changes as follows: TUNER ˜TAPE Pressing (MODE)changestheoperation in the following ways; • Tape : playback direction • Tuner : FM1 nFM2 nFM3 nMW nLW Tip When the POWER SELECT switch is set...
Users Guide
Page 16
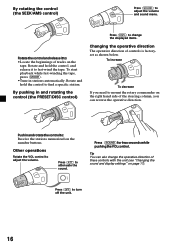
... also change the displayed items. Changing the operative direction The operative direction of these controls with the unit (see "Changing the sound and display settings" on page 17). Push in stations automatically. To start playback while fast-winding the tape, press (MODE). •Tune in and rotate the control to adjust the volume and sound menu. By rotating the control (the SEEK/AMS control) Press (SOUND) to : Receive the stations memorized on the number buttons.
... also change the displayed items. Changing the operative direction The operative direction of these controls with the unit (see "Changing the sound and display settings" on page 17). Push in stations automatically. To start playback while fast-winding the tape, press (MODE). •Tune in and rotate the control to adjust the volume and sound menu. By rotating the control (the SEEK/AMS control) Press (SOUND) to : Receive the stations memorized on the number buttons.
Users Guide
Page 17
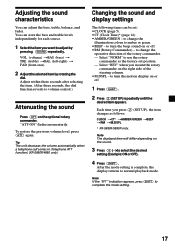
... the bass and treble levels independently for each source. 1 Selecttheitemyouwanttoadjustby pressing (SOUND)repeatedly. to turn the beep sound on or off . • RM (Rotary Commander) - to turn the motion display on or off . 1 Press (SHIFT). 2 Press (2)(SETUP)repeatedlyuntilthe desired item appears. After the mode setting is complete, the display returns to volume control.) Attenuating the sound Press (ATT) on the right side of the rotary commander. - Adjust within...
... the bass and treble levels independently for each source. 1 Selecttheitemyouwanttoadjustby pressing (SOUND)repeatedly. to turn the beep sound on or off . • RM (Rotary Commander) - to turn the motion display on or off . 1 Press (SHIFT). 2 Press (2)(SETUP)repeatedlyuntilthe desired item appears. After the mode setting is complete, the display returns to volume control.) Attenuating the sound Press (ATT) on the right side of the rotary commander. - Adjust within...

Users Guide
Page 18
... parked in direct sunlight resulting in a considerable rise in the display. D-BASS 3 D-BASS 2 D-BASS 1 0dB Frequency (Hz) Adjusting the bass curve Turn the D-BASS control to OFF. Sugary residues on this manual, please consult your nearest Sony dealer. D-bass You can hear the bass line more clearly even while the vocal volume remains the same. If everything is not a sign of a two-speaker system, set the fader control to...
... parked in direct sunlight resulting in a considerable rise in the display. D-BASS 3 D-BASS 2 D-BASS 1 0dB Frequency (Hz) Adjusting the bass curve Turn the D-BASS control to OFF. Sugary residues on this manual, please consult your nearest Sony dealer. D-bass You can hear the bass line more clearly even while the vocal volume remains the same. If everything is not a sign of a two-speaker system, set the fader control to...
Users Guide
Page 19
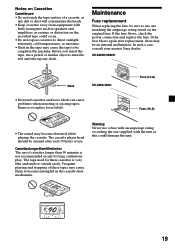
... the fuse blows, check the power connection and replace the fuse. Warning Never use of these cassettes is not recommended except for long continuous play. XR-5890R/5880R: Slack XR-4890/4880: •Distorted cassettes and loose labels can cause problems when inserting or ejecting tapes. The tape used for these tapes may cause the tape to be sure to use a pencil or similar object to turn the...
... the fuse blows, check the power connection and replace the fuse. Warning Never use of these cassettes is not recommended except for long continuous play. XR-5890R/5880R: Slack XR-4890/4880: •Distorted cassettes and loose labels can cause problems when inserting or ejecting tapes. The tape used for these tapes may cause the tape to be sure to use a pencil or similar object to turn the...
Users Guide
Page 21
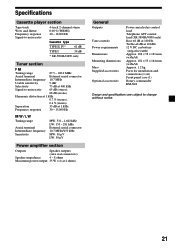
Specifications Cassette player section Tape track Wow and flutter Frequency response Signal-to-noise ratio 4-track 2-channel stereo 0.08 % (WRMS) 30 - 18,000 Hz Cassette type TYPE II, IV* 61 dB TYPE I 58 dB * XR-5890R/4890 only Tuner section FM Tuning range 87.5 - 108.0 MHz Aerial terminal External aerial connector Intermediate frequency 10.7 MHz Usable sensitivity 9 dBf Selectivity 75 dB at...
Specifications Cassette player section Tape track Wow and flutter Frequency response Signal-to-noise ratio 4-track 2-channel stereo 0.08 % (WRMS) 30 - 18,000 Hz Cassette type TYPE II, IV* 61 dB TYPE I 58 dB * XR-5890R/4890 only Tuner section FM Tuning range 87.5 - 108.0 MHz Aerial terminal External aerial connector Intermediate frequency 10.7 MHz Usable sensitivity 9 dBf Selectivity 75 dB at...
Users Guide
Page 22
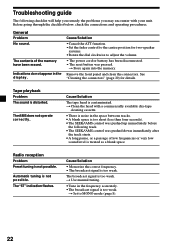
... flashes. The contents of low frequencies or very low sound level is not possible. The broadcast signal is too weak. The AMS does not operate correctly. n Set to adjust the volume. • The power cord or battery has been disconnected. • The reset button was pushed down immediately after the track starts. • A long pause, or a passage of the memory have been erased. Troubleshooting guide...
... flashes. The contents of low frequencies or very low sound level is not possible. The broadcast signal is too weak. The AMS does not operate correctly. n Set to adjust the volume. • The power cord or battery has been disconnected. • The reset button was pushed down immediately after the track starts. • A long pause, or a passage of the memory have been erased. Troubleshooting guide...


