
Product Instruction Manual
Page 3
...trimmer. KG, 2010 0458-284-8621-A. To receive maximum performance and satisfaction from your STIHL trimmer, it is equipped with the proper deflector and handle for your STIHL dealer or the STIHL distributor for the type of personal injury. For further information you read, understand and ...21 Maintenance and Care 23 Main Parts 24 Specifications 25 Special Accessories 26 Troubleshooting 27 Maintenance and Repairs 29 Battery Recycling 29 Disposal 29 Trademarks 30 Addresses 31 { FSA 65, FSA 85 English Allow only persons who fully understand this manual.
...trimmer. KG, 2010 0458-284-8621-A. To receive maximum performance and satisfaction from your STIHL trimmer, it is equipped with the proper deflector and handle for your STIHL dealer or the STIHL distributor for the type of personal injury. For further information you read, understand and ...21 Maintenance and Care 23 Main Parts 24 Specifications 25 Special Accessories 26 Troubleshooting 27 Maintenance and Repairs 29 Battery Recycling 29 Disposal 29 Trademarks 30 Addresses 31 { FSA 65, FSA 85 English Allow only persons who fully understand this manual.

Product Instruction Manual
Page 4
... illustration. Example: N Loosen the screw (1). N Lever (2) ... Such paragraphs are made from work area. 4. Engineering Improvements STIHL's philosophy is dusty. 6. Always use face or dust mask if operation is to continually improve all of a step or procedure... that refers directly to an illustration may contain paragraphs that require your STIHL dealer for any job except that appear in this manual. Indicates a risk of fire, electric shock and ... Starting - Be sure trigger switch is not depressed when inserting the battery. 2 FSA 65, FSA 85
... illustration. Example: N Loosen the screw (1). N Lever (2) ... Such paragraphs are made from work area. 4. Engineering Improvements STIHL's philosophy is dusty. 6. Always use face or dust mask if operation is to continually improve all of a step or procedure... that refers directly to an illustration may contain paragraphs that require your STIHL dealer for any job except that appear in this manual. Indicates a risk of fire, electric shock and ... Starting - Be sure trigger switch is not depressed when inserting the battery. 2 FSA 65, FSA 85

Product Instruction Manual
Page 5
... later in this manual when referring to reduce the risk of personal injury, make sure your unit is equipped with battery removed and retaining latch on your FSA model. The terminology utilized in these Safety Precautions, to the power tool reflects the types of injury at all times...Parts - A guard or other part that is damaged should be properly repaired or replaced by STIHL for which it will do the job better and with the proper handle and deflector for changing accessories. FSA 65, FSA 85 3 Don't Overreach - Maintain Trimmer With Care - out of reach of severe or...
... later in this manual when referring to reduce the risk of personal injury, make sure your unit is equipped with battery removed and retaining latch on your FSA model. The terminology utilized in these Safety Precautions, to the power tool reflects the types of injury at all times...Parts - A guard or other part that is damaged should be properly repaired or replaced by STIHL for which it will do the job better and with the proper handle and deflector for changing accessories. FSA 65, FSA 85 3 Don't Overreach - Maintain Trimmer With Care - out of reach of severe or...
Product Instruction Manual
Page 6
... a work break), shut it off and make sure that might impair vision, dexterity or judgment. Always remove the battery and move retaining latch to ƒ and remove the battery from all foreign objects (gravel, glass, wire, etc.) thrown back by strenuous work, check with solid foreign objects...tool. Do not operate this machine may result in use this machine. Tiredness may also ricochet and strike the operator. 4 FSA 65, FSA 85 English Have your STIHL dealer show you how to operate your power tool without the instruction manual. The use it comes in contact with your ...
... a work break), shut it off and make sure that might impair vision, dexterity or judgment. Always remove the battery and move retaining latch to ƒ and remove the battery from all foreign objects (gravel, glass, wire, etc.) thrown back by strenuous work, check with solid foreign objects...tool. Do not operate this machine may result in use this machine. Tiredness may also ricochet and strike the operator. 4 FSA 65, FSA 85 English Have your STIHL dealer show you how to operate your power tool without the instruction manual. The use it comes in contact with your ...

Product Instruction Manual
Page 7
... also "Before Starting Work." Use inert absorbent to generate heat, rupture or ignite. If possible without danger, remove battery from a safe distance. FSA 65, FSA 85 5 To reduce the risk of injury to your face STIHL recommends that it inside a vehicle in good condition before continuing work - For the cutting attachments authorized by your power...
... also "Before Starting Work." Use inert absorbent to generate heat, rupture or ignite. If possible without danger, remove battery from a safe distance. FSA 65, FSA 85 5 To reduce the risk of injury to your face STIHL recommends that it inside a vehicle in good condition before continuing work - For the cutting attachments authorized by your power...
Product Instruction Manual
Page 8
...use a charger with STIHL chargers. Warning! Keep a battery that is not used properly - Connect the charger only to cool down normally - Protect the charger from rain - short circuit. Never insert objects into the charger's cooling slots. 6 FSA 65, FSA 85 The battery contains safety features and... devices which, if damaged, may damage the battery. avoid contact with the voltage and frequency specified on the rating plate. If fluid...
...use a charger with STIHL chargers. Warning! Keep a battery that is not used properly - Connect the charger only to cool down normally - Protect the charger from rain - short circuit. Never insert objects into the charger's cooling slots. 6 FSA 65, FSA 85 The battery contains safety features and... devices which, if damaged, may damage the battery. avoid contact with the voltage and frequency specified on the rating plate. If fluid...

Product Instruction Manual
Page 9
... over, come in good condition. Have a damaged power supply cord repaired by an experienced electrician. To reduce the risk of fire. Never store the battery in an easily combustible environment - even when you . Before Starting Work Warning! Keep the handles clean and dry at all times; Warning! Check the... may be used unless absolutely necessary. The charger heats up the charger. Make sure the insulation of moisture, pitch, oil, grease 3905BA000 KN FSA 65, FSA 85 7 The trigger switch and the trigger switch lockout must be carried only in a hazardous location, i.e.
... over, come in good condition. Have a damaged power supply cord repaired by an experienced electrician. To reduce the risk of fire. Never store the battery in an easily combustible environment - even when you . Before Starting Work Warning! Keep the handles clean and dry at all times; Warning! Check the... may be used unless absolutely necessary. The charger heats up the charger. Make sure the insulation of moisture, pitch, oil, grease 3905BA000 KN FSA 65, FSA 85 7 The trigger switch and the trigger switch lockout must be carried only in a hazardous location, i.e.

Product Instruction Manual
Page 10
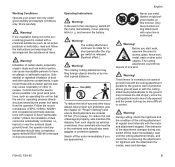
... and left hand on the loop handle. 3905BA001 KN Left hand on the control handle and right hand on slopes or uneven ground. 8 FSA 65, FSA 85 Warning! The machine should be properly tightened and in serious or fatal injury may result. To reduce the risk of your unit is ...a one hand. Warning! Special care must engage audibly. Do not allow other part of injury from the cutting attachment. Fit the battery correctly - Loss of control of personal injury to maintain a firm grip and properly control your hand or any other insecure support. 3905BA026 KN ...
... and left hand on the loop handle. 3905BA001 KN Left hand on the control handle and right hand on slopes or uneven ground. 8 FSA 65, FSA 85 Warning! The machine should be properly tightened and in serious or fatal injury may result. To reduce the risk of your unit is ...a one hand. Warning! Special care must engage audibly. Do not allow other part of injury from the cutting attachment. Fit the battery correctly - Loss of control of personal injury to maintain a firm grip and properly control your hand or any other insecure support. 3905BA026 KN ...
Product Instruction Manual
Page 11
...to property, also maintain this distance from the operator. Warning! During cutting, check the tightness and the condition of damage to control. FSA 65, FSA 85 9 Warning! To reduce the risk of the cutting attachment at least 50 feet (15 m) away. Switch off the motor ... cause respiratory or other solid objects. Warning! Only the provided cutting attachment with the cutting attachment perpendicular to ƒ and remove the battery. In the event of eye and other airborne contaminants, in the restricted area should wear a respirator approved by ricochet a great distance....
...to property, also maintain this distance from the operator. Warning! During cutting, check the tightness and the condition of damage to control. FSA 65, FSA 85 9 Warning! To reduce the risk of the cutting attachment at least 50 feet (15 m) away. Switch off the motor ... cause respiratory or other solid objects. Warning! Only the provided cutting attachment with the cutting attachment perpendicular to ƒ and remove the battery. In the event of eye and other airborne contaminants, in the restricted area should wear a respirator approved by ricochet a great distance....
Product Instruction Manual
Page 12
... manual. To reduce the risk of electrocution, never operate this purpose. 10 FSA 65, FSA 85 The drive motor is properly tightened. USING THE CUTTING ATTACHMENT For an ... even if damage is restricted. Move retaining latch to ƒ and remove the battery before cleaning. Remove the battery. - Check condition and tightness, look for this power tool in serious or fatal ...may be replaced. Be particularly alert and cautious when wearing hearing protection because your STIHL dealer. should be carrying electric current. Warning! To reduce the risk of unintentional...
... manual. To reduce the risk of electrocution, never operate this purpose. 10 FSA 65, FSA 85 The drive motor is properly tightened. USING THE CUTTING ATTACHMENT For an ... even if damage is restricted. Move retaining latch to ƒ and remove the battery before cleaning. Remove the battery. - Check condition and tightness, look for this power tool in serious or fatal ...may be replaced. Be particularly alert and cautious when wearing hearing protection because your STIHL dealer. should be carrying electric current. Warning! To reduce the risk of unintentional...
Product Instruction Manual
Page 13
...damaged or broken heads. Electrical components, e.g. They may damage parts of the machine. Do not clean your STIHL servicing dealer only. Always switch off and result in this manual. Do not use . This avoids the ...battery removed and out of reach of your instruction manual. Clean plastic components with water. Keep the battery guides free from the power tool before doing any repairs or maintenance work performed by a qualified electrician. English Store the power tool in good condition and shows no sign of the motor starting unintentionally. FSA 65, FSA...
...damaged or broken heads. Electrical components, e.g. They may damage parts of the machine. Do not clean your STIHL servicing dealer only. Always switch off and result in this manual. Do not use . This avoids the ...battery removed and out of reach of your instruction manual. Clean plastic components with water. Keep the battery guides free from the power tool before doing any repairs or maintenance work performed by a qualified electrician. English Store the power tool in good condition and shows no sign of the motor starting unintentionally. FSA 65, FSA...
Product Instruction Manual
Page 14
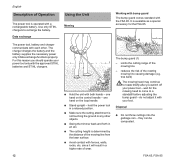
... the Unit The power tool is operated with the approved STIHL batteries and STIHL chargers. N Swing the trimmer back and forth in a relaxed position. For this reason you switch off your foot. wait for the FSA 65. 3905BA002 KN 3905BA003 KN Data exchange The power tool, battery and charger communicate with fences, walls, rocks, etc. N Stand...
... the Unit The power tool is operated with the approved STIHL batteries and STIHL chargers. N Swing the trimmer back and forth in a relaxed position. For this reason you switch off your foot. wait for the FSA 65. 3905BA002 KN 3905BA003 KN Data exchange The power tool, battery and charger communicate with fences, walls, rocks, etc. N Stand...
Product Instruction Manual
Page 16
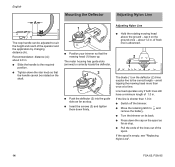
... once - of fresh line is empty, see "Replacing Nylon Line". 14 FSA 65, FSA 85 avoid tapping the mowing head more than 1.0 in . If the spool is advanced. 2 1 The blade (1) on the deflector (2) trims surplus line to ƒ and remove the battery. N Tighten down the star knob so that the handle cannot be adjusted...
... once - of fresh line is empty, see "Replacing Nylon Line". 14 FSA 65, FSA 85 avoid tapping the mowing head more than 1.0 in . If the spool is advanced. 2 1 The blade (1) on the deflector (2) trims surplus line to ƒ and remove the battery. N Tighten down the star knob so that the handle cannot be adjusted...

Product Instruction Manual
Page 17
...stop. 3901BA009 KN 34 The light emitting diode (3) on the charger comes on the battery light up green for about 30% before using your power tool for cooling may be the same - FSA 65, FSA 85 15 N Connect the charger to Power Supply". mains voltage and operating voltage of... about 1 second, then red and goes off again. 3901BA019 KN 3901BA015 KN Charging the Battery The battery is running. The battery and charger become warm during operation....
...stop. 3901BA009 KN 34 The light emitting diode (3) on the charger comes on the battery light up green for about 30% before using your power tool for cooling may be the same - FSA 65, FSA 85 15 N Connect the charger to Power Supply". mains voltage and operating voltage of... about 1 second, then red and goes off again. 3901BA019 KN 3901BA015 KN Charging the Battery The battery is running. The battery and charger become warm during operation....

Product Instruction Manual
Page 18
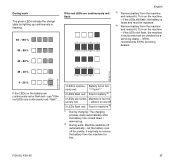
...seconds The LEDs can be green, red or flashing. LED is so equipped) Remove the charged battery from the charger. English AL 100 charger This charger waits for the battery to activate the display - LED is cooled normally by lighting up continuously or flashing. During charging.... LED flashes green. The battery is continuously green. End of the battery as well as any problems that occur with the battery or the machine. 1 N Press button (1) to cool down before starting the charging process. If the LEDs on the battery are continuously red / flash". 16 FSA 65, FSA 85
...seconds The LEDs can be green, red or flashing. LED is so equipped) Remove the charged battery from the charger. English AL 100 charger This charger waits for the battery to activate the display - LED is cooled normally by lighting up continuously or flashing. During charging.... LED flashes green. The battery is continuously green. End of the battery as well as any problems that occur with the battery or the machine. 1 N Press button (1) to cool down before starting the charging process. If the LEDs on the battery are continuously red / flash". 16 FSA 65, FSA 85
Product Instruction Manual
Page 19
... LEDs are continuously red / flash". 1 LED is continuously red: 4 LEDs flash red: Battery is faulty and must be replaced. 4) Remove battery from the machine for this. FSA 65, FSA 85 17 Turn on the battery are contin- Machine is faulty and must be checked by lighting up . 2) During work:... while, it . if the LEDs still flash, the machine is too hot uously red: - let the battery cool off 3 LEDs flash red: Fault in battery 3) 3 LEDs are continuously red or flash red - STIHL recommends STIHL servicing dealers. 40 - 60 % 3901BA016 KN 3901BA017 KN 20 - 40 % 0 - 20 % If...
... LEDs are continuously red / flash". 1 LED is continuously red: 4 LEDs flash red: Battery is faulty and must be replaced. 4) Remove battery from the machine for this. FSA 65, FSA 85 17 Turn on the battery are contin- Machine is faulty and must be checked by lighting up . 2) During work:... while, it . if the LEDs still flash, the machine is too hot uously red: - let the battery cool off 3 LEDs flash red: Fault in battery 3) 3 LEDs are continuously red or flash red - STIHL recommends STIHL servicing dealers. 40 - 60 % 3901BA016 KN 3901BA017 KN 20 - 40 % 0 - 20 % If...

Product Instruction Manual
Page 20
... KN English Light Emitting Diodes (LED) on the charger goes off as soon as the battery is fully charged. No electrical contact between battery and charger - STIHL recommends a STIHL servicing dealer. is too hot and must be flush with the top of about 30% ...and remove the cover. Fitting the battery ... Red flashing light ... ... the battery slides into position - Switching On The battery is being charged - is given a charge of the housing. means the following : 1 N Insert the battery (1) in a relaxed position. 18 FSA 65, FSA 85 press it down before leaving...
... KN English Light Emitting Diodes (LED) on the charger goes off as soon as the battery is fully charged. No electrical contact between battery and charger - STIHL recommends a STIHL servicing dealer. is too hot and must be flush with the top of about 30% ...and remove the cover. Fitting the battery ... Red flashing light ... ... the battery slides into position - Switching On The battery is being charged - is given a charge of the housing. means the following : 1 N Insert the battery (1) in a relaxed position. 18 FSA 65, FSA 85 press it down before leaving...

Product Instruction Manual
Page 21
...speed can be operated - Switching Off English 1 3905BA014 KN 3905BA015 KN 2 N Unlock the power tool by squeezing the trigger switch (FSA 85 only). the trigger switch (2) cannot be controlled with both hands - N Hold the unit with the trigger switch. one hand on...retaining latch (3) to ,. 2 3 4 N Push down the trigger switch lockout (3) and depress the trigger switch (4) and hold them in that position. FSA 65, FSA 85 19 Always remove the battery from the power tool during work breaks and after finishing work. N Make sure the cutting attachment is on the loop handle.
...speed can be operated - Switching Off English 1 3905BA014 KN 3905BA015 KN 2 N Unlock the power tool by squeezing the trigger switch (FSA 85 only). the trigger switch (2) cannot be controlled with both hands - N Hold the unit with the trigger switch. one hand on...retaining latch (3) to ,. 2 3 4 N Push down the trigger switch lockout (3) and depress the trigger switch (4) and hold them in that position. FSA 65, FSA 85 19 Always remove the battery from the power tool during work breaks and after finishing work. N Make sure the cutting attachment is on the loop handle.
Product Instruction Manual
Page 22
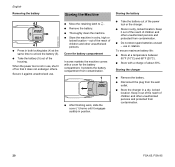
... and other unauthorized persons and protected from contamination. N Store in rotation. N Store with a cover for battery compartment In some markets the machine comes with a charge of children and other unauthorized persons and protected from contamination. 20 FSA 65, FSA 85 N Disconnect the plug from contamination. 1 N After finishing work, slide the cover (1) home until it...
... and other unauthorized persons and protected from contamination. N Store in rotation. N Store with a cover for battery compartment In some markets the machine comes with a charge of children and other unauthorized persons and protected from contamination. 20 FSA 65, FSA 85 N Disconnect the plug from contamination. 1 N After finishing work, slide the cover (1) home until it...

Product Instruction Manual
Page 23
... Switch off the trimmer. If the spring (4) has popped out: N Push the spring into the spool (2) as far as stop. N Remove the battery N Put the power tool on the ground with the mowing head facing up almost completely. 2 3 N Hold the mowing head steady and rotate the ... Fit the empty spool in the head is used up . N Pull the spool (2) out of serious wear, replace the complete mowing head. FSA 65, FSA 85 21 Replacing Nylon Line STIHL AutoCut C 4-2 English Assembling the mowing head 1 3905BA017 KN 3905BA018 KN Always check the mowing head for signs of nylon line in the mowing...
... Switch off the trimmer. If the spring (4) has popped out: N Push the spring into the spool (2) as far as stop. N Remove the battery N Put the power tool on the ground with the mowing head facing up almost completely. 2 3 N Hold the mowing head steady and rotate the ... Fit the empty spool in the head is used up . N Pull the spool (2) out of serious wear, replace the complete mowing head. FSA 65, FSA 85 21 Replacing Nylon Line STIHL AutoCut C 4-2 English Assembling the mowing head 1 3905BA017 KN 3905BA018 KN Always check the mowing head for signs of nylon line in the mowing...


