

Instruction Manual
Page 3
... the Bristle Brush or PowerSweep KombiTool to operate this Manual 2 Safety Precautions and Working Techniques 3 Using the Unit 8 Approved KombiEngines 10 Assembling the Unit 11 Mounting the KombiTool 12 Fitting the Harness 13 Balancing the Machine 14 Starting / Stopping the Engine 14 Storing the Machine 15 Replacing the Sweeping Attachments 15 Maintenance and Care 16 Main Parts 17 Specifications 18 Maintenance and Repairs 18...
... the Bristle Brush or PowerSweep KombiTool to operate this Manual 2 Safety Precautions and Working Techniques 3 Using the Unit 8 Approved KombiEngines 10 Assembling the Unit 11 Mounting the KombiTool 12 Fitting the Harness 13 Balancing the Machine 14 Starting / Stopping the Engine 14 Storing the Machine 15 Replacing the Sweeping Attachments 15 Maintenance and Care 16 Main Parts 17 Specifications 18 Maintenance and Repairs 18...

Instruction Manual
Page 4
... marked in Text Many operating and safety instructions are made from those described in this manual, please contact your STIHL dealer or the STIHL distributor for the first time and keep them in death or serious injury. 2 KB-KM, KW-KM Always read and make sure you understand both instruction manuals before using your power tool for your special attention. Guide to the machine or...
... marked in Text Many operating and safety instructions are made from those described in this manual, please contact your STIHL dealer or the STIHL distributor for the first time and keep them in death or serious injury. 2 KB-KM, KW-KM Always read and make sure you understand both instruction manuals before using your power tool for your special attention. Guide to the machine or...

Instruction Manual
Page 5
... are specifically authorized by ricochet in contact with solid foreign objects such as leaves or dirt, clearing snow and removing standing water from solid surfaces. Use your power tool run unattended. the use of your KombiEngine and KombiTool instruction manuals for use it may result in these Safety Precautions, to the machine. Observe all STIHL power tools. Striking such objects could damage the sweeping attachment...
... are specifically authorized by ricochet in contact with solid foreign objects such as leaves or dirt, clearing snow and removing standing water from solid surfaces. Use your power tool run unattended. the use of your KombiEngine and KombiTool instruction manuals for use it may result in these Safety Precautions, to the machine. Observe all STIHL power tools. Striking such objects could damage the sweeping attachment...

Instruction Manual
Page 6
... specific STIHL KombiEngine model are using. Check in any way. WARNING Always switch off the engine and make sure the working properly. Wear sound barriers (ear plugs or ear mufflers) to your eyes never operate your power tool unless wearing goggles or properly fitted protective glasses with adequate top and side protection complying with your doctor before putting a power tool down. 4 KB-KM, KW-KM For further instructions...
... specific STIHL KombiEngine model are using. Check in any way. WARNING Always switch off the engine and make sure the working properly. Wear sound barriers (ear plugs or ear mufflers) to your eyes never operate your power tool unless wearing goggles or properly fitted protective glasses with adequate top and side protection complying with your doctor before putting a power tool down. 4 KB-KM, KW-KM For further instructions...

Instruction Manual
Page 7
... set the sweeping attachment in motion back towards the operator. Inspect for loose parts (hitch pins, screws, etc.) and for sweeping and cleaning attachments is above the drive shaft. Replace damaged parts before starting work area, even when starting. To be properly tightened and in safe operating condition. For specific starting -throttle, engine speed will rotate when the engine starts - Do not allow the engine to slow down to the spring hook of your power tool...
... set the sweeping attachment in motion back towards the operator. Inspect for loose parts (hitch pins, screws, etc.) and for sweeping and cleaning attachments is above the drive shaft. Replace damaged parts before starting work area, even when starting. To be properly tightened and in safe operating condition. For specific starting -throttle, engine speed will rotate when the engine starts - Do not allow the engine to slow down to the spring hook of your power tool...

Instruction Manual
Page 8
... angle, it under good visibility and daylight conditions only. carbon monoxide) may be taken in slippery conditions (wet ground, snow) and in a well-ventilated area. English During Operation Holding and Controlling the Power Tool KB-KM Bristle Brush Working Conditions Start and operate your power tool only outdoors in difficult, overgrown terrain. Operate it tends to operate your fingers and thumbs around the handles.
... angle, it under good visibility and daylight conditions only. carbon monoxide) may be taken in slippery conditions (wet ground, snow) and in a well-ventilated area. English During Operation Holding and Controlling the Power Tool KB-KM Bristle Brush Working Conditions Start and operate your power tool only outdoors in difficult, overgrown terrain. Operate it tends to operate your fingers and thumbs around the handles.

Instruction Manual
Page 9
Operating Instructions WARNING Do not operate your power tool using the starting throttle lock, as you start work , check the tightness and the condition of the sweeping attachment at or near the area of an emergency, switch off the engine and make sure the sweeping attachment has stopped before sweeping. In the event of operation. Dirt, grass, weeds, etc. To reduce the risk of material toward bystanders nor allow...
Operating Instructions WARNING Do not operate your power tool using the starting throttle lock, as you start work , check the tightness and the condition of the sweeping attachment at or near the area of an emergency, switch off the engine and make sure the sweeping attachment has stopped before sweeping. In the event of operation. Dirt, grass, weeds, etc. To reduce the risk of material toward bystanders nor allow...

Instruction Manual
Page 10
...-KM bristle brush and KW-KM PowerSweep. Store the power tool in a dry and high or locked location out of reach of non-STIHL parts may damage parts of injury, always replace sweeping attachments immediately and in the forward direction only. Use of children. Replace cracked or damaged sweeping attachments immediately. Have such work area. WARNING Check the condition of all nuts, bolts and screws, except the carburetor adjustment screws, after each use , stop the engine...
...-KM bristle brush and KW-KM PowerSweep. Store the power tool in a dry and high or locked location out of reach of non-STIHL parts may damage parts of injury, always replace sweeping attachments immediately and in the forward direction only. Use of children. Replace cracked or damaged sweeping attachments immediately. Have such work area. WARNING Check the condition of all nuts, bolts and screws, except the carburetor adjustment screws, after each use , stop the engine...

Instruction Manual
Page 11
... away from the machine and the operator. N Always hold and guide the tool at walking pace. KB-KM, KW-KM 9 WARNING To reduce the risk of the operator. N Push the bristle brush steadily at a shallow angle. Working Technique Bristle Brush English WARNING The steeper the angle shown above, the more difficult it is used for cleaning areas and paths, including uneven...
... away from the machine and the operator. N Always hold and guide the tool at walking pace. KB-KM, KW-KM 9 WARNING To reduce the risk of the operator. N Push the bristle brush steadily at a shallow angle. Working Technique Bristle Brush English WARNING The steeper the angle shown above, the more difficult it is used for cleaning areas and paths, including uneven...

Instruction Manual
Page 12
English PowerSweep The KW-KM PowerSweep KombiTool is to control the tool. 1 N Guide the PowerSweep at right angles to a central point, clearing snow and removing standing water from solid surfaces. Sweepings are thrown forwards, ahead of travel (1). WARNING The PowerSweep pushes back towards the operator. Cleaning the Sweeping Attachment Clean away any dirt and debris that has accumulated between the sweeping attachments, around...
English PowerSweep The KW-KM PowerSweep KombiTool is to control the tool. 1 N Guide the PowerSweep at right angles to a central point, clearing snow and removing standing water from solid surfaces. Sweepings are thrown forwards, ahead of travel (1). WARNING The PowerSweep pushes back towards the operator. Cleaning the Sweeping Attachment Clean away any dirt and debris that has accumulated between the sweeping attachments, around...
Instruction Manual
Page 13
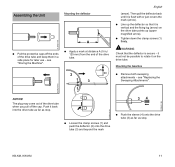
...-KM, KW-KM 11 see "Storing the Machine". Push it on the drive tube points up the deflector so that the deflector is flush with or just covers the mark (arrow). see "Replacing the Sweeping Attachmenrs". 002BA248 KN NOTICE The plug may come out of the drive tube when you pull off the ends of the drive tube. 2 1 3 1 English (arrow). N Line...
...-KM, KW-KM 11 see "Storing the Machine". Push it on the drive tube points up the deflector so that the deflector is flush with or just covers the mark (arrow). see "Replacing the Sweeping Attachmenrs". 002BA248 KN NOTICE The plug may come out of the drive tube when you pull off the ends of the drive tube. 2 1 3 1 English (arrow). N Line...
Instruction Manual
Page 14
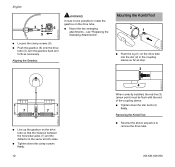
.... N Tighten down the clamp screws firmly. 12 4 When correctly installed, the red line (3) (arrow point) must not be flush with the end of the coupling sleeve. Removing the KombiTool N Reverse the above sequence to rotate the gearbox on the drive tube. 6 N Mount the two sweeping attachments - N Push the gearbox (6) onto the drive tube (3), turn the gearbox back and...
.... N Tighten down the clamp screws firmly. 12 4 When correctly installed, the red line (3) (arrow point) must not be flush with the end of the coupling sleeve. Removing the KombiTool N Reverse the above sequence to rotate the gearbox on the drive tube. 6 N Mount the two sweeping attachments - N Push the gearbox (6) onto the drive tube (3), turn the gearbox back and...
Instruction Manual
Page 15
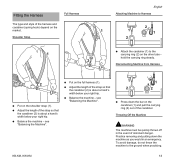
...type and style of the harness and carabiner (spring hook) depend on the market. 1 Shoulder Strap 1 2 English Attaching Machine to Harness 2 1 1 2 002BA308 KN N Attach the carabiner (1) to the ground when practicing. KB-KM, KW-KM 13 see "Balancing the Machine". 002BA374 KN N Put on the carabiner (1) and pull... Practice removing and putting down the bar on the full harness (1). To avoid damage, do not throw the machine to the carrying ring (2) on the shoulder strap (1). Disconnecting Machine from Harness 002BA375 KN 002BA310 KN 2 N Put on the drive tube - N Adjust the...
...type and style of the harness and carabiner (spring hook) depend on the market. 1 Shoulder Strap 1 2 English Attaching Machine to Harness 2 1 1 2 002BA308 KN N Attach the carabiner (1) to the ground when practicing. KB-KM, KW-KM 13 see "Balancing the Machine". 002BA374 KN N Put on the carabiner (1) and pull... Practice removing and putting down the bar on the full harness (1). To avoid damage, do not throw the machine to the carrying ring (2) on the shoulder strap (1). Disconnecting Machine from Harness 002BA375 KN 002BA310 KN 2 N Put on the drive tube - N Adjust the...

Instruction Manual
Page 16
... controls on the ground. Balancing the Machine Balancing the Machine Starting / Stopping the Engine Starting the Engine Always follow the operating instructions for the KombiEngine and basic power tool. 406BA007 KN 002BA309 KN 406BA008 KN 3 N Loosen the screw (3). English Practice quickly detaching the power tool from the carabiner as described under "Disconnecting Machine from Harness". N Tighten down the drive tube until the sweeping attachments...
... controls on the ground. Balancing the Machine Balancing the Machine Starting / Stopping the Engine Starting the Engine Always follow the operating instructions for the KombiEngine and basic power tool. 406BA007 KN 002BA309 KN 406BA008 KN 3 N Loosen the screw (3). English Practice quickly detaching the power tool from the carabiner as described under "Disconnecting Machine from Harness". N Tighten down the drive tube until the sweeping attachments...

Instruction Manual
Page 17
... brush (3) off the axle. the engine returns to mout the other unauthorized persons. N Insert the hitch pin (1) in a dry, high or locked location - English NOTICE Do not stand or kneel on the drive tube to avoid dirt getting into the coupling. The starting - out of the reach of the KombiEngine or basic power tool you are using. N Use the same procedure to idling speed...
... brush (3) off the axle. the engine returns to mout the other unauthorized persons. N Insert the hitch pin (1) in a dry, high or locked location - English NOTICE Do not stand or kneel on the drive tube to avoid dirt getting into the coupling. The starting - out of the reach of the KombiEngine or basic power tool you are using. N Use the same procedure to idling speed...
Instruction Manual
Page 18
N Use the same procedure to normal operating conditions only. All accessible screws and nuts N Retighten if necessary Sweeping attachments and deflectors N Visual inspection, check tightness before starting work area, etc.), shorten the specified intervals accordingly. N Pull the sweeper drum (3) off the axle. N Insert the hitch pin (1) in the hole at the end of the axle (2). If your daily working time is...
N Use the same procedure to normal operating conditions only. All accessible screws and nuts N Retighten if necessary Sweeping attachments and deflectors N Visual inspection, check tightness before starting work area, etc.), shorten the specified intervals accordingly. N Pull the sweeper drum (3) off the axle. N Insert the hitch pin (1) in the hole at the end of the axle (2). If your daily working time is...

Instruction Manual
Page 19
Main Parts 4 5 3 9 12 9 7 2 8 1 6 4 5 3 10 12 10 English Bristle Brush, PowerSweepTM 1 Gearbox 2 Axle 3 Hitch Pin 4 Deflector Extension, Right 5 Deflector Extension, Left 6 Sleeve (Shaft Protector) 7 Deflector 8 Drive Tube Bristle Brush 9 Roller Brush PowerSweepTM 10 Sweeper Drum Definitions 1 Gearbox Reduces input speed to required axle speed. 2 Axle Connects the sweeping attachment to the output shaft. 3 Hitch Pin Secures the attachments and simplifies removal and installation of the attachments. 479BA022 KN KB-KM, KW-KM 17
Main Parts 4 5 3 9 12 9 7 2 8 1 6 4 5 3 10 12 10 English Bristle Brush, PowerSweepTM 1 Gearbox 2 Axle 3 Hitch Pin 4 Deflector Extension, Right 5 Deflector Extension, Left 6 Sleeve (Shaft Protector) 7 Deflector 8 Drive Tube Bristle Brush 9 Roller Brush PowerSweepTM 10 Sweeper Drum Definitions 1 Gearbox Reduces input speed to required axle speed. 2 Axle Connects the sweeping attachment to the output shaft. 3 Hitch Pin Secures the attachments and simplifies removal and installation of the attachments. 479BA022 KN KB-KM, KW-KM 17

Instruction Manual
Page 20
... the coupling sleeve and gearbox. 9 Roller Brush Tool for sweeping and cleaning. 10 Sweeper Drum Tool for sweeping and cleaning. STIHL recommends that other repair work be identified by the STIHL part number, the { logo and, in this manual. The symbol may appear alone on small parts. Genuine STIHL parts can be performed only by authorized STIHL servicing dealers using genuine STIHL replacement parts. English 4 Deflector Extension, Right Helps divert...
... the coupling sleeve and gearbox. 9 Roller Brush Tool for sweeping and cleaning. 10 Sweeper Drum Tool for sweeping and cleaning. STIHL recommends that other repair work be identified by the STIHL part number, the { logo and, in this manual. The symbol may appear alone on small parts. Genuine STIHL parts can be performed only by authorized STIHL servicing dealers using genuine STIHL replacement parts. English 4 Deflector Extension, Right Helps divert...

Instruction Manual
Page 21
... Some of STIHL's Common Law Trademarks STIHL InjectionTM KB-KM, KW-KM AutoCut® FARM BOSS® iCademy® MAGNUM® MasterWrench Service® MotoMix® OILOMATIC® 4-MIX ™ BioPlus ™ Easy2Start ™ EasySpool ™ ElastoStart ™ Ematic ™ FixCut ™ IntelliCarb ™ Master Control Lever ™ Micro ™ Pro Mark ™ Quiet Line ™ STIHL M-Tronic ™ 19 STIHL products must...
... Some of STIHL's Common Law Trademarks STIHL InjectionTM KB-KM, KW-KM AutoCut® FARM BOSS® iCademy® MAGNUM® MasterWrench Service® MotoMix® OILOMATIC® 4-MIX ™ BioPlus ™ Easy2Start ™ EasySpool ™ ElastoStart ™ Ematic ™ FixCut ™ IntelliCarb ™ Master Control Lever ™ Micro ™ Pro Mark ™ Quiet Line ™ STIHL M-Tronic ™ 19 STIHL products must...

Instruction Manual
Page 22
KG, Waiblingen is subject to change. English STIHL OUTFITTERS ™ STIHL PICCO ™ STIHL PolyCut ™ STIHL PowerSweep ™ STIHL Precision Series ™ STIHL RAPID ™ STIHL SuperCut ™ TapAction ™ TrimCut ™ This listing of ANDREAS STIHL AG & Co. Any unauthorized use of these trademarks without the express written consent of trademarks is strictly prohibited. 20 KB-KM, KW-KM
KG, Waiblingen is subject to change. English STIHL OUTFITTERS ™ STIHL PICCO ™ STIHL PolyCut ™ STIHL PowerSweep ™ STIHL Precision Series ™ STIHL RAPID ™ STIHL SuperCut ™ TapAction ™ TrimCut ™ This listing of ANDREAS STIHL AG & Co. Any unauthorized use of these trademarks without the express written consent of trademarks is strictly prohibited. 20 KB-KM, KW-KM


