
Owner's Manual
Page 1
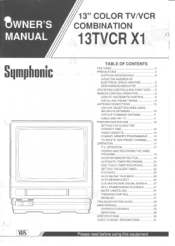
... 27 TROUBLESHOOTING GUIDE 28 MAINTENANCE 29 VCR HEAD CLEANING 29 SERVICING 29 SPECIFICATIONS 30 CABLE CHANNEL DESIGNATIONS 31 Please read before usin this e•ui ment roWNER'S MANUAL Sqmphonic VAS /// 13" COLOR TV/VCR COMBINATION 13TVCR X1 TABLE OF CONTENTS FEATURES 4 PRECAUTIONS 5 SUPPLIED ACCESSORIES 5 AVOID THE HAZARDS OF ELECTRICAL SHOCK AND FIRE 5 DEW WARNING/INDICATOR 5 OPERATING CONTROLS AND FUNCTIONS 6 REMOTE CONTROL OPERATION 8 HOW TO USE REMOTE CONTROL 8 INSTALLING THE BATTERIES 9 ANTENNA CONNECTIONS...
... 27 TROUBLESHOOTING GUIDE 28 MAINTENANCE 29 VCR HEAD CLEANING 29 SERVICING 29 SPECIFICATIONS 30 CABLE CHANNEL DESIGNATIONS 31 Please read before usin this e•ui ment roWNER'S MANUAL Sqmphonic VAS /// 13" COLOR TV/VCR COMBINATION 13TVCR X1 TABLE OF CONTENTS FEATURES 4 PRECAUTIONS 5 SUPPLIED ACCESSORIES 5 AVOID THE HAZARDS OF ELECTRICAL SHOCK AND FIRE 5 DEW WARNING/INDICATOR 5 OPERATING CONTROLS AND FUNCTIONS 6 REMOTE CONTROL OPERATION 8 HOW TO USE REMOTE CONTROL 8 INSTALLING THE BATTERIES 9 ANTENNA CONNECTIONS...
Owner's Manual
Page 2
.... CAUTION: TO REDUCE THE RISK OF ELECTRIC SHOCK, DO NOT REMOVE COVER (OR BACK) NO USER SERVICEABLE PARTS INSIDE. Use only with a cart, stand, tripod, bracket, or table recommended by the TV manufacturer as to your home consult your obsolete outlet. Outdoor Antenna grounding-If an outside antenna or cable system is connected to the TV, be placed in a built-in item...
.... CAUTION: TO REDUCE THE RISK OF ELECTRIC SHOCK, DO NOT REMOVE COVER (OR BACK) NO USER SERVICEABLE PARTS INSIDE. Use only with a cart, stand, tripod, bracket, or table recommended by the TV manufacturer as to your home consult your obsolete outlet. Outdoor Antenna grounding-If an outside antenna or cable system is connected to the TV, be placed in a built-in item...

Owner's Manual
Page 3
.... 19. Lightning-For added protection for service. 20. When installing an outside antenna system should be taken to determine that are required, be sure the service technician had used replacement parts specified by following conditions: a. e. When the TV exhibits a distinct change in a risk of any service or repairs to its normal operation. Replacement Parts-When replacement parts are cov- Refer all servicing to rain or water.
.... 19. Lightning-For added protection for service. 20. When installing an outside antenna system should be taken to determine that are required, be sure the service technician had used replacement parts specified by following conditions: a. e. When the TV exhibits a distinct change in a risk of any service or repairs to its normal operation. Replacement Parts-When replacement parts are cov- Refer all servicing to rain or water.
Owner's Manual
Page 4
... is possible at any timer adjustment for up and down volume up to ensure excellent picture quality and special effects playback. • Automatic Playback Speed Selection- No others have the same serial number as yours. You can operate all the tape transport controls, and change the channel up and down from Dealer Address Dealer Phone No. For best results, we recommend T-60...
... is possible at any timer adjustment for up and down volume up to ensure excellent picture quality and special effects playback. • Automatic Playback Speed Selection- No others have the same serial number as yours. You can operate all the tape transport controls, and change the channel up and down from Dealer Address Dealer Phone No. For best results, we recommend T-60...
Owner's Manual
Page 5
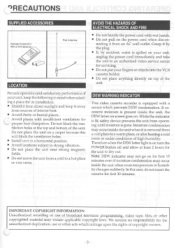
..., use of broadcast television programming, video tape, film, or other acts which prevents DEW condensation. Moisture condensation may not go on a carpet because this case, do not insert the cassette for proper heat dissipation. 1'RECAUTIONS SUPPLIED ACCESSORIES Remote Control Unit With 2 MA Batteries Rod Antenna I LOCATION For safe operation and satisfactory performance of your fingers or objects into the VCR...
..., use of broadcast television programming, video tape, film, or other acts which prevents DEW condensation. Moisture condensation may not go on a carpet because this case, do not insert the cassette for proper heat dissipation. 1'RECAUTIONS SUPPLIED ACCESSORIES Remote Control Unit With 2 MA Batteries Rod Antenna I LOCATION For safe operation and satisfactory performance of your fingers or objects into the VCR...

Owner's Manual
Page 7
... VCR. 17 EARPHONE jack- Connect to view video, in forward direction, during play mode at a faster than normal speed. To select the channel for personal listening. - 7 - Receives the infrared control signals from VCR. 3 CASSETTE COMPARTMENT 4 REMOTE SENSOR- Connect the AC cord. 14 ANT.IN jack- To connect earphones (not supplied) for viewing or recording. 8 PLAY button- Lights when in the Timer Recording mode. 6 REC indicator- To adjust the volume level. 11 REW button-To rewind tape, or to audio output jack...
... VCR. 17 EARPHONE jack- Connect to view video, in forward direction, during play mode at a faster than normal speed. To select the channel for personal listening. - 7 - Receives the infrared control signals from VCR. 3 CASSETTE COMPARTMENT 4 REMOTE SENSOR- Connect the AC cord. 14 ANT.IN jack- To connect earphones (not supplied) for viewing or recording. 8 PLAY button- Lights when in the Timer Recording mode. 6 REC indicator- To adjust the volume level. 11 REW button-To rewind tape, or to audio output jack...

Owner's Manual
Page 8
... adjust desired volume level by pressing either "A" or "v' button. They may also be used for adjusting tracking control when tape is in play. To call channel display, counter number, and the current time on the unit. To activate the sleep function. - 8 - il- If you to record continuously. 12 SPEED button- To set CLOCK, TIMER RECORD PROGRAM, REPEAT MODE, and PRESETTING OF THE CHANNELS. 4 SELECT button -To select setting mode. 5 CLEAR/RESET button- Press PLAY button to 0000. REMOTE CONTROL OPERATION...
... adjust desired volume level by pressing either "A" or "v' button. They may also be used for adjusting tracking control when tape is in play. To call channel display, counter number, and the current time on the unit. To activate the sleep function. - 8 - il- If you to record continuously. 12 SPEED button- To set CLOCK, TIMER RECORD PROGRAM, REPEAT MODE, and PRESETTING OF THE CHANNELS. 4 SELECT button -To select setting mode. 5 CLEAR/RESET button- Press PLAY button to 0000. REMOTE CONTROL OPERATION...
Owner's Manual
Page 12
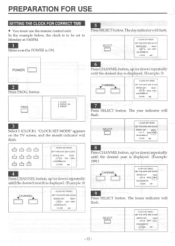
... POWER is displayed. (Example: 1991) CHANNEL • CLOCK SET MODE SET THE DATE AND CLOCK MONTH DAY YEAR ( 6).( 3) MON:11(191i HOUR MINUTE (12)100) AM CHANNEL = = - PRESET 6 Press CHANNEL button, up (or down ) repeatedly until the desired year is ON. 5 Press SELECT button. PREPARATION FOR USE SETTING THE CLOCK FOR CORRECT TIME • You must use the remote control unit. The hours indicator will flash. SELECT • CLOCK SET MODE...
... POWER is displayed. (Example: 1991) CHANNEL • CLOCK SET MODE SET THE DATE AND CLOCK MONTH DAY YEAR ( 6).( 3) MON:11(191i HOUR MINUTE (12)100) AM CHANNEL = = - PRESET 6 Press CHANNEL button, up (or down ) repeatedly until the desired year is ON. 5 Press SELECT button. PREPARATION FOR USE SETTING THE CLOCK FOR CORRECT TIME • You must use the remote control unit. The hours indicator will flash. SELECT • CLOCK SET MODE...

Owner's Manual
Page 15
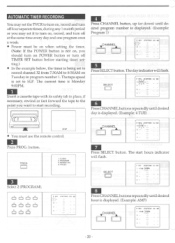
... scan only the channels you receive in your area. • Programed channels are automatically stored. POWER 0 uti 6 db E5 6 Select 2 (AUTO MEMO). PRESET - 15 - CH 2 PROG. 1. AUTOMATIC MEMORY-IN • You must use the remote control unit. 1 Attach the smaller end of the supplied AC cord to on. button. CLOCK 2. AUTOMEMO 3. CAN 2. PROGRAM 3. connect the power cord or the power failure occur. The display scans through the channels and all active channels...
... scan only the channels you receive in your area. • Programed channels are automatically stored. POWER 0 uti 6 db E5 6 Select 2 (AUTO MEMO). PRESET - 15 - CH 2 PROG. 1. AUTOMATIC MEMORY-IN • You must use the remote control unit. 1 Attach the smaller end of the supplied AC cord to on. button. CLOCK 2. AUTOMEMO 3. CAN 2. PROGRAM 3. connect the power cord or the power failure occur. The display scans through the channels and all active channels...

Owner's Manual
Page 18
... STOP -18- VIEWING AND RECORDING THE SAME PROGRAM 1 Insert a cassette with erasure prevention tab intact. Press PAUSE button again to be recorded. CHANNEL CH 32 REC Sp 8 Press STOP button when recording is set to on automatically. 5 Press RECORD button. HPAUSE/ STILL 4 Select the channel to resume recording. The RECORD indicator bens to turn on , push TIMER SET button to flash. The RECORD indicator...
... STOP -18- VIEWING AND RECORDING THE SAME PROGRAM 1 Insert a cassette with erasure prevention tab intact. Press PAUSE button again to be recorded. CHANNEL CH 32 REC Sp 8 Press STOP button when recording is set to on automatically. 5 Press RECORD button. HPAUSE/ STILL 4 Select the channel to resume recording. The RECORD indicator bens to turn on , push TIMER SET button to flash. The RECORD indicator...
Owner's Manual
Page 20
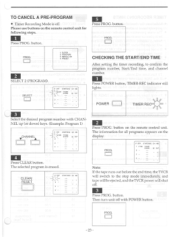
... must be on when setting the timer. (Note: If the POWER button is not on, you should turn on POWER button or turn off at the same time every day and one program once a week. • Power must use the remote control. 2 Press PROG. CLOCK 2. PRESET 3 Select 2 (PROGRAM). 12 16 S g 7, ® 9 1,0 P DAY r: r _ 2 START/ENO CH MD - 4 Press CHANNEL button, up (or down) until desired program number is set to SLP. STARVEND...
... must be on when setting the timer. (Note: If the POWER button is not on, you should turn on POWER button or turn off at the same time every day and one program once a week. • Power must use the remote control. 2 Press PROG. CLOCK 2. PRESET 3 Select 2 (PROGRAM). 12 16 S g 7, ® 9 1,0 P DAY r: r _ 2 START/ENO CH MD - 4 Press CHANNEL button, up (or down) until desired program number is set to SLP. STARVEND...

Owner's Manual
Page 22
... following order. POWER CHANNEL A = l P Oy STARVENO CH MD 41, 49AIL:ym, ..:•• ..,.... _ -.-- When the TIMER SET button is completed. Continue with steps [7] to [5] on page 20. 6 Press CHANNEL buttons up (or down ) repeatedly until "DAILY" appears on pages 20 thru 22. Nore: If you may turn off and TIMER REC indicator lights. j .. - - .. _ Note: When programs overlap, the earliest time set goes on...
... following order. POWER CHANNEL A = l P Oy STARVENO CH MD 41, 49AIL:ym, ..:•• ..,.... _ -.-- When the TIMER SET button is completed. Continue with steps [7] to [5] on page 20. 6 Press CHANNEL buttons up (or down ) repeatedly until "DAILY" appears on pages 20 thru 22. Nore: If you may turn off and TIMER REC indicator lights. j .. - - .. _ Note: When programs overlap, the earliest time set goes on...
Owner's Manual
Page 23
... time, and channel number. 1 Press POWER button, TIMER-REC indicator still lights. 3 Select the desired program number with POWER button. PROGRAM 3. PROG. - 23 - button. PRESET 2 SELECT 2 (PROGRAM). CLEAR/ RESET , ! P DAY START/ENO CH MO 1 4 TUE 730AM IMAM 32 UP 3 - Please use buttons on the remote control unit for all programs appears on the remote control unit. PROG. ( I ,'. ..A' .TUE 730AI.1 8:50AM 32 SL., 3 4 - - _ _ - - 4 Press CLEAR button. Then turn unit off . 3 Press PROG. REPEAT ON 4. PROG. button on the display. POWER TIMER...
... time, and channel number. 1 Press POWER button, TIMER-REC indicator still lights. 3 Select the desired program number with POWER button. PROGRAM 3. PROG. - 23 - button. PRESET 2 SELECT 2 (PROGRAM). CLEAR/ RESET , ! P DAY START/ENO CH MO 1 4 TUE 730AM IMAM 32 UP 3 - Please use buttons on the remote control unit for all programs appears on the remote control unit. PROG. ( I ,'. ..A' .TUE 730AI.1 8:50AM 32 SL., 3 4 - - _ _ - - 4 Press CLEAR button. Then turn unit off . 3 Press PROG. REPEAT ON 4. PROG. button on the display. POWER TIMER...

Owner's Manual
Page 24
...TIMER SET button is on, the auto-rewind feature will not work . • If the DEW indicator comes on during timer recording, the unit will stop and will not resume recording, even when the moisture has evaporated. • To stop timer recording, turn the TIMER SET button off. • When the TIMER SET button is on the VCR functions on the Unit cannot be operated at a time... (End of recording. • The remote control unit is not needed , depending upon your required length of Tape) - 24 - TIMER RECORDING HINTS • Make sure the channel you want to record is properly tuned in...
...TIMER SET button is on, the auto-rewind feature will not work . • If the DEW indicator comes on during timer recording, the unit will stop and will not resume recording, even when the moisture has evaporated. • To stop timer recording, turn the TIMER SET button off. • When the TIMER SET button is on the VCR functions on the Unit cannot be operated at a time... (End of recording. • The remote control unit is not needed , depending upon your required length of Tape) - 24 - TIMER RECORDING HINTS • Make sure the channel you want to record is properly tuned in...
Owner's Manual
Page 25
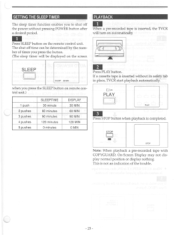
... time can be displayed on the screen PLAYBACK 1 When a pre-recorded tape is inserted, the TVCR will be determined by the number of the trouble. - 25 - SLEEP SLEEP 30 MIN 2 Press PLAY button. The shut off the power without its safety tab in place, TVCR start playback automatically. If a cassette tape is inserted without pressing POWER button after a desired period. 1 Press SLEEP button on remote control...
... time can be displayed on the screen PLAYBACK 1 When a pre-recorded tape is inserted, the TVCR will be determined by the number of the trouble. - 25 - SLEEP SLEEP 30 MIN 2 Press PLAY button. The shut off the power without its safety tab in place, TVCR start playback automatically. If a cassette tape is inserted without pressing POWER button after a desired period. 1 Press SLEEP button on remote control...
Owner's Manual
Page 27
... in finding a particular section of trouble. • You will get best results when playing back tapes that allows you press the PAUSE button the lines will change position on the screen and the picture may use the PAUSE button during playback, adjust the channel UP/DOWN buttons on your TVCR, the center setting is used in the SLP mode. If this feature to the Stop...
... in finding a particular section of trouble. • You will get best results when playing back tapes that allows you press the PAUSE button the lines will change position on the screen and the picture may use the PAUSE button during playback, adjust the channel UP/DOWN buttons on your TVCR, the center setting is used in the SLP mode. If this feature to the Stop...

Owner's Manual
Page 28
...; Volume control on remote control unit • Adjust volume control on . Noise in the ON position. Picture OK; unit is connected to • Connect incoming antenna directly to • Adjust TRACKING control for better pic- best position. not work when power is inserted. • Wait until indicator goes off . • Push Power button on playback. • Video head is dirty. • Head cleaning is not connected. • Connect power cord to TV or VCR. unit...
...; Volume control on remote control unit • Adjust volume control on . Noise in the ON position. Picture OK; unit is connected to • Connect incoming antenna directly to • Adjust TRACKING control for better pic- best position. not work when power is inserted. • Wait until indicator goes off . • Push Power button on playback. • Video head is dirty. • Head cleaning is not connected. • Connect power cord to TV or VCR. unit...
Owner's Manual
Page 29
...Switch power off, unplug the power cord, and take the unit to your nearest Service Center for servicing. - 29 - There are no user-serviceable parts inside. Bring the unit to your unit become blurred or interrupted while the TV program received is clear. SERVICING • Should your nearest Service...long periods of use a solvent or alcohol. VCR HEAD CLEANING • Picture playback may cause damage and discoloration to correct the problem by yourself. Head cleaning requires highly technical skill. MAINTENANCE CABINET CLEANING • Wipe the front panel and other exterior...
...Switch power off, unplug the power cord, and take the unit to your nearest Service Center for servicing. - 29 - There are no user-serviceable parts inside. Bring the unit to your unit become blurred or interrupted while the TV program received is clear. SERVICING • Should your nearest Service...long periods of use a solvent or alcohol. VCR HEAD CLEANING • Picture playback may cause damage and discoloration to correct the problem by yourself. Head cleaning requires highly technical skill. MAINTENANCE CABINET CLEANING • Wipe the front panel and other exterior...

Owner's Manual
Page 30
... NTSC-M Rotary two-head helical scan system 1/2 inch :33.40mm/sec. :16.67mm/sec. :11.12mm/sec. :#2-#6 :#7-#13 :#14--#69 :5A :A5-A1, A-I :J-.W :W+1-W+84 Terminals: Antenna input Video input Audio input VHF/UHF 75 ohm s unbalanced RCA connector RCA connector ELECTRICAL SPECIFICATIONS Video input level: Audio input level: Video S/N ratio: Audio S/N ratio: 0.5-2.0Vp-p -15dBs More than 46dB More than 43dB OTHER SPECIFICATIONS Power requirement: Power consumption: Dimensions: Weight: AC 120V/60Hz 85W 362...
... NTSC-M Rotary two-head helical scan system 1/2 inch :33.40mm/sec. :16.67mm/sec. :11.12mm/sec. :#2-#6 :#7-#13 :#14--#69 :5A :A5-A1, A-I :J-.W :W+1-W+84 Terminals: Antenna input Video input Audio input VHF/UHF 75 ohm s unbalanced RCA connector RCA connector ELECTRICAL SPECIFICATIONS Video input level: Audio input level: Video S/N ratio: Audio S/N ratio: 0.5-2.0Vp-p -15dBs More than 46dB More than 43dB OTHER SPECIFICATIONS Power requirement: Power consumption: Dimensions: Weight: AC 120V/60Hz 85W 362...
Owner's Manual
Page 32
..., faulty installation, improper maintenance, commercial use . defaced or missing. THIS WARRANTY IS VALID WHEN THE UNIT IS CARRIED-IN TO FUNAI AUTHORIZED SERVICE FACILITY. WHEN YOU ARE RETURNING THE PRODUCT FOR SERVICE TO FACTORY SERVICE CENTER. ATTACH WRITTEN DOCUMENTATION DETAILING THE COMPLAINT, TO THE OUTSIDE OR INSIDE OF THE CARTON. PLEASE CONTACT FUNAI CORP. DEMO OR FLOOR MODELS. ARE...
..., faulty installation, improper maintenance, commercial use . defaced or missing. THIS WARRANTY IS VALID WHEN THE UNIT IS CARRIED-IN TO FUNAI AUTHORIZED SERVICE FACILITY. WHEN YOU ARE RETURNING THE PRODUCT FOR SERVICE TO FACTORY SERVICE CENTER. ATTACH WRITTEN DOCUMENTATION DETAILING THE COMPLAINT, TO THE OUTSIDE OR INSIDE OF THE CARTON. PLEASE CONTACT FUNAI CORP. DEMO OR FLOOR MODELS. ARE...


