
Owners Manual
Page 4
...Erasing songs 31 Protecting songs 32 6 - Quick Start Guides 8 Playback and mixing 8 Preparations 8 Listening to the demo song 9 Recording and mastering 10 Creating a new song 10 Connecting and setting the input sources........ 11 Set the guitar as the recording source for TRACK 1 11 Adjusting ...40 To set a location mark 40 To move to TRACK 3 14 Mixing the tracks 15 Mastering a stereo track 16 Shutting down 27 Formatting SD cards 27 Recorder modes 28 Connecting other equipment 28 Rear panel 28 Left side panel 29 Adjusting the contrast 29 4 TASCAM DP-03SD 5 - Contents 1 -
...Erasing songs 31 Protecting songs 32 6 - Quick Start Guides 8 Playback and mixing 8 Preparations 8 Listening to the demo song 9 Recording and mastering 10 Creating a new song 10 Connecting and setting the input sources........ 11 Set the guitar as the recording source for TRACK 1 11 Adjusting ...40 To set a location mark 40 To move to TRACK 3 14 Mixing the tracks 15 Mastering a stereo track 16 Shutting down 27 Formatting SD cards 27 Recorder modes 28 Connecting other equipment 28 Rear panel 28 Left side panel 29 Adjusting the contrast 29 4 TASCAM DP-03SD 5 - Contents 1 -
Owners Manual
Page 5
... 61 Backing-up songs 61 Restoring songs 62 Track import and export 63 Importing tracks 63 Exporting tracks 64 Exporting a stereo master track 65 13 - Specifications 70 Ratings 70 Audio input/output ratings 70 Control input/output ratings 70 Audio performance 70 Computer ... master track 53 Exiting MASTERING mode 53 10 - SD Card Management 57 Overview of partitions 57 Formatting cards 57 Reformatting MTR partitions 58 Reformatting the FAT partition 58 Viewing the capacity of the MTR partition 59 Initializing SD cards 59 12 - Commonly-used Functions 73 5 TASCAM DP-03SD...
... 61 Backing-up songs 61 Restoring songs 62 Track import and export 63 Importing tracks 63 Exporting tracks 64 Exporting a stereo master track 65 13 - Specifications 70 Ratings 70 Audio input/output ratings 70 Control input/output ratings 70 Audio performance 70 Computer ... master track 53 Exiting MASTERING mode 53 10 - SD Card Management 57 Overview of partitions 57 Formatting cards 57 Reformatting MTR partitions 58 Reformatting the FAT partition 58 Viewing the capacity of the MTR partition 59 Initializing SD cards 59 12 - Commonly-used Functions 73 5 TASCAM DP-03SD...
Owners Manual
Page 6
... include simultaneous 2-track recording and 8-track playback (44.1 kHz, 16-bit) • Nine 45-mm faders include eight track faders and one master level fader • Each track has independent REVERB and PAN adjustments and track selection buttons, as well as "SD card." • Additional information... their respective owners. Moreover, since transferring data between the unit and a computer is connected by foot switches (RC-3F, sold separately) 6 TASCAM DP-03SD Items included with up and connect the unit, as well as F1, F2, F3 and F4 from the TEAC Global Site (http://teac-global...
... include simultaneous 2-track recording and 8-track playback (44.1 kHz, 16-bit) • Nine 45-mm faders include eight track faders and one master level fader • Each track has independent REVERB and PAN adjustments and track selection buttons, as well as "SD card." • Additional information... their respective owners. Moreover, since transferring data between the unit and a computer is connected by foot switches (RC-3F, sold separately) 6 TASCAM DP-03SD Items included with up and connect the unit, as well as F1, F2, F3 and F4 from the TEAC Global Site (http://teac-global...

Owners Manual
Page 9
... practice listening to and mixing a recording. 1 Press the HOME button to open the SONG screen. 7 Press the PLAY (Á) button, and raise the TRACK 1-8 faders, MASTER fader and PHONES LEVEL knob to listen to open the Home Screen. NOTE When an item is open, press the MENU button to open the... return to the Home Screen. 3 Use the DATA wheel to select the SONG menu item and press the F4 (¥) button to the demo song. 9 TASCAM DP-03SD These lost data and settings cannot be lost. TIP If an amplifier or powered speakers are connected to the demo song The included SD card...
... practice listening to and mixing a recording. 1 Press the HOME button to open the SONG screen. 7 Press the PLAY (Á) button, and raise the TRACK 1-8 faders, MASTER fader and PHONES LEVEL knob to listen to open the Home Screen. NOTE When an item is open, press the MENU button to open the... return to the Home Screen. 3 Use the DATA wheel to select the SONG menu item and press the F4 (¥) button to the demo song. 9 TASCAM DP-03SD These lost data and settings cannot be lost. TIP If an amplifier or powered speakers are connected to the demo song The included SD card...
Owners Manual
Page 10
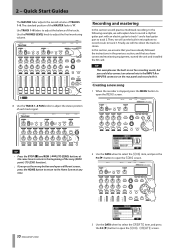
...165;) button to open the SONG screen. 10 TASCAM DP-03SD 3 Use the DATA wheel to select the CREATE item, and press the F4 (¥) button to open the MENU screen. 8 Use the TRACK 1-8 PAN knobs to adjust the stereo position of the MASTER fader is stopped, press the MENU button to...you have connected monitoring equipment, started the unit and installed the SD card. The standard position of each track signal. Quick Start Guides The MASTER fader adjusts the overall volume of the tracks. Finally, we assume that you have already followed the instructions in the previous section, and that...
...165;) button to open the SONG screen. 10 TASCAM DP-03SD 3 Use the DATA wheel to select the CREATE item, and press the F4 (¥) button to open the MENU screen. 8 Use the TRACK 1-8 PAN knobs to adjust the stereo position of the MASTER fader is stopped, press the MENU button to...you have connected monitoring equipment, started the unit and installed the SD card. The standard position of each track signal. Quick Start Guides The MASTER fader adjusts the overall volume of the tracks. Finally, we assume that you have already followed the instructions in the previous section, and that...

Owners Manual
Page 12
... of the guitar through the headphones, and the and level meters move. Its REC indicator becomes unlit. When you raise the TRACK 1 fader, the MASTER fader and the PHONES LEVEL knob, you are done performing, press the STOP (ª) button to stop blinking and stays lit. Play the guitar. ... to end record standby. When you play guitar, the input level is too loud. NOTE • Use the TRACK 1 PAN knob to be heard. 12 TASCAM DP-03SD 2 - Set the TRIM knob so that the OL indicator for " " (INPUT A) and " " (TRACK 1) on the guitar. If the OL indicator continues to light even...
... of the guitar through the headphones, and the and level meters move. Its REC indicator becomes unlit. When you raise the TRACK 1 fader, the MASTER fader and the PHONES LEVEL knob, you are done performing, press the STOP (ª) button to stop blinking and stays lit. Play the guitar. ... to end record standby. When you play guitar, the input level is too loud. NOTE • Use the TRACK 1 PAN knob to be heard. 12 TASCAM DP-03SD 2 - Set the TRIM knob so that the OL indicator for " " (INPUT A) and " " (TRACK 1) on the guitar. If the OL indicator continues to light even...
Owners Manual
Page 13
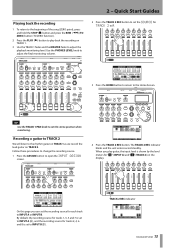
... on TRACK 1 as we record the lead guitar on TRACK 2. On this page you play back the recording on the display. TRACK 2 REC indicator 13 TASCAM DP-03SD Use the PHONES LEVEL knob to adjust the final monitoring volume. 2 Press the TRACK 2 REC button to INPUT B (B). Recording a guitar to TRACK 2 .... TIP Use the TRACK 1 PAN knob to set the SOURCE for " " (INPUT A) and " " (TRACK 2) on TRACK 1. 3 Use the TRACK 1 fader and the MASTER fader to the Home Screen. Quick Start Guides Playing back the recording 1 To return to the beginning of the song (ZERO point), press and hold...
... on TRACK 1 as we record the lead guitar on TRACK 2. On this page you play back the recording on the display. TRACK 2 REC indicator 13 TASCAM DP-03SD Use the PHONES LEVEL knob to adjust the final monitoring volume. 2 Press the TRACK 2 REC button to INPUT B (B). Recording a guitar to TRACK 2 .... TIP Use the TRACK 1 PAN knob to set the SOURCE for " " (INPUT A) and " " (TRACK 2) on TRACK 1. 3 Use the TRACK 1 fader and the MASTER fader to the Home Screen. Quick Start Guides Playing back the recording 1 To return to the beginning of the song (ZERO point), press and hold...
Owners Manual
Page 14
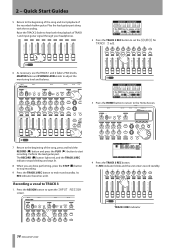
... 5 Return to the beginning of the song and start recording. Play the lead guitar part along with the recording. TRACK 3 REC indicator 14 TASCAM DP-03SD Its REC indicator becomes unlit. Recording a vocal to start playback of the song, press and hold the RECORD (º) button and press the PLAY...headphones. 2 Press the TRACK 3 REC button to set the SOURCE for TRACK 3 to B. 6 As necessary, use the TRACK 1 and 2 faders, PAN knobs, MASTER fader and PHONES LEVEL knob to adjust the monitoring level and balance. 3 Press the HOME button to return to the Home Screen. 7 Return to the...
... 5 Return to the beginning of the song and start recording. Play the lead guitar part along with the recording. TRACK 3 REC indicator 14 TASCAM DP-03SD Its REC indicator becomes unlit. Recording a vocal to start playback of the song, press and hold the RECORD (º) button and press the PLAY...headphones. 2 Press the TRACK 3 REC button to set the SOURCE for TRACK 3 to B. 6 As necessary, use the TRACK 1 and 2 faders, PAN knobs, MASTER fader and PHONES LEVEL knob to adjust the monitoring level and balance. 3 Press the HOME button to return to the Home Screen. 7 Return to the...
Owners Manual
Page 15
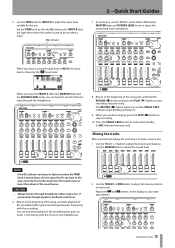
...even when the loudest sound to adjust the overall level. When you raise the TRACK 3 fader, the MASTER fader and the PHONES LEVEL knob, you finish recording, the next step is to make adjustments. 15 TASCAM DP-03SD Sing your headphones. 2 Use the TRACK 1-3 PAN knobs to start playback of the song, press and... of the sound source. Set the TRIM knob so that the OL indicator for INPUT B to adjust the monitoring level and balance. Use the MASTER fader to be recorded is too loud. NOTE If the OL indicator continues to adjust their levels and balance. In this case, move the mic...
...even when the loudest sound to adjust the overall level. When you raise the TRACK 3 fader, the MASTER fader and the PHONES LEVEL knob, you finish recording, the next step is to make adjustments. 15 TASCAM DP-03SD Sing your headphones. 2 Use the TRACK 1-3 PAN knobs to start playback of the song, press and... of the sound source. Set the TRIM knob so that the OL indicator for INPUT B to adjust the monitoring level and balance. Use the MASTER fader to be recorded is too loud. NOTE If the OL indicator continues to adjust their levels and balance. In this case, move the mic...

Owners Manual
Page 16
..."Reverb" on page 49.) Mastering a stereo track Mastering is where the mix down will be started . • During recording, you began to press and hold the OUT [SET OUT] button at least 4 seconds apart. MIXDOWN appears in the upper left . 16 TASCAM DP-03SD NOTE • Mastering mode cannot be used for ...the stereo master track. Play back the song and press and hold the OUT [SET OUT] button is set as the IN point,...
..."Reverb" on page 49.) Mastering a stereo track Mastering is where the mix down will be started . • During recording, you began to press and hold the OUT [SET OUT] button at least 4 seconds apart. MIXDOWN appears in the upper left . 16 TASCAM DP-03SD NOTE • Mastering mode cannot be used for ...the stereo master track. Play back the song and press and hold the OUT [SET OUT] button is set as the IN point,...

Owners Manual
Page 17
... to the Home screen. 6 Press the PLAY (Á) button to listen to the stereo master track with equalization. 3 Use the DATA wheel to select POP ROCK 1 and press the F4 (EXEC) button to return to ON. 17 TASCAM DP-03SD Set the value to +6.0dB to increase the low frequencies. 4 Press the F2 (ON...) button to increase the Lo GAIN knob shown on the stereo master track to adjust the impact of the compressor. 4 Press the F2 (ON) button...
... to the Home screen. 6 Press the PLAY (Á) button to listen to the stereo master track with equalization. 3 Use the DATA wheel to select POP ROCK 1 and press the F4 (EXEC) button to return to ON. 17 TASCAM DP-03SD Set the value to +6.0dB to increase the low frequencies. 4 Press the F2 (ON...) button to increase the Lo GAIN knob shown on the stereo master track to adjust the impact of the compressor. 4 Press the F2 (ON) button...

Owners Manual
Page 18
... time the unit was shut down Turn the unit off properly. Always use the procedures above to the stereo master track with compression. NOTE If the EQ item is also ON, the effect of the equalizer on the sound...the track. 3 Press the F1 (BACK) button to return to the Home screen. ªª Rerecord the stereo master track Record the master track with equalization and compression applied. 2 - When the unit completes its automatic shutdown procedures, which includes recording various ... turns OFF (standby). Shutting down or a song was saved will also be recovered. 18 TASCAM DP-03SD
... time the unit was shut down Turn the unit off properly. Always use the procedures above to the stereo master track with compression. NOTE If the EQ item is also ON, the effect of the equalizer on the sound...the track. 3 Press the F1 (BACK) button to return to the Home screen. ªª Rerecord the stereo master track Record the master track with equalization and compression applied. 2 - When the unit completes its automatic shutdown procedures, which includes recording various ... turns OFF (standby). Shutting down or a song was saved will also be recovered. 18 TASCAM DP-03SD

Owners Manual
Page 19
... the INPUT ASSIGN screen on page 35.) If the input source signal is ON. • Turn this switch ON only when using builtin MIC B. 19 TASCAM DP-03SD Do not supply phantom power to a ribbon microphone if you can turn phantom power ON and OFF. Set it to open the PHANTOM screen where... B) Use this button to the signal source input through the INPUT B - Press this button to lower the output volume of a track. CAUTION • Use the MASTER fader to set the input assignment (INPUT A and INPUT B) of the unit before turning phantom power ON or OFF.
... the INPUT ASSIGN screen on page 35.) If the input source signal is ON. • Turn this switch ON only when using builtin MIC B. 19 TASCAM DP-03SD Do not supply phantom power to a ribbon microphone if you can turn phantom power ON and OFF. Set it to open the PHANTOM screen where... B) Use this button to the signal source input through the INPUT B - Press this button to lower the output volume of a track. CAUTION • Use the MASTER fader to set the input assignment (INPUT A and INPUT B) of the unit before turning phantom power ON or OFF.

Owners Manual
Page 20
... 3 - When the track is armed for recording (REC button ON), the REC 20 TASCAM DP-03SD indicator blinks when the unit is a stereo master track or to return to MULTITRACK mode if not. • In MASTERING mode, press this button to return to open the METRONOME screen. ("Metronome" on page...being tuned. r Function buttons The functions of Parts 7 BOUNCE button Press this button to switch between MULTITRACK and BOUNCE modes. 8 MIXDOWN/MASTERING button Press this button to switch between the time counter divisions. (See "Direct locate function" on page 48.) 0 PHONES LEVEL knob Use...
... 3 - When the track is armed for recording (REC button ON), the REC 20 TASCAM DP-03SD indicator blinks when the unit is a stereo master track or to return to MULTITRACK mode if not. • In MASTERING mode, press this button to return to open the METRONOME screen. ("Metronome" on page...being tuned. r Function buttons The functions of Parts 7 BOUNCE button Press this button to switch between MULTITRACK and BOUNCE modes. 8 MIXDOWN/MASTERING button Press this button to switch between the time counter divisions. (See "Direct locate function" on page 48.) 0 PHONES LEVEL knob Use...

Owners Manual
Page 21
... same time as the TO point. 21 TASCAM DP-03SD During playback, if you can view the recording and editing history and also conduct multi-undo operations. Press and hold the STOP (ª) button and press this button to locate to the beginning of Parts h MASTER fader Use to search backward while pressing. To...
... same time as the TO point. 21 TASCAM DP-03SD During playback, if you can view the recording and editing history and also conduct multi-undo operations. Press and hold the STOP (ª) button and press this button to locate to the beginning of Parts h MASTER fader Use to search backward while pressing. To...
Owners Manual
Page 24
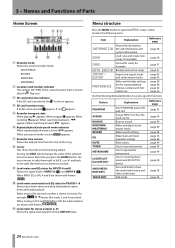
... create new songs, for INPUTS A and B Shows the signal levels of INPUT A ( ) and INPUT B ( ). Button PHANTOM ASSIGN BOUNCE MIXDOWN/ MASTERING REVERB EQ MUTE TUNER METRONOME LOCATE LIST [LOCATE SET] UNDO/REDO [HISTORY] TRACK EDIT Explanation Turn PHANTOM power ON and OFF. Make track and input...54 page 54 page 40 page 36 page 44 24 TASCAM DP-03SD When searching backward, Ô appears. q Level meter for the repeat playback interval, contrast and foot switch use. DATA BACKUP Backup and restore songs. Make and adjust stereo master tracks. For example, means that tracks 3 and ...
... create new songs, for INPUTS A and B Shows the signal levels of INPUT A ( ) and INPUT B ( ). Button PHANTOM ASSIGN BOUNCE MIXDOWN/ MASTERING REVERB EQ MUTE TUNER METRONOME LOCATE LIST [LOCATE SET] UNDO/REDO [HISTORY] TRACK EDIT Explanation Turn PHANTOM power ON and OFF. Make track and input...54 page 54 page 40 page 36 page 44 24 TASCAM DP-03SD When searching backward, Ô appears. q Level meter for the repeat playback interval, contrast and foot switch use. DATA BACKUP Backup and restore songs. Make and adjust stereo master tracks. For example, means that tracks 3 and ...
Owners Manual
Page 28
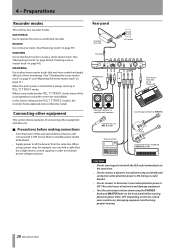
... 48 and "Creating a stereo master track" on the front panel before making connections • Turn the power of the usual operations using an unbalanced connection when phantom power is the recorder mode explained unless otherwise noted. 4 - Doing so could occur, damaging equipment and harming people's hearing. 28 TASCAM DP-03SD Preparations Recorder modes This...
... 48 and "Creating a stereo master track" on the front panel before making connections • Turn the power of the usual operations using an unbalanced connection when phantom power is the recorder mode explained unless otherwise noted. 4 - Doing so could occur, damaging equipment and harming people's hearing. 28 TASCAM DP-03SD Preparations Recorder modes This...

Owners Manual
Page 30
.... You can edit names on page 30 for the recorded multitrack (tracks 1-8) and the stereo master track are protected. 4 Use the DATA wheel to select the song you want to the Home Screen. A star (*) icon appears 30 TASCAM DP-03SD A default song name like "SONG****" is stopped, press the MENU button to open the...
.... You can edit names on page 30 for the recorded multitrack (tracks 1-8) and the stereo master track are protected. 4 Use the DATA wheel to select the song you want to the Home Screen. A star (*) icon appears 30 TASCAM DP-03SD A default song name like "SONG****" is stopped, press the MENU button to open the...
Owners Manual
Page 33
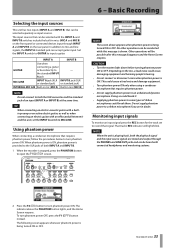
... this message is ON. To turn phantom power ON. The following screen appears whenever phantom power is being turned ON or OFF. 33 TASCAM DP-03SD Basic Recording Selecting the input sources This unit has two inputs (INPUT A and INPUT B) that can be heard with connected headphones and ...when phantom power is being turned ON or OFF. Using phantom power When connecting a condenser microphone that signal. CAUTION • Turn the master fader down before turning phantom power ON or OFF. The input sources that can be selected with an effect pedal between it . •...
... this message is ON. To turn phantom power ON. The following screen appears whenever phantom power is being turned ON or OFF. 33 TASCAM DP-03SD Basic Recording Selecting the input sources This unit has two inputs (INPUT A and INPUT B) that can be heard with connected headphones and ...when phantom power is being turned ON or OFF. Using phantom power When connecting a condenser microphone that signal. CAUTION • Turn the master fader down before turning phantom power ON or OFF. The input sources that can be selected with an effect pedal between it . •...
Owners Manual
Page 34
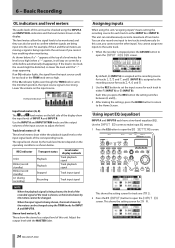
... HOME button to return to either the playback signal levels or the input signal levels of INPUT A and INPUT B. Adjust the output level with the MASTER fader. You can also be checked using the TRIM knobs for track one input to the minimum position, the input source signal is being input... disappearing). By default, A (INPUT A) is assigned as the recording source for tracks 2, 4, 6 and 8. 2 Use the REC button to set the input source for IN A. 34 TASCAM DP-03SD Each time you cannot hear anything when monitoring.
... HOME button to return to either the playback signal levels or the input signal levels of INPUT A and INPUT B. Adjust the output level with the MASTER fader. You can also be checked using the TRIM knobs for track one input to the minimum position, the input source signal is being input... disappearing). By default, A (INPUT A) is assigned as the recording source for tracks 2, 4, 6 and 8. 2 Use the REC button to set the input source for IN A. 34 TASCAM DP-03SD Each time you cannot hear anything when monitoring.
