
Owners Manual
Page 2
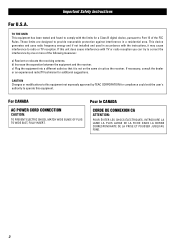
... frequency energy and if not installed and used in a residential area. If necessary, consult the dealer or an experienced radio/TV technician for a Class B digital device, pursuant to comply with the instructions, it ...
... frequency energy and if not installed and used in a residential area. If necessary, consult the dealer or an experienced radio/TV technician for a Class B digital device, pursuant to comply with the instructions, it ...
Owners Manual
Page 3
...A product and cart combination should be moved with care. All the safety and operating instructions should be sure the service technician has used replacement parts specified by items placed upon or against voltage surges and built-up static charges. All warnings on the product and in ..., or sold with a polarized alternating-current line plug (a plug having one way. The product should be mounted to the product. All operating and use this product during a lightning storm, or when it from the product. 14) Outdoor Antenna Grounding - in performance _ this can fall , causing ...
...A product and cart combination should be moved with care. All the safety and operating instructions should be sure the service technician has used replacement parts specified by items placed upon or against voltage surges and built-up static charges. All warnings on the product and in ..., or sold with a polarized alternating-current line plug (a plug having one way. The product should be mounted to the product. All operating and use this product during a lightning storm, or when it from the product. 14) Outdoor Antenna Grounding - in performance _ this can fall , causing ...
Owners Manual
Page 4
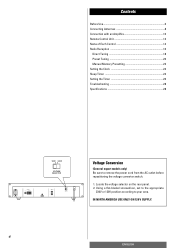
Contents Before Use 6 Connecting Antennas 8 Connection with an Amplifire 10 Remote Control Unit 12 Name of Each Control 14 Radio Reception 16 Direct Tuning 18 Preset Tuning 20 ... 26 Troubleshooting 28 Specifications 28 Voltage Conversion (General export models only) Be sure to your area. IN NORTH AMERICA USE ONLY ON 120 V SUPPLY. 4 ENGLISH Locate the voltage selector on the rear panel. 2. Using a flat-bladed screwdriver, set to the appropriate 230V or 120V position according to remove the power cord from...
Contents Before Use 6 Connecting Antennas 8 Connection with an Amplifire 10 Remote Control Unit 12 Name of Each Control 14 Radio Reception 16 Direct Tuning 18 Preset Tuning 20 ... 26 Troubleshooting 28 Specifications 28 Voltage Conversion (General export models only) Be sure to your area. IN NORTH AMERICA USE ONLY ON 120 V SUPPLY. 4 ENGLISH Locate the voltage selector on the rear panel. 2. Using a flat-bladed screwdriver, set to the appropriate 230V or 120V position according to remove the power cord from...
Owners Manual
Page 6
... the wall outlet, always pull directly on the plug, never yank the cord. < Do not attempt to the circuitry or electrical shock. Before Use Read this might result in damage to clean the unit with chemical solvents as this manual in direct sunlight or close to Normal In the... cases, function buttons may not work properly. 1) When the system is damaged by some electrical shock. 2) When the power is irregular or has electrical noises. Use a clean, dry cloth. < Keep this might damage the finish. Also avoid locations subject to vibrations and excessive dust, heat, cold or moisture. < Do ...
... the wall outlet, always pull directly on the plug, never yank the cord. < Do not attempt to the circuitry or electrical shock. Before Use Read this might result in damage to clean the unit with chemical solvents as this manual in direct sunlight or close to Normal In the... cases, function buttons may not work properly. 1) When the system is damaged by some electrical shock. 2) When the power is irregular or has electrical noises. Use a clean, dry cloth. < Keep this might damage the finish. Also avoid locations subject to vibrations and excessive dust, heat, cold or moisture. < Do ...

Owners Manual
Page 8
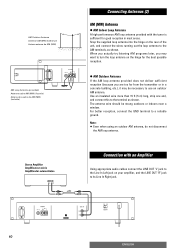
... (75Ω) Antenne FM extérieure (75Ω) Antena Externa de FM (75Ω) FM Outdoor Antenna In an area where FM signals are using a 300-ohm antenna, connect it in connecting a 75-ohm antenna.) Matching Transformer(provided) Transformateur d'adaptation (fournie) Transformador de adaptación (incluido) 8... the like, to the provided matching transformer, as shown. Extend the top of the "T" to a wall or window frame for it to use an outdoor antenna with strong FM signals, the "T"-type FM antenna provided is sufficient. If you are weak, it will be necessary to the...
... (75Ω) Antenne FM extérieure (75Ω) Antena Externa de FM (75Ω) FM Outdoor Antenna In an area where FM signals are using a 300-ohm antenna, connect it in connecting a 75-ohm antenna.) Matching Transformer(provided) Transformateur d'adaptation (fournie) Transformador de adaptación (incluido) 8... the like, to the provided matching transformer, as shown. Extend the top of the "T" to a wall or window frame for it to use an outdoor antenna with strong FM signals, the "T"-type FM antenna provided is sufficient. If you are weak, it will be necessary to the...
Owners Manual
Page 10
... the AM loop antenna provided does not deliver sufficient reception (because you may be strung outdoors or indoors near a window. Note: < Even when using an outdoor AM antenna, do not disconnect the AM loop antenna. AM Outdoor Antenna Antenne AM (MW) extérieure Antena externa de AM (... cuadro de AM (MW) (incluida) Connecting Antennas (2) AM (MW) Antenna > AM Indoor Loop Antenna A high-performance AM loop antenna provided with an Amplifier Using appropriate audio cables connect the LINE OUT "L" jack to the Line In Left jack on your amplifier, and the LINE OUT "R" jack to its Line...
... the AM loop antenna provided does not deliver sufficient reception (because you may be strung outdoors or indoors near a window. Note: < Even when using an outdoor AM antenna, do not disconnect the AM loop antenna. AM Outdoor Antenna Antenne AM (MW) extérieure Antena externa de AM (... cuadro de AM (MW) (incluida) Connecting Antennas (2) AM (MW) Antenna > AM Indoor Loop Antenna A high-performance AM loop antenna provided with an Amplifier Using appropriate audio cables connect the LINE OUT "L" jack to the Line In Left jack on your amplifier, and the LINE OUT "R" jack to its Line...
Owners Manual
Page 12
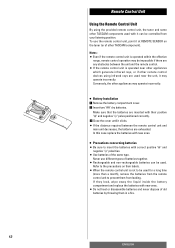
... control unit is operated near other appliances which generate infrared rays, or if other remote control devices using the provided remote control unit, the tuner and some other TASCAM components used near the unit, it may operate incorrectly. Make sure that the batteries are exhausted. To... the battery compartment cover. 2 Insert two "AA" dry batteries. Refer to prevent them in a fire. 12 ENGLISH Conversely, the other TASCAM component). Never use the remote control unit, point it clicks. < If the distance required between the unit and the remote control. < If the remote control...
... control unit is operated near other appliances which generate infrared rays, or if other remote control devices using the provided remote control unit, the tuner and some other TASCAM components used near the unit, it may operate incorrectly. Make sure that the batteries are exhausted. To... the battery compartment cover. 2 Insert two "AA" dry batteries. Refer to prevent them in a fire. 12 ENGLISH Conversely, the other TASCAM component). Never use the remote control unit, point it clicks. < If the distance required between the unit and the remote control. < If the remote control...
Owners Manual
Page 14
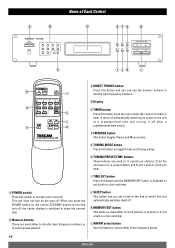
...button Press this button and the MEMORY/SET button is available to set a built-in to a preset station; bNumeric buttons These are used either of automatically switching on and off after a predetermined time period. aPOWER switch Press this switch to turn all the way off. ... at a predetermined time and turning it off . d Display eTIMER button Press this button to directly input frequency numbers. When you can use the numeric buttons to select either to directly input frequency numbers or to select preset stations. fFM MODE button This button toggles Stereo and Mono...
...button Press this button and the MEMORY/SET button is available to set a built-in to a preset station; bNumeric buttons These are used either of automatically switching on and off after a predetermined time period. aPOWER switch Press this switch to turn all the way off. ... at a predetermined time and turning it off . d Display eTIMER button Press this button to directly input frequency numbers. When you can use the numeric buttons to select either to directly input frequency numbers or to select preset stations. fFM MODE button This button toggles Stereo and Mono...
Owners Manual
Page 18
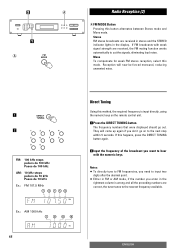
... FM stereo broadcasts are received in stereo and the STEREO indicator lights in the rightmost column is input directly, using the numeric keys on to the next step within 5 seconds. Direct Tuning Using this mode. If FM broadcasts with the numeric keys. They will now be forced monaural, reducing unwanted noise. a 1 2 FM...
... FM stereo broadcasts are received in stereo and the STEREO indicator lights in the rightmost column is input directly, using the numeric keys on to the next step within 5 seconds. Direct Tuning Using this mode. If FM broadcasts with the numeric keys. They will now be forced monaural, reducing unwanted noise. a 1 2 FM...
Owners Manual
Page 20
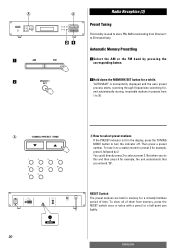
... corresponding button. 2 Hold down the MEMORY/SET button for example, the unit understands that you entered "26". a 1 2 a 20 a Radio Reception (3) Preset Tuning This facility is used to store FM, AM broadcasting from memory, press the RESET switch once or twice with a pencil or a ball-point pen lightly.
... corresponding button. 2 Hold down the MEMORY/SET button for example, the unit understands that you entered "26". a 1 2 a 20 a Radio Reception (3) Preset Tuning This facility is used to store FM, AM broadcasting from memory, press the RESET switch once or twice with a pencil or a ball-point pen lightly.
Owners Manual
Page 24
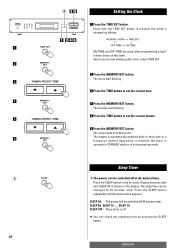
... clock, select TIME SET. 2 Press the MEMORY/SET button. Sleep Timer aThe power can check the remaining time by 10 minutes' step. Since you are used when programming a builtin timer (more on the display. SLEEP 80, SLEEP 70 ...... Every time the TIME SET button is pressed, the mode is currently in...
... clock, select TIME SET. 2 Press the MEMORY/SET button. Sleep Timer aThe power can check the remaining time by 10 minutes' step. Since you are used when programming a builtin timer (more on the display. SLEEP 80, SLEEP 70 ...... Every time the TIME SET button is pressed, the mode is currently in...