
Datasheet
Page 1
... definition DVI or VGA monitor. FEATURES • Compliant with static, interactive and video content • Supports Windows 2000/XP/Vista (include Vista Aero mode) operating systems • 2 year limited warranty TU2-DVIV rev:10.02.2008 Install the driver and plug the USB 2.0 cable into a LCD or CRT monitor... that has a free VGA or DVI port. medianet USB to DVI/VGA Adapter TU2-DVIV (A1.0R) The USB to DVI / VGA Adapter uses a USB port on your Microsoft Windows desktop or laptop computer. Connect your monitor image onto 7 monitors or display a single viewing field ...
... definition DVI or VGA monitor. FEATURES • Compliant with static, interactive and video content • Supports Windows 2000/XP/Vista (include Vista Aero mode) operating systems • 2 year limited warranty TU2-DVIV rev:10.02.2008 Install the driver and plug the USB 2.0 cable into a LCD or CRT monitor... that has a free VGA or DVI port. medianet USB to DVI/VGA Adapter TU2-DVIV (A1.0R) The USB to DVI / VGA Adapter uses a USB port on your Microsoft Windows desktop or laptop computer. Connect your monitor image onto 7 monitors or display a single viewing field ...

Datasheet
Page 2
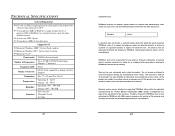
...Fax: 1-310-961-5511 Web: www.trendnet.com Email: sales@trendnet.com To Order Please Call: 1-888-326-6061 TRENDnet is subject to DVI/VGA Adapter TU2-DVIV (A1.0R) SPECIFICATIONS Hardware Standard Interface ...Power mode Expansions Supported OS Resolution System Requirements Dimension Weight Temperature Humidity Certifications • USB 2.0 ; USB to change at any time, without notice. VGA (DVI to D-Sub15 VGA adapter) • Bus-power • Up to 6 adapters (7 monitors) • Windows...
...Fax: 1-310-961-5511 Web: www.trendnet.com Email: sales@trendnet.com To Order Please Call: 1-888-326-6061 TRENDnet is subject to DVI/VGA Adapter TU2-DVIV (A1.0R) SPECIFICATIONS Hardware Standard Interface ...Power mode Expansions Supported OS Resolution System Requirements Dimension Weight Temperature Humidity Certifications • USB 2.0 ; USB to change at any time, without notice. VGA (DVI to D-Sub15 VGA adapter) • Bus-power • Up to 6 adapters (7 monitors) • Windows...
User's Guide
Page 2
... with this user's guide, may cause harmful interference to radio communications. TABLE OF CONTENTS INTRODUCTION 1 FEATURES 1 SYSTEM REQUIREMENT 2 UNPACKING AND SETUP 3 UNPACKING 3 SOFTWARE INSTALLATION 5 WINDOWS VISTA INSTALL 5 WINDOWS 2000/XP INSTALL 7 HARDWARE INSTALLATION 9 CONNECTING THE ADAPTER 9 CONNECTING THE MONITORS 11 CONFIGURE YOUR SCREEN 13 SCREEN RESOLUTION 14 COLOR QUALITY 15 SCREEN ROTATION...
... with this user's guide, may cause harmful interference to radio communications. TABLE OF CONTENTS INTRODUCTION 1 FEATURES 1 SYSTEM REQUIREMENT 2 UNPACKING AND SETUP 3 UNPACKING 3 SOFTWARE INSTALLATION 5 WINDOWS VISTA INSTALL 5 WINDOWS 2000/XP INSTALL 7 HARDWARE INSTALLATION 9 CONNECTING THE ADAPTER 9 CONNECTING THE MONITORS 11 CONFIGURE YOUR SCREEN 13 SCREEN RESOLUTION 14 COLOR QUALITY 15 SCREEN ROTATION...
User's Guide
Page 3
... ‹ Fully integrated into the Windows system and appear as a virtual graphics card (VGC). ‹ Full flexibility to clone or extend desktop display space. ‹ Static, interactive and video content. ‹ Auto display identification using a simple USB connection. TU2-DVIV allows you for more attached screens. ...; At least one USB 2.0 port. ‹ 30 megabytes (MB) of RAM for two attached screens, more for purchasing the TU2-DVIV. INTRODUCTION Thank you to connect up to your workspace and increase productivity with multiple monitors. You can now organize your desktop or laptop...
... ‹ Fully integrated into the Windows system and appear as a virtual graphics card (VGC). ‹ Full flexibility to clone or extend desktop display space. ‹ Static, interactive and video content. ‹ Auto display identification using a simple USB connection. TU2-DVIV allows you for more attached screens. ...; At least one USB 2.0 port. ‹ 30 megabytes (MB) of RAM for two attached screens, more for purchasing the TU2-DVIV. INTRODUCTION Thank you to connect up to your workspace and increase productivity with multiple monitors. You can now organize your desktop or laptop...

User's Guide
Page 5
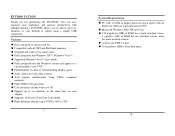
... button to install the control software to continue. Click on your PC as shown. 6 When the process is finished click Yes to the next step. 4. Windows Vista Install 1. Click Continue to go to reboot. 7. Wait a few moments for permission to your PC and if ask for permission to run the CD.... Plug in your PC 3. After reading the License Agreement click I Accept to continue then the Autorun wizard will appear. 2. Insert the CD-ROM in the TU2-DVIV and a message will start. 5 5. SOFTWARE INSTALLATION This chapter describes the software installation procedure of the...
... button to install the control software to continue. Click on your PC as shown. 6 When the process is finished click Yes to the next step. 4. Windows Vista Install 1. Click Continue to go to reboot. 7. Wait a few moments for permission to your PC and if ask for permission to run the CD.... Plug in your PC 3. After reading the License Agreement click I Accept to continue then the Autorun wizard will appear. 2. Insert the CD-ROM in the TU2-DVIV and a message will start. 5 5. SOFTWARE INSTALLATION This chapter describes the software installation procedure of the...
User's Guide
Page 6
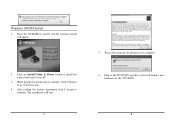
When prompt for the process to complete. 6. The installation will found a new hardware of the TU2-DVIV. 8 Plug in your PC 3. Click on Install Utility & Driver button to install the control software to continue. Windows 2000/XP Install 1. Wait a few moments for permission to your PC and the Autorun wizard will appear. 2. Click Continue to go to continue. Insert the CD-ROM in the TU2-DVIV and the system will start. 7 5. After reading the License Agreement click I Accept to the next step. 4.
When prompt for the process to complete. 6. The installation will found a new hardware of the TU2-DVIV. 8 Plug in your PC 3. Click on Install Utility & Driver button to install the control software to continue. Windows 2000/XP Install 1. Wait a few moments for permission to your PC and the Autorun wizard will appear. 2. Click Continue to go to continue. Insert the CD-ROM in the TU2-DVIV and the system will start. 7 5. After reading the License Agreement click I Accept to the next step. 4.

User's Guide
Page 11
Drag it to activate Display Settings. 4. The display will be highlighted with a blue border whilst you wish to move the position of a display, click and hold the monitor icon you are moving the display to extend your desktop. Configuring Extend Mode 1. Display Settings window now opens. Select Advanced from the Extend To submenu to choose where to its new position 17 18 Or 3. To move . 2. Select Right, Left, Above, and Below from the menu to the desired position.
Drag it to activate Display Settings. 4. The display will be highlighted with a blue border whilst you wish to move the position of a display, click and hold the monitor icon you are moving the display to extend your desktop. Configuring Extend Mode 1. Display Settings window now opens. Select Advanced from the Extend To submenu to choose where to its new position 17 18 Or 3. To move . 2. Select Right, Left, Above, and Below from the menu to the desired position.
User's Guide
Page 13
...are no user serviceable parts inside the product. There are replaced will become the property of TRENDnet. TU2-DVIV 2 Years If a product does not operate as warranted above during the applicable warranty period, TRENDnet shall, at its products against defects in material and workmanship, under normal use (iii)...153; At least one USB 2.0 port ™ 30 megabytes (MB) of free disk space Supported OS ™ Microsoft Windows 2000™ Service Pack 4 and up ™ Microsoft Windows XP™ Service Pack 2 and up ™ Microsoft Vista™ Power mode: USB Bus Powered mode Number of ...
...are no user serviceable parts inside the product. There are replaced will become the property of TRENDnet. TU2-DVIV 2 Years If a product does not operate as warranted above during the applicable warranty period, TRENDnet shall, at its products against defects in material and workmanship, under normal use (iii)...153; At least one USB 2.0 port ™ 30 megabytes (MB) of free disk space Supported OS ™ Microsoft Windows 2000™ Service Pack 4 and up ™ Microsoft Windows XP™ Service Pack 2 and up ™ Microsoft Vista™ Power mode: USB Bus Powered mode Number of ...

Quick Installation Guide
Page 5
How to Install Note: Do not connect the TU2-DVIV to your CD-ROM Drive. 2. Insert the Driver CD-ROM into your computer until instructed to restart your computer (Windows 2000/Vista only). 3 English Choose the desired language, read the Software End User License Agreement and then click I Accept. 5. Click Yes to do so. 1. Click Install Utility & Driver. 4. Click Run autorun.exe (Windows Vista only). 3. 2.
How to Install Note: Do not connect the TU2-DVIV to your CD-ROM Drive. 2. Insert the Driver CD-ROM into your computer until instructed to restart your computer (Windows 2000/Vista only). 3 English Choose the desired language, read the Software End User License Agreement and then click I Accept. 5. Click Yes to do so. 1. Click Install Utility & Driver. 4. Click Run autorun.exe (Windows Vista only). 3. 2.

Quick Installation Guide
Page 8
... the computer is on the Driver CD-ROM or contact TRENDnet's Technical Support Department. 6 If you can connect or disconnect TU2-DVIV while the computer is on because the USB interface is Plug-and-Play compliant and hot-pluggable. Troubleshooting Q1: Can I do? Q2: Windows is unable to the User's Guide included on ? A1...
... the computer is on the Driver CD-ROM or contact TRENDnet's Technical Support Department. 6 If you can connect or disconnect TU2-DVIV while the computer is on because the USB interface is Plug-and-Play compliant and hot-pluggable. Troubleshooting Q1: Can I do? Q2: Windows is unable to the User's Guide included on ? A1...


