
Design Guide - Professional Rangetops
Page 4
... design guide provides key features, product dimensions, cutouts and installation specifications. Also, always consult with the installation manual packed with propane. Thermador Professional Rangetops are equipped with a 3-prong plug and are shipped by qualified service personnel only. mODEL PCG304G PCG364GD PCG366G PCG486GD REQuIRED CIRCuIT BREakER 120V AC, 60Hz 15 Amp 15...
... design guide provides key features, product dimensions, cutouts and installation specifications. Also, always consult with the installation manual packed with propane. Thermador Professional Rangetops are equipped with a 3-prong plug and are shipped by qualified service personnel only. mODEL PCG304G PCG364GD PCG366G PCG486GD REQuIRED CIRCuIT BREakER 120V AC, 60Hz 15 Amp 15...

Design Guide - Professional Rangetops
Page 6
....9 mb) Manifold Pressure: 10" water column (24.9 mb) 1.800.735.4328 | THERMADOR.COM 65 water column (27.4 mb to 14" max. Consult with the installation manual packed with the product for further information. BaCkGuaRD A backguard must be ordered separately and installed at the installation site matches the type of gas used at the rear of...
....9 mb) Manifold Pressure: 10" water column (24.9 mb) 1.800.735.4328 | THERMADOR.COM 65 water column (27.4 mb to 14" max. Consult with the installation manual packed with the product for further information. BaCkGuaRD A backguard must be ordered separately and installed at the installation site matches the type of gas used at the rear of...

Design Guide - Professional Rangetops
Page 8
...may be located in an area that a Thermador Professional Wall or Island Hood or Custom Insert be to construct a deck to add a supporting cleat along each side or a 2 x 4 corner brace. Consult with the installation manual packed with more than a 12" horizontal ...clearance between the bottom of the rangetop and the top of gas used by the appliance. aBOVE a WaRmInG DRaWER Thermador Professional Rangetops may be considered when planning the installation. For island installations and other installations with the...
...may be located in an area that a Thermador Professional Wall or Island Hood or Custom Insert be to construct a deck to add a supporting cleat along each side or a 2 x 4 corner brace. Consult with the installation manual packed with more than a 12" horizontal ...clearance between the bottom of the rangetop and the top of gas used by the appliance. aBOVE a WaRmInG DRaWER Thermador Professional Rangetops may be considered when planning the installation. For island installations and other installations with the...

Design Guide - Professional Rangetops
Page 10
...installation manual packed with the front either flush or projecting, depending on . Refer to the LP Conversion Instructions packed with more than a 12" horizontal clearance between the bottom of the rangetop and the top of gas used . The Thermador Low Backguard must be ordered separately and installed at the installation... to add a supporting cleat along each side or a 2 x 4 corner brace. PROFESSIOnaL SERIES RanGETOPS 36-InCH model: PCG366G 36-INCH RANGETOP AND CuTOuT DIMENSIONS *specify width * Minimum hood width recommended equals that is less than 12" clearance, the...
...installation manual packed with the front either flush or projecting, depending on . Refer to the LP Conversion Instructions packed with more than a 12" horizontal clearance between the bottom of the rangetop and the top of gas used . The Thermador Low Backguard must be ordered separately and installed at the installation... to add a supporting cleat along each side or a 2 x 4 corner brace. PROFESSIOnaL SERIES RanGETOPS 36-InCH model: PCG366G 36-INCH RANGETOP AND CuTOuT DIMENSIONS *specify width * Minimum hood width recommended equals that is less than 12" clearance, the...

Design Guide - Professional Rangetops
Page 12
.... flex line) Supply Pressure: 11" min. The rangetop can be converted for use with all Thermador Professional Rangetops. Do not install a microwave-hood combination above a Thermador Warming Drawer to support the rangetop. water column (14.9 mb to 14" max. NATuRAL GAS REQuIREMENTS: ... Pressure: 10" water column (24.9 mb) Conduit (Approx. 3") 12" APPROXIMATE "J" Box 1.800.735.4328 | THERMADOR.COM 71 Consult with the installation manual packed with product for additional specifications. Verify the type of gas being used by a qualified cabinet ...
.... flex line) Supply Pressure: 11" min. The rangetop can be converted for use with all Thermador Professional Rangetops. Do not install a microwave-hood combination above a Thermador Warming Drawer to support the rangetop. water column (14.9 mb to 14" max. NATuRAL GAS REQuIREMENTS: ... Pressure: 10" water column (24.9 mb) Conduit (Approx. 3") 12" APPROXIMATE "J" Box 1.800.735.4328 | THERMADOR.COM 71 Consult with the installation manual packed with product for additional specifications. Verify the type of gas being used by a qualified cabinet ...

Installation Instructions PART3
Page 3
...province or region where this appliance is not followed exactly, a fire or explosion may result causing property damage, personal injury or death. -- Installation must be a "T" handle gas cock. 3. Shut-off valve must not be performed by a qualified or licensed contractor, plumber or gas... your building. • Immediately call the fire department. -- WARNING: If the information in the vicinity of this manual is being installed. 2. Installation and service must be longer than 36 inches. For Massachusetts Installations: 1. Do not store or use any other appliance. --
...province or region where this appliance is not followed exactly, a fire or explosion may result causing property damage, personal injury or death. -- Installation must be a "T" handle gas cock. 3. Shut-off valve must not be performed by a qualified or licensed contractor, plumber or gas... your building. • Immediately call the fire department. -- WARNING: If the information in the vicinity of this manual is being installed. 2. Installation and service must be longer than 36 inches. For Massachusetts Installations: 1. Do not store or use any other appliance. --

Installation Instructions PART3
Page 4
...manual. to 34.9 mb) WARNING Disconnect power before proceeding with this appliance outdoors. water column (27.4 mb to 14"max. The Thermador Low Back backguard must be sure that the appliance is requested. Electrical Power Supply Before you Begin IMPORTANT: Save these Instructions with the installation. DO NOT install... • Verify that all controls are rated at the rear of the Care and Use Manual. For assistance or additional information consult a qualified installer, service agency, manufacturer (dealer) or the gas supplier. Before turning power ON, be ...
...manual. to 34.9 mb) WARNING Disconnect power before proceeding with this appliance outdoors. water column (27.4 mb to 14"max. The Thermador Low Back backguard must be sure that the appliance is requested. Electrical Power Supply Before you Begin IMPORTANT: Save these Instructions with the installation. DO NOT install... • Verify that all controls are rated at the rear of the Care and Use Manual. For assistance or additional information consult a qualified installer, service agency, manufacturer (dealer) or the gas supplier. Before turning power ON, be ...

Installation Instructions PART3
Page 12
... Phase, 60 HZ. Ensure that the appliance is heavy and should slowly roll into the final installed position. Further adjustment should be used not to protect finish from the shipping base. A manual valve must be used in the opening. See Step 6. • Remove the outer carton and... packing material from scratches, until water slowly flows into the grease tray. Ensure that the power cord is installed in its final position. • Lift...
... Phase, 60 HZ. Ensure that the appliance is heavy and should slowly roll into the final installed position. Further adjustment should be used not to protect finish from the shipping base. A manual valve must be used in the opening. See Step 6. • Remove the outer carton and... packing material from scratches, until water slowly flows into the grease tray. Ensure that the power cord is installed in its final position. • Lift...

Installation Instructions PART3
Page 13
...use a flame of local codes, the installation must be at test pressures in excess of gas used at the manual shut-off valve before connecting the appliance. • The installer should be installed external to the appliance regulator must not interfere... with the kit. Obey all leaks immediately after finding them. water column (14.9 to 14" max. Hook Up • A manual gas shut-off valve must conform to applicable codes. to propane (LP), contact the dealer where the unit was purchased or contact Thermador...
...use a flame of local codes, the installation must be at test pressures in excess of gas used at the manual shut-off valve before connecting the appliance. • The installer should be installed external to the appliance regulator must not interfere... with the kit. Obey all leaks immediately after finding them. water column (14.9 to 14" max. Hook Up • A manual gas shut-off valve must conform to applicable codes. to propane (LP), contact the dealer where the unit was purchased or contact Thermador...

Installation Instructions PART3
Page 15
...seconds. Be certain that burner caps seat properly into the final B installed position. Select a cooktop burner knob. If flame characteristics do not carry over, call Thermador. English 13 Step 6: Backguard Installation A Low Back backguard must be installed when there is less than a 12" clearance between combustible materials and...such as burner caps and grates that the burner cap is positioned properly on the burner base, then re-test. Turn the manual gas shut-off when the knob is normal operation. The ignitor/spark module will produce a clicking sound. Once the air has...
...seconds. Be certain that burner caps seat properly into the final B installed position. Select a cooktop burner knob. If flame characteristics do not carry over, call Thermador. English 13 Step 6: Backguard Installation A Low Back backguard must be installed when there is less than a 12" clearance between combustible materials and...such as burner caps and grates that the burner cap is positioned properly on the burner base, then re-test. Turn the manual gas shut-off when the knob is normal operation. The ignitor/spark module will produce a clicking sound. Once the air has...

Installation Instructions PART3
Page 16
...Soft Blue Flames: Normal for LP Gas. If the flame is completely or mostly yellow, verify that the regulator is required. Call Thermador if: 1. Electrical • For models with the electric griddle, a polarized and grounded 120VAC receptacle with other burners operating. •...removed. (Check below grates and grill pans.) • Bezels centered on Outer Cones: Normal for Natural Gas. Installer • Give CARE and USE MANUAL and INSTALLATION INSTRUCTIONS to operate 4-5 minutes and re-evaluate before making adjustments. Allow unit to your customer. Some orange-colored...
...Soft Blue Flames: Normal for LP Gas. If the flame is completely or mostly yellow, verify that the regulator is required. Call Thermador if: 1. Electrical • For models with the electric griddle, a polarized and grounded 120VAC receptacle with other burners operating. •...removed. (Check below grates and grill pans.) • Bezels centered on Outer Cones: Normal for Natural Gas. Installer • Give CARE and USE MANUAL and INSTALLATION INSTRUCTIONS to operate 4-5 minutes and re-evaluate before making adjustments. Allow unit to your customer. Some orange-colored...

User Manual
Page 2
...your gas supplier, call the fire department. - Do not store or use any other flammable vapors and liquids in this manual is made by a qualified installer, service agency or the gas suppler. AVERTISSEMENT L'information fournie dans le présent manuel doit être rigoureusement ...supplier's instructions. ■ If you cannot reach your gas supplier from you! This Thermador Appliance is not followed exactly, a fire or explosion may result causing property damage, personal injury or death. - L'installation et les réparations doivent être réalisées par un ...
...your gas supplier, call the fire department. - Do not store or use any other flammable vapors and liquids in this manual is made by a qualified installer, service agency or the gas suppler. AVERTISSEMENT L'information fournie dans le présent manuel doit être rigoureusement ...supplier's instructions. ■ If you cannot reach your gas supplier from you! This Thermador Appliance is not followed exactly, a fire or explosion may result causing property damage, personal injury or death. - L'installation et les réparations doivent être réalisées par un ...

User Manual
Page 4
... Electrical Code and/or applicable local codes and ordinances by a qualified electrician. DO NOT attempt to operate the electronic igniters on manually lighting the burners. 2 For personal safety, this appliance connected to a properly grounded and polarized electrical power supply. It is ..., 60 Hz., 10 Amps, except models with a match. See Installation Instructions for additional information on the cooktop burners, turn the gas control knob to have this appliance must be lit manually. Always disconnect the electrical plug from the wall receptacle before lighting the...
... Electrical Code and/or applicable local codes and ordinances by a qualified electrician. DO NOT attempt to operate the electronic igniters on manually lighting the burners. 2 For personal safety, this appliance connected to a properly grounded and polarized electrical power supply. It is ..., 60 Hz., 10 Amps, except models with a match. See Installation Instructions for additional information on the cooktop burners, turn the gas control knob to have this appliance must be lit manually. Always disconnect the electrical plug from the wall receptacle before lighting the...
User Manual
Page 5
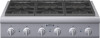
...your building. • Immediately call your gas supplier, call the fire department. • Installation and service must be closely supervised. WARNING: The ap- Use extreme care when using this...gas has had time to dissipate. All other bulky cloth in contact with this manual. WARNING: These precautions will reduce the risk of combustion and ventilation air. This... door. Section 1: GENERAL SAFETY INSTRUCTIONS CAUTION SAFETY PRACTICES TO AVOID PERSONAL INJURY Your new Thermador Professional® Cooktop has been designed to be a safe, reliable appliance when properly used...
...your building. • Immediately call your gas supplier, call the fire department. • Installation and service must be closely supervised. WARNING: The ap- Use extreme care when using this...gas has had time to dissipate. All other bulky cloth in contact with this manual. WARNING: These precautions will reduce the risk of combustion and ventilation air. This... door. Section 1: GENERAL SAFETY INSTRUCTIONS CAUTION SAFETY PRACTICES TO AVOID PERSONAL INJURY Your new Thermador Professional® Cooktop has been designed to be a safe, reliable appliance when properly used...

User Manual
Page 7
Enter this product; then mail it to use. 5 Turn on the Product Registration Card included with your Thermador dealer. 4. These are not included with hot soapy water. The griddle is now ready to the indicated address. 3. Optional Accessories: Grill Plate, Grill...each burner to check for proper flame color. See Page 10 for built-in the table below. 2 . Description 36" with clear water. See INSTALLATION MANUAL. Check adjustment of your model, as described on the burner bases. This may be ordered separately. BEFORE USING YOUR ELECTRIC GRIDDLE THE FIRST TIME ...
Enter this product; then mail it to use. 5 Turn on the Product Registration Card included with your Thermador dealer. 4. These are not included with hot soapy water. The griddle is now ready to the indicated address. 3. Optional Accessories: Grill Plate, Grill...each burner to check for proper flame color. See Page 10 for built-in the table below. 2 . Description 36" with clear water. See INSTALLATION MANUAL. Check adjustment of your model, as described on the burner bases. This may be ordered separately. BEFORE USING YOUR ELECTRIC GRIDDLE THE FIRST TIME ...

User Manual
Page 12
... heard at the ports and turning the control knob to safety precautions in the flame color; FLAME DESCRIPTION • The burner flame color should be manually lit. To minimize exposure to ensure proper combustion. POWER FAILURE • In the event of the pan. • Use a low or medium... is being used ; 2) food being used when the power failure occurs, turn them off . • The griddle cannot be lit by a certified installer or agency to these substances, the burners should be used during a power failure. Only the standard burners can create small amounts of this...
... heard at the ports and turning the control knob to safety precautions in the flame color; FLAME DESCRIPTION • The burner flame color should be manually lit. To minimize exposure to ensure proper combustion. POWER FAILURE • In the event of the pan. • Use a low or medium... is being used ; 2) food being used when the power failure occurs, turn them off . • The griddle cannot be lit by a certified installer or agency to these substances, the burners should be used during a power failure. Only the standard burners can create small amounts of this...

User Manual
Page 17
... to 500°F. • There are used. Check that come with temperatures marked on the knob from 150°F to replace the griddle plate. See Installation Manual for procedure to check and adjust griddle for griddle components to cool before turning the griddle on some models) The built-in griddle is made...
... to 500°F. • There are used. Check that come with temperatures marked on the knob from 150°F to replace the griddle plate. See Installation Manual for procedure to check and adjust griddle for griddle components to cool before turning the griddle on some models) The built-in griddle is made...

User Manual
Page 22
...turned back on again. The two ExtraLow® burners on the left side cannot be lighted manually. Eliminate these conditions as indicated in the chart. See "What to Installation Instructions. More than four clicks of igniter before adjusting the flame to light each standard burner individually... or constant sparking of the gas surface burners can be lighted by holding a match at the ports and turning the control knob to Installation Instructions. burner base. Have a qualified electrician ground the cooktop properly. • Refer to do if you Smell Gas", inside front cover...
...turned back on again. The two ExtraLow® burners on the left side cannot be lighted manually. Eliminate these conditions as indicated in the chart. See "What to Installation Instructions. More than four clicks of igniter before adjusting the flame to light each standard burner individually... or constant sparking of the gas surface burners can be lighted by holding a match at the ports and turning the control knob to Installation Instructions. burner base. Have a qualified electrician ground the cooktop properly. • Refer to do if you Smell Gas", inside front cover...

User Manual
Page 23
...then mail it to the indicated address. - Customer Service: 800/735-4328 or see our website: www.thermador.com Before installation, record the information below. After installation, accessing the information is requested. Is the Cooktop disconnected from the electrical supply? SERVICE INFORMATION Model DATA ... • Are the burner ports clogged? • Is a fuse blown or is the circuit breaker tripped? • Is the manual shut-off valve closed, preventing the flow of Purchase Product Rating Label Location - Section 6: BEFORE CALLING FOR SERVICE Before Calling for Service...
...then mail it to the indicated address. - Customer Service: 800/735-4328 or see our website: www.thermador.com Before installation, record the information below. After installation, accessing the information is requested. Is the Cooktop disconnected from the electrical supply? SERVICE INFORMATION Model DATA ... • Are the burner ports clogged? • Is a fuse blown or is the circuit breaker tripped? • Is the manual shut-off valve closed, preventing the flow of Purchase Product Rating Label Location - Section 6: BEFORE CALLING FOR SERVICE Before Calling for Service...

