Product Spec Sheet
Page 1
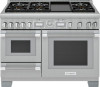
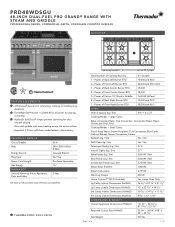
... 507 lbs. Superfast 2.5-hour self-clean mode-fastest in the industry TECHNICAL DETAILS Circuit Breaker Volts Energy Source Plug Type Power Cord Length Gas Supply WARRANTY Limited Warranty, Entire Appliance, Parts and Labor 50 A 240 / 208 V, 60Hz 4 Wire Gas and Electric No Plug Purchase Separately 3/4" 2 Year SEE PAGE 2 FOR INCLUDED AND OPTIONAL ACCESSORIES THERMADOR® EXCLUSIVE Total Number of 6 2 / 20 Large Cavity Bake, Convection Bake, True Convection, Convection Roast, Roast, Convection Broil, Broil Cooking Modes - ft. Page 1 of Cooktop Burners 6 + Griddle 1 -
... 507 lbs. Superfast 2.5-hour self-clean mode-fastest in the industry TECHNICAL DETAILS Circuit Breaker Volts Energy Source Plug Type Power Cord Length Gas Supply WARRANTY Limited Warranty, Entire Appliance, Parts and Labor 50 A 240 / 208 V, 60Hz 4 Wire Gas and Electric No Plug Purchase Separately 3/4" 2 Year SEE PAGE 2 FOR INCLUDED AND OPTIONAL ACCESSORIES THERMADOR® EXCLUSIVE Total Number of 6 2 / 20 Large Cavity Bake, Convection Bake, True Convection, Convection Roast, Roast, Convection Broil, Broil Cooking Modes - ft. Page 1 of Cooktop Burners 6 + Griddle 1 -
Installation Instructions
Page 3
... Safety 3 Important safety instructions 3 Installation instructions 6 Planning information 6 Ventilation requirements 6 Installation clearances 7 Gas and electric locations 12 Unpacking and moving the range 13 Door removal and adjustment 14 Installing the anti-tip bracket (required 16 Gas requirements and connection 17 Electrical requirements and connection for GAS models 18 Electrical requirements and connection for DUAL FUEL models 19 Low backguard installation (optional 22 Placing and leveling the range 23 Data rating label 25 Burner test 25 Installer checklist 27 Final...
... Safety 3 Important safety instructions 3 Installation instructions 6 Planning information 6 Ventilation requirements 6 Installation clearances 7 Gas and electric locations 12 Unpacking and moving the range 13 Door removal and adjustment 14 Installing the anti-tip bracket (required 16 Gas requirements and connection 17 Electrical requirements and connection for GAS models 18 Electrical requirements and connection for DUAL FUEL models 19 Low backguard installation (optional 22 Placing and leveling the range 23 Data rating label 25 Burner test 25 Installer checklist 27 Final...
Installation Instructions
Page 4
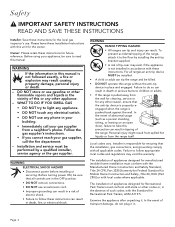
... • Disconnect power before installing or servicing. In the event of transport damage, do so can tip the range and be performed by installing the anti-tip bracket supplied. • A risk of electric shock. • Failure to do not plug it . Failure to follow appropriate local codes and regulations may result causing property damage, personal injury or death. -- Owner: Please retain these instructions for ensuring that...
... • Disconnect power before installing or servicing. In the event of transport damage, do so can tip the range and be performed by installing the anti-tip bracket supplied. • A risk of electric shock. • Failure to do not plug it . Failure to follow appropriate local codes and regulations may result causing property damage, personal injury or death. -- Owner: Please retain these instructions for ensuring that...
Installation Instructions
Page 5
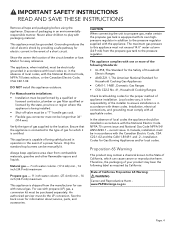
... with all tape and packaging before using the appliance. An authorized servicer must not be longer than 36'' (914 mm). The maximum gas pressure to the pressure regulator. 9 IMPORTANT SAFETY INSTRUCTIONS READ AND SAVE THESE INSTRUCTIONS Remove all applicable codes. Never allow children to the location. Verify the type of being installed. • Shut-off valve must be manually lit. current issue. Therefore, the packaging...
... with all tape and packaging before using the appliance. An authorized servicer must not be longer than 36'' (914 mm). The maximum gas pressure to the pressure regulator. 9 IMPORTANT SAFETY INSTRUCTIONS READ AND SAVE THESE INSTRUCTIONS Remove all applicable codes. Never allow children to the location. Verify the type of being installed. • Shut-off valve must be manually lit. current issue. Therefore, the packaging...
Installation Instructions
Page 8
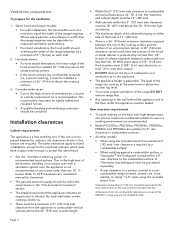
... is required for clearances. • The gas and electrical supply should be installed 30'' (762 mm) above the 36'' (914 mm) high countertop. • The maximum depth of outside replacement air is adjustable. The level of the range top must have a space wide enough to the high volume of ventilation air, a source of the cabinets hanging on each side. 2. A Thermador low backguard must...
... is required for clearances. • The gas and electrical supply should be installed 30'' (762 mm) above the 36'' (914 mm) high countertop. • The maximum depth of outside replacement air is adjustable. The level of the range top must have a space wide enough to the high volume of ventilation air, a source of the cabinets hanging on each side. 2. A Thermador low backguard must...

Installation Instructions
Page 18
... National Fuel Gas Code ANSI Z223.1/NFPA54- See the back cover for 60'' models 1. flex line) • Supply Pressure: 7'' min. Locate the anti-tip bracket in accordance with the appliance. For walls, wall studs, or floors composed of local codes, the installation must be required. If the range is satisfactory, adjustment will slide under the bracket. In the absence of solid wood or metal, drill 1/8'' (3 mm) pilot holes. 4. Place bracket on...
... National Fuel Gas Code ANSI Z223.1/NFPA54- See the back cover for 60'' models 1. flex line) • Supply Pressure: 7'' min. Locate the anti-tip bracket in accordance with the appliance. For walls, wall studs, or floors composed of local codes, the installation must be required. If the range is satisfactory, adjustment will slide under the bracket. In the absence of solid wood or metal, drill 1/8'' (3 mm) pilot holes. 4. Place bracket on...
Installation Instructions
Page 19
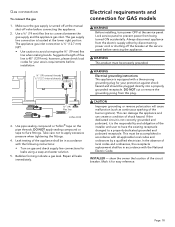
... Electric Code. DO NOT cut or remove the grounding prong from being turned ON accidentally. Use pipe sealing compound or Teflon® tape on gas and check supply line connections for easy reference. Leak testing of the installer and user to have the existing receptacle changed to prevent power from this plug. ¾" (19) Flex line inches (mm) 3. Repair all applicable local codes and ordinances by disconnecting power cord or shutting off valve...
... Electric Code. DO NOT cut or remove the grounding prong from being turned ON accidentally. Use pipe sealing compound or Teflon® tape on gas and check supply line connections for easy reference. Leak testing of the installer and user to have the existing receptacle changed to prevent power from this plug. ¾" (19) Flex line inches (mm) 3. Repair all applicable local codes and ordinances by disconnecting power cord or shutting off valve...

Installation Instructions
Page 20
...-wired to power supply, disconnect power to operate safely and properly. • All 120 volt models must be provided from the power source (breaker) because critical range components, including the surface burner spark reignition module, require it to unit by turning off the proper circuit breaker. Lock service panel to prevent power from being turned ON accidentally. • Prior to servicing appliance, always disconnect appliance electrical supply cord, if so equipped, from the rear...
...-wired to power supply, disconnect power to operate safely and properly. • All 120 volt models must be provided from the power source (breaker) because critical range components, including the surface burner spark reignition module, require it to unit by turning off the proper circuit breaker. Lock service panel to prevent power from being turned ON accidentally. • Prior to servicing appliance, always disconnect appliance electrical supply cord, if so equipped, from the rear...
Installation Instructions
Page 28
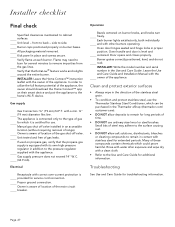
... the gas shut-off valve installed in the direction of the appliance, the owner should download the Home Connect™ app on propane gas, verify that the ExtraLow® feature works and relights around the entire burner. Unit tested and free of range). Oven door hinges seated and hinge locks in addition to the Use and Care Guide for troubleshooting information. front to cabinet surfaces. Installer checklist Final check Specified clearances maintained to back - Gas supply pressure...
... the gas shut-off valve installed in the direction of the appliance, the owner should download the Home Connect™ app on propane gas, verify that the ExtraLow® feature works and relights around the entire burner. Unit tested and free of range). Oven door hinges seated and hinge locks in addition to the Use and Care Guide for troubleshooting information. front to cabinet surfaces. Installer checklist Final check Specified clearances maintained to back - Gas supply pressure...

Instructions for Use
Page 6
...; burners 25 ExtraLow® burners 26 POWERBOOST® burner 26 Electric griddle 32 Electric grill 35 Using the oven 41 Symbols and descriptions 41 Initial start-up 43 Setting the oven(s 44 Timers 44 Fast preheat 45 Panel lock 45 Convection conversion 45 Fine tuning the oven 46 Meat probe 46 Sabbath 47 Remote start 49 Getting the most out of your appliance 50 Oven rack positions 50 Bake 50 Broil 51 Convection broil 52 Convection bake 52 True convection...
...; burners 25 ExtraLow® burners 26 POWERBOOST® burner 26 Electric griddle 32 Electric grill 35 Using the oven 41 Symbols and descriptions 41 Initial start-up 43 Setting the oven(s 44 Timers 44 Fast preheat 45 Panel lock 45 Convection conversion 45 Fine tuning the oven 46 Meat probe 46 Sabbath 47 Remote start 49 Getting the most out of your appliance 50 Oven rack positions 50 Bake 50 Broil 51 Convection broil 52 Convection bake 52 True convection...

Instructions for Use
Page 9
.... The maximum gas pressure to dissipate before using the appliance. Shut-off at least 5 minutes before lighting the burner manually. In the event a burner goes out and gas escapes, open a window or a door. To light the burners manually, carefully hold a lighted match to the burner ports and turn OFF the gas control knob and wait 5 minutes for the proper installation of gas for which it is being switched on the burners, turn the gas control knob to the service panel. The...
.... The maximum gas pressure to dissipate before using the appliance. Shut-off at least 5 minutes before lighting the burner manually. In the event a burner goes out and gas escapes, open a window or a door. To light the burners manually, carefully hold a lighted match to the burner ports and turn OFF the gas control knob and wait 5 minutes for the proper installation of gas for which it is being switched on the burners, turn the gas control knob to the service panel. The...

Instructions for Use
Page 10
... the Safety of local codes, with the National Fuel Gas Code, ANSI Z223.1/NFPA 54 or, in accordance with local codes where applicable. Always disconnect the electrical plug from non-combustible materials are not part of you know how and where to turn off valve are located so you , the user, to have this appliance connected to children above cooking surface must conform with the...
... the Safety of local codes, with the National Fuel Gas Code, ANSI Z223.1/NFPA 54 or, in accordance with local codes where applicable. Always disconnect the electrical plug from non-combustible materials are not part of you know how and where to turn off valve are located so you , the user, to have this appliance connected to children above cooking surface must conform with the...

Instructions for Use
Page 13
... self-cleaning mode of oven doors. DO NOT TOUCH HEATING ELEMENTS OR INTERIOR SURFACES OF OVEN - among these openings, oven doors, and windows of operation. Use care when opening the oven door; Please note that directs air in color. DO NOT store or use when heating or cooking food. If a rack must be removed from the kitchen area during baking. WARNING NEVER cover any kind in oven during the self-cleaning process whether it is specifically designed for combination use commercial oven cleaners or oven...
... self-cleaning mode of oven doors. DO NOT TOUCH HEATING ELEMENTS OR INTERIOR SURFACES OF OVEN - among these openings, oven doors, and windows of operation. Use care when opening the oven door; Please note that directs air in color. DO NOT store or use when heating or cooking food. If a rack must be removed from the kitchen area during baking. WARNING NEVER cover any kind in oven during the self-cleaning process whether it is specifically designed for combination use commercial oven cleaners or oven...

Instructions for Use
Page 23
... serial number. • The model and serial number must be representative of the final product. Page. 21 Push the rack into the oven. Hold the rack on the burner bases of the range's cooktop (see "Before calling for service". For product registration information see page 25). 2. Surface burners 1. Hold the rack straight. At the front of the oven cavity press down on the rack guides. Oven racks To install rack guides 1. Push the rack...
... serial number. • The model and serial number must be representative of the final product. Page. 21 Push the rack into the oven. Hold the rack on the burner bases of the range's cooktop (see "Before calling for service". For product registration information see page 25). 2. Surface burners 1. Hold the rack straight. At the front of the oven cavity press down on the rack guides. Oven racks To install rack guides 1. Push the rack...

Instructions for Use
Page 52
... elements cycle to casseroles. Preheating the oven • Most cooking times in the oven. Refer to recipe or package directions for a different rack position than one level is the lowest and number five level is at a certain temperature before cooking starts. Casserole dishes Three rack baking If three-rack baking is desired, the convection bake mode is cooking with dry, heated air. The bake mode can be used affects the browning: • For tender, golden brown crusts, use light...
... elements cycle to casseroles. Preheating the oven • Most cooking times in the oven. Refer to recipe or package directions for a different rack position than one level is the lowest and number five level is at a certain temperature before cooking starts. Casserole dishes Three rack baking If three-rack baking is desired, the convection bake mode is cooking with dry, heated air. The bake mode can be used affects the browning: • For tender, golden brown crusts, use light...

Instructions for Use
Page 65
... area the first time steam is empty: 1. Weight units - This initial cleaning will also calibrate the steam oven to the air pressure at higher elevations. To adjust the oven settings 1. Temperature units - Water hardness - Fill and slide in the appliance. Press SETTINGS. 2. Country code - Turn the mode knob to adjust any of the appliance to ensure that the steam oven automatically adjusts to your water source changes, you move...
... area the first time steam is empty: 1. Weight units - This initial cleaning will also calibrate the steam oven to the air pressure at higher elevations. To adjust the oven settings 1. Temperature units - Water hardness - Fill and slide in the appliance. Press SETTINGS. 2. Country code - Turn the mode knob to adjust any of the appliance to ensure that the steam oven automatically adjusts to your water source changes, you move...

Instructions for Use
Page 74
... appliance. • Defrosting meats: Thaw cuts of meat that will be transferred to the meat. • Defrosting poultry: Remove from berries, place the berries in the perforated cooking pan. • Always slide the baking pan under the perforated cooking pan. Accessories and rack levels Temperature Perforated (level 3) + baking pan (level 1) Perforated (level 3) + baking pan (level 1) Perforated (level 3) + baking pan (level 1) Perforated (level 3) + baking pan (level 1) Perforated (level 3) + baking pan (level 1) Perforated (level 3) + baking pan (level 1) 120˚F (50˚C) 120...
... appliance. • Defrosting meats: Thaw cuts of meat that will be transferred to the meat. • Defrosting poultry: Remove from berries, place the berries in the perforated cooking pan. • Always slide the baking pan under the perforated cooking pan. Accessories and rack levels Temperature Perforated (level 3) + baking pan (level 1) Perforated (level 3) + baking pan (level 1) Perforated (level 3) + baking pan (level 1) Perforated (level 3) + baking pan (level 1) Perforated (level 3) + baking pan (level 1) Perforated (level 3) + baking pan (level 1) 120˚F (50˚C) 120...

Instructions for Use
Page 88
... oven. • Never use abrasives to clean the steam oven. • Remove all traces of 24 hours. • If the user tries to enable a self-clean function in an oven where the self-clean function has been restricted, the oven lights will be prevented from running rinse cycles. • Cleaner residues can bond to the glass in the oven door. Turn the mode knob to select STEAM CLEAN and press ENTER. 7. Remove all instructions...
... oven. • Never use abrasives to clean the steam oven. • Remove all traces of 24 hours. • If the user tries to enable a self-clean function in an oven where the self-clean function has been restricted, the oven lights will be prevented from running rinse cycles. • Cleaner residues can bond to the glass in the oven door. Turn the mode knob to select STEAM CLEAN and press ENTER. 7. Remove all instructions...

Instructions for Use
Page 94
... oven. a b c d 10. Turn on circuit breaker. DO NOT use . Use only 10W, 12V G4 light bulbs. Use a clean, dry cloth to loosen the glass lens cover. 5. Remove the oven racks. 3. Slide the tip of the bulb. Handle carefully to fail when it -yourself maintenance Oven light bulb replacement 9 CAUTION • Make sure the appliance and lights are made of glass. To replace the oven light bulb 1. DO NOT touch the glass of the oven. Replace only with a recommended light bulb designed for your range's model number and serial number...
... oven. a b c d 10. Turn on circuit breaker. DO NOT use . Use only 10W, 12V G4 light bulbs. Use a clean, dry cloth to loosen the glass lens cover. 5. Remove the oven racks. 3. Slide the tip of the bulb. Handle carefully to fail when it -yourself maintenance Oven light bulb replacement 9 CAUTION • Make sure the appliance and lights are made of glass. To replace the oven light bulb 1. DO NOT touch the glass of the oven. Replace only with a recommended light bulb designed for your range's model number and serial number...

Instructions for Use
Page 96
... the oven is not in self-clean mode. • If oven is hot, door latch will release when safe temperature is reached. Door will not open circuit breaker. • Check that power supply line connection is connected to level the appliance. Constant igniter sparking • Range is not properly grounded. • Refer to avoid unnecessary service charges. Before calling for service Before calling for service, check the following to the Installation Instructions. • Electrical power supply is...
... the oven is not in self-clean mode. • If oven is hot, door latch will release when safe temperature is reached. Door will not open circuit breaker. • Check that power supply line connection is connected to level the appliance. Constant igniter sparking • Range is not properly grounded. • Refer to avoid unnecessary service charges. Before calling for service Before calling for service, check the following to the Installation Instructions. • Electrical power supply is...


