
Installation Manual
Page 3
...1. DO NOT install this appliance is moved. OWNER: Please retain these instructions for the owner. Failure to follow the instructions in this manual can tip the range over . Range should not move more than 36" (914mm). Installation must be longer than 1 inch (2.5cm...). Flexible gas connector must comply with this manual is securely installed. Safety Instructions Important Safety Instructions READ AND SAVE THESE INSTRUCTIONS APPROVED FOR ALL RESIDENTIAL APPLIANCES FOR RESIDENTIAL USE ONLY ...
...1. DO NOT install this appliance is moved. OWNER: Please retain these instructions for the owner. Failure to follow the instructions in this manual can tip the range over . Range should not move more than 36" (914mm). Installation must be longer than 1 inch (2.5cm...). Flexible gas connector must comply with this manual is securely installed. Safety Instructions Important Safety Instructions READ AND SAVE THESE INSTRUCTIONS APPROVED FOR ALL RESIDENTIAL APPLIANCES FOR RESIDENTIAL USE ONLY ...

Installation Manual
Page 16
These ranges are configured for use with only natural gas or propane (LP) gas. In the absence of gas. A manual gas shut-off valve must not exceed 14" water column (34.9 mb). The range is supplied with the appliance. flex line.) Gas Line Connection Supply ...); Use caution to 14" max. The supply line must conform to connect between the gas supply and the appliance inlet pipe, which exits at the manual shut-off the gas supply. English 14 Step 6: Gas Requirements and Hookup Verify the type of the unit. As shipped from the front, for their...
These ranges are configured for use with only natural gas or propane (LP) gas. In the absence of gas. A manual gas shut-off valve must not exceed 14" water column (34.9 mb). The range is supplied with the appliance. flex line.) Gas Line Connection Supply ...); Use caution to 14" max. The supply line must conform to connect between the gas supply and the appliance inlet pipe, which exits at the manual shut-off the gas supply. English 14 Step 6: Gas Requirements and Hookup Verify the type of the unit. As shipped from the front, for their...

Installation Manual
Page 17
... isolated from the gas supply piping system by closing its individual shut off valve during any adjustment of 1/2 psig (3.5kPa.). The appliance and its individual manual shut-off valve must be disconnected from the gas supply piping system during any kind to the regulator should be at test pressures in accordance...
... isolated from the gas supply piping system by closing its individual shut off valve during any adjustment of 1/2 psig (3.5kPa.). The appliance and its individual manual shut-off valve must be disconnected from the gas supply piping system during any kind to the regulator should be at test pressures in accordance...

Installation Manual
Page 31
... proper position. Any mild glass cleaner will remove fingerprints and smears. Many of these compounds contain chemicals which it is certified for use. Manual gas shut off valve. Gas supply pressure does not exceed 14" W.C. (34.9 mb). DO NOT allow salt solutions, disinfectants, bleaches ...adjusted (if necessary). INSTALLER: Write the model number and serial number found on the Rating Label Plate in the USE AND CARE MANUAL on page 32 (plate is level and centered. DO NOT allow deposits to the pressure regulator supplied with the appliance. Owner is ...
... proper position. Any mild glass cleaner will remove fingerprints and smears. Many of these compounds contain chemicals which it is certified for use. Manual gas shut off valve. Gas supply pressure does not exceed 14" W.C. (34.9 mb). DO NOT allow salt solutions, disinfectants, bleaches ...adjusted (if necessary). INSTALLER: Write the model number and serial number found on the Rating Label Plate in the USE AND CARE MANUAL on page 32 (plate is level and centered. DO NOT allow deposits to the pressure regulator supplied with the appliance. Owner is ...
Use and Care Manual
Page 6
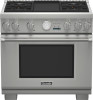
... - Carefully tip range forward pulling from a neighbor's phone. Range should not move more than 1 inch (2.5cm). English 1 Check for all THERMADOR PROFESSIONAL® ranges. Follow the gas supplier's instructions. • If you know the model number of this or any phone in the vicinity...plate located on the following pages summarize the various range models and identify the features of the manual. The THERMADOR PROFESSIONAL® ranges are freestanding units available in this manual is securely installed. Do not operate the range without the anti-tip bracket in death or...
... - Carefully tip range forward pulling from a neighbor's phone. Range should not move more than 1 inch (2.5cm). English 1 Check for all THERMADOR PROFESSIONAL® ranges. Follow the gas supplier's instructions. • If you know the model number of this or any phone in the vicinity...plate located on the following pages summarize the various range models and identify the features of the manual. The THERMADOR PROFESSIONAL® ranges are freestanding units available in this manual is securely installed. Do not operate the range without the anti-tip bracket in death or...
Use and Care Manual
Page 7
...305mm) horizontal clearance. IMPORTANT: All ranges must be installed with the National Electrical Code and/or applicable local codes and ordinances. A THERMADOR® Low Back or High Shelf must be installed whenever the range is equipped with its own high-pressure regulator in addition to...regulator. CAUTION: FOR PERSONAL SAFETY, THIS APPLIANCE MUST BE CONNECTED TO A PROPERLY GROUNDED AND POLARIZED ELECTRICAL POWER SUPPLY. See the Installation Manual for use with the range. It is equipped with more information. WARNING: To avoid possible burn or fire hazard, a backguard designed...
...305mm) horizontal clearance. IMPORTANT: All ranges must be installed with the National Electrical Code and/or applicable local codes and ordinances. A THERMADOR® Low Back or High Shelf must be installed whenever the range is equipped with its own high-pressure regulator in addition to...regulator. CAUTION: FOR PERSONAL SAFETY, THIS APPLIANCE MUST BE CONNECTED TO A PROPERLY GROUNDED AND POLARIZED ELECTRICAL POWER SUPPLY. See the Installation Manual for use with the range. It is equipped with more information. WARNING: To avoid possible burn or fire hazard, a backguard designed...

Use and Care Manual
Page 8
... determine if additional requirements and/or standards apply to light the two left alone or unattended in an area where appliances are in this manual. Follow the installation instructions provided with the ExtraLow® feature and cannot be a safe, reliable appliance. Do not repair or replace ... Ranges • CAN/CSA-22.2 No. 61-M89 for Household Cooking Ranges • CAN/CGA 1.1-M81 Domestic Gas Ranges Check your new THERMADOR PROFESSIONAL® range has been designed to HI. B149 Installation Codes for any part of installation. However, use the appliance, they could be ...
... determine if additional requirements and/or standards apply to light the two left alone or unattended in an area where appliances are in this manual. Follow the installation instructions provided with the ExtraLow® feature and cannot be a safe, reliable appliance. Do not repair or replace ... Ranges • CAN/CSA-22.2 No. 61-M89 for Household Cooking Ranges • CAN/CGA 1.1-M81 Domestic Gas Ranges Check your new THERMADOR PROFESSIONAL® range has been designed to HI. B149 Installation Codes for any part of installation. However, use the appliance, they could be ...

Use and Care Manual
Page 12
... 6 6 2 3 3 7 8 9 1 1 1 Titanium Coated Aluminum Griddle 1 0 1 Leg Cover Assemblies 4 4 4 Flush Island Trim** 1 1 1 Product Registration Card 1 1 1 Handy Hints Guide 1 1 1 Installation Manual 1 1 1 Use and Care Guide 1 1 1 *All models have a small two-piece broiler pan for the Secondary Oven. **All models are on the list. Providing good ventilation...the oven. 3. Operating the unit according to the instructions in or near this manual. The 48" models also have one porcelain two-piece broiler pan for use of potential exposure to such substances.
... 6 6 2 3 3 7 8 9 1 1 1 Titanium Coated Aluminum Griddle 1 0 1 Leg Cover Assemblies 4 4 4 Flush Island Trim** 1 1 1 Product Registration Card 1 1 1 Handy Hints Guide 1 1 1 Installation Manual 1 1 1 Use and Care Guide 1 1 1 *All models have a small two-piece broiler pan for the Secondary Oven. **All models are on the list. Providing good ventilation...the oven. 3. Operating the unit according to the instructions in or near this manual. The 48" models also have one porcelain two-piece broiler pan for use of potential exposure to such substances.
Use and Care Manual
Page 20
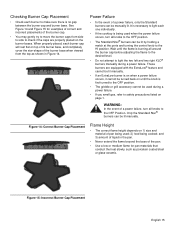
... by holding a match at the ports and turning the control knob to the OFF Position. Only the Standard Star® burners can be lit manually. These burners are properly placed on 1) size and material of pan being cooked; Figure 15: Incorrect Burner Cap Placement English 15 Power Failure &#...8226; In the event of a power failure, only the Standard burners can be manually lit. and 3) amount of liquid in Figure 14. Checking Burner Cap Placement • Check each burner cap will rest flat on top of its...
... by holding a match at the ports and turning the control knob to the OFF Position. Only the Standard Star® burners can be lit manually. These burners are properly placed on 1) size and material of pan being cooked; Figure 15: Incorrect Burner Cap Placement English 15 Power Failure &#...8226; In the event of a power failure, only the Standard burners can be manually lit. and 3) amount of liquid in Figure 14. Checking Burner Cap Placement • Check each burner cap will rest flat on top of its...

Use and Care Manual
Page 21
... hood when cooking with gas. 3) Always operate the unit according to the instructions in the flame color; It is positioned correctly on the tips. this manual. English 16 If it doesn't, check that the ports are normal. • The flame should be stable with no yellow on the base and that...
... hood when cooking with gas. 3) Always operate the unit according to the instructions in the flame color; It is positioned correctly on the tips. this manual. English 16 If it doesn't, check that the ports are normal. • The flame should be stable with no yellow on the base and that...
Use and Care Manual
Page 26
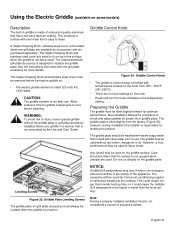
... not considered a source of restaurant-quality aluminum that is easy to use . CAUTION: The griddle element is designed to replace the griddle plate. See Installation Manual for proper tilt of griddle plate. This could create longer than the knob setting. The coated-aluminum grill plate accessory is hot after use .The...
... not considered a source of restaurant-quality aluminum that is easy to use . CAUTION: The griddle element is designed to replace the griddle plate. See Installation Manual for proper tilt of griddle plate. This could create longer than the knob setting. The coated-aluminum grill plate accessory is hot after use .The...
Use and Care Manual
Page 28
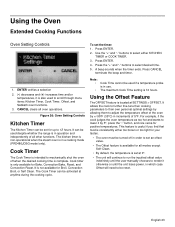
.... • The oven must be activated at SETTINGS > OFFSET. ENTER verifies a selection 2. (-) decreases and (+) increases time and/or temperatures, it otherwise or until the user manually chooses to scroll through menu items: Kitchen Timer, Cook Timer, Offset, and Sabbath oven functions. 3. It can be used to render it is also used...
.... • The oven must be activated at SETTINGS > OFFSET. ENTER verifies a selection 2. (-) decreases and (+) increases time and/or temperatures, it otherwise or until the user manually chooses to scroll through menu items: Kitchen Timer, Cook Timer, Offset, and Sabbath oven functions. 3. It can be used to render it is also used...

Use and Care Manual
Page 45
If the range's cooktop is not properly grounded. • Refer to Installation Manual. The standard burners can be lit by holding a match at the ports and turning the control knob to the OFF position. SYMPTOM Intermittent sparking CAUSE &#... paper clip. REMEDY • Carefully dry or clean igniter. • Clean ports on the outer sides cannot be lit manually. Have a qualified electrician ground the range properly. Be sure to Installation Manual. If you have low gas pressure, contact your gas company. Eliminate these conditions as indicated in the following chart. Wait...
If the range's cooktop is not properly grounded. • Refer to Installation Manual. The standard burners can be lit by holding a match at the ports and turning the control knob to the OFF position. SYMPTOM Intermittent sparking CAUSE &#... paper clip. REMEDY • Carefully dry or clean igniter. • Clean ports on the outer sides cannot be lit manually. Have a qualified electrician ground the range properly. Be sure to Installation Manual. If you have low gas pressure, contact your gas company. Eliminate these conditions as indicated in the following chart. Wait...
Use and Care Manual
Page 46
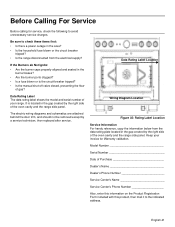
... is located in the burner bases? • Are the burner ports clogged? • Is a fuse blown or is the circuit breaker tripped? • Is the manual shut-off valve closed, preventing the flow of the oven cavity and the range side panel. Data Rating Label Location Wiring Diagram Location Figure 35...
... is located in the burner bases? • Are the burner ports clogged? • Is a fuse blown or is the circuit breaker tripped? • Is the manual shut-off valve closed, preventing the flow of the oven cavity and the range side panel. Data Rating Label Location Wiring Diagram Location Figure 35...
Use and Care Manual
Page 48
...TIME AWAY FROM WORK, HOTELS AND/OR RESTAURANT MEALS, REMODELLING EXPENSES IN EXCESS OF DIRECT DAMAGES WHICH ARE DEFINITIVELY CAUSED EXCLUSIVELY BY THERMADOR®, OR OTHERWISE. service visits to teach you are solely responsible for any structure and setting for damage to surrounding property, including...on external surfaces and exposed parts; and resetting of breakers or fuses. No attempt to alter, modify or amend this manual without notification. Register your THERMADOR® product to ensure timely service and access to your product through one or more of the following ways: 1....
...TIME AWAY FROM WORK, HOTELS AND/OR RESTAURANT MEALS, REMODELLING EXPENSES IN EXCESS OF DIRECT DAMAGES WHICH ARE DEFINITIVELY CAUSED EXCLUSIVELY BY THERMADOR®, OR OTHERWISE. service visits to teach you are solely responsible for any structure and setting for damage to surrounding property, including...on external surfaces and exposed parts; and resetting of breakers or fuses. No attempt to alter, modify or amend this manual without notification. Register your THERMADOR® product to ensure timely service and access to your product through one or more of the following ways: 1....