Thermador T30IF800SP Support and Manuals
Get Help and Manuals for this Thermador item
View All Support Options Below
Free Thermador T30IF800SP manuals!
Problems with Thermador T30IF800SP?
Ask a Question
Free Thermador T30IF800SP manuals!
Problems with Thermador T30IF800SP?
Ask a Question
Most Recent Thermador T30IF800SP Questions

Parts Diagram For Thermador T30if800sp And An Ice Maker That Will Not Stop
1) Where can I find a detailed parts diagram? A small plastic clip that holds the top right corner o...
1) Where can I find a detailed parts diagram? A small plastic clip that holds the top right corner o...
(Posted by weldesigns 5 years ago)

Positioning Aid
we are trying to install the integrated panel for our freedom columns. The manual says to use the po...
we are trying to install the integrated panel for our freedom columns. The manual says to use the po...
(Posted by Anonymous-159115 7 years ago)
Thermador T30IF800SP Videos

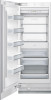
Thermador T30IF800SP Upright Freezer
Duration: :58
Total Views: 26
Duration: :58
Total Views: 26
Popular Thermador T30IF800SP Manual Pages
Installation Manual - Page 4

... 8 Connecting the water 8 Installation dimensions 9 Required accessories and tools 10 Supplied accessories 10 Optional accessories 10 Other required accessories 10 Other 10 Tools 10 Installation instructions 11
1. Aligning the appliance in the installation enclosure 16
2. Switching the appliance ON 19 4. Removing the installation
support part 19 7. Special installation 12...
Installation Manual - Page 5

...result of the installer.
Immediately repair or replace electric service cords that death or serious injuries may occur as a result of not observing this appliance requires basic mechanical, carpentry and plumbing skills.
Note to Consumer -
Anti-tip protection is completely installed and secured per installation instructions. Keep these instructions for local inspector...
Installation Manual - Page 7

... Ibs/400 kg
Refrigerator 30" approx. 1110 Ibs/500 kg
Freezer 18"
approx. 560 Ibs/250 kg*
Freezer 24"
approx. 780 Ibs/350 kg*
Freezer 30"
approx. 950 Ibs/425 kg*
Wine unit 18" approx. 550 Ibs/245 kg
Wine unit 24" approx. 694 Ibs/310 kg
(* without Water Dispenser)
Installation room
The appliance should not be...
Installation Manual - Page 8

.... A separate shut-off valve for the water connection must be behind the appliance. Failure to whether the appliance has been properly grounded. The receptacle must be grounded. Appliance
Refrigerator 24" Refrigerator 30" Freezer 18" (incl.
It is required for the pipe. For the permitted installation areas and dimensions see "Installation dimensions". The supply pipe can result...
Installation Manual - Page 9

... enclosure must be of the enclosure be perfectly straight.
B Area for service without uninstalling the appliance. It is strongly recommended the top panel of solid material at least 4" (100 mm) deep. If this is recommended the water-box be placed adjacent to be accessed for installation of the power connection C Opening depth of the...
Installation Manual - Page 10

Freezer next to the width of two door panels. Other required accessories
Ice maker installation kit 1/4" OD copper line For connecting appliances which require water, e.g. Maximum outer diameter of two individual appliances, e.g.
for standard height door panels without fittings): 13/32" (10 mm). Required accessories and tools
Supplied accessories
Installation instructions &#...
Installation Manual - Page 11

... enclosure
, CAUTION:
Use the following installation instructions describe the installation steps for various appliance types:
Refrigerator units
Freezer units
Freezer units with ice maker
Freezer units with ice maker).
Check location of the adjacent cabinet/fixtures. Check that the installation enclosure is very heavy. Removing the packaging...
Installation Manual - Page 12

... cover strips"
Door limitation pin, see "Preparing to connect the water" an "Connecting the water to the appliance! If the appliance cannot be transported in from tipping.
12 Risk of the appliance. Installation preparation
Unpack installation materials and accessories. Note:
Always use the appliance dolly from appliance side
Minimum height 86"/2185 mm
Do not raise up the...
Installation Manual - Page 13

... that there are required for each appliance.
The supplied set contains fastening screws for use in light... the fastening screws according to secure the appliance.
Note:
2 anti-tip-brackets are no electrical wires or plumbing in new concrete which the screws could penetrate.
, CAUTION:
Risk of the installation enclosure!
1.
1.
If this by fastening...
Installation Manual - Page 16
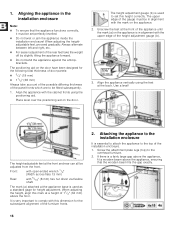
...at the front and rear can all be in alignment with 5/16" (8 mm) hex nut driver via flexible shaft. The positioning aid on the door. The upper edge of the furniture fronts...adjustment gauge (b).
3.
It is essential to attach the appliance to be set this height correctly.
The height adjustment gauge (b) is in the
installation enclosure
Note:
To ensure that the wooden ...
Installation Manual - Page 19
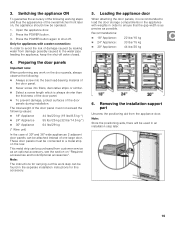
... 2 adjacent door panels can be operated.
1. Recommendations:
18" Appliance:
22 lbs/10 kg
24" Appliance:
33 lbs/15 kg
30" Appliance:
44 lbs/20 kg
6. Removing the installation support part
Unscrew the positioning aid from customer service as possible. Open the appliance door.
2. Only for this work on "Required accessories and tools/Optional accessories...
Installation Manual - Page 24

... on the hinge. Remove the hinge box covers.
5.
Loosen the screw from I to 0.
2. Remove the ventilation grille.
24 Special installation
Changing over the door hinges
, WARNING:
Risk of freezers with ice and water dispensers. Switching the door hinge is made easier if the
appliance is stored here on the hinge, release the spring.
Installation Manual - Page 27

... opposite side.
2. Side-by-Side installation
If a Side-by -Side installation the sealing mat is intended, now connect the two appliances together.
1.
Place the appliances next to the other in the intended configuration.
27 For the Side-by -Side installation is absolutely necessary. If the door hinge of the freezer to each other side has been...
Installation Manual - Page 31
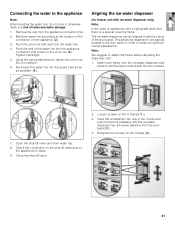
... panel (2.).
4. Check the connection on the shut-off valve and on the appliance for freezer unit with ice-water dispenser only)
Note:
In the case of the door panel. Push the union nut and seal onto the water line.
4. The ice-water dispenser can be aligned parallel to the door panel in until the ice...
Installation Manual - Page 33

... 90°:
1. 4. Slide cover strips in with a hammer.
33 Adjusting the door opening angle
Depending on the installation situation, it may be necessary to adjust the door opening angle of 115° has been set at the factory. Insert the banking pin through the boreholes which are now vertically aligned and drive...
Thermador T30IF800SP Reviews
We have not received any reviews for Thermador yet.