
Installation Manual
Page 7
... a heat source is very heavy: Refrigerator 24" approx. 310 Ibs/140 kg Refrigerator 30" approx. 350 Ibs/158 kg Freezer 18" approx. 255 Ibs/115 kg* Freezer 24" approx. 300 Ibs/135 kg* Freezer 30" approx. 335 Ibs/150 kg* Wine unit 18 "approx. 300 Ibs/135 kg Wine unit 24 "approx. 360... plate or observe the following : Refrigerator 24" approx. 890 Ibs/400 kg Refrigerator 30" approx. 1110 Ibs/500 kg Freezer 18" approx. 560 Ibs/250 kg* Freezer 24" approx. 780 Ibs/350 kg* Freezer 30" approx. 950 Ibs/425 kg* Wine unit 18" approx. 550 Ibs/245 kg Wine unit 24" approx. 694...
... a heat source is very heavy: Refrigerator 24" approx. 310 Ibs/140 kg Refrigerator 30" approx. 350 Ibs/158 kg Freezer 18" approx. 255 Ibs/115 kg* Freezer 24" approx. 300 Ibs/135 kg* Freezer 30" approx. 335 Ibs/150 kg* Wine unit 18 "approx. 300 Ibs/135 kg Wine unit 24 "approx. 360... plate or observe the following : Refrigerator 24" approx. 890 Ibs/400 kg Refrigerator 30" approx. 1110 Ibs/500 kg Freezer 18" approx. 560 Ibs/250 kg* Freezer 24" approx. 780 Ibs/350 kg* Freezer 30" approx. 950 Ibs/425 kg* Wine unit 18" approx. 550 Ibs/245 kg Wine unit 24" approx. 694...

Installation Manual
Page 8
... A separate shut-off valve for the water connection must be a 15 A breaker or fuse. The receptacle must be grounded. IceMaker) Freezer 24" (incl. Additional grounding procedure Some local regulations may result in doubt as a separate accessory and must be installed by a qualified... only. Never ground the appliance to drinking water! The appliance comes with local plumbing regulations. Appliance Refrigerator 24" Refrigerator 30" Freezer 18" (incl. A cold water connection is recommended to place the shut-off valve directly next to follow these instructions can ...
... A separate shut-off valve for the water connection must be a 15 A breaker or fuse. The receptacle must be grounded. IceMaker) Freezer 24" (incl. Additional grounding procedure Some local regulations may result in doubt as a separate accessory and must be installed by a qualified... only. Never ground the appliance to drinking water! The appliance comes with local plumbing regulations. Appliance Refrigerator 24" Refrigerator 30" Freezer 18" (incl. A cold water connection is recommended to place the shut-off valve directly next to follow these instructions can ...

Installation Manual
Page 10
... appliances which require water, e.g. protective sheets) Adhesive tape Note: Before using, check whether the removed adhesive tape leaves adhesive residue on high-quality work . Freezer next to protect the floor from damage Suitable material for material and in different sizes Wooden beam (cross section min. 3" x 4") as an alternative...
... appliances which require water, e.g. protective sheets) Adhesive tape Note: Before using, check whether the removed adhesive tape leaves adhesive residue on high-quality work . Freezer next to protect the floor from damage Suitable material for material and in different sizes Wooden beam (cross section min. 3" x 4") as an alternative...

Installation Manual
Page 11
... appliance is visibly damaged. Close the door again. Installation instructions The following check list for various appliance types: Refrigerator units Freezer units Freezer units with ice maker Freezer units with ice maker). Particular reference is very heavy! 5. Check attachment of the adjacent cabinet/fixtures. It can be damaged! ...
... appliance is visibly damaged. Close the door again. Installation instructions The following check list for various appliance types: Refrigerator units Freezer units Freezer units with ice maker Freezer units with ice maker). Particular reference is very heavy! 5. Check attachment of the adjacent cabinet/fixtures. It can be damaged! ...

Installation Manual
Page 24
Remove the hinges. 1. Remove the ventilation grille. 24 Special installation Changing over the door hinges , WARNING: Risk of freezers with ice and water dispensers. Switching the door hinge is made easier if the appliance is stored here on the hinge. Note: The door hinges cannot be exchanged in the case of injury! Release the spring on the back (put the pallet underneath). 3. Unscrew (1.) and remove (2.) the door. 4. Loosen the screw from I to 0. 2. Before working on the hinge, release the spring. Remove the hinge box covers. 5.
Remove the hinges. 1. Remove the ventilation grille. 24 Special installation Changing over the door hinges , WARNING: Risk of freezers with ice and water dispensers. Switching the door hinge is made easier if the appliance is stored here on the hinge. Note: The door hinges cannot be exchanged in the case of injury! Release the spring on the back (put the pallet underneath). 3. Unscrew (1.) and remove (2.) the door. 4. Loosen the screw from I to 0. 2. Before working on the hinge, release the spring. Remove the hinge box covers. 5.

Installation Manual
Page 27
For the Side-by-Side installation the sealing mat is intended, now connect the two appliances together. 1. Removing/changing over the sealing mat Freezers are missing. Unpack the Side-by-Side kit and check that no parts are factory equipped with a sealing mat for the Side-by -Side ...been placed before, the sealing mat must also be removed. Side-by-Side installation If a Side-by -side installation. If the door hinge of the freezer to the opposite side. 2. If the installation is planned as a individual unit, the sealing mat is not needed and can be implemented to the other...
For the Side-by-Side installation the sealing mat is intended, now connect the two appliances together. 1. Removing/changing over the sealing mat Freezers are missing. Unpack the Side-by-Side kit and check that no parts are factory equipped with a sealing mat for the Side-by -Side ...been placed before, the sealing mat must also be removed. Side-by-Side installation If a Side-by -side installation. If the door hinge of the freezer to the opposite side. 2. If the installation is planned as a individual unit, the sealing mat is not needed and can be implemented to the other...

Installation Manual
Page 28
3. Place the water-absorbing stripes from the Side-by -side installation. Note: Freezers are factory equipped with a sealing mat for the Side-by -Side kit around the edge. Screw side plates from the Side-by-Side kit to step 6. Attach the mat always left standing appliance! 4. Stick sealing mat from the Side-bySide kit on the side wall and secure with the pins. 28 Secure the sealing mat with self adhesive tape. 6. Unscrew the base panels. 5. Note the position of both appliances. Continues the work to both appliances!
3. Place the water-absorbing stripes from the Side-by -side installation. Note: Freezers are factory equipped with a sealing mat for the Side-by -Side kit around the edge. Screw side plates from the Side-by-Side kit to step 6. Attach the mat always left standing appliance! 4. Stick sealing mat from the Side-bySide kit on the side wall and secure with the pins. 28 Secure the sealing mat with self adhesive tape. 6. Unscrew the base panels. 5. Note the position of both appliances. Continues the work to both appliances!
Installation Manual
Page 31
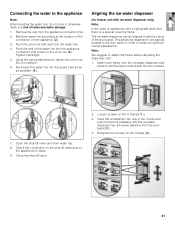
... be aligned inside the cutout of the water line into the appliance connection and screw on the appliance (2.). 3. Retighten the screws on the appliance for freezer unit with ice-water dispenser only) Note: In the case of leaks and water damage. 1. Do not overturn! 6. Slide cover frame onto the ice-water...
... be aligned inside the cutout of the water line into the appliance connection and screw on the appliance (2.). 3. Retighten the screws on the appliance for freezer unit with ice-water dispenser only) Note: In the case of leaks and water damage. 1. Do not overturn! 6. Slide cover frame onto the ice-water...


