
Owners Manual
Page 1
Before use OWNER'S MANUAL 3LCD DATA PROJECTOR TLP380 TLP381 (WITH DOCUMENT IMAGING CAMERA) MENU CONTENTS 1 TLP380
Before use OWNER'S MANUAL 3LCD DATA PROJECTOR TLP380 TLP381 (WITH DOCUMENT IMAGING CAMERA) MENU CONTENTS 1 TLP380
Owners Manual
Page 3
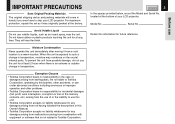
...by third parties, other accidents, or use under abnormal conditions including erroneous or improper operation and other problems. • Toshiba Corporation bears no responsibility for incidental damages (lost profit, work interruption, corruption or loss of the memory contents, etc.)...such as it from possible damage, do not use this unit. • Toshiba Corporation accepts no liability whatsoever for any damages arising from not having followed the descriptions in this Owner's Manual. • Toshiba Corporation accepts no liability whatsoever for a long time. Do not leave rubber...
...by third parties, other accidents, or use under abnormal conditions including erroneous or improper operation and other problems. • Toshiba Corporation bears no responsibility for incidental damages (lost profit, work interruption, corruption or loss of the memory contents, etc.)...such as it from possible damage, do not use this unit. • Toshiba Corporation accepts no liability whatsoever for any damages arising from not having followed the descriptions in this Owner's Manual. • Toshiba Corporation accepts no liability whatsoever for a long time. Do not leave rubber...

Owners Manual
Page 4
...similar surface. Improper use IMPORTANT SAFETY INSTRUCTIONS CONTENTS 4 CAUTION: PLEASE READ AND OBSERVE ALL WARNINGS AND INSTRUCTIONS GIVEN IN THIS OWNER'S MANUAL AND THOSE MARKED ON THE UNIT. REFER SERVICING TO QUALIFIED SERVICE PERSONNEL ONLY. 2. Ventilation Openings in installation such as a bookcase or...lens while the lamp is on the marking label. The strong light from battery power, or other instructions. 3. Read Owner's Manual After unpacking this unit will protect you if you are provided for installation, use and servicing. RETAIN THIS BOOKLET FOR FUTURE REFERENCE....
...similar surface. Improper use IMPORTANT SAFETY INSTRUCTIONS CONTENTS 4 CAUTION: PLEASE READ AND OBSERVE ALL WARNINGS AND INSTRUCTIONS GIVEN IN THIS OWNER'S MANUAL AND THOSE MARKED ON THE UNIT. REFER SERVICING TO QUALIFIED SERVICE PERSONNEL ONLY. 2. Ventilation Openings in installation such as a bookcase or...lens while the lamp is on the marking label. The strong light from battery power, or other instructions. 3. Read Owner's Manual After unpacking this unit will protect you if you are provided for installation, use and servicing. RETAIN THIS BOOKLET FOR FUTURE REFERENCE....
Owners Manual
Page 22
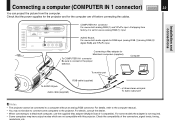
... the supplied Mac adapter (Multiple Scan 21 compatible). Check the compatibility of the connectors, signal levels, timing, resolutions, etc. For details, refer to the computer manual. • You may have output modes which are off before connecting the cables. For details, consult the dealer. • When connecting to connect in the...
... the supplied Mac adapter (Multiple Scan 21 compatible). Check the compatibility of the connectors, signal levels, timing, resolutions, etc. For details, refer to the computer manual. • You may have output modes which are off before connecting the cables. For details, consult the dealer. • When connecting to connect in the...
Owners Manual
Page 29
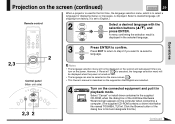
... will be displayed when the power is turned on next. • The language can also be selected on the menu screen. 50 • This Owner's manual is described on the supposition that English was selected. 4 Turn on the connected equipment and put it is executed, the language selection menu will not...
... will be displayed when the power is turned on next. • The language can also be selected on the menu screen. 50 • This Owner's manual is described on the supposition that English was selected. 4 Turn on the connected equipment and put it is executed, the language selection menu will not...
Owners Manual
Page 31
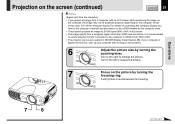
... recommended to set the external monitor connected to the computer to SVGA mode (800 x 600). • The projector can be also applied to the computer's manual and description on the picture by turning the zooming lever. In this case, turn off the computer display. Turn to the right to the DDC...
... recommended to set the external monitor connected to the computer to SVGA mode (800 x 600). • The projector can be also applied to the computer's manual and description on the picture by turning the zooming lever. In this case, turn off the computer display. Turn to the right to the DDC...
Owners Manual
Page 35
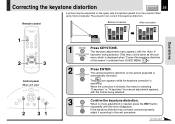
... is needed, press the EXIT button EXIT repeatedly until the menu disappears. Continued INPUT When the correction is selected from the projector lifted up by manual adjustment appears, with the "Auto. EXIT If the keystone distortion has not been corrected properly, adjust it according to the next procedure. The keystone adjustment...
... is needed, press the EXIT button EXIT repeatedly until the menu disappears. Continued INPUT When the correction is selected from the projector lifted up by manual adjustment appears, with the "Auto. EXIT If the keystone distortion has not been corrected properly, adjust it according to the next procedure. The keystone adjustment...
Owners Manual
Page 40
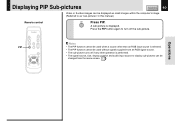
... used without signals supplied from the menu screen. 53 Operations ENTER CT-90113 EXIT Press the PIP button again to as "sub-pictures" in this manual.) Remote control PIP Press PIP. Displaying PIP Sub-pictures CONTENTS 40 Video or S-video images can be changed from an RGB signal source. • The...
... used without signals supplied from the menu screen. 53 Operations ENTER CT-90113 EXIT Press the PIP button again to as "sub-pictures" in this manual.) Remote control PIP Press PIP. Displaying PIP Sub-pictures CONTENTS 40 Video or S-video images can be changed from an RGB signal source. • The...
Owners Manual
Page 42
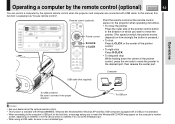
.... (The speed at the remote control sensor on the projector when operating its buttons. • To move the pointer to use a shielded type. In this manual, this function is available with Windows98/98SE, Windows Me, Windows2000, Windows XP and Mac OS9 computers equipped with USB cable. To USB port Notes •...
.... (The speed at the remote control sensor on the projector when operating its buttons. • To move the pointer to use a shielded type. In this manual, this function is available with Windows98/98SE, Windows Me, Windows2000, Windows XP and Mac OS9 computers equipped with USB cable. To USB port Notes •...
Owners Manual
Page 45
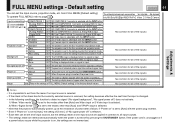
... Hz. - - - - - - If the power cord is unplugged or if a power failure occurs while the projector is turned off by pressing the ON/STANDBY button. To manual adjustment EXEC. Yes (common for all input sources, but the adjustments (settings) made are memorized automatically when the power is on, the adjustments or settings...
... Hz. - - - - - - If the power cord is unplugged or if a power failure occurs while the projector is turned off by pressing the ON/STANDBY button. To manual adjustment EXEC. Yes (common for all input sources, but the adjustments (settings) made are memorized automatically when the power is on, the adjustments or settings...
Owners Manual
Page 51
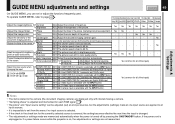
..., if "Power on" is set to all input sources. • The settings made at the restoration of the inputs) Background Logo Blue None SET The TOSHIBA logo is displayed when no signal status continues for all of the inputs) Start-up screen On Off SET The start -up display does not... source, projection mode, etc. SET The start -up at one input source are applied in the check box for all of the inputs) Power on Manual Auto SET The power turns on , the settings are memorized automatically when the power is set to [Auto] with the INPUT button. from the menu...
..., if "Power on" is set to all input sources. • The settings made at the restoration of the inputs) Background Logo Blue None SET The TOSHIBA logo is displayed when no signal status continues for all of the inputs) Start-up screen On Off SET The start -up display does not... source, projection mode, etc. SET The start -up at one input source are applied in the check box for all of the inputs) Power on Manual Auto SET The power turns on , the settings are memorized automatically when the power is set to [Auto] with the INPUT button. from the menu...
Owners Manual
Page 76
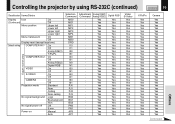
... Yes Yes Yes Yes Yes Yes Yes Yes Yes Yes Yes Yes Yes Yes Yes Yes Yes Yes Yes Yes Yes Yes Continued Power on Manual Auto. Controlling the projector by using RS-232C (continued) CONTENTS 76 Others Input source setting Classification Items/Status Display Icon On (Continued) Off Menu position...
... Yes Yes Yes Yes Yes Yes Yes Yes Yes Yes Yes Yes Yes Yes Yes Yes Yes Yes Yes Yes Yes Yes Continued Power on Manual Auto. Controlling the projector by using RS-232C (continued) CONTENTS 76 Others Input source setting Classification Items/Status Display Icon On (Continued) Off Menu position...
Owners Manual
Page 79
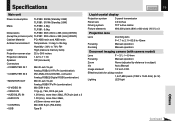
...(H./V.) x 3 Projection lens Lens Focusing Zooming Zooming lens F=1.7 to 2.1 f=33.6 to 42mm Manual operation Manual operation Document imaging camera (with camera model) Lens F = 3.1, f = 6.4mm Focusing Manual operation Zoom None (adjusted by distance to 35 deg. Specifications Main unit Power consumption TLP380: ... Material PC+ABS resin and ABS resin Ambient environment Temperature : 0 deg. to subject) Iris Auto./Manual Image element 1/2 inch CCD Effective pixels for pickup section 1,447,680 pixels (1392 x 1040 dots) (H./V.) Lighting LED light Others Continued
...(H./V.) x 3 Projection lens Lens Focusing Zooming Zooming lens F=1.7 to 2.1 f=33.6 to 42mm Manual operation Manual operation Document imaging camera (with camera model) Lens F = 3.1, f = 6.4mm Focusing Manual operation Zoom None (adjusted by distance to 35 deg. Specifications Main unit Power consumption TLP380: ... Material PC+ABS resin and ABS resin Ambient environment Temperature : 0 deg. to subject) Iris Auto./Manual Image element 1/2 inch CCD Effective pixels for pickup section 1,447,680 pixels (1392 x 1040 dots) (H./V.) Lighting LED light Others Continued


