
Owners Manual
Page 1
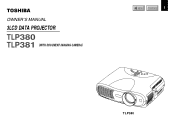
Before use OWNER'S MANUAL 3LCD DATA PROJECTOR TLP380 TLP381 (WITH DOCUMENT IMAGING CAMERA) MENU CONTENTS 1 TLP380
Before use OWNER'S MANUAL 3LCD DATA PROJECTOR TLP380 TLP381 (WITH DOCUMENT IMAGING CAMERA) MENU CONTENTS 1 TLP380
Owners Manual
Page 3
...loss of the memory contents, etc.) arising from the use of your LCD projector. Exemption Clauses • Toshiba Corporation bears no responsibility in the case of damages arising from earthquakes, fire not liable to Toshiba Corporation, operating by third parties, other accidents, or use under abnormal conditions ...arising from combination with equipment or software that is an extreme or sudden change in handy if you ever have to ship your LCD projector. Serial No. Moisture Condensation Never operate this information for a long time. To prevent the unit from a cold location to use...
...loss of the memory contents, etc.) arising from the use of your LCD projector. Exemption Clauses • Toshiba Corporation bears no responsibility in the case of damages arising from earthquakes, fire not liable to Toshiba Corporation, operating by third parties, other accidents, or use under abnormal conditions ...arising from combination with equipment or software that is an extreme or sudden change in handy if you ever have to ship your LCD projector. Serial No. Moisture Condensation Never operate this information for a long time. To prevent the unit from a cold location to use...

Owners Manual
Page 7
.... Unauthorized substitutions may result in fire, electric shock, or other hazards. Safety Check Upon completion of the lamp rupturing, thoroughly clean the area around the projector and discard any edible items placed in proper operating condition. d) If the product does not operate normally by the manufacturer or have fallen into the...
.... Unauthorized substitutions may result in fire, electric shock, or other hazards. Safety Check Upon completion of the lamp rupturing, thoroughly clean the area around the projector and discard any edible items placed in proper operating condition. d) If the product does not operate normally by the manufacturer or have fallen into the...
Owners Manual
Page 8
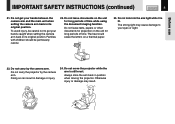
...your hands caught when setting the camera arm back in its original position. The strong light may result. Do not move the projector while the arm is lit. Do not carry by the camera arm. Always store the arm back in damage or injury. 24.... Do not look into the arm light while it is still erect. Do not carry the projector by the camera arm. Otherwise injury or damage may cause damage to get your hands between the camera arm and the main... projection on the unit for long periods of time. Doing so can result in position when moving the projector.
...your hands caught when setting the camera arm back in its original position. The strong light may result. Do not move the projector while the arm is lit. Do not carry by the camera arm. Always store the arm back in damage or injury. 24.... Do not look into the arm light while it is still erect. Do not carry the projector by the camera arm. Otherwise injury or damage may cause damage to get your hands between the camera arm and the main... projection on the unit for long periods of time. Doing so can result in position when moving the projector.
Owners Manual
Page 10
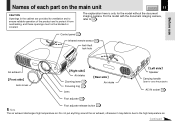
... part on the main unit 11 Names of COMPUTER IN, MONITOR OUT connector 70 Applicable signal 71 Controlling the projector by using RS-232C 73 Specifications 79 Before use the output connector 27 Operations Projection on the remote control 14... Loading batteries 15 Remote control operation 16 Installation and connections Floor-mounted projector placement 17 Projector placement angle adjustment 20 Ceiling-mounted projector placement 21 Connecting a computer (COMPUTER IN 1 connector) ... 22 Connecting a computer (COMPUTER IN 2 connector...
... part on the main unit 11 Names of COMPUTER IN, MONITOR OUT connector 70 Applicable signal 71 Controlling the projector by using RS-232C 73 Specifications 79 Before use the output connector 27 Operations Projection on the remote control 14... Loading batteries 15 Remote control operation 16 Installation and connections Floor-mounted projector placement 17 Projector placement angle adjustment 20 Ceiling-mounted projector placement 21 Connecting a computer (COMPUTER IN 1 connector) ... 22 Connecting a computer (COMPUTER IN 2 connector...
Owners Manual
Page 11
... Foot adjuster release button 20 Note The air exhaust discharges high temperature air. For the model with the document imaging camera, refer to carry the projector. Do not put anything around the air exhaust, otherwise it may deform due to protect it from overheating, and these openings must not be blocked...
... Foot adjuster release button 20 Note The air exhaust discharges high temperature air. For the model with the document imaging camera, refer to carry the projector. Do not put anything around the air exhaust, otherwise it may deform due to protect it from overheating, and these openings must not be blocked...
Owners Manual
Page 12
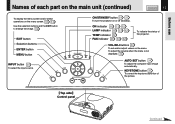
... is not displayed. 32 AUTO SET button 34 To adjust the computer input image automatically. KEYSTONE button 35 To correct the keystone distortion of the projector. Top side Control panel Continued Before use KEYSTONE Names of each part on the main unit (continued) CONTENTS 12 To display the menu screen and... TEMP indicator 62 FAN indicator 28 33 62 To indicate the status of the picture. MENU INPUT ON/STANDBY button 28 33 To turn the projector on or off (standby).
... is not displayed. 32 AUTO SET button 34 To adjust the computer input image automatically. KEYSTONE button 35 To correct the keystone distortion of the projector. Top side Control panel Continued Before use KEYSTONE Names of each part on the main unit (continued) CONTENTS 12 To display the menu screen and... TEMP indicator 62 FAN indicator 28 33 62 To indicate the status of the picture. MENU INPUT ON/STANDBY button 28 33 To turn the projector on or off (standby).
Owners Manual
Page 13
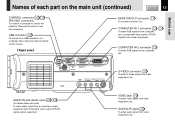
... use Names of each part on the main unit (continued) CONTENTS 13 CONTROL connector 26 73 (RS-232C connector) To connect a computer to control the projector. (Remove the cover to use the connector.) USB connector 42 To connect to a USB connector of a computer when using the optional remote control mouse. COMPUTER...
... use Names of each part on the main unit (continued) CONTENTS 13 CONTROL connector 26 73 (RS-232C connector) To connect a computer to control the projector. (Remove the cover to use the connector.) USB connector 42 To connect to a USB connector of a computer when using the optional remote control mouse. COMPUTER...
Owners Manual
Page 14
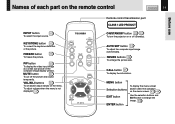
... PIP CALL RESIZE MENU VOL / ADJ ENTER CT-90113 EXIT Remote control transmission part CLASS 1 LED PRODUCT ON/STANDBY button 28 33 To turn the projector on the remote control CONTENTS 14 Before use INPUT button 30 To select the input source. Names of the picture. RESIZE buttons 39 To enlarge...
... PIP CALL RESIZE MENU VOL / ADJ ENTER CT-90113 EXIT Remote control transmission part CLASS 1 LED PRODUCT ON/STANDBY button 28 33 To turn the projector on the remote control CONTENTS 14 Before use INPUT button 30 To select the input source. Names of the picture. RESIZE buttons 39 To enlarge...
Owners Manual
Page 16
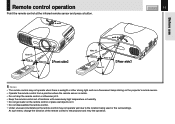
...INPUT MUTE PI CAL RESIZ MENU SET About 15° Rear side Notes • The remote control may not operate well due to the projector and retry the operation. At such times, change the direction of locations with excessively high temperature or humidity. • Do not get water...• Under unusual circumstances the remote control may not operate when there is sunlight or other strong light such as a fluorescent lamp shining on the projector's remote sensor. • Operate the remote control from a position where the remote sensor is visible. • Do not drop the remote control ...
...INPUT MUTE PI CAL RESIZ MENU SET About 15° Rear side Notes • The remote control may not operate well due to the projector and retry the operation. At such times, change the direction of locations with excessively high temperature or humidity. • Do not get water...• Under unusual circumstances the remote control may not operate when there is sunlight or other strong light such as a fluorescent lamp shining on the projector's remote sensor. • Operate the remote control from a position where the remote sensor is visible. • Do not drop the remote control ...

Owners Manual
Page 17
Perform the "Projection mode" setting on the front of the screen from a floor installation. Installation and connections Floor-mounted projector placement CONTENTS 17 There are two ways to the page 21 . Floor-mounted front projection Viewing a picture projected on the menu screen for the projection method. 51 For the ceiling-mounted projector placement, refer to place the floor-mounted projector. Translucent screen Viewer Viewer Continued Floor-mounted rear projection Viewing a picture projected through the back of the screen from a floor installation.
Perform the "Projection mode" setting on the front of the screen from a floor installation. Installation and connections Floor-mounted projector placement CONTENTS 17 There are two ways to the page 21 . Floor-mounted front projection Viewing a picture projected on the menu screen for the projection method. 51 For the ceiling-mounted projector placement, refer to place the floor-mounted projector. Translucent screen Viewer Viewer Continued Floor-mounted rear projection Viewing a picture projected through the back of the screen from a floor installation.
Owners Manual
Page 18
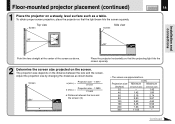
... table. The projection size depends on the distance between the lens and the screen (m) a • The values are approximations. Floor-mounted projector placement (continued) 1 Place the projector on a steady, level surface such as above. Screen 90° Projection size - 1.6017 a (min.) = 27.041 a (max....) = Projection size - 1.2699 21.463 a: Distance between the lens and the screen. Place the projector horizontally so that the light beam hits the screen squarely. Adjust the projection size by changing the distances as shown below. Projection size (inches...
... table. The projection size depends on the distance between the lens and the screen (m) a • The values are approximations. Floor-mounted projector placement (continued) 1 Place the projector on a steady, level surface such as above. Screen 90° Projection size - 1.6017 a (min.) = 27.041 a (max....) = Projection size - 1.2699 21.463 a: Distance between the lens and the screen. Place the projector horizontally so that the light beam hits the screen squarely. Adjust the projection size by changing the distances as shown below. Projection size (inches...
Owners Manual
Page 19
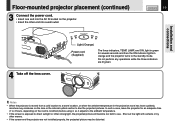
... section to blur the projected pictures. Shut out the light with curtains or by other means. • If the screen and the projector are lit green. Notes • When the projector is exposed to direct sunlight or other end into a wall outlet. CONTENTS 19 4 Take off the lens cover. In such a ...case, leave the projector for several seconds and then the ON indicator lights in the projection room has risen suddenly, moisture may be distorted. ON LAMP ON / STANDBY TEMP...
... section to blur the projected pictures. Shut out the light with curtains or by other means. • If the screen and the projector are lit green. Notes • When the projector is exposed to direct sunlight or other end into a wall outlet. CONTENTS 19 4 Take off the lens cover. In such a ...case, leave the projector for several seconds and then the ON indicator lights in the projection room has risen suddenly, moisture may be distorted. ON LAMP ON / STANDBY TEMP...
Owners Manual
Page 20
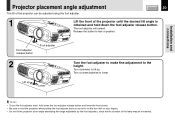
...up Lower Turn the foot adjuster to make fine adjustment to the height. Foot adjuster release button Foot adjuster 2 Lift up . Installation and connections Projector placement angle adjustment The tilt of the lamp may be adjusted using the foot adjuster. Notes • To put the foot adjuster back, hold ... putting the foot adjuster back so as not to hold down the foot adjuster release button. CONTENTS 20 1 Lift the front of the projector until the desired tilt angle is obtained and hold down the foot adjuster release button and lower the front slowly. • Be sure ...
...up Lower Turn the foot adjuster to make fine adjustment to the height. Foot adjuster release button Foot adjuster 2 Lift up . Installation and connections Projector placement angle adjustment The tilt of the lamp may be adjusted using the foot adjuster. Notes • To put the foot adjuster back, hold ... putting the foot adjuster back so as not to hold down the foot adjuster release button. CONTENTS 20 1 Lift the front of the projector until the desired tilt angle is obtained and hold down the foot adjuster release button and lower the front slowly. • Be sure ...
Owners Manual
Page 21
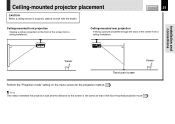
... projection method. 51 Note The relation between the projection size and the distance to the screen is required, please consult with the dealer. Ceiling-mounted projector placement CAUTION When a ceiling mount is the same as that of the floor-mounted projection mode 18 . Ceiling-mounted rear projection Viewing a picture projected through...
... projection method. 51 Note The relation between the projection size and the distance to the screen is required, please consult with the dealer. Ceiling-mounted projector placement CAUTION When a ceiling mount is the same as that of the floor-mounted projection mode 18 . Ceiling-mounted rear projection Viewing a picture projected through...
Owners Manual
Page 22
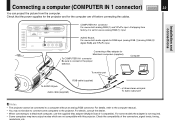
...port RGB cable (supplied) To AUDIO IN jack Audio cable (supplied) ø3.5mm stereo mini-jack To audio output port Notes • The projector cannot be able to a Macintosh computer, use as both analog RGB (1) and Y/PB/PR input. AUDIO IN jack For use as both ...audio signals for the computer are not compatible with this projector. Connecting a Mac adapter for use the supplied Mac adapter (Multiple Scan 21 compatible). Installation and connections Connecting a computer (COMPUTER IN 1 connector)...
...port RGB cable (supplied) To AUDIO IN jack Audio cable (supplied) ø3.5mm stereo mini-jack To audio output port Notes • The projector cannot be able to a Macintosh computer, use as both analog RGB (1) and Y/PB/PR input. AUDIO IN jack For use as both ...audio signals for the computer are not compatible with this projector. Connecting a Mac adapter for use the supplied Mac adapter (Multiple Scan 21 compatible). Installation and connections Connecting a computer (COMPUTER IN 1 connector)...
Owners Manual
Page 23
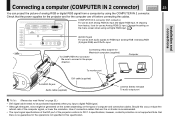
... cables. L VIDEO S-VIDEO AUDIO IN jack For use as both analog RGB (2) input and digital RGB input. Note that the power supplies for the projector and for the operations not specified in the proper direction. Installation and connections Connecting a computer (COMPUTER IN 2 connector) CONTENTS 23 You can project the ... (supplied) DVI cable (supplied) ø3.5mm Stereo mini-jack To audio output port Notes (Please also read "Notes" on the types of the projector conform to DVI 1.0 specifications; Connecting a Mac adapter for use as Analog RGB (2) input. AUDIO -
... cables. L VIDEO S-VIDEO AUDIO IN jack For use as both analog RGB (2) input and digital RGB input. Note that the power supplies for the projector and for the operations not specified in the proper direction. Installation and connections Connecting a computer (COMPUTER IN 2 connector) CONTENTS 23 You can project the ... (supplied) DVI cable (supplied) ø3.5mm Stereo mini-jack To audio output port Notes (Please also read "Notes" on the types of the projector conform to DVI 1.0 specifications; Connecting a Mac adapter for use as Analog RGB (2) input. AUDIO -
Owners Manual
Page 24
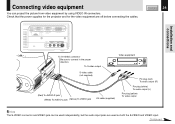
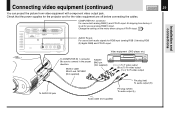
... 24 Installation and connections USB MONITOR OUT CONTROL COMPUTER IN 1 ( Y/PB/PR ) COMPUTER IN 2 AUDIO IN VIDEO IN R - Check that the power supplies for the projector and for the video equipment are used independently, but the audio input jacks are off before connecting the cables. To S-video output Video equipment S-video...
... 24 Installation and connections USB MONITOR OUT CONTROL COMPUTER IN 1 ( Y/PB/PR ) COMPUTER IN 2 AUDIO IN VIDEO IN R - Check that the power supplies for the projector and for the video equipment are used independently, but the audio input jacks are off before connecting the cables. To S-video output Video equipment S-video...
Owners Manual
Page 25
... equipment with component video output jack. Change the setting on the menu when using as analog RGB(1) input. Check that the power supplies for the projector and for RGB input (analog RGB (1)/analog RGB (2)/digital RGB) and Y/PB/PR input.
... equipment with component video output jack. Change the setting on the menu when using as analog RGB(1) input. Check that the power supplies for the projector and for RGB input (analog RGB (1)/analog RGB (2)/digital RGB) and Y/PB/PR input.
Owners Manual
Page 26
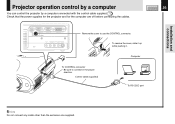
... while pushing it. Control cable (supplied) To RS-232C port Note Do not connect any cable other than the exclusive one supplied. Installation and connections Projector operation control by a computer You can control the projector by a computer connected with the control cable supplied. 73 Check that the power supplies for the...
... while pushing it. Control cable (supplied) To RS-232C port Note Do not connect any cable other than the exclusive one supplied. Installation and connections Projector operation control by a computer You can control the projector by a computer connected with the control cable supplied. 73 Check that the power supplies for the...


