

Owners Manual
Page 1
Before use OWNER'S MANUAL 3LCD DATA PROJECTOR TLP680U TLP681U (WITH DOCUMENT IMAGING CAMERA) CONTENTS 1
Before use OWNER'S MANUAL 3LCD DATA PROJECTOR TLP680U TLP681U (WITH DOCUMENT IMAGING CAMERA) CONTENTS 1
Owners Manual
Page 10
Image 31 Picture adjustments - Picture 32 Sound adjustments - Default 28 Keystone correction - Audio 33 Saving data - Save 34 CONTENTS 10 Camera Part names and functions of document imaging camera 35 Picture projection with the document ... 2 IMPORTANT PRECAUTIONS 3 IMPORTANT SAFETY INSTRUCTIONS 4 Power supply cord selection 9 Part names and functions 11 Connections and installation Connections 16 Projector placement 18 Operations Picture projection 21 Operating the computer by the remote control 25 Adjustments Settings and adjustments on the menu 27 Initial settings -
Image 31 Picture adjustments - Picture 32 Sound adjustments - Default 28 Keystone correction - Audio 33 Saving data - Save 34 CONTENTS 10 Camera Part names and functions of document imaging camera 35 Picture projection with the document ... 2 IMPORTANT PRECAUTIONS 3 IMPORTANT SAFETY INSTRUCTIONS 4 Power supply cord selection 9 Part names and functions 11 Connections and installation Connections 16 Projector placement 18 Operations Picture projection 21 Operating the computer by the remote control 25 Adjustments Settings and adjustments on the menu 27 Initial settings -

Owners Manual
Page 27
...settings are adjustments and settings on the menu. Clock : To adjust the clock frequency. To make the correction of the 31 speaker. Save 34 Save data : To save the adjustments and settings on the menu. Contrast : To adjust the contrast. Sharpness : To adjust the sharpness. R-level : To... adjust the amount of RGB input. Video signal : To set the signal type of red in the picture. When using this projector for displays. Color : To adjust the color depth. Proj. Phase : To adjust the phase. B-level : To adjust the amount of green in 29...
...settings are adjustments and settings on the menu. Clock : To adjust the clock frequency. To make the correction of the 31 speaker. Save 34 Save data : To save the adjustments and settings on the menu. Contrast : To adjust the contrast. Sharpness : To adjust the sharpness. R-level : To... adjust the amount of RGB input. Video signal : To set the signal type of red in the picture. When using this projector for displays. Color : To adjust the color depth. Proj. Phase : To adjust the phase. B-level : To adjust the amount of green in 29...
Owners Manual
Page 30
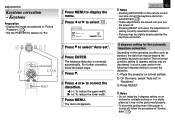
...L-CLICK MENU R-CLICK ENTER RGB VIDEO CAMERA 4 RESIZE RESET FREEZE RESET 4 Press ENTER. For further correction, follow the procedure of "Saving data". 34 Adjustments Keystone correction - Keystone Preparation • Display the image as it may be performed properly. • To store this setting even...turned off . • Pressing RESET will return the adjustment or setting currently selected to correct the distortion. 1) Place the projector on the operating condition such as vibration, the distortion may be beyond the automatic keystone correction. The menu disappears.
...L-CLICK MENU R-CLICK ENTER RGB VIDEO CAMERA 4 RESIZE RESET FREEZE RESET 4 Press ENTER. For further correction, follow the procedure of "Saving data". 34 Adjustments Keystone correction - Keystone Preparation • Display the image as it may be performed properly. • To store this setting even...turned off . • Pressing RESET will return the adjustment or setting currently selected to correct the distortion. 1) Place the projector on the operating condition such as vibration, the distortion may be beyond the automatic keystone correction. The menu disappears.
Owners Manual
Page 31
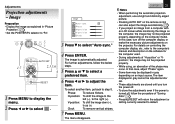
...'s manual and description on the computer model. The item displayed in gray cannot be projected properly. • While using, an aberration of "Saving data". 34 • Pressing RESET will return the adjustment or setting currently selected to adjust the item. I ma g e Au t o sync .... preferred item. 6 Press or to default. The image is turned off the computer display, or make the necessary picture adjustments on the projector. CONTENTS 31 Notes • When performing the automatic projection adjustment, use a bright and distinctly edged picture. • Pressing AUTO SET on...
...'s manual and description on the computer model. The item displayed in gray cannot be projected properly. • While using, an aberration of "Saving data". 34 • Pressing RESET will return the adjustment or setting currently selected to adjust the item. I ma g e Au t o sync .... preferred item. 6 Press or to default. The image is turned off the computer display, or make the necessary picture adjustments on the projector. CONTENTS 31 Notes • When performing the automatic projection adjustment, use a bright and distinctly edged picture. • Pressing AUTO SET on...


