

Owners Manual
Page 1
Before use OWNER'S MANUAL 3LCD DATA PROJECTOR TLP680U TLP681U (WITH DOCUMENT IMAGING CAMERA) CONTENTS 1
Before use OWNER'S MANUAL 3LCD DATA PROJECTOR TLP680U TLP681U (WITH DOCUMENT IMAGING CAMERA) CONTENTS 1

Owners Manual
Page 3
... for future reference. To prevent the unit from possible damage, do not use volatile liquids, such as it from a cold location to ship your LCD projector. They will come in temperature, moisture may condense on the crucial internal parts. Avoid Volatile Liquid Do not use the unit for a long time. When... and Serial No. located at the factory. Model No. Retain this unit immediately after moving it was originally packed at the rear of your LCD projector. For maximum protection, repack the set as an insect spray, near the unit.
... for future reference. To prevent the unit from possible damage, do not use volatile liquids, such as it from a cold location to ship your LCD projector. They will come in temperature, moisture may condense on the crucial internal parts. Avoid Volatile Liquid Do not use the unit for a long time. When... and Serial No. located at the factory. Model No. Retain this unit immediately after moving it was originally packed at the rear of your LCD projector. For maximum protection, repack the set as an insect spray, near the unit.
Owners Manual
Page 8
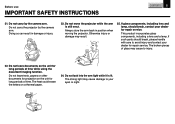
...including a lens and a lamp. Do not leave documents on the unit for repair service. Before use IMPORTANT SAFETY INSTRUCTIONS CONTENTS 8 21. Do not move the projector while the arm is lit. If glass components, including lens and lamp, should break, please handle with care to your eyes or sight. If such... while using the document imaging function. Always store the arm back in damage or injury. 23. Doing so can result in position when moving the projector. Do not leave texts, papers or other documents for projection on a thermal paper. 24. Do not look into the arm light while it is...
...including a lens and a lamp. Do not leave documents on the unit for repair service. Before use IMPORTANT SAFETY INSTRUCTIONS CONTENTS 8 21. Do not move the projector while the arm is lit. If glass components, including lens and lamp, should break, please handle with care to your eyes or sight. If such... while using the document imaging function. Always store the arm back in damage or injury. 23. Doing so can result in position when moving the projector. Do not leave texts, papers or other documents for projection on a thermal paper. 24. Do not look into the arm light while it is...
Owners Manual
Page 10
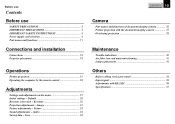
... use Contents Before use SAFETY PRECAUTIONS 2 IMPORTANT PRECAUTIONS 3 IMPORTANT SAFETY INSTRUCTIONS 4 Power supply cord selection 9 Part names and functions 11 Connections and installation Connections 16 Projector placement 18 Operations Picture projection 21 Operating the computer by the remote control 25 Adjustments Settings and adjustments on the menu 27 Initial settings - Picture...
... use Contents Before use SAFETY PRECAUTIONS 2 IMPORTANT PRECAUTIONS 3 IMPORTANT SAFETY INSTRUCTIONS 4 Power supply cord selection 9 Part names and functions 11 Connections and installation Connections 16 Projector placement 18 Operations Picture projection 21 Operating the computer by the remote control 25 Adjustments Settings and adjustments on the menu 27 Initial settings - Picture...
Owners Manual
Page 11
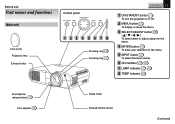
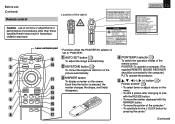
... MENU SELECT/ADJUST ENTER INPUT ON LAMP TEMP 123 4 5 6 78 Zooming ring 21 Focusing ring 21 CONTENTS 11 1 ON/STANDBY button 21 To turn the projector on or off. 2 MENU button 27 To display or close the menu. 3 SELECT/ADJUST button 28 ( / / / ) To select items or adjust values on the menu...
... MENU SELECT/ADJUST ENTER INPUT ON LAMP TEMP 123 4 5 6 78 Zooming ring 21 Focusing ring 21 CONTENTS 11 1 ON/STANDBY button 21 To turn the projector on or off. 2 MENU button 27 To display or close the menu. 3 SELECT/ADJUST button 28 ( / / / ) To select items or adjust values on the menu...
Owners Manual
Page 12
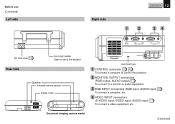
AUDIO -R Anti-theft lock 1 CONTROL connector 17 49 To connect a computer to control the projector. 2 MONITOR OUTPUT connectors (RGB output, AUDIO output) 17 To connect to carry the projetor. Before use (Continued) Left side Right side CONTENTS 12 1 2 34 RS-...
AUDIO -R Anti-theft lock 1 CONTROL connector 17 49 To connect a computer to control the projector. 2 MONITOR OUTPUT connectors (RGB output, AUDIO output) 17 To connect to carry the projetor. Before use (Continued) Left side Right side CONTENTS 12 1 2 34 RS-...
Owners Manual
Page 13
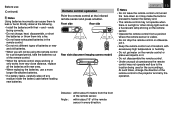
...JAPAN CAUTION LASER RADIATION DO NOT STARE INTO BEAM WAVE LENGTH: 650nm MAX OUTPUT: 1mW CLASS II LASER PRODUCT COMPLIES WITH DHHS 21 CFR SUBCHAPTER J TOSHIBA AMERICA CONSUMER PRODUCTS, INC. 82 TOTOWA RD., WAYNE, NJ 07470, U.S.A REMOTE CONTROL MODEL CT-90009 MANUFACTURED: SEPTEMBER 1999 PLACE OF MANUFACTURER: A.../PJ selector 26 To switch the operation modes of the remote control. Each time the button is set to the computer.) PJ: To operate the projector. 5 button 28 / Pointer control* 26 • To select items or adjust values on the screen. POINTER: To operate a computer. (The ...
...JAPAN CAUTION LASER RADIATION DO NOT STARE INTO BEAM WAVE LENGTH: 650nm MAX OUTPUT: 1mW CLASS II LASER PRODUCT COMPLIES WITH DHHS 21 CFR SUBCHAPTER J TOSHIBA AMERICA CONSUMER PRODUCTS, INC. 82 TOTOWA RD., WAYNE, NJ 07470, U.S.A REMOTE CONTROL MODEL CT-90009 MANUFACTURED: SEPTEMBER 1999 PLACE OF MANUFACTURER: A.../PJ selector 26 To switch the operation modes of the remote control. Each time the button is set to the computer.) PJ: To operate the projector. 5 button 28 / Pointer control* 26 • To select items or adjust values on the screen. POINTER: To operate a computer. (The ...

Owners Manual
Page 14
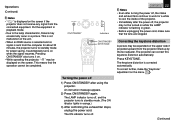
... the menu. 7 RGB button 21 To select the RGB input. 8 RESIZE button 24 To change the picture size. 9 ON/STANDBY button 21 To turn the projector on the menu. 12 VIDEO button 21 To select the video input. 13 CAMERA button (for document imaging camera model only) 37 To select the...
... the menu. 7 RGB button 21 To select the RGB input. 8 RESIZE button 24 To change the picture size. 9 ON/STANDBY button 21 To turn the projector on the menu. 12 VIDEO button 21 To select the video input. 13 CAMERA button (for document imaging camera model only) 37 To select the...
Owners Manual
Page 15
... control out of locations with their + and - ends facing correctly. • Do not charge, heat, disassemble, or short the batteries or throw them to the projector and retry the operation. Angle : within about 15° of the remote sensor in the remote control. • Do not mix different types of batteries...
... control out of locations with their + and - ends facing correctly. • Do not charge, heat, disassemble, or short the batteries or throw them to the projector and retry the operation. Angle : within about 15° of the remote sensor in the remote control. • Do not mix different types of batteries...
Owners Manual
Page 16
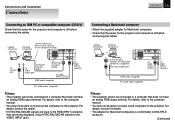
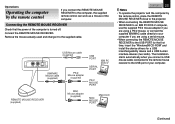
...terminal. AUDIO -R To RGB INPUT (RGB) To RGB INPUT (AUDIO) RGB cable (supplied) PC audio cable (supplied) Notes • The projector cannot be connected to the VIDEO INPUT jack.) Connecting a Macintosh computer • Attach the supplied adapter for Macintosh computers. • Check that ...the power for the projector and computer is off before connecting the cables. or Computer To audio monitor cable output port RS-232C CONTROL RGB AUDIO MONITOR OUTPUT...
...terminal. AUDIO -R To RGB INPUT (RGB) To RGB INPUT (AUDIO) RGB cable (supplied) PC audio cable (supplied) Notes • The projector cannot be connected to the VIDEO INPUT jack.) Connecting a Macintosh computer • Attach the supplied adapter for Macintosh computers. • Check that ...the power for the projector and computer is off before connecting the cables. or Computer To audio monitor cable output port RS-232C CONTROL RGB AUDIO MONITOR OUTPUT...
Owners Manual
Page 17
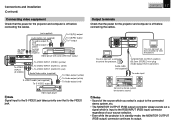
...the power for dynamic sound. You can connect an extra monitor to view the picture. AUDIO -R You can connect a computer to control the projector. 49 Audio cable (not supplied) To MONITOR OUTPUT (AUDIO) Ø3.5mm STEREO mini plug (Audio output level is constant.) To audio ...input Connect a stereo system for the projector and computer is off before connecting the cables. Connections and installation (Continued) Connecting video equipment Check that to the VIDEO jack. AUDIO -R ...
...the power for dynamic sound. You can connect an extra monitor to view the picture. AUDIO -R You can connect a computer to control the projector. 49 Audio cable (not supplied) To MONITOR OUTPUT (AUDIO) Ø3.5mm STEREO mini plug (Audio output level is constant.) To audio ...input Connect a stereo system for the projector and computer is off before connecting the cables. Connections and installation (Continued) Connecting video equipment Check that to the VIDEO jack. AUDIO -R ...
Owners Manual
Page 18
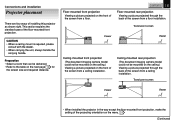
...Viewing a picture projected on the front of the screen from a ceiling installation. Translucent screen Viewer Viewer • When installed the projector in the way except the floor-mounted front projection, make the setting of the projecting orientation on the ceiling.) Viewing a picture... projected through the back of the screen from a floor installation. This section explains the standard case of installing this projector as shown right. CONTENTS 18 Floor-mounted rear projection Viewing a picture projected through the back of the screen from a ceiling ...
...Viewing a picture projected on the front of the screen from a ceiling installation. Translucent screen Viewer Viewer • When installed the projector in the way except the floor-mounted front projection, make the setting of the projecting orientation on the ceiling.) Viewing a picture... projected through the back of the screen from a floor installation. This section explains the standard case of installing this projector as shown right. CONTENTS 18 Floor-mounted rear projection Viewing a picture projected through the back of the screen from a ceiling ...
Owners Manual
Page 19
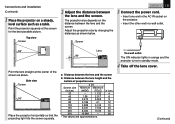
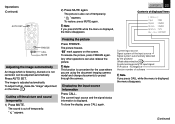
...the distances as a table. CONTENTS 19 3 Connect the power cord. • Insert one end in the AC IN socket on the projector. • Insert the other end in orange and the projector turns to standby mode. 4 Take off the lens cover. (Continued) b (cm) 4 6 9 12 15 23 30 38 To... a wall outlet. a: Distance between the lens and the screen b: Distance between the lens and the screen. Point the projector squarely at the center of projection area a (m) Screen size Minimum Maximum (inches) (WIDE) (TELE) 23 - 1.132 40 1.56 2.017 60 2.373 3.059 80 ...
...the distances as a table. CONTENTS 19 3 Connect the power cord. • Insert one end in the AC IN socket on the projector. • Insert the other end in orange and the projector turns to standby mode. 4 Take off the lens cover. (Continued) b (cm) 4 6 9 12 15 23 30 38 To... a wall outlet. a: Distance between the lens and the screen b: Distance between the lens and the screen. Point the projector squarely at the center of projection area a (m) Screen size Minimum Maximum (inches) (WIDE) (TELE) 23 - 1.132 40 1.56 2.017 60 2.373 3.059 80 ...
Owners Manual
Page 20
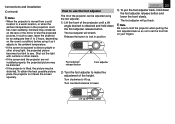
...• If the screen is exposed to direct sunlight or other means. • If the screen and the projector are not installed properly, the projected picture may be distorted. • If the projector is tilted, the picture may condense on the lens or the mirror to blur the projected pictures. Lift up... . In such a case, leave the projector for an adequate time (1 to 2 hours, depending on your fingers. Release the button to lock in the projection room has risen suddenly, moisture may be...
...• If the screen is exposed to direct sunlight or other means. • If the screen and the projector are not installed properly, the projected picture may be distorted. • If the projector is tilted, the picture may condense on the lens or the mirror to blur the projected pictures. Lift up... . In such a case, leave the projector for an adequate time (1 to 2 hours, depending on your fingers. Release the button to lock in the projection room has risen suddenly, moisture may be...
Owners Manual
Page 21
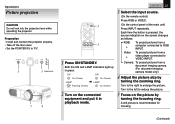
... VIDEO. (On the control panel of the main unit) Press INPUT repeatedly. Turn to the left to VIDEO INPUT. Preparation • Install and connect the projector properly. • Take off the lens cover. • Set the POINTER/PJ to enlarge the picture. Each time the button is recommended for focusing. (Continued... R-CLICK ENTER RGB VIDEO CAMERA RESIZE RESET FREEZE 3 1 Press ON/STANDBY. Operations Picture projection CAUTION Do not look into the projection lens while operating the projector.
... VIDEO. (On the control panel of the main unit) Press INPUT repeatedly. Turn to the left to VIDEO INPUT. Preparation • Install and connect the projector properly. • Take off the lens cover. • Set the POINTER/PJ to enlarge the picture. Each time the button is recommended for focusing. (Continued... R-CLICK ENTER RGB VIDEO CAMERA RESIZE RESET FREEZE 3 1 Press ON/STANDBY. Operations Picture projection CAUTION Do not look into the projection lens while operating the projector.
Owners Manual
Page 22
...screen. This means that the fans are stopped. The keystone distortion is flashing in a picture. The ON indicator turns off , and the projector turns to the lamp characteristic, flickers may not be turned on when the signal resumes. Correcting the keystone distortion A picture may be expanded ...on the upper side if projected upward from the projector lifted up by the foot adjuster. To correct further, make sure that the operation cannot be completed. CONTENTS 22 Notes • Even...
...screen. This means that the fans are stopped. The keystone distortion is flashing in a picture. The ON indicator turns off , and the projector turns to the lamp characteristic, flickers may not be turned on when the signal resumes. Correcting the keystone distortion A picture may be expanded ...on the upper side if projected upward from the projector lifted up by the foot adjuster. To correct further, make sure that the operation cannot be completed. CONTENTS 22 Notes • Even...
Owners Manual
Page 23
... ON/STANDBY KEYSTONE MARKER POINTER PJ LASER 2) Press MUTE again. Current input source Signal system of the input source Signal system automatically detected by the projector (Mode determination 45 ) Synchronizing polarity of input signal P=Positive N=Negative Version number of displayed items [ St atus ] I n p u t : RGB S i g n a l : XGA6 0 Sc r e e n : XGA6 0 Synch ro . :N/N Ve r . / r ev...
... ON/STANDBY KEYSTONE MARKER POINTER PJ LASER 2) Press MUTE again. Current input source Signal system of the input source Signal system automatically detected by the projector (Mode determination 45 ) Synchronizing polarity of input signal P=Positive N=Negative Version number of displayed items [ St atus ] I n p u t : RGB S i g n a l : XGA6 0 Sc r e e n : XGA6 0 Synch ro . :N/N Ve r . / r ev...
Owners Manual
Page 25
...Mouse adapter (supplied) USB PORT SERIAL PORT IBM PC DOS/V PS/2 MOUSE PORT Macintosh MAC MOUSE PORT CONTENTS 25 Notes • To operate the projector and the computer by the remote control If you are using a serial mouse. • When connecting the REMOTE MOUSE RECEIVER to the USB PORT for... actually used and change it to the supplied cable. Operations Operating the computer by the remote control, place the REMOTE MOUSE RECEIVER close to the projector. • When connecting the REMOTE MOUSE RECEIVER to an IBM PC/DOS V computer, use the supplied PS/2 mouse adapter if you are using a ...
...Mouse adapter (supplied) USB PORT SERIAL PORT IBM PC DOS/V PS/2 MOUSE PORT Macintosh MAC MOUSE PORT CONTENTS 25 Notes • To operate the projector and the computer by the remote control If you are using a serial mouse. • When connecting the REMOTE MOUSE RECEIVER to the USB PORT for... actually used and change it to the supplied cable. Operations Operating the computer by the remote control, place the REMOTE MOUSE RECEIVER close to the projector. • When connecting the REMOTE MOUSE RECEIVER to an IBM PC/DOS V computer, use the supplied PS/2 mouse adapter if you are using a ...

Owners Manual
Page 27
... in the picture. Auto sync. : To adjust the image automatically. Adjustments Settings and adjustments on the menu Most of the sound output. When using this projector for displays. Tint : To adjust the tint. Proj. RGB input : To set : Adjust : To correct the keystone distortion automatically. All preset : To restore the adjustments...
... in the picture. Auto sync. : To adjust the image automatically. Adjustments Settings and adjustments on the menu Most of the sound output. When using this projector for displays. Tint : To adjust the tint. Proj. RGB input : To set : Adjust : To correct the keystone distortion automatically. All preset : To restore the adjustments...
Owners Manual
Page 30
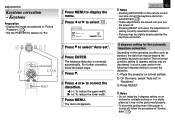
... 4 Press ENTER. Keys t one Au t o se t Ad j us t - + ON/STANDBY MENU SELECT/ADJUST ENTER INPUT ON LAMP TEMP 3 Press to correct the distortion. 1) Place the projector on the operating condition such as explained in "Keystone". 3) Press RESET. For further correction, follow the procedure of "Saving data". 34 The keystone distortion is...
... 4 Press ENTER. Keys t one Au t o se t Ad j us t - + ON/STANDBY MENU SELECT/ADJUST ENTER INPUT ON LAMP TEMP 3 Press to correct the distortion. 1) Place the projector on the operating condition such as explained in "Keystone". 3) Press RESET. For further correction, follow the procedure of "Saving data". 34 The keystone distortion is...


