

Owners Manual
Page 1
Before use OWNER'S MANUAL 3LCD DATA PROJECTOR TLP680U TLP681U (WITH DOCUMENT IMAGING CAMERA) CONTENTS 1
Before use OWNER'S MANUAL 3LCD DATA PROJECTOR TLP680U TLP681U (WITH DOCUMENT IMAGING CAMERA) CONTENTS 1
Owners Manual
Page 16
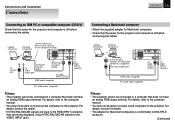
...computers to a computer that does not have an analog RGB output terminal. For details, refer to the computer manual. • You may not be connected to the projector. Connections and installation Connections CONTENTS 16 Connecting an IBM PC or compatible computer (DOS/V) Check that the power for... the projector and computer is off before connecting the cables. For details, refer to the computer manual. • You may not be connected to the projector. AUDIO -R To RGB INPUT (RGB) To RGB INPUT (AUDIO) RGB cable...
...computers to a computer that does not have an analog RGB output terminal. For details, refer to the computer manual. • You may not be connected to the projector. Connections and installation Connections CONTENTS 16 Connecting an IBM PC or compatible computer (DOS/V) Check that the power for... the projector and computer is off before connecting the cables. For details, refer to the computer manual. • You may not be connected to the projector. AUDIO -R To RGB INPUT (RGB) To RGB INPUT (AUDIO) RGB cable...
Owners Manual
Page 31
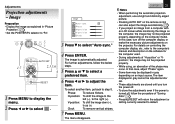
...6 Press or to select "Auto sync." 4 Press ENTER. For further adjustments, follow the procedure of the phase may not be projected properly, depending on the projector. CONTENTS 31 Notes • When performing the automatic projection adjustment, use a bright and distinctly edged picture. • Pressing AUTO SET on an input source.... adjustments - I ma g e Au t o sync . Clock To remove vertical stripes. 7 Press MENU. For details on controlling the computer display, etc., refer to the computer's manual and description on - + Cl ock - + 3 Press to adjust the item.
...6 Press or to select "Auto sync." 4 Press ENTER. For further adjustments, follow the procedure of the phase may not be projected properly, depending on the projector. CONTENTS 31 Notes • When performing the automatic projection adjustment, use a bright and distinctly edged picture. • Pressing AUTO SET on an input source.... adjustments - I ma g e Au t o sync . Clock To remove vertical stripes. 7 Press MENU. For details on controlling the computer display, etc., refer to the computer's manual and description on - + Cl ock - + 3 Press to adjust the item.


