
Management Guide
Page 3
... Color Systems. This manual explains the instructions for administrators to set up and manage the Multifunctional Digital Systems or Multifunctional Digital Color Systems. Read this manual before using your equipment. Indicates a potentially hazardous situation which, if not avoided, may differ from those of data. The shape and location of some buttons on the touch panel menus may be useful for the operation of the buttons...
... Color Systems. This manual explains the instructions for administrators to set up and manage the Multifunctional Digital Systems or Multifunctional Digital Color Systems. Read this manual before using your equipment. Indicates a potentially hazardous situation which, if not avoided, may differ from those of data. The shape and location of some buttons on the touch panel menus may be useful for the operation of the buttons...
Management Guide
Page 5
... Replacing the toner cartridge 17 Setting Copy Functions ...18 Setting Fax Functions ...24 Setting Scan Functions...25 Setting e-Filing Functions ...29 Printing Lists...30 Setting Drawer ...33 Managing Address Book ...36 Managing contacts in address book 36 Managing groups in address book 48 Checking E-mail...64 Setting BIP Printing...65 Chapter 2 SETTING ITEMS (ADMIN) Entering Admin Menu ...69 Setting General Functions...71 Setting the device information 71 Setting the notification ...73 Changing the administrator password 75 Setting the date and time ...77 Setting the energy saver modes...
... Replacing the toner cartridge 17 Setting Copy Functions ...18 Setting Fax Functions ...24 Setting Scan Functions...25 Setting e-Filing Functions ...29 Printing Lists...30 Setting Drawer ...33 Managing Address Book ...36 Managing contacts in address book 36 Managing groups in address book 48 Checking E-mail...64 Setting BIP Printing...65 Chapter 2 SETTING ITEMS (ADMIN) Entering Admin Menu ...69 Setting General Functions...71 Setting the device information 71 Setting the notification ...73 Changing the administrator password 75 Setting the date and time ...77 Setting the energy saver modes...

Management Guide
Page 67
Setting BIP Printing 65 For instructions on how to set the BIP printing, refer to the GN-2010 Operator's Manual for Bluetooth Module. 1 SETTING ITEMS (USER) Setting BIP Printing [BIP PRINTING] is available only when the Bluetooth Module (optional) is installed.
Setting BIP Printing 65 For instructions on how to set the BIP printing, refer to the GN-2010 Operator's Manual for Bluetooth Module. 1 SETTING ITEMS (USER) Setting BIP Printing [BIP PRINTING] is available only when the Bluetooth Module (optional) is installed.
Management Guide
Page 71
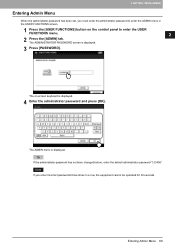
... set, you enter incorrect passwords three times in the USER FUNCTIONS screen. 1 Press the [USER FUNCTIONS] button on -screen keyboard is displayed. 4 Enter the administrator password and press [OK]. The ADMINISTRATOR PASSWORD screen is displayed. The ADMIN menu is displayed. 3 Press [PASSWORD]. If you must enter the administrator password to enter the USER FUNCTIONS menu. 2 Press the [ADMIN] tab. If the administrator password has not been changed before, enter the default administrator password "123456". The on the control panel...
... set, you enter incorrect passwords three times in the USER FUNCTIONS screen. 1 Press the [USER FUNCTIONS] button on -screen keyboard is displayed. 4 Enter the administrator password and press [OK]. The ADMINISTRATOR PASSWORD screen is displayed. The ADMIN menu is displayed. 3 Press [PASSWORD]. If you must enter the administrator password to enter the USER FUNCTIONS menu. 2 Press the [ADMIN] tab. If the administrator password has not been changed before, enter the default administrator password "123456". The on the control panel...
Management Guide
Page 119
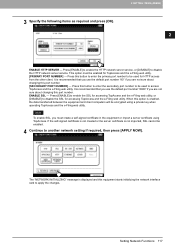
... recommended that you use the default port number "80" if you must be used to be enabled for HTTP access from the other client. Press [ENABLE] to enable the HTTP network server service, or [DISABLE] to disable the SSL for accessing TopAccess and the e-Filing web utility. 2.SETTING ITEMS (ADMIN) 3 Specify the following items as required and press [OK]. 2 SETTING ITEMS (ADMIN) ENABLE HTTP SERVER - Press this port number. [SECONDARY PORT NUMBER] - When this port number. Setting Network Functions 117 This...
... recommended that you use the default port number "80" if you must be used to be enabled for HTTP access from the other client. Press [ENABLE] to enable the HTTP network server service, or [DISABLE] to disable the SSL for accessing TopAccess and the e-Filing web utility. 2.SETTING ITEMS (ADMIN) 3 Specify the following items as required and press [OK]. 2 SETTING ITEMS (ADMIN) ENABLE HTTP SERVER - Press this port number. [SECONDARY PORT NUMBER] - When this port number. Setting Network Functions 117 This...
Management Guide
Page 137
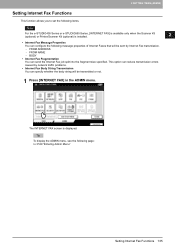
... Printer/Scanner Kit (optional) is displayed. Setting Internet Fax Functions This function allows you to set the following page: P.69 "Entering Admin Menu" Setting Internet Fax Functions 135 This option can reduce transmission errors caused by Internet Fax transmission. - y Internet Fax Message Properties You can configure the following message properties of Internet Faxes that will be sent by network traffic problems. y Internet Fax Body String Transmission You can send the Internet Fax job split...
... Printer/Scanner Kit (optional) is displayed. Setting Internet Fax Functions This function allows you to set the following page: P.69 "Entering Admin Menu" Setting Internet Fax Functions 135 This option can reduce transmission errors caused by Internet Fax transmission. - y Internet Fax Message Properties You can configure the following message properties of Internet Faxes that will be sent by network traffic problems. y Internet Fax Body String Transmission You can send the Internet Fax job split...
Management Guide
Page 148
For instructions on how to operate the Bluetooth SETTINGS, refer to the GN-1050 Operator's Manual for Bluetooth Module. 146 Wireless Settings and Bluetooth Settings This button will be available only when the Bluetooth Module (optional) is installed. 2 SETTING ITEMS (ADMIN) Wireless Settings and Bluetooth Settings There is also [WIRELESS SETTINGS] in the ADMIN menu. There is installed. For instructions on how to operate the WIRELESS SETTINGS, refer to the GN-2010 Operator's Manual for Wireless LAN Module...
For instructions on how to operate the Bluetooth SETTINGS, refer to the GN-1050 Operator's Manual for Bluetooth Module. 146 Wireless Settings and Bluetooth Settings This button will be available only when the Bluetooth Module (optional) is installed. 2 SETTING ITEMS (ADMIN) Wireless Settings and Bluetooth Settings There is also [WIRELESS SETTINGS] in the ADMIN menu. There is installed. For instructions on how to operate the WIRELESS SETTINGS, refer to the GN-2010 Operator's Manual for Wireless LAN Module...
Management Guide
Page 172
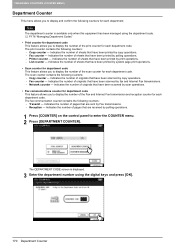
...each department code. List counter - 3 MANAGING COUNTERS (COUNTER MENU) Department Counter This menu allows you to display and confirm the following counters: - Printer counter - Indicates the number of sheets that have been printed by scan operations. Indicates the number of sheets that have been printed by Fax transmissions. - Fax counter - Indicates the number of sheets that are received by copy operations. - Indicates the number of originals that have been scanned by polling operations. 1 Press [COUNTER] on the control panel to display the number of pages that...
...each department code. List counter - 3 MANAGING COUNTERS (COUNTER MENU) Department Counter This menu allows you to display and confirm the following counters: - Printer counter - Indicates the number of sheets that have been printed by scan operations. Indicates the number of sheets that have been printed by Fax transmissions. - Fax counter - Indicates the number of sheets that are received by copy operations. - Indicates the number of originals that have been scanned by polling operations. 1 Press [COUNTER] on the control panel to display the number of pages that...

Management Guide
Page 181
... not support Web Services Scan. 3.MANAGING COUNTERS (COUNTER MENU) 3 MANAGING COUNTERS (COUNTER MENU) „ Enabling department codes In the initial setting, the department code feature is displayed. If you want to the TopAccess Guide. In addition, print jobs that are always counted as administrator" 2 Press [ENABLE] to enable the department code, or [DISABLE] to manage the operations for each department code. y [DEPARTMENT MANAGEMENT] will be displayed before entering the copy, scan, fax, and e-Filing operation screens to disable the department code. For instructions on...
... not support Web Services Scan. 3.MANAGING COUNTERS (COUNTER MENU) 3 MANAGING COUNTERS (COUNTER MENU) „ Enabling department codes In the initial setting, the department code feature is displayed. If you want to the TopAccess Guide. In addition, print jobs that are always counted as administrator" 2 Press [ENABLE] to enable the department code, or [DISABLE] to manage the operations for each department code. y [DEPARTMENT MANAGEMENT] will be displayed before entering the copy, scan, fax, and e-Filing operation screens to disable the department code. For instructions on...
Management Guide
Page 222
... 32 FUNCTION 144 Function List (Administrator 202 Function List (User 30 Function list (User 200 G [GATEWAY 103 Gateway 100 GENERAL Administrator password 75 Auto clear 9 Calibration 15, 88 Change language 11 Date and time 77 Device information 71 Display contrast 13 Display level 85 Energy saver mode 79 Notification 73 Option 96 Panel calibration 94 Pop-up message 86 Registration 16, 93 Replace toner cartridge 17 Reversed display mode 12 Status Message 87 Group Creating 48...
... 32 FUNCTION 144 Function List (Administrator 202 Function List (User 30 Function list (User 200 G [GATEWAY 103 Gateway 100 GENERAL Administrator password 75 Auto clear 9 Calibration 15, 88 Change language 11 Date and time 77 Device information 71 Display contrast 13 Display level 85 Energy saver mode 79 Notification 73 Option 96 Panel calibration 94 Pop-up message 86 Registration 16, 93 Replace toner cartridge 17 Reversed display mode 12 Status Message 87 Group Creating 48...
Management Guide
Page 223
... MODE PRIORITY 128 [STATIC 100 Static IP Address 100 [STATUS MESSAGE 87 Storage maintenance 132 Subnet mask 100 SUSPEND PRINTING IF STAPLER EMPTY ...... 129, 145 T TAB EXTENSION 23 [TOTAL COUNTER 164 Total counter list 196 Transmission journal 139 [TREE 111 TX JOURNAL 140 U USE AUTHENTICATION CODE AS PASSWORD ...... 138 Use Username from Common Name in the User Certificate 152 USER ADDRESS BOOK 36 CHECK E-MAIL 64 COPY 18 DRAWER 33 E-FILING 29 FAX...
... MODE PRIORITY 128 [STATIC 100 Static IP Address 100 [STATUS MESSAGE 87 Storage maintenance 132 Subnet mask 100 SUSPEND PRINTING IF STAPLER EMPTY ...... 129, 145 T TAB EXTENSION 23 [TOTAL COUNTER 164 Total counter list 196 Transmission journal 139 [TREE 111 TX JOURNAL 140 U USE AUTHENTICATION CODE AS PASSWORD ...... 138 Use Username from Common Name in the User Certificate 152 USER ADDRESS BOOK 36 CHECK E-MAIL 64 COPY 18 DRAWER 33 E-FILING 29 FAX...
Printing Guide
Page 14
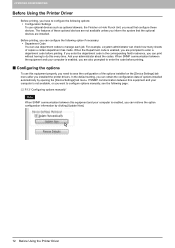
... and your computer is enabled, you can check how many sheets of options installed automatically by clicking [Update Now]. 12 Before Using the Printer Driver In the default setting, you are prompted to enter a department code before printing. „ Configuring the options To use department codes to configure options manually, see the following option if necessary: y Department Code You can configure the following page: P.13 "Configuring options manually" When SNMP communication between...
... and your computer is enabled, you can check how many sheets of options installed automatically by clicking [Update Now]. 12 Before Using the Printer Driver In the default setting, you are prompted to enter a department code before printing. „ Configuring the options To use department codes to configure options manually, see the following option if necessary: y Department Code You can configure the following page: P.13 "Configuring options manually" When SNMP communication between...

Printing Guide
Page 22
... display: Windows Vista / Windows Server 2008 1 Click [Start], [Control Panel], [Hardware and Sound] and select [Printers]. 2 Select the printer driver for your print job. If the [File] menu is not displayed, press [Alt]. For example, the private print and proof print options determine how the copier manages your specific needs, see the procedures in properties dialog box, which can be used and click [Preferences]. 20 Setting Up Print Options How to display: Windows...
... display: Windows Vista / Windows Server 2008 1 Click [Start], [Control Panel], [Hardware and Sound] and select [Printers]. 2 Select the printer driver for your print job. If the [File] menu is not displayed, press [Alt]. For example, the private print and proof print options determine how the copier manages your specific needs, see the procedures in properties dialog box, which can be used and click [Preferences]. 20 Setting Up Print Options How to display: Windows...
Printing Guide
Page 31
... the same size and color mode. - This button is displayed. 5) [Settings] The set print options and their details are displayed in the box. Print to print a master page image on the [Print] option. This button remains grayed out until a setting is enabled, it detects the available box numbers and Box name in a list. 6) Profile Print option settings can preview how a document will be printed from the touch panel display at the specified time by checking on the...
... the same size and color mode. - This button is displayed. 5) [Settings] The set print options and their details are displayed in the box. Print to print a master page image on the [Print] option. This button remains grayed out until a setting is enabled, it detects the available box numbers and Box name in a list. 6) Profile Print option settings can preview how a document will be printed from the touch panel display at the specified time by checking on the...
Printing Guide
Page 48
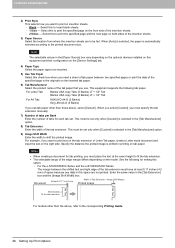
... side of the tab extension must be inserted. 5) Use Tab Paper Select this to shift the printed image. y The selectable range of the insertion sheets. 3) Paper Source Select the location from where the insertion sheets are not printed. This must have at the exact height to the corresponding Printing Guide. 46 Setting Up Print Options 2 PRINTING FROM WINDOWS 2) Print Style This selects how you want to the printed document size. Blank...
... side of the tab extension must be inserted. 5) Use Tab Paper Select this to shift the printed image. y The selectable range of the insertion sheets. 3) Paper Source Select the location from where the insertion sheets are not printed. This must have at the exact height to the corresponding Printing Guide. 46 Setting Up Print Options 2 PRINTING FROM WINDOWS 2) Print Style This selects how you want to the printed document size. Blank...

Printing Guide
Page 56
...)/PS3/XPS Printer driver. 2 PRINTING FROM WINDOWS Setting: [Advanced] tab In the [Advanced] tab of the [Setting] dialog box, you can also be set from the TopAccess menu. The color profile data of this equipment may be retained even on colored paper. 6) [Restore Defaults] Click this to restore all the image quality setting details displayed in [Image Quality]. The setup items differ depending on how to set color profiles from...
...)/PS3/XPS Printer driver. 2 PRINTING FROM WINDOWS Setting: [Advanced] tab In the [Advanced] tab of the [Setting] dialog box, you can also be set from the TopAccess menu. The color profile data of this equipment may be retained even on colored paper. 6) [Restore Defaults] Click this to restore all the image quality setting details displayed in [Image Quality]. The setup items differ depending on how to set color profiles from...

Printing Guide
Page 69
... displaying the properties from the [Devices and Printers] folder (Windows Vista / Windows Server 2008: [Printer], Windows XP / Windows Server 2003: [Printers and Faxes]). Drawer 1, 2 & Drawer 3 - Setting Up Print Options 67 For detailed instructions on this when only Drawer 1 is not available for some countries or regions. Drawers This sets the installation of the machine on how to other e-STUDIO Series models. 2) Option This option sets whether the following page: P.13 "Configuring options manually...
... displaying the properties from the [Devices and Printers] folder (Windows Vista / Windows Server 2008: [Printer], Windows XP / Windows Server 2003: [Printers and Faxes]). Drawer 1, 2 & Drawer 3 - Setting Up Print Options 67 For detailed instructions on this when only Drawer 1 is not available for some countries or regions. Drawers This sets the installation of the machine on how to other e-STUDIO Series models. 2) Option This option sets whether the following page: P.13 "Configuring options manually...
Printing Guide
Page 73
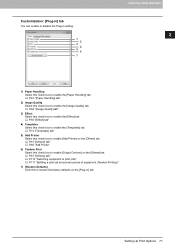
... "Switching equipment to print jobs" P.111 "Splitting a print job across two pieces of equipment (Tandem Printing)" 7) [Restore Defaults] Click this to restore the factory defaults on the [Others] tab. P.43 "[Paper Handling] tab" 2) Image Quality Select this check box to enable the [Paper Handling] tab. P.48 "[Image Quality] tab" 3) Effect Select this check box to enable [Add Printer] on the [Plug-in setting. 1 2 3 4 5 6 7 2 PRINTING FROM WINDOWS 1) Paper Handling Select this check box to enable the [Image...
... "Switching equipment to print jobs" P.111 "Splitting a print job across two pieces of equipment (Tandem Printing)" 7) [Restore Defaults] Click this to restore the factory defaults on the [Others] tab. P.43 "[Paper Handling] tab" 2) Image Quality Select this check box to enable the [Paper Handling] tab. P.48 "[Image Quality] tab" 3) Effect Select this check box to enable [Add Printer] on the [Plug-in setting. 1 2 3 4 5 6 7 2 PRINTING FROM WINDOWS 1) Paper Handling Select this check box to enable the [Image...
Printing Guide
Page 117
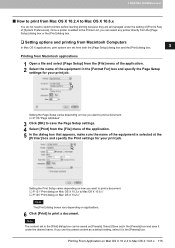
... Mac OS X 10.6.x 115 3.PRINTING FROM Macintosh 3 PRINTING FROM Macintosh „ How to print from the [File] menu of the application. 5 In the dialog box that appears, make sure the name of the equipment is added to the Printer List, you can be saved as a default setting, select it under the setting of [Print & Fax] of the equipment in the [Presets] box. If you use...
... Mac OS X 10.6.x 115 3.PRINTING FROM Macintosh 3 PRINTING FROM Macintosh „ How to print from the [File] menu of the application. 5 In the dialog box that appears, make sure the name of the equipment is added to the Printer List, you can be saved as a default setting, select it under the setting of [Print & Fax] of the equipment in the [Presets] box. If you use...

Printing Guide
Page 218
... window 29 Primary Tab Dialog 33 Print 124, 125 Print Cover Page 128 Print Document 124 Print Error Information 73 Print Job 28 Print Mode 134, 135, 156 Print on Both Sides 147 Print on First Page Only 56, 101 Print Options 20 Print Over the Document 57, 104, 143 Print Paper Size 30, 88, 107 Print the document 142 Print to Overlay File 29, 81 Print under the document 144 printer description file 17 Printer Drivers 9 Printer Features 136, 149 Printer Name 27 Printing Modes 156 Printing Modes...
... window 29 Primary Tab Dialog 33 Print 124, 125 Print Cover Page 128 Print Document 124 Print Error Information 73 Print Job 28 Print Mode 134, 135, 156 Print on Both Sides 147 Print on First Page Only 56, 101 Print Options 20 Print Over the Document 57, 104, 143 Print Paper Size 30, 88, 107 Print the document 142 Print to Overlay File 29, 81 Print under the document 144 printer description file 17 Printer Drivers 9 Printer Features 136, 149 Printer Name 27 Printing Modes 156 Printing Modes...


