933E80
Page 1
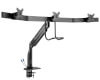
... mildew. x 3 (6.5 kg x 3) MAX *Antimicrobial tape on handle aids in our monthly drawing! tripplite.com/warranty 1111 W. 35th Street, Chicago, IL 60609 USA • tripplite.com/support Copyright © 2021 Tripp Lite. Owner's Manual Precision Placement Triple-Display Desk Clamp with Antimicrobial Tape* with USB 3.0 Port Model: DMPDT1732AM 75x75 100x100 CAUTION: DO NOT EXCEED MAXIMUM LISTED WEIGHT CAPACITY.
... mildew. x 3 (6.5 kg x 3) MAX *Antimicrobial tape on handle aids in our monthly drawing! tripplite.com/warranty 1111 W. 35th Street, Chicago, IL 60609 USA • tripplite.com/support Copyright © 2021 Tripp Lite. Owner's Manual Precision Placement Triple-Display Desk Clamp with Antimicrobial Tape* with USB 3.0 Port Model: DMPDT1732AM 75x75 100x100 CAUTION: DO NOT EXCEED MAXIMUM LISTED WEIGHT CAPACITY.
933E80
Page 2
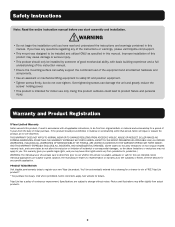
... OTHER THAN THE WARRANTY EXPRESSLY SET FORTH HEREIN. Specifications are subject to win a FREE Tripp Lite product!* * No purchase necessary. Over-tightening screws can safely support the combined load of the equipment and all applicable instructions, to be installed by someone of good mechanical ... The individual user should prove defective in material or workmanship within that period, Seller will repair or replace the product, at its sole discretion. Tripp Lite has a policy of the instructions or warnings, please visit tripplite.com/support. • This mount was designed to...
... OTHER THAN THE WARRANTY EXPRESSLY SET FORTH HEREIN. Specifications are subject to win a FREE Tripp Lite product!* * No purchase necessary. Over-tightening screws can safely support the combined load of the equipment and all applicable instructions, to be installed by someone of good mechanical ... The individual user should prove defective in material or workmanship within that period, Seller will repair or replace the product, at its sole discretion. Tripp Lite has a policy of the instructions or warnings, please visit tripplite.com/support. • This mount was designed to...

933E80
Page 3
A B C D E F G (x1) (x1) (x1) (x1) (x1) (x1) (x1) I (x1) Package M (x3) J K L M Y (x1) (x1) (x1) (x3) (x1) 115x52 mm Antimicrobial Tape Package P M-A M4x12 (x4) (12 total) M-B M5x12 (x4) (12 total) M-C D5 (x4) (12 total) H N O P Q R (x2) (x2) (x2) (x2) (x2) (x8) S T U (x2) (x4) (x2) V W (x1) 4 mm (x1) 3 X 6 mm (x1) Component Checklist IMPORTANT: Ensure you have received all parts according to the component checklist prior to installing. If any parts are missing or faulty, visit tripplite.com/support for service.
A B C D E F G (x1) (x1) (x1) (x1) (x1) (x1) (x1) I (x1) Package M (x3) J K L M Y (x1) (x1) (x1) (x3) (x1) 115x52 mm Antimicrobial Tape Package P M-A M4x12 (x4) (12 total) M-B M5x12 (x4) (12 total) M-C D5 (x4) (12 total) H N O P Q R (x2) (x2) (x2) (x2) (x2) (x8) S T U (x2) (x4) (x2) V W (x1) 4 mm (x1) 3 X 6 mm (x1) Component Checklist IMPORTANT: Ensure you have received all parts according to the component checklist prior to installing. If any parts are missing or faulty, visit tripplite.com/support for service.

933E80
Page 4
Assembly 1 Base Assembly and Desk Installation 1a Edge Installation 1b Hole Installation A F T G DW H E T H 10-40 mm 0.4-1.6 in . O X P V Q 4 W O 10 mm O 0.375 in . OR 40-84 mm 1.6-3.3 in. 10-84 mm 0.4-3.3 in. 49 mm 1.9 in.
Assembly 1 Base Assembly and Desk Installation 1a Edge Installation 1b Hole Installation A F T G DW H E T H 10-40 mm 0.4-1.6 in . O X P V Q 4 W O 10 mm O 0.375 in . OR 40-84 mm 1.6-3.3 in. 10-84 mm 0.4-3.3 in. 49 mm 1.9 in.
933E80
Page 5
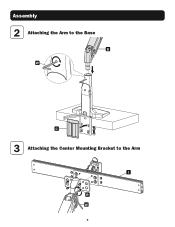
Assembly 2 Attaching the Arm to the Base B W C 3 Attaching the Center Mounting Bracket to the Arm I R W 5
Assembly 2 Attaching the Arm to the Base B W C 3 Attaching the Center Mounting Bracket to the Arm I R W 5
933E80
Page 6
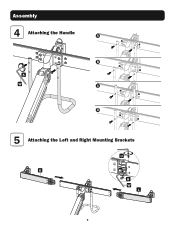
Assembly 4 Attaching the Handle A B S W C D 5 Attaching the Left and Right Mounting Brackets U K R W L 6
Assembly 4 Attaching the Handle A B S W C D 5 Attaching the Left and Right Mounting Brackets U K R W L 6
933E80
Page 7
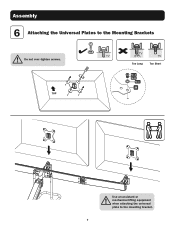
Assembly 6 Attaching the Universal Plates to the mounting bracket. 7 TOP Too Long Too Short M-A M-B M-C M Use an assistant or mechanical lifting equipment when attaching the universal plate to the Mounting Brackets Do not over-tighten screws.
Assembly 6 Attaching the Universal Plates to the mounting bracket. 7 TOP Too Long Too Short M-A M-B M-C M Use an assistant or mechanical lifting equipment when attaching the universal plate to the Mounting Brackets Do not over-tighten screws.
933E80
Page 8
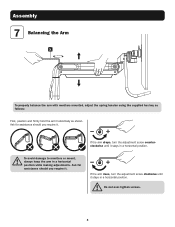
... horizontal position. Do not over-tighten screws. 8 Ask for assistance should you require it stays in a horizontal position while making adjustments. Assembly 7 Balancing the Arm X To properly balance the arm with monitors mounted, adjust the spring tension using the supplied hex key as follows: First..., position and firmly hold the arm horizontally as shown. To avoid damage to monitors or mount, always keep the arm in a horizontal position. ...
... horizontal position. Do not over-tighten screws. 8 Ask for assistance should you require it stays in a horizontal position while making adjustments. Assembly 7 Balancing the Arm X To properly balance the arm with monitors mounted, adjust the spring tension using the supplied hex key as follows: First..., position and firmly hold the arm horizontally as shown. To avoid damage to monitors or mount, always keep the arm in a horizontal position. ...
933E80
Page 10
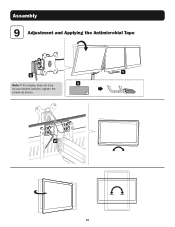
Assembly 9 Adjustment and Applying the Antimicrobial Tape Y X Note: If the display does not stop Y at your desired position, tighten the screws as shown. W 10
Assembly 9 Adjustment and Applying the Antimicrobial Tape Y X Note: If the display does not stop Y at your desired position, tighten the screws as shown. W 10

933E80
Page 11
Assembly Maintenance • Check that the bracket is secure and safe to use at regular intervals (at least every three months). • Please visit tripplite.com/support if you have any questions. 11
Assembly Maintenance • Check that the bracket is secure and safe to use at regular intervals (at least every three months). • Please visit tripplite.com/support if you have any questions. 11